Check CPU Temp Windows 11 to understand your PC’s health. A hot CPU can lead to performance issues, system instability, and even hardware damage. This guide delves into various methods for monitoring your CPU temperature, from built-in Windows tools to third-party applications. We’ll cover everything from interpreting readings to troubleshooting high temperatures and preventing overheating. Let’s explore the world of CPU temperature monitoring in Windows 11.
Understanding your CPU’s temperature is crucial for maintaining optimal PC performance. This guide provides a comprehensive overview of how to check CPU temperature in Windows 11, from basic methods to advanced troubleshooting techniques. We’ll also discuss how to prevent overheating and maintain a healthy system.
Introduction to CPU Temperature Monitoring
Keeping an eye on your CPU temperature is crucial for the health and performance of your Windows 11 system. A CPU that runs too hot can lead to performance throttling, system instability, and even permanent damage. Understanding how to monitor CPU temperature allows you to proactively address potential issues and maintain optimal system operation.High CPU temperatures are a common problem in modern systems, often stemming from intensive tasks or insufficient cooling solutions.
Recognizing the signs of overheating and knowing how to monitor your CPU’s temperature are key to preventing potential system failures.
Potential Risks of Overheating
Overheating can manifest in various ways, ranging from minor performance hiccups to complete system crashes. Prolonged exposure to high temperatures can damage internal components, potentially leading to irreversible hardware failures. This damage can range from decreased performance to complete component failure, requiring costly replacements.
Common Reasons for CPU Overheating
Several factors can contribute to elevated CPU temperatures. Insufficient cooling, such as inadequate fans or blocked vents, is a significant contributor. Running resource-intensive applications or programs, like video editing software or complex simulations, can also lead to higher temperatures. Excessive background processes or a poorly configured system can also cause problems. Even the accumulation of dust in your computer’s internal components can hinder airflow and lead to overheating.
Checking your CPU temp in Windows 11 is super important, especially if you’re noticing your computer running a bit sluggish. While you’re diving into system diagnostics, you might also want to check out how the latest summer fashion trends are shaping up, like the stylish return of suits. Suits makes summer return is definitely a trend worth keeping an eye on.
Ultimately, a well-maintained CPU temperature keeps your Windows 11 machine running smoothly, just like a perfectly tailored suit keeps you looking sharp all summer long.
Methods for Monitoring CPU Temperature in Windows 11
Various tools are available to monitor your CPU’s temperature in Windows 11. These methods range from simple built-in utilities to more comprehensive third-party applications. Choosing the right method depends on your specific needs and the level of detail you require.
| Method | Steps | Pros | Cons |
|---|---|---|---|
| Windows Task Manager | Open Task Manager (Ctrl+Shift+Esc). Go to the “Performance” tab. The CPU temperature should be displayed on the graph or in the details. | Free and readily available. Provides real-time temperature readings. | Limited information compared to dedicated utilities. May not be as detailed. |
| Hardware Monitor (Windows 11) | Search for “Performance Monitor” in the Start Menu. Open the “Performance Monitor” tool. Add “CPU Usage” and “Temperature” counters to the graph to monitor the CPU temperature. | Provides comprehensive performance and temperature monitoring. More granular control over data. | Can be more complex to use for basic temperature monitoring. |
| Third-Party Applications (e.g., Core Temp) | Download and install a dedicated CPU monitoring application. These applications often offer detailed charts and graphs to monitor CPU temperature and performance over time. | Often provides advanced features, including detailed graphs and performance analysis. | Requires downloading and installing additional software. May have a learning curve. |
| Built-in Sensors (BIOS) | Access the BIOS settings during boot. Some BIOS versions provide CPU temperature readings. | Offers insights into temperature before the operating system loads. | Requires entering the BIOS setup, which can vary between motherboards. Information might not be as up-to-date as real-time monitoring. |
Built-in Windows 11 Tools for Checking CPU Temperature

Windows 11 offers several built-in tools for monitoring CPU temperature, allowing users to keep an eye on system performance and identify potential issues. These tools provide valuable insights into the health and stress levels of your processor, enabling proactive maintenance and preventing overheating. Understanding how to utilize these tools is crucial for optimizing your system’s performance and longevity.Understanding the CPU’s temperature is vital for maintaining optimal system performance.
Overheating can lead to performance degradation, instability, and even permanent hardware damage. By using the built-in tools, you can proactively identify and address potential thermal issues before they escalate.
Accessing Performance Monitor
Performance Monitor is a comprehensive tool for visualizing various system metrics, including CPU temperature. To access it, open the Run dialog box (Win + R), type “perfmon”, and press Enter. This launches the Performance Monitor window, presenting a graphical interface for monitoring performance counters.
Checking your CPU temperature in Windows 11 is crucial for maintaining optimal system performance. High temps can lead to instability, and understanding the underlying cause can be just as important as knowing the reading itself. Sometimes, a simple fix like optimizing your cooling solution, like perhaps taking a radiator off the wall for a while to assess its effect on your computer, can be the difference between a smooth experience and a system meltdown.
Take a Radiator Off the Wall is an excellent resource for exploring potential solutions to cooling issues. So, next time you’re troubleshooting your Windows 11 CPU temperature, remember that a little investigation can go a long way.
Utilizing Resource Monitor for CPU Temperature
Resource Monitor provides a real-time view of system resources, including CPU usage, memory, and disk activity. To access it, search for “Resource Monitor” in the Start menu. The Resource Monitor window displays a detailed breakdown of resource utilization, and the CPU tab will show the current temperature. The CPU tab in Resource Monitor displays the current CPU temperature.
The Task Manager’s Role in CPU Temperature Monitoring
Task Manager, a ubiquitous Windows utility, provides basic CPU temperature information. To access Task Manager, right-click the taskbar and select “Task Manager,” or press Ctrl + Shift + Esc. The Performance tab within Task Manager offers a snapshot of CPU usage, including temperature readings. It offers a quick overview, but may not be as detailed as dedicated monitoring tools.
Employing System Information for Detailed CPU Data
The System Information tool offers a comprehensive overview of your system’s hardware, including detailed CPU information, such as the model, speed, and temperature sensors. To access this tool, search for “System Information” in the Start menu. It is a good resource for understanding the specifics of your CPU and its current thermal state.
Comparison of Tools
| Tool | Key Features | Use Cases | Limitations |
|---|---|---|---|
| Performance Monitor | Graphical representation of system metrics, including CPU temperature. Detailed view of system performance metrics. | Identifying performance bottlenecks, diagnosing thermal issues, monitoring overall system health. | Requires understanding of performance counters for in-depth analysis, interface can be complex for casual users. |
| Resource Monitor | Real-time view of system resources, including CPU temperature. Detailed breakdown of resource utilization. | Monitoring resource consumption, identifying CPU bottlenecks, troubleshooting performance issues, checking real-time temperature. | Limited visualization of historical data compared to Performance Monitor, not as comprehensive as dedicated monitoring software. |
| Task Manager | Basic CPU usage and temperature information. Quick overview of system activity. | Quick checks for CPU load and temperature, identifying high-usage processes. | Lacks detailed information about system resources, limited historical data, not as comprehensive as other tools. |
| System Information | Comprehensive overview of hardware, including CPU details and temperature sensors. | Understanding CPU specifications, identifying thermal sensor data, verifying CPU details. | Static snapshot of information; doesn’t provide real-time monitoring, limited to static details. |
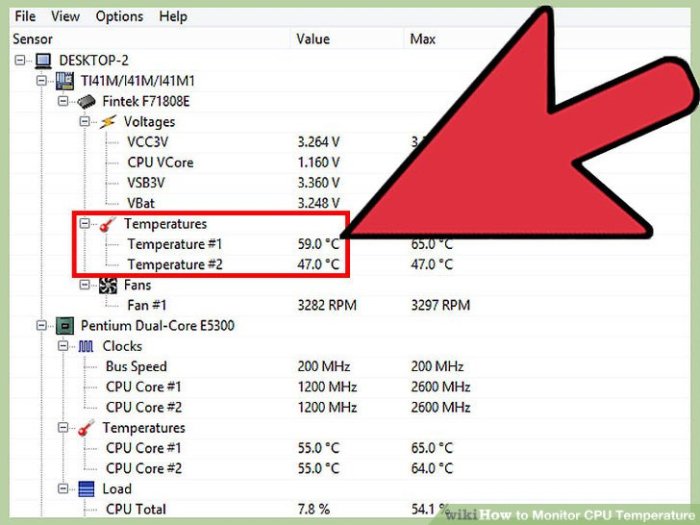
Third-Party Applications for CPU Temperature Monitoring: Check Cpu Temp Windows 11
Beyond the built-in Windows 11 tools, third-party applications offer more comprehensive and customizable CPU temperature monitoring. These programs often provide real-time graphs, detailed historical data, and advanced features that go beyond the basic temperature readings. They can be valuable for users seeking a more in-depth understanding of their system’s performance under various loads.
Popular Third-Party Applications, Check Cpu Temp Windows 11
Numerous applications cater to CPU temperature monitoring needs. Some are lightweight and focused on core functionality, while others offer extensive features like hardware monitoring, system diagnostics, and even overclocking controls. Choosing the right application depends on individual needs and the level of detail desired.
Comparison of Strengths and Weaknesses
Different applications have varying strengths and weaknesses. Some might excel at visual clarity and real-time updates, while others might provide more in-depth data analysis. Ease of use and customization options are also important factors. For instance, a user heavily involved in overclocking might prioritize applications with advanced settings, whereas a casual user might prefer something intuitive and straightforward.
Installation and Configuration
Installing and configuring a third-party application is generally straightforward. Download the application from the developer’s website, run the installer, and follow the on-screen instructions. Most applications have intuitive interfaces that allow users to quickly set up monitoring preferences. Some might require user accounts or specific permissions for certain functionalities. Thoroughly reviewing the application’s documentation can resolve any initial setup challenges.
Checking CPU temp on Windows 11 is pretty straightforward, but sometimes a little extra know-how can be helpful. While you’re researching how to do it, you might find yourself drawn to other exciting things like the new Black Panther Wakanda Forever trailer, which you can check out here: black panther wakanda forever gets first trailer watch. Regardless, getting your CPU temperature under control is important for optimal performance, and these resources will help you do just that.
Top 3 Applications and Their Key Functionalities
| App | Key Features | Pros | Cons |
|---|---|---|---|
| Core Temp | Real-time CPU temperature monitoring, core-specific readings, customizable alerts, historical data tracking. | Highly detailed core-level monitoring, reliable, widely used and well-regarded. | Can be somewhat complex for beginners, may require some configuration for optimal use. |
| HWMonitor | Comprehensive hardware monitoring, including CPU, GPU, RAM, and more, detailed graphs and charts, advanced settings for configuration. | Excellent for users needing a holistic view of their system’s hardware performance, detailed readings. | Can be resource-intensive, a larger application with more features than some users may need. |
| Speccy | Detailed system information including hardware specs, CPU temperatures, and other components. Provides a comprehensive overview of the entire system. | Easy to use interface, provides system overview. | Might not be the best choice for those primarily focused on CPU temperature monitoring; more of a system information tool. |
Benefits of Using Third-Party Applications
Third-party applications provide numerous advantages over built-in tools. They often offer a wider range of customization options, allowing users to tailor the monitoring experience to their specific needs. This includes adjusting update frequencies, selecting which hardware components to track, and setting up alerts for critical temperature thresholds. Moreover, the graphical representations and historical data tracking capabilities can offer valuable insights into system performance trends.
For example, identifying patterns in temperature spikes can lead to optimizing cooling strategies or identifying potential hardware issues.
Interpreting CPU Temperature Readings
Understanding your CPU’s temperature is crucial for maintaining optimal performance and preventing potential damage. A healthy CPU temperature directly correlates with efficient system operation. This section delves into how to interpret CPU temperature readings, covering normal ranges, various scenarios, and what to watch out for in consistently high temperatures.Interpreting CPU temperature readings requires context. A temperature that seems high in one situation might be perfectly normal in another.
This guide provides a framework for evaluating your CPU’s thermal health, allowing you to proactively address potential issues.
Normal CPU Temperatures for Windows 11 Systems
CPU temperatures vary based on factors like processor model, cooling system, and workload. Generally, a CPU temperature between 40-60°C under light load is considered normal. Heavier tasks, like gaming or video rendering, can push temperatures into the 70-80°C range, depending on the system’s cooling capabilities. Crucially, sustained temperatures exceeding 90°C for extended periods can indicate a problem.
Exceeding 100°C is a serious concern requiring immediate attention.
CPU Temperature Scenarios
Different scenarios illustrate the importance of interpreting readings in context.
- Low Temperatures: A consistently low CPU temperature (below 35°C under light load) could suggest the cooling system is over-performing or the workload is extremely light. While not problematic, it warrants observation if the system is experiencing unusual performance issues.
- High Temperatures: High temperatures, often exceeding 80°C under heavy load, can be a symptom of inadequate cooling or an excessively demanding task. Sustained high temperatures can lead to performance throttling, system instability, and even hardware damage. Understanding the cause and implementing solutions are vital to maintain system health.
- Fluctuating Temperatures: Temperatures that fluctuate significantly during various tasks might indicate a cooling system issue, a faulty fan, or an incompatibility with certain applications. These fluctuations can impact performance and are worth investigating.
Temperature Range Implications
This table provides a guide to interpreting different CPU temperature ranges.
| Temperature Range | Possible Causes | Symptoms | Solutions |
|---|---|---|---|
| 40-60°C (Light Load) | Normal operating temperatures. | System performs smoothly and efficiently. | No action required. |
| 60-80°C (Moderate Load) | Normal for moderate tasks. | System performs without noticeable issues. | Monitor for sustained high temperatures. |
| 80-90°C (Heavy Load) | Adequate cooling may be insufficient. | Potential for performance throttling. | Verify cooling system functionality, consider upgrading cooling solution, adjust power settings. |
| 90-100°C (Critical) | Significant cooling issues, hardware stress. | Performance degradation, system instability, potential hardware damage. | Immediate action required, investigate and address cooling issues. |
| Over 100°C (Emergency) | Severe cooling failure. | System may shut down unexpectedly. | Immediate system shutdown and hardware diagnostics. |
Troubleshooting Consistently High Temperatures
When CPU temperatures remain consistently high, several factors merit investigation. Verify the cooling system’s functionality, including fans and thermal paste. Ensure the system is not obstructed by dust or other debris. Also, review power settings and task manager to determine if any programs are excessively demanding. Consider upgrading the cooling solution or adjusting power settings if necessary.
Professional assistance may be required if issues persist despite these steps.
Troubleshooting High CPU Temperatures
High CPU temperatures can significantly impact the performance and stability of your Windows 11 system. Understanding the common causes and implementing effective troubleshooting steps is crucial for maintaining optimal system health. This section details the process of identifying and resolving high CPU temperature issues, covering thermal paste application, cooling system maintenance, and potential hardware problems.
Common Causes of High CPU Temperatures
Several factors can contribute to elevated CPU temperatures. Insufficient airflow, dust accumulation, thermal paste degradation, and faulty cooling components are common culprits. Overclocking the CPU without proper cooling can also push temperatures beyond safe operating limits. Furthermore, demanding tasks like video editing, gaming, or running resource-intensive software can cause temporary spikes in CPU usage and heat generation.
Troubleshooting Steps for High CPU Temperatures
A systematic approach to troubleshooting high CPU temperatures is essential. Begin by checking for obvious signs of overheating, like fans not spinning, unusual noises, or performance degradation. Then, assess the cooling system’s condition and identify any potential issues.
- Check Fan Functionality: Ensure that all fans, including the CPU cooler fan, are spinning at the appropriate speed. If a fan is not working, it could indicate a mechanical failure or a problem with the fan’s power connection. Check the fan cables for proper connections and examine the fan itself for any physical obstructions.
- Examine Dust Accumulation: Dust buildup within the computer’s cooling system can significantly hinder airflow and increase temperatures. Regular cleaning is essential to maintain optimal cooling performance. Accumulated dust can also affect other components, leading to further issues.
- Evaluate Thermal Paste: Thermal paste acts as a thermal conductor between the CPU and the heatsink. Over time, the thermal paste can dry out or degrade, reducing its effectiveness in transferring heat. Inspect the thermal paste for cracks, dryness, or significant discoloration. A lack of thermal paste or improperly applied paste can lead to elevated CPU temperatures.
Thermal Paste Application and Replacement
Proper thermal paste application is vital for optimal heat transfer. Applying an excessive amount of paste can also hinder cooling, while insufficient paste can also reduce efficiency. Ensure that the application is even and consistent, covering the CPU’s surface without creating air pockets. Using a quality thermal paste and following the manufacturer’s instructions is crucial.
Cooling System Cleaning
Regular cleaning of the computer’s cooling system is crucial for maintaining optimal performance. Disassemble the computer’s cooling components, remove dust, and reassemble the components. This process ensures efficient airflow and prevents dust buildup. Use compressed air to gently remove dust particles from fans, heatsinks, and other components.
Troubleshooting Table
| Problem | Potential Causes | Solutions | Confirmation |
|---|---|---|---|
| High CPU Temperatures | Insufficient airflow, dust accumulation, thermal paste degradation, faulty cooling components, overclocking | Clean the cooling system, replace thermal paste, ensure adequate airflow, check fan speeds, ensure correct fan connections, adjust cooling settings | Monitor CPU temperature after implementation of solutions using dedicated monitoring tools; check fan RPMs and airflow to determine if cooling solutions have been successful |
| Fans not spinning | Fan failure, loose connections, power issues, blocked airflow | Check fan connections, replace faulty fans, clear any obstructions, check power supply | Verify fan rotation and speed using monitoring tools |
| Excessive Noise from Fans | Loose fan blades, dust accumulation, or bearing issues | Clean fans, lubricate bearings (if possible), check for loose connections, adjust fan speeds | Listen for reduced noise after implementing solutions |
Preventing CPU Overheating
Keeping your computer’s CPU cool is crucial for its longevity and performance. Overheating can lead to performance throttling, instability, and even permanent damage. Understanding the factors that contribute to overheating and implementing preventative measures is essential for maintaining a healthy and efficient system.Proper cooling and careful power management are key to preventing CPU overheating. By addressing these aspects, you can ensure your system runs smoothly and reliably, avoiding costly repairs or replacements.
Ventilation and Airflow
Adequate ventilation and airflow around the CPU are vital for heat dissipation. Poor airflow can trap heat, leading to overheating. This is especially important in systems with limited or restricted cooling solutions.
- Regular Cleaning: Dust buildup on fans and heatsinks significantly hinders airflow. Regular cleaning, ideally once every few months, is essential for maintaining optimal airflow. Using compressed air to carefully remove dust is highly recommended. This will ensure proper cooling and prevent thermal throttling.
- Case Placement: Ensure your computer case is in a well-ventilated area. Avoid placing it in enclosed spaces or near heat sources like radiators or direct sunlight. Proper placement can dramatically reduce the ambient temperature affecting the system.
- Heatsink and Fan Assessment: Examine the heatsink and fans for any signs of damage or blockage. If the fans are not spinning or the heatsink is obstructed, replace them or clean them as required. Ensuring the cooling components are working optimally is crucial.
Power Management Settings
Power management settings can significantly influence CPU temperature. Aggressive power saving modes might reduce performance but can also decrease heat generation. Finding the right balance is key.
- Adjust Power Plans: Experiment with different power plans to see how they affect CPU temperature. A balanced or high-performance plan might generate more heat, but also offer better performance. Using the power plan that fits your usage patterns is important.
- CPU Throttling: Understanding how CPU throttling works can help you prevent overheating. Throttling is a protective mechanism that reduces CPU speed when temperatures get too high. Regular monitoring helps you to avoid situations where throttling becomes frequent.
Optimizing System Performance
Overloading the system with too many programs or demanding tasks can increase CPU load and heat generation. Balancing performance with cooling is essential.
- Task Management: Monitor running processes and close unnecessary programs. Heavy applications or processes that run continuously can strain the CPU and increase its temperature. Using Task Manager or similar tools can help to identify and manage these tasks.
- Software Updates: Keeping your software updated is crucial. Outdated software may have performance issues, leading to increased CPU usage and potential overheating. Software updates often include performance improvements.
- Regular Checkups: Regularly checking your CPU temperature helps to avoid potential issues before they escalate. Regular monitoring ensures proactive measures can be taken to prevent overheating.
Importance of Regular Monitoring
Continuous monitoring of CPU temperature is essential for preventing overheating issues. This proactive approach allows you to identify and address problems early on, preventing potential damage.Regular temperature checks will provide you with a clear picture of how your system is performing under different loads. This knowledge will allow you to take corrective actions and optimize your system.
CPU Temperature Monitoring Best Practices

Keeping a close eye on your CPU temperature is crucial for maintaining optimal performance and preventing potential damage to your computer. Understanding how to monitor temperatures effectively, recognize warning signs, and take preventative measures is key to a healthy and long-lasting system. Proper monitoring goes beyond just knowing the current temperature; it involves proactive steps to ensure your system operates within safe parameters.
Effective Monitoring Techniques
Regular monitoring is vital for identifying potential issues before they escalate. Utilize your chosen monitoring tool, whether it’s a built-in Windows utility or a third-party application, at least once daily. This provides a baseline understanding of your system’s typical operating temperatures under various workloads. Note the temperature readings during both light and intensive tasks to gain a comprehensive picture.
Consistency in monitoring allows for early detection of unusual spikes or prolonged high temperatures.
Responding to High Temperatures
High CPU temperatures often signal an underlying issue. If you notice consistently high readings, take the following steps:
- Check for Obstructions: Ensure adequate airflow around your computer. Dust buildup can significantly hinder cooling. A simple cleaning can often resolve the issue.
- Adjust Power Settings: If possible, temporarily reduce power settings or the CPU’s maximum frequency to mitigate the load. This is particularly helpful during intensive tasks.
- Identify Resource-Intensive Processes: Monitor which applications or processes are consuming the most CPU resources. If possible, close unnecessary applications or temporarily disable demanding programs.
- Examine Thermal Paste: If you’re comfortable, inspect and potentially reapply thermal paste on the CPU heatsink. Proper thermal paste application ensures efficient heat transfer. Incorrect application or dried paste can result in higher temperatures.
When to Seek Professional Help
While many issues can be addressed through simple troubleshooting steps, certain situations warrant professional intervention. If the high temperatures persist despite your efforts, or if you notice unusual system behavior (like frequent crashes or freezes), it’s best to consult a qualified technician. They can perform a thorough diagnostic to identify the root cause and recommend appropriate solutions.
Maintaining a Clean and Well-Ventilated System
Regular cleaning and maintenance are crucial for optimal cooling. A well-ventilated computer is essential for preventing overheating. Ensure adequate airflow around the computer case by removing any obstructions and regularly dusting components. Avoid placing the computer in confined spaces where airflow is restricted.
Importance of Driver Updates
Outdated drivers can lead to suboptimal performance and, in some cases, increased temperatures. Keeping your drivers updated is essential. Regularly check for updates and install them as necessary. This can often significantly improve performance and stability, leading to lower temperatures.
Concluding Remarks
In conclusion, monitoring your CPU temperature in Windows 11 is a vital aspect of PC maintenance. By understanding the various methods available, from built-in tools to specialized software, you can effectively manage your system’s thermal health. This guide has provided insights into identifying potential issues, troubleshooting high temperatures, and implementing preventive measures to ensure optimal performance and longevity of your Windows 11 machine.
Remember, a cool CPU is a happy CPU.