Use Your TV as a Second Monitor for Your Computer opens up a world of productivity and multitasking possibilities. Imagine extending your desktop workspace onto a larger screen, perfect for video editing, gaming, or even presentations. This guide dives into the how-to, covering everything from hardware setup to software configuration, and troubleshooting common issues. We’ll explore different TV types, connection methods, and optimize your setup for the best viewing experience.
From connecting your computer to your TV to configuring it as a secondary display, this comprehensive guide covers every step of the process. We’ll also compare this method to other secondary monitor options, providing you with a clear understanding of the pros and cons of each. Let’s get started!
Using a TV as a Second Monitor

Using a TV as a second monitor for your computer opens up a world of productivity and multitasking possibilities. Imagine having a larger workspace, displaying multiple applications side-by-side, or extending your desktop for a more immersive experience. This setup can significantly improve your workflow, especially for tasks requiring visual clarity and ample screen real estate.Beyond the enhanced workspace, using a TV as a secondary display offers significant flexibility.
Ever wished you could expand your computer screen? Using your TV as a second monitor is a surprisingly simple way to boost productivity. It’s like having a whole new workspace, perfect for video editing or just having more room to spread out your apps. Speaking of productivity hacks, did you know you can recover those hidden gems on Spotify?
If you’ve accidentally hidden a song or two, check out this helpful guide on Unhide a Song on Spotify for a quick fix. It’s amazing how a little bit of online knowledge can solve such problems, making your digital life easier. Back to your TV monitor setup, it’s a game-changer for anyone who wants to work smarter, not harder.
You can easily move applications and windows between your computer monitor and the TV, allowing you to quickly switch between different tasks. This flexibility can be invaluable for various tasks, from editing videos to collaborating on projects.
Suitable TV Types
Choosing the right TV for your needs is crucial for a smooth and efficient setup. Consider factors like resolution, refresh rate, and input options. Modern TVs offer a wide range of features that make them ideal secondary displays.High-definition televisions (HDTVs) with a minimum resolution of 1920×1080 pixels are a good starting point. For more demanding tasks like video editing or gaming, a TV with a higher resolution (e.g., 4K) provides a crisper image and more detailed visuals.
The refresh rate, measured in Hertz (Hz), dictates how smoothly images are displayed. Higher refresh rates, such as 60Hz or 120Hz, are preferred for tasks involving motion, reducing motion blur and providing a more fluid experience. Input options, like HDMI or DisplayPort, are essential for connecting the TV to your computer. Look for TVs that support the input method your computer uses.
Connection Methods
Several methods facilitate connecting your computer to a TV for display purposes. The most common method is using a high-definition multimedia interface (HDMI) cable. This is a versatile option that supports a wide range of resolutions and refresh rates. DisplayPort is another popular choice, especially for high-resolution displays and demanding applications. Consider the type of input supported by your computer and TV when selecting the connection method.
Enhancing Productivity and Multitasking
A dual-monitor setup, with a computer monitor and a TV as a secondary display, significantly boosts productivity. You can arrange applications across both screens, maximizing your workspace. This arrangement is particularly helpful for tasks like video editing, graphic design, and programming, allowing you to keep important reference materials or tools visible while working on the primary task. For example, a graphic designer can have their design software on the main monitor and a reference image on the TV, improving efficiency and reducing context switching time.
Comparison Table of TV Types
| TV Type | Resolution | Refresh Rate | Input Options | Price Range |
|---|---|---|---|---|
| 1080p HDTV | 1920×1080 pixels | 60Hz | HDMI, DisplayPort | $200 – $500 |
| 4K UHD TV | 3840×2160 pixels | 60Hz or 120Hz | HDMI 2.0 or higher, DisplayPort | $400 – $2000+ |
| 8K TV | 7680×4320 pixels | 60Hz or 120Hz | HDMI 2.1 or higher, DisplayPort | $1500 – $5000+ |
Hardware Requirements and Setup
Setting up your TV as a second monitor for your computer opens up a world of possibilities, from enhanced productivity to a more immersive gaming experience. Crucially, understanding the hardware requirements and the proper setup process ensures a smooth and trouble-free transition. This section dives into the essential components, cable types, and troubleshooting steps to help you get started.A successful setup hinges on careful consideration of compatible hardware and the correct cable connections.
Compatibility issues, if not addressed promptly, can lead to frustrating delays and wasted time. This guide will equip you with the knowledge to navigate these potential challenges and establish a robust secondary display setup.
Essential Hardware Components
To successfully use your TV as a secondary monitor, you’ll need several key components. These components work together seamlessly to provide a unified display experience. The core components include the TV itself, a computer, and a suitable connection cable.
- TV: A compatible TV with HDMI or similar input capabilities is fundamental. Ensure your TV supports the resolution and refresh rate you desire. Older TVs might not support the latest display standards, potentially leading to compatibility issues. Consider the TV’s capabilities to guarantee a smooth experience.
- Computer: Your computer needs a compatible graphics card capable of handling the additional monitor. Integrated graphics cards, while adequate for a single monitor, might struggle with higher resolutions or refresh rates on a second display.
- Connection Cables: The appropriate cables are essential for transmitting video and audio signals between your computer and the TV. This will be further discussed in the next section.
Cable Types and Adapters
Choosing the correct cables and adapters is critical for a stable connection. Using incompatible cables or outdated adapters can cause display issues or connection problems.
- HDMI Cables: High-Definition Multimedia Interface (HDMI) cables are a popular and versatile option for transmitting both video and audio signals. They support a wide range of resolutions and refresh rates, making them suitable for most modern setups. Ensure the HDMI port on your computer and TV are compatible with the HDMI cable type.
- DisplayPort Cables: DisplayPort cables are another high-quality option, especially for high-resolution displays. They offer better bandwidth and support for higher refresh rates than HDMI, making them ideal for demanding applications. Verify your computer and TV support DisplayPort.
- Adapters: If your computer lacks the necessary ports (HDMI or DisplayPort), adapters can bridge the gap. These adapters come in various types and can convert signals between different interfaces, such as DVI to HDMI. Always verify the adapter’s compatibility with your computer and TV.
Cable Selection for Optimal Performance
Selecting the appropriate cables directly impacts the quality of your secondary display. Low-quality cables can introduce signal degradation, leading to blurry images or intermittent display issues. Choosing high-quality cables with sufficient bandwidth is essential for maintaining optimal performance.
- Cable Length: Consider the distance between your computer and TV. Longer cables might introduce signal loss. While many cables handle long distances, using a shorter cable generally leads to a more stable and consistent connection.
- Bandwidth Requirements: The resolution and refresh rate of your display affect the bandwidth requirements of the cable. Higher resolutions and refresh rates necessitate cables with higher bandwidth capacities to prevent signal loss and display issues.
- Cable Quality: High-quality cables are built to minimize signal loss and interference. Look for cables with shielded connectors and high-quality materials to ensure optimal signal transmission. Invest in reputable brands for the best results.
Compatibility Issues and Troubleshooting
Compatibility issues can arise from various factors, including incompatible hardware or outdated drivers.
- Driver Updates: Ensure that your computer’s graphics card drivers are up-to-date. Outdated drivers can lead to compatibility issues with the TV display.
- Resolution and Refresh Rate: Adjust the resolution and refresh rate settings on your TV to match your computer’s output. Mismatched settings can cause image distortion or other display problems.
- Connection Issues: Check for loose connections at both the computer and TV ends. Verify that the cables are securely plugged into the respective ports. Try different ports on both devices.
Setting Up Your TV as a Secondary Display
This step-by-step procedure guides you through setting up your TV as a secondary display.
| Step | Action |
|---|---|
| 1 | Connect the appropriate cable (HDMI or DisplayPort) to your computer and TV. |
| 2 | Turn on both your computer and TV. |
| 3 | In your computer’s display settings, identify the connected TV as a second display. |
| 4 | Adjust the resolution, refresh rate, and other settings as needed. |
| 5 | Test the functionality of the second display by moving windows or applications to it. |
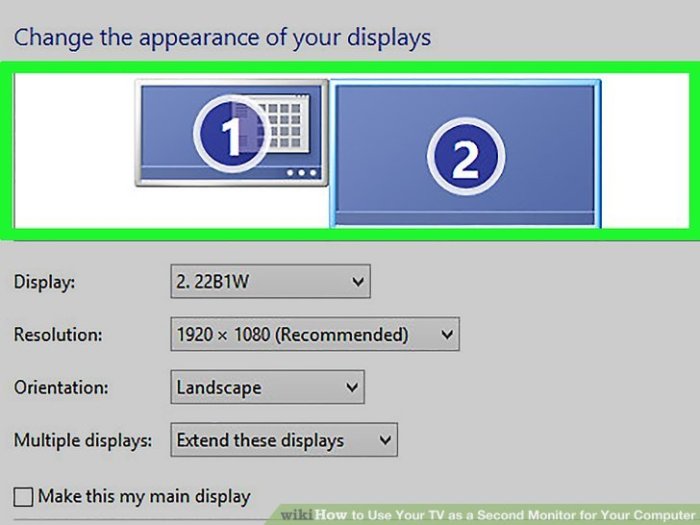
Software Configuration and Optimization

Now that you’ve got your TV connected and ready to go, the next step is to configure the software side of things. This involves making sure your operating system recognizes the TV as a secondary display and fine-tuning settings for optimal performance. This crucial step will allow you to seamlessly extend your computer’s desktop onto the larger screen of your TV, enhancing productivity and visual experience.
Supported Operating Systems
This setup is compatible with various operating systems. Windows 10 and 11, macOS (versions 10.15 and above), and Linux distributions (with compatible graphics drivers) are all viable options. The specifics of configuration will differ slightly between platforms, but the fundamental principles remain consistent.
Configuring the TV as a Secondary Display
The process of adding your TV as a secondary display within your operating system is relatively straightforward. Your operating system will detect the connected TV and present it as a new display option. This will typically occur automatically, or you may need to perform a few simple steps to confirm its inclusion in the system’s display settings.
Display Resolution and Settings
Proper display resolution configuration is vital for a smooth and clear viewing experience. Choosing a resolution that matches the TV’s capabilities will prevent stretching or pixelation. In most cases, the operating system will offer a variety of resolutions for your TV, so you can select the one that provides the best visual quality. Adjusting brightness, contrast, and color settings can also be crucial for a personalized and comfortable viewing experience.
Optimizing Display Settings
Beyond resolution, consider optimizing settings like scaling, refresh rate, and color profiles. Experimenting with different settings may be necessary to find the optimal configuration for your specific TV and viewing preferences. For instance, selecting a higher refresh rate can lead to smoother motion, while adjusting color profiles can enhance the accuracy of displayed colors.
Software Applications Benefitting from the Setup
A secondary display on a TV offers a wide range of benefits. Video editing, graphic design, and programming can be significantly enhanced by having a larger workspace. Similarly, presentations, video conferencing, and even gaming can benefit from the added screen real estate. For instance, you could use the TV as a secondary display for a larger, more immersive gaming experience.
Configuring the Secondary Display on Different Operating Systems
| Operating System | Steps |
|---|---|
| Windows 10/11 | 1. Open Display settings. 2. Select “Multiple displays”. 3. Select the TV as the secondary display. 4. Adjust resolution and settings. |
| macOS | 1. Open System Preferences. 2. Select Displays. 3. Select the TV as a secondary display. 4. Adjust resolution and settings. |
| Linux | 1. Identify your graphics drivers and the appropriate configuration tool. 2. Add the TV as a secondary display in the driver-specific configuration utility. 3. Adjust resolution and settings. |
Applications and Use Cases
Using a TV as a second monitor opens up a world of possibilities for enhancing productivity and enjoyment. Beyond the basic expansion of your desktop space, this setup unlocks unique applications in various fields, from gaming and video editing to presentations and remote work. The versatility of this approach is truly remarkable, transforming how you interact with your computer and its various applications.
Gaming
Expanding your gaming experience with a larger screen is a compelling use case. A larger display provides a more immersive experience, particularly for games that benefit from a wider field of view. The added real estate can significantly improve gameplay in strategy games, first-person shooters, or racing games, allowing for more strategic positioning and enhanced visual clarity.
- Improved situational awareness: With a larger screen, players can more easily spot enemies or obstacles, which can be crucial in fast-paced games.
- Enhanced visual clarity: High-resolution displays on TVs provide greater clarity for detailed game environments and character models, leading to a more realistic and enjoyable experience.
- Immersive experience: The wider viewing area of a TV screen creates a more encompassing gaming environment, pulling players deeper into the game world.
- Example: Playing racing games or strategy games like Starcraft or Forza Horizon on a TV, with the added screen real estate, enables players to quickly scan the game map or environment for opponents or resources, enhancing strategy and improving response time.
Video Editing
The increased screen real estate provided by a TV monitor can revolutionize the video editing process. This allows editors to view the project in a larger context, enabling easier assessment of cuts, transitions, and overall video flow.
- Detailed review: A larger display facilitates detailed review of video footage, allowing for precise cuts, edits, and transitions.
- Improved workflow: Having multiple video editing software and reference material visible on a second monitor can streamline workflow and reduce the need to constantly switch between applications.
- Example: When editing a video, you can display the source footage and the edited version simultaneously on the TV screen, enabling side-by-side comparison, which makes it easier to spot inconsistencies and ensure seamless transitions.
Presentations
Presenting to a large audience can be greatly enhanced by using a TV as a secondary monitor. It allows for more dynamic presentations with visuals, diagrams, and interactive elements easily displayed on a larger screen.
- Large-scale visuals: High-resolution TVs display complex visuals and diagrams in a clear and comprehensive manner, enhancing presentation clarity for a large audience.
- Interactive elements: Presenters can incorporate interactive elements and demonstrate processes or simulations more effectively on a larger screen.
- Example: During a product launch presentation, you can display detailed product information and visuals on the TV, alongside your presentation slides, allowing the audience to grasp the product’s features and benefits more easily.
Remote Work Efficiency
For remote workers, a TV monitor can significantly improve workflow. The larger screen size facilitates the management of multiple applications, documents, and communications simultaneously, making remote collaboration and task management more effective.
- Enhanced multitasking: A larger display allows for simultaneous viewing of multiple project files, communication platforms, and reference materials, enhancing multitasking capabilities.
- Improved communication: Facilitates seamless communication and collaboration, as remote workers can access important communication channels and documents simultaneously.
- Example: When working remotely on a project, a TV screen can display a video conferencing application alongside your project files and documents, enabling you to participate in calls and manage your work efficiently without switching between multiple windows.
| Category | Application | Example |
|---|---|---|
| Gaming | Strategy Games, First-Person Shooters, Racing Games | Improved situational awareness, enhanced visual clarity |
| Video Editing | Video Editing Software | Detailed review, improved workflow |
| Presentations | Presentations, Lectures | Large-scale visuals, interactive elements |
| Remote Work | Project Management, Collaboration Tools | Enhanced multitasking, improved communication |
Troubleshooting Common Issues
Transforming your TV into a second monitor can sometimes present challenges. Understanding common problems and their solutions is crucial for a seamless experience. This section will guide you through troubleshooting various issues, from connectivity problems to display inconsistencies and input lag. A systematic approach to identifying and resolving these problems will help you maximize your TV’s potential as an extended desktop.
Connectivity Issues
Connectivity problems are among the most frequent issues encountered when using a TV as a second monitor. These issues can range from a simple cable disconnection to more complex problems related to the HDMI port or the TV’s settings. Addressing these problems promptly is essential for a smooth workflow.
- Verify HDMI Cable Connection: Ensure the HDMI cable connecting your computer and TV is securely plugged into both devices. Loose connections can lead to intermittent or no signal. A damaged cable can also cause issues. Try a different, known-good cable.
- Check TV Input Settings: Make sure the TV is set to the correct input source (HDMI 1, HDMI 2, etc.). Incorrect settings will prevent your computer from displaying on the TV.
- Confirm Computer Display Settings: Ensure your computer is set to output to the TV as a second display. The specific method varies depending on the operating system.
Display Resolution and Refresh Rate Problems
Issues with display resolution and refresh rate can cause the image on your TV to appear blurry, pixelated, or flicker. These issues often stem from mismatched settings between your computer and TV.
Ever wanted a bigger screen for your computer work? Using your TV as a second monitor is a surprisingly simple and affordable upgrade. While you’re exploring that, check out this new track by yhwh nailgun, “Animal Death Already Breathing” – it’s a real earworm! yhwh nailgun share new song animal death already breathing listen. It’s a fantastic way to expand your desktop space and make tasks like video editing or photo manipulation much smoother.
Plus, you’ll have a seriously impressive setup.
- Matching Resolutions: The resolution of your TV and the resolution of your computer’s output should ideally match. Select a resolution supported by both your TV and computer. If not, a lower resolution might be a viable solution.
- Adjusting Refresh Rate: Mismatch in refresh rates can lead to screen tearing or stuttering. Select a refresh rate supported by both your computer and TV. For optimal performance, aim for a common refresh rate, like 60Hz or 144Hz.
- Troubleshooting Display Settings: If issues persist, check the display settings on your computer and TV. You might need to adjust scaling, aspect ratio, or other display parameters to find a compatible combination.
Input Lag
Input lag, the delay between a user’s action and the corresponding reaction on the screen, can be frustrating when using a TV as a second monitor. Input lag can arise from various sources and might impact the user experience.
- HDMI Cable Quality: A low-quality HDMI cable can contribute to input lag. Using a higher-quality cable can often resolve this issue. High-bandwidth cables are ideal.
- Refresh Rate Settings: A mismatch in refresh rates can lead to input lag. Choose a refresh rate that is supported by both the TV and the computer. A lower refresh rate might reduce the lag, but image smoothness could be affected.
- Graphics Card Drivers: Outdated or incompatible graphics card drivers can cause input lag. Ensure the latest drivers are installed for your graphics card.
Troubleshooting Guide
| Step | Action | Expected Result |
|---|---|---|
| 1 | Verify HDMI cable connections and TV input settings. | Signal detected on TV. |
| 2 | Check computer display settings to ensure the TV is recognized as a second monitor. | TV appears as a second monitor in the computer’s display settings. |
| 3 | Adjust display resolution and refresh rate settings on both the computer and TV to match. | Clear, stable image without pixelation or tearing. |
| 4 | Update graphics card drivers. | Drivers updated successfully. |
| 5 | Try different HDMI cables (if necessary). | Consistent signal and reduced lag. |
Alternatives and Comparisons: Use Your TV As A Second Monitor For Your Computer
Using a TV as a second monitor offers a unique approach, but it’s important to consider other options. This section explores the pros and cons of alternative second monitor setups, specifically comparing them to the TV-based solution. Understanding the trade-offs will help you choose the best option for your needs and budget.
Ever wanted a bigger screen for your computer work? Using your TV as a second monitor is surprisingly easy, and it’s a game-changer for productivity. While you’re exploring the expanded workspace, you might want to check out Mike’s new album, “Renaissance Man,” which is absolutely fantastic! mike releases new album renaissance man listen It’s a great way to enjoy your new setup and immerse yourself in the music while you work.
Plus, it’s a super affordable upgrade for your home office.
Dedicated Monitor Comparison
Dedicated monitors are the traditional and often preferred method for extending a computer’s display. They offer a consistent, high-quality experience with precise control over resolution and refresh rate. The key advantages of dedicated monitors often outweigh the convenience of a TV setup, particularly for users with demanding applications or high-resolution needs.
TV vs. Dedicated Monitor: A Detailed Comparison
The decision between a TV and a dedicated monitor depends heavily on individual needs and priorities. A dedicated monitor provides superior picture quality and stability, crucial for tasks requiring high precision. Conversely, a TV often offers a larger screen size, which is beneficial for presentations or multi-tasking scenarios, and can be a more affordable alternative.
| Feature | TV | Dedicated Monitor |
|---|---|---|
| Resolution | May vary significantly depending on the TV model; often lower than dedicated monitors. | Higher resolution, typically with consistent and precise pixel density. |
| Refresh Rate | May be lower than dedicated monitors, affecting responsiveness, especially for fast-paced games or applications. | Higher refresh rates, generally leading to smoother visuals and better performance. |
| Picture Quality | Can vary significantly depending on the TV model and its features. | Generally superior picture quality, often with advanced features like HDR. |
| Screen Size | Larger screen size, ideal for presentations and wider viewing angles. | Smaller screen size, but offers greater control over the resolution and refresh rate. |
| Cost | Potentially lower upfront cost, depending on the size and features of the TV. | Higher upfront cost, but potentially more versatile and long-lasting. |
| Connectivity | Requires HDMI or similar connections; compatibility varies based on TV and computer ports. | Direct connection to the computer using standard video ports. |
| Ergonomics | Placement may be less flexible due to the TV’s design; may require a dedicated stand. | More flexibility in positioning and adjusting to user needs. |
Pros and Cons of Using a TV as a Second Monitor
Using a TV as a second monitor presents specific advantages and disadvantages. Its lower cost and larger screen size are attractive features, but the potential for lower resolution and refresh rate compromises its suitability for demanding applications.
- Pros: Affordability, larger screen size, potentially greater screen real estate for tasks requiring more visual space.
- Cons: Variable picture quality and resolution, potentially lower refresh rates affecting performance in some applications, potential incompatibility issues with certain video formats.
Pros and Cons of Using a Dedicated Monitor as a Second Monitor
A dedicated monitor offers a reliable and high-quality alternative. Its superior resolution, refresh rate, and picture quality make it ideal for users requiring a consistently high-performance setup.
- Pros: Superior image quality, consistent performance, high resolution and refresh rate options, wide compatibility with computer components.
- Cons: Higher upfront cost, potentially less screen real estate compared to a TV, fixed size and placement.
Tips and Recommendations
Transforming your TV into a second monitor opens up a world of possibilities, but getting the most out of this setup requires careful consideration. Optimizing your TV’s use as a secondary display involves understanding the optimal size, resolution, placement, and software configurations for a seamless and comfortable user experience. This section provides practical tips and recommendations to help you maximize your setup’s potential.
Maximizing TV Usage
Careful consideration of your TV’s capabilities and your workspace’s layout is essential for an optimal experience. Using your TV as a second monitor should enhance, not hinder, your workflow. To maximize the benefits, ensure the display resolution matches the TV’s capabilities, and the display’s size provides adequate visual clarity.
Choosing the Right TV Size and Resolution, Use Your TV as a Second Monitor for Your Computer
The ideal TV size depends on the viewing distance and the resolution of the TV. A larger TV with a higher resolution will offer a more detailed display for tasks requiring more screen real estate. For instance, if you’re primarily using the TV for general tasks like web browsing or document editing, a 40-inch TV with 1080p resolution might be suitable for a typical viewing distance.
For more demanding tasks such as graphic design or video editing, a 55-inch TV with 4K resolution might be preferable. It’s crucial to consider your viewing distance and the specific use cases for your second monitor setup when making your choice.
Optimal TV Placement
Proper placement of the TV is crucial for comfort and ergonomics. The ideal position is at a distance that allows for comfortable viewing without straining your eyes. A viewing angle that’s neither too high nor too low is also essential for preventing neck and back pain. Consider the lighting in your room and position the TV accordingly to avoid glare or excessive shadows.
For example, positioning the TV directly in front of a window might result in glare, and an angle that directs light into your eyes can be equally uncomfortable.
Improving User Experience and Setup
To improve your overall experience, consider investing in a quality HDMI cable for a stable connection. Adjusting the TV’s display settings, including brightness, contrast, and color settings, can significantly impact your viewing comfort. Using a dedicated monitor stand can further enhance the ergonomics of your setup, allowing for adjustable height and tilt.
Optimal Room Setups
Several room setups can be optimized for effective TV-as-second-monitor use. A home office setup might benefit from placing the TV on a stand or a wall-mounted mount to maximize desk space. In a living room setup, consider a multi-functional layout where the TV acts as both a primary entertainment center and a secondary display for work or entertainment.
A simple example includes arranging the TV and the main computer monitor in a way that minimizes visual distractions.
- Home Office Setup: A dedicated workspace can benefit from a TV mounted on a wall or placed on a stand. This frees up desk space, allowing for a more efficient and comfortable workflow.
- Living Room Setup: A multi-purpose setup might involve the TV serving as both a primary entertainment hub and a secondary display for tasks such as document review or video conferencing. This setup can be designed to seamlessly transition between entertainment and productivity.
- Gaming Setup: In a gaming environment, a larger TV or monitor combined with the computer’s display can create an immersive and expansive view. This setup enhances the visual experience and improves the gameplay experience.
Closing Summary
In conclusion, using your TV as a second monitor for your computer can significantly enhance your productivity and workflow. By carefully considering hardware compatibility, software configuration, and troubleshooting potential issues, you can unlock a powerful and versatile setup. Whether you’re a gamer, video editor, or someone who frequently works remotely, this setup can be a game-changer. This guide provides a complete overview of the process, from initial setup to advanced configuration and troubleshooting.

 - wikiHow")
 - wikiHow")