Tag: paper crafts

  • Make 3D Origami Pieces A Beginners Guide

    Make 3D Origami Pieces A Beginners Guide

    Make 3D Origami Pieces sets the stage for this enthralling journey into the world of paper artistry. From simple folds to complex structures, this guide will equip you with the knowledge and techniques to create stunning 3D origami models. We’ll cover everything from fundamental principles and essential tools to advanced techniques and creative applications, culminating in a robust understanding of this fascinating craft.

    This comprehensive guide delves into the multifaceted world of 3D origami, from its history and foundational principles to intricate techniques and creative applications. You’ll learn how to transform flat sheets of paper into captivating three-dimensional forms, and discover the satisfaction of bringing your origami designs to life.

    Introduction to 3D Origami

    • D origami, a fascinating blend of paper folding and sculptural design, transcends the traditional flat forms of 2D origami. It involves creating three-dimensional structures from a single sheet of paper, employing intricate folding techniques to achieve complex shapes and forms. The artistry lies not just in the final product, but also in the precise folding sequences and the careful consideration of paper grain and material properties.

    • D origami design principles are built upon fundamental geometric concepts, enabling the creation of a wide range of shapes, from simple geometric forms to more elaborate and intricate designs. A crucial aspect is the understanding of how to manipulate paper in three dimensions to generate stability and structural integrity in the final model. This approach emphasizes the interplay between the material properties of the paper and the structural demands of the desired form.

    Fundamental Principles of 3D Origami Design, Make 3D Origami Pieces

    The core principles of 3D origami design hinge on the understanding of how to create rigid structures from a flat sheet of paper. This involves mastering techniques for generating precise folds, manipulating angles and lengths, and understanding the interplay between the forces applied during the folding process and the structural integrity of the final form. Careful consideration of paper grain and material properties is also crucial for achieving the desired results.

    Tools and Materials Commonly Used

    A wide array of tools and materials are employed in 3D origami, catering to different levels of complexity and precision. The primary tool is a sharp pair of scissors or a craft knife for cutting the paper to the desired size and shape. Other essential tools include a ruler or measuring tape for precise measurements and a pencil or pen for marking guidelines.

    Ever tried making 3D origami pieces? It’s surprisingly satisfying, and a great way to unwind. Speaking of satisfying, check out this hilarious video of Jonny Greenwood pranking Thom Yorke during a Radiohead show watch Jonny Greenwood prank Thom Yorke during a Radiohead show. The energy is infectious, and it makes you appreciate the unexpected twists in life, just like finding the perfect crease in a paper crane.

    Back to the origami, the precision is key to getting those intricate shapes just right.

    The quality of the paper itself significantly impacts the final results, ranging from simple origami paper to more specialized types, each possessing unique characteristics.

    Types of Paper Suitable for 3D Origami

    The choice of paper plays a vital role in achieving the desired form and aesthetic appeal in 3D origami. Different types of paper exhibit varying properties, impacting folding characteristics, structural integrity, and visual appeal. The table below Artikels the common types of paper used, along with their properties and typical applications.

    Paper Type Properties Typical Uses
    Regular Origami Paper Thin, lightweight, readily available, comes in various colors and patterns. Generally, smooth surfaces. Suitable for beginners and basic 3D origami projects.
    Cardstock Thicker and stronger than origami paper, more rigid. Good for intricate details and structural elements. Ideal for projects demanding greater stability and durability. Excellent for models with complex shapes or requiring reinforcement.
    Bristol Board Even thicker and more rigid than cardstock, excellent for larger, more elaborate models. Best for intricate structures that require great rigidity and strength, like complex architectural models.
    Specialty Origami Paper Specialized paper with various textures, thicknesses, and colors. Often designed with specific folding techniques in mind. Used for achieving unique aesthetics, and often tailored for particular models or styles.

    Basic 3D Origami Models

    Origami, the art of paper folding, transcends its two-dimensional roots to create captivating three-dimensional forms. This journey into 3D origami will introduce you to some fundamental models, laying the groundwork for more intricate designs. These basic models are crucial for understanding the core principles of 3D origami folding techniques.

    Simple 3D Origami Models

    These five simple models offer a solid foundation for learning 3D origami. Each model progressively builds upon the previous, teaching you crucial folding techniques and introducing different types of base structures.
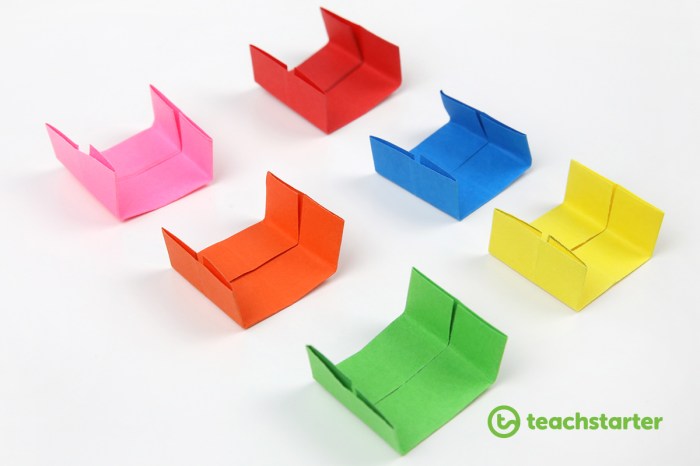
    Box

    Learning to make a box is a fundamental step in 3D origami. The box is a versatile model, forming the base for many more complex structures. Its straightforward construction allows beginners to grasp the basic concepts of layering and manipulating paper to create a three-dimensional form.

    1. Start with a square piece of paper. Ensure the paper is oriented with the corners precisely aligned, as this will be crucial for maintaining symmetry throughout the folding process. The size of the paper can vary depending on the desired size of the box, but it’s important to ensure consistent proportions.
    2. Fold the paper in half diagonally twice. This creates a central crease that acts as a reference point for further folds.
    3. Fold the corners to the center point. Make sure to fold each corner in the same way to ensure symmetry.
    4. Repeat the folding process on the opposite side. Carefully follow the previous steps to fold the corners to the center.
    5. Fold the flaps to create the box sides. This final step combines all the prior folds, shaping the paper into a box. Ensure that all flaps are folded smoothly to ensure the box holds its shape.

    Visual Representation: Imagine a square piece of paper. The first fold creates a triangle shape. The second fold creates a smaller triangle within the larger triangle. The third and fourth steps involve folding the corners to the center of the triangle. The final steps fold the flaps to form the box sides, culminating in a finished box shape.

    Triangular Pyramid

    A triangular pyramid is a classic 3D origami shape. Its construction utilizes the fundamental principles of folding and shaping paper into a three-dimensional form. This model will be a stepping stone to more intricate shapes, using similar techniques.

    I’ve been diving deep into making 3D origami pieces lately, and it’s been quite the creative outlet. Thinking about intricate folds and shapes reminds me of the upcoming Golden Globes. While I’m busy crafting paper swans and dragons, I’m also keeping my eye on the 73rd golden globes our predictions , which has me pondering who might take home the awards.

    It’s fascinating to see how different artistic expressions can inspire each other. Back to the origami, though! I’m really excited to see what shapes I can create next.

    1. Begin with a square sheet of paper. The size of the paper can be adjusted to suit your needs, but maintaining consistent proportions is essential.
    2. Fold the paper in half diagonally twice. This creates a triangular base. Carefully align the folds to ensure a precise base for the pyramid.
    3. Fold the corners to the center point. This will form the sides of the pyramid.
    4. Repeat the folding process on the opposite side. Ensure that the folds are symmetrical.
    5. Fold the triangular flaps upwards. This step will shape the paper into a pyramid. Ensure that the creases are sharp and accurate to maintain the pyramid’s shape.

    Visual Representation: Start with a square sheet of paper. The first folds create a triangle. The next folds bring the corners of the triangle towards the center point. The final folds shape the paper into a pyramid. The pyramid’s sides will be defined by the creases, ensuring stability and symmetry.

    Crane

    This classic origami model, a crane, demonstrates the beauty of transforming a simple piece of paper into a more complex 3D structure. The technique teaches the importance of accuracy in folding for intricate designs.

    Modular Cube

    This model demonstrates the principles of modular origami, where multiple identical units are assembled to create a larger, complex form. The modular cube showcases the potential for creating intricate structures through repetition and assembly.

    Tetrahedron

    The tetrahedron is a fundamental geometric shape in 3D origami. Its construction involves folding and layering the paper in a way that creates a triangular pyramid. The process emphasizes the use of precise folds for creating symmetrical and stable forms.

    Advanced 3D Origami Techniques

    Origami, the art of paper folding, extends beyond simple shapes to intricate 3D structures. Advanced techniques push the boundaries of what’s possible with paper, leading to complex forms and dynamic designs. These techniques build upon the fundamental principles of basic origami, adding layers of complexity and sophistication. This exploration dives into the world of advanced folding, modular construction, and the design process itself.Modular origami, a cornerstone of advanced 3D origami, involves assembling multiple identical units, or modules, to create a larger, complex form.

    The intricate connections between these modules are carefully considered, often requiring precise folding and assembly techniques to achieve a cohesive structure. The modular approach allows for a vast range of forms, from geometric shapes to intricate animals and even architectural models.

    Modular Origami Construction

    Modular origami allows for the creation of intricate and complex forms by assembling numerous identical units, or modules. The beauty lies in the interconnectivity of these modules, requiring precise folding and assembly techniques to ensure a sturdy and aesthetically pleasing final product. The assembly process is often meticulous, demanding attention to detail and a good understanding of the module’s design.

    • Module Design: Each module’s design is critical. Careful consideration of the folding patterns and the intended connections between modules is essential for the final structure’s stability and aesthetics. Examples include the use of tabs and valleys that interlock seamlessly.
    • Assembly Techniques: The method of joining modules varies depending on the specific design. Techniques include precisely aligning modules, using glue, or relying on the inherent structure of the module’s folds to connect them securely. Examples involve interlocking tabs, using creases, and adding glue to stabilize the structure.
    • Complexity and Scale: Modular origami allows for a broad range of complexity and scale. Simple designs can be quickly assembled, while intricate structures may require hours or even days of meticulous work. Examples range from simple geometric shapes to large, detailed models.

    Advanced Folding Techniques

    Beyond modular construction, advanced origami utilizes intricate folding techniques to create intricate 3D shapes. These methods push the boundaries of traditional origami, incorporating complex creases, angles, and layering techniques. The precise folding of these advanced techniques are crucial for creating a strong and stable structure.

    • Complex Creases: Beyond simple valley and mountain folds, advanced models incorporate more complex crease patterns, often involving reverse folds, kite folds, and other intricate techniques. These creases are critical in creating specific shapes and angles within the model.
    • Precise Angles and Layering: Accurate folding and alignment of layers are essential for creating precise angles and layered structures. The layering method creates depth and volume, enhancing the complexity of the model.
    • Shape Control: Mastering these techniques enables control over the shape, size, and structure of the final model. This control is paramount in designing and constructing sophisticated 3D models.

    Designing a 3D Origami Model

    Designing a 3D origami model is a process that blends artistic vision with technical precision. It involves careful planning, experimentation, and an understanding of the fundamental principles of origami. The design process often starts with a visual concept, which then needs to be translated into a series of folds.

    • Initial Concept: The designer begins with a visual concept of the desired 3D form. This might be an abstract shape, an animal, or a specific object. This conceptualization is the foundation of the design.
    • Developing the Folding Pattern: The next step is translating the visual concept into a sequence of folds. This involves identifying the necessary creases, their directions, and their angles to achieve the desired shape. Sketching diagrams, or using specialized software, are common steps in this process.
    • Testing and Iteration: Testing the folding pattern on paper is crucial to identify and address potential problems in the design. Iterative refinement and adjustments to the crease pattern are common during the design process. Trial and error is often involved in this stage.

    Resources for Learning 3D Origami

    Make 3D Origami Pieces

    Delving into the world of 3D origami requires more than just a passion for paper folding. Access to quality resources is crucial for progressing from basic models to intricate designs. This section explores various avenues for learning, from online tutorials to dedicated books, equipping you with the tools necessary for mastering this fascinating art form.

    Reputable Online Resources

    The internet offers a wealth of 3D origami resources, ranging from simple tutorials to comprehensive courses. Finding reliable and well-structured learning materials is key to a productive learning journey. Sites that focus on detailed instructions, clear diagrams, and supportive communities are particularly valuable.

    • YouTube channels dedicated to origami, such as those featuring tutorials by experienced practitioners, offer a visual learning experience. Many channels offer a variety of levels and complexity of models, catering to different skill sets. These channels often feature demonstrations alongside explanations, allowing learners to grasp the steps more easily.
    • Dedicated origami websites and forums provide extensive collections of patterns, diagrams, and step-by-step instructions. They frequently include detailed explanations of techniques and principles that enhance understanding. These resources often include forums where learners can ask questions and share their creations, fostering a sense of community.
    • Online origami courses are available from various platforms. Some are free, while others offer paid courses with more in-depth content, including advanced techniques and project examples. Paid courses may feature expert instructors and provide more comprehensive learning materials.

    Books and Printed Materials

    While online resources offer convenience, printed books and magazines provide a tangible reference for learning 3D origami. They often contain detailed diagrams and illustrations, which can be invaluable for visual learners. Books on 3D origami can cover a wide range of models and techniques, from simple animals to intricate architectural structures.

    • Books specifically dedicated to 3D origami often provide comprehensive instructions and detailed illustrations. They frequently include a range of models, from basic shapes to more complex structures, allowing learners to progress through different levels of difficulty.
    • Magazines focused on origami can feature articles and tutorials, introducing new models and techniques. They often showcase the work of skilled origami artists, inspiring further exploration and creativity.

    Comparison of Online Courses

    Different online courses cater to various learning styles and experience levels. A comparison can help learners select a course that best meets their needs.

    Course Platform Strengths Weaknesses
    Platform A High-quality video tutorials, clear explanations, diverse model selection. Limited community support, relatively expensive.
    Platform B Free introductory content, interactive exercises, active community forum. Limited advanced content, some instructions may not be detailed enough for beginners.
    Platform C Comprehensive course structure, expert instructors, advanced techniques covered. Higher cost, potentially less accessible to learners with limited budgets.

    Practice and Experimentation

    Mastering 3D origami requires consistent practice and a willingness to experiment. Learning is not a linear process. There will be moments of frustration and breakthroughs, and it is through this process that understanding deepens.

    • Practice consistently, focusing on the precision of folds and the proper application of techniques. Regular practice builds muscle memory and refines the understanding of origami principles. This allows learners to transition from basic shapes to more complex designs. It is crucial to avoid skipping steps or rushing through the process. Careful attention to each step will enhance the quality of the final result.

    • Experiment with variations and different techniques. Don’t be afraid to modify existing models or create your own. Experimentation is key to discovering new approaches and improving one’s understanding of the art form. By experimenting with different folding techniques, learners can discover unique ways to create intricate designs.

    Designing Your Own 3D Origami Pieces

    Unleashing your creativity to craft unique 3D origami forms is a rewarding journey. This exploration delves into the process of designing your own origami pieces, from initial concept to final execution. We’ll explore the use of design tools, essential considerations, and brainstorming techniques to help you bring your origami visions to life.The process of designing your own 3D origami piece is much more than just folding paper.

    It involves a blend of artistic vision, geometric understanding, and a methodical approach. It’s about translating a concept into a tangible structure, taking into account the inherent limitations and possibilities of origami principles.

    Creating Unique 3D Origami Designs

    Developing original origami designs often begins with sketching and visualizing the desired form. Consider the overall shape, the number of layers, and the necessary folds. Sketches can be simple lines and shapes, or more detailed representations. A good starting point is to study existing origami models, analyzing their fold patterns and structures. Identifying the basic units and how they combine is crucial to understanding the building blocks of your own design.

    Utilizing Software and Online Tools

    Various software and online tools are available to aid in 3D origami design. These tools often allow you to create and manipulate 3D models, visualize different fold sequences, and even simulate the folding process. Software options can range from basic 3D modeling programs to specialized origami design tools. Free online tools offer a user-friendly approach, enabling you to explore different designs without extensive software knowledge.

    These tools can help you visualize and test your designs, saving time and resources in the design process.

    Creating intricate 3D origami pieces is a fantastic way to unleash your inner artist. It’s a rewarding process, much like navigating the complexities of the Imperial government, as detailed in the imperial government guide imperials rogue one. Understanding the intricate hierarchy and motivations of the Imperials in Rogue One can actually inspire some fascinating, almost geometric, design choices for your origami creations.

    The precise folds and intricate shapes offer a surprising parallel to the structure and strategy of the Empire. Ultimately, both processes are about bringing something complex into a tangible form, which is what makes origami so compelling.

    Essential Design Considerations

    Creating a successful 3D origami model requires careful consideration of several factors. A well-designed model is both aesthetically pleasing and structurally sound. Consider the following points:

    • Simplicity and Clarity: The design should be clear and straightforward to fold. Avoid overly complex folds that could lead to confusion or errors during construction. A simple fold pattern is more likely to yield a successful outcome.
    • Structural Integrity: The design must have a stable structure that can maintain its shape after folding. Consider how the folds interact to create a strong and robust form. Consider the use of valley and mountain folds and how they will affect the model’s stability.
    • Aesthetic Appeal: The design should be visually appealing. Consider the balance and symmetry of the final form, and how different folds contribute to the overall aesthetic. Experiment with different fold patterns and shapes to find a design that you find visually interesting.
    • Scalability and Versatility: Think about how the design can be scaled to different sizes and materials. Consider whether the design can be adapted to different paper sizes or thicknesses, or different materials.

    Brainstorming Ideas for 3D Origami Models

    A crucial aspect of origami design is the generation of ideas. Brainstorming can be a powerful tool for discovering new and innovative models. The following are some suggestions:

    • Drawing Inspiration from Nature: Examine natural forms such as flowers, animals, or geometric shapes found in nature. Consider how these forms can be translated into origami models. Mimicking the forms of plants or animals can lead to interesting and unique designs.
    • Exploring Geometric Shapes: Explore various geometric shapes such as cubes, tetrahedrons, or octahedrons. Experiment with combining these shapes to create more complex and intricate forms. Understanding geometric principles can lead to structurally sound and visually interesting designs.
    • Combining Existing Models: Try to combine elements from existing origami models to create something new. Adapting and combining different models can inspire fresh and original designs. Experiment with modifying existing designs to incorporate new elements or perspectives.
    • Utilizing Existing Patterns: Using existing patterns or frameworks can serve as a springboard for new designs. Start with a known pattern and then adapt it to create something new. Modifying existing patterns can accelerate the design process and yield novel results.

    Creative Applications of 3D Origami

    Origami, the art of paper folding, has evolved beyond simple shapes into a fascinating realm of three-dimensional artistry. 3D origami, in particular, offers a unique blend of precision and creativity, opening doors to applications far beyond the traditional paper craft. It’s not just about creating intricate figures; it’s about harnessing the principles of geometry and structure to build diverse forms.D origami’s adaptability makes it a powerful tool for design and creation across various fields.

    From intricate sculptures to functional models, the potential for innovative applications is immense. The process of meticulously folding paper into precise shapes cultivates problem-solving skills, and the aesthetic appeal of the final creations is undeniable. This exploration will delve into how 3D origami is finding its way into the realms of art, architecture, and engineering.

    Art Applications of 3D Origami

    D origami is increasingly recognized as a powerful artistic medium. The precision required to create intricate 3D models allows for the expression of complex ideas and intricate designs. The interplay of light and shadow on these structures further enhances their visual appeal, making them captivating pieces of art. Artists often incorporate different types of paper, colors, and textures to add to the aesthetic impact.

    Architectural Applications of 3D Origami

    The principles of 3D origami can be translated into architectural design. Origami’s ability to create complex structures from a single sheet of material makes it a potentially revolutionary approach to design. Imagine creating lightweight, adaptable structures for temporary shelters, or intricate facades for buildings. The structural integrity of these models, when combined with modern materials, offers possibilities for creating novel architectural forms.

    Lightweight, modular designs are especially promising for environmentally friendly constructions.

    Engineering Applications of 3D Origami

    The precision and structural integrity of 3D origami models are increasingly capturing the attention of engineers. The intricate folding patterns can be adapted for creating complex mechanisms and intricate robots. The use of foldable structures in robotics allows for compactness during transportation and deployment. These structures can then expand and assemble in complex configurations. Imagine deployable antennas or miniature robots that can navigate complex environments.

    Engineers are exploring how to translate the unique folding principles into functional prototypes.

    Adapting 3D Origami for Diverse Purposes

    D origami’s inherent flexibility makes it adaptable to various applications. The precise folding patterns can be tailored for different needs. For instance, the structural elements of a 3D origami model can be reinforced with different materials, increasing their load-bearing capacity. The modularity of some origami structures enables easy assembly and disassembly. This adaptability is a significant factor in its potential to revolutionize manufacturing processes and contribute to more sustainable design practices.

    The creative possibilities in adapting origami principles are vast.

    Troubleshooting Common Issues: Make 3D Origami Pieces

    Make 3D Origami Pieces

    Mastering 3D origami, like any craft, requires patience and a willingness to learn from mistakes. This section will address common difficulties encountered during the folding process, providing solutions and emphasizing the importance of persistence. Troubleshooting is a crucial part of the learning journey, allowing you to refine your technique and overcome obstacles effectively.Understanding that errors are a natural part of the learning process is key to progressing in 3D origami.

    The ability to identify and rectify these mistakes is fundamental to improving your skills and ultimately creating stunning 3D models.

    Identifying and Correcting Measurement Errors

    Accurate measurements are critical in 3D origami. Inaccuracies can lead to misaligned folds, distorted shapes, and ultimately, a flawed model. Carefully examining your folding patterns and comparing your work with diagrams is vital to ensure precision.

    • Using a Ruler or Measuring Tool: Ensure that you are using a precise measuring tool, especially for intricate models. Even small discrepancies in measurement can accumulate, resulting in significant deviations from the intended shape.
    • Double-Checking Measurements: Before proceeding with each fold, double-check your measurements to minimize errors. This will save you time and effort in the long run by preventing the need to redo multiple folds.
    • Referring to Diagrams: Carefully compare your measurements with the diagrams provided in the instructions. Any discrepancies should be rectified before proceeding to the next fold.

    Overcoming Difficulty in Following Instructions

    Sometimes, the instructions for complex 3D origami models can be challenging to follow, especially for beginners. Breaking down complex steps into smaller, manageable steps can significantly improve your comprehension.

    • Breaking Down Complex Steps: If a step seems confusing, break it down into smaller, more manageable sub-steps. This will allow you to understand each part of the procedure more easily. For example, a complex fold might be broken down into several smaller folds that gradually form the desired shape.
    • Visualizing the Fold: Try visualizing the intended fold in your mind before physically performing it. This can help you understand the intended result and anticipate potential issues.
    • Using Visual Aids: If possible, use visual aids such as videos or 3D models to help understand the instructions better. Watching someone else perform the fold can often provide valuable insights.
    • Reviewing Previous Steps: If you encounter difficulty with a step, review the preceding steps to ensure that you haven’t made any errors. Sometimes, a problem in a previous step can manifest later as an issue.

    Importance of Patience and Persistence

    D origami is a rewarding but often challenging craft. Patience and persistence are essential for success. Don’t get discouraged by setbacks; instead, view them as opportunities to learn and improve your technique.

    • Embracing Setbacks: Setbacks are a natural part of the learning process. Don’t be discouraged by mistakes or challenges; learn from them and move forward.
    • Celebrating Small Victories: Acknowledge and appreciate your progress, no matter how small. This positive reinforcement can motivate you to continue learning and developing your skills.
    • Consistency and Practice: Regular practice and consistent effort are crucial to mastering 3D origami. The more you practice, the more comfortable and proficient you will become.

    Last Point

    In conclusion, mastering Make 3D Origami Pieces is a rewarding journey that blends creativity with precision. From the basic principles to advanced techniques, this guide provides a comprehensive resource for aspiring origami artists. Embrace the challenge, experiment with different designs, and most importantly, enjoy the process of transforming simple paper into extraordinary shapes.

  • Make an Infinity Cube Out of Paper A Step-by-Step Guide

    Make an Infinity Cube Out of Paper A Step-by-Step Guide

    Make an Infinity Cube Out of Paper: a fascinating project that combines geometry, creativity, and the satisfaction of crafting something truly unique. This guide will walk you through the process, from understanding the mathematical principles behind the cube to constructing a beautiful and functional paper model. Get ready to dive into the world of origami-inspired 3D shapes!

    We’ll explore various methods for creating a paper infinity cube, comparing their advantages and disadvantages. Detailed instructions, step-by-step, will empower you to bring your own infinity cube to life. Learn how to design a custom template, ensuring accuracy and scalability. We’ll also cover variations, enhancements, and troubleshooting common construction issues, equipping you with the skills to craft truly unique designs.

    Introduction to Infinity Cubes

    An infinity cube is a fascinating three-dimensional puzzle, renowned for its seemingly endless transformations. Its unique design allows for a continuous, seamless flow of rotations and changes in perspective, making it a captivating object for both mathematicians and puzzle enthusiasts. This intricate structure is more than just a toy; it embodies a powerful interplay of geometry and spatial reasoning.The mathematical principles underpinning the infinity cube’s design revolve around the concept of rotations and symmetries within three-dimensional space.

    It demonstrates how various rotations can be combined to create intricate patterns and transitions. The fundamental geometric shapes, such as triangles, squares, and other polyhedra, are combined in a precise manner to create the illusion of infinite movement. This geometric precision is what gives the cube its distinctive aesthetic and the seemingly impossible transformation capability.

    Types of Infinity Cubes

    Different variations of infinity cubes exist, categorized primarily by their design and construction. Some cubes feature more complex internal mechanisms or different numbers of connected pieces. These differences affect the possible rotations and transformations. The complexity of the design affects the number of possible configurations and the intricate patterns that can be created. The variation in design often leads to different degrees of difficulty in manipulating the cube, creating a spectrum of challenges for puzzle solvers.

    Historical Context

    The precise origins of the infinity cube are somewhat obscure. While its exact historical trajectory is not readily documented, its emergence likely stems from the intersection of geometric fascination and the desire to create interactive puzzles. Early attempts at creating intricate three-dimensional puzzles predate the modern form of the infinity cube, evolving over time to encompass increasingly complex geometric principles.

    The emergence of modern manufacturing and design techniques likely played a significant role in popularizing these objects. The development of these puzzles shows a constant interplay between artistic creativity and the pursuit of mathematical understanding.

    Materials Used

    The materials employed in creating infinity cubes are diverse and often dictated by the desired aesthetic and functionality. Common choices include plastic, wood, and metal. Plastic is frequently used due to its affordability and ease of molding, enabling the creation of intricate designs. Wood is chosen for its aesthetic appeal and tactile qualities. Metal, often used for more substantial and durable infinity cubes, brings an element of sophistication and heft.

    The choice of material often influences the weight, feel, and durability of the final product. Different materials can impact the overall feel and handling experience.

    Paper-Based Infinity Cube Construction: Make An Infinity Cube Out Of Paper

    Crafting an infinity cube from paper offers a captivating hands-on experience, allowing for a deeper understanding of the geometric principles behind this intriguing shape. Different methods exist, each with unique advantages and disadvantages. This exploration will delve into the various approaches, focusing on the practical aspects of folding and assembling these intricate structures.The beauty of paper-based infinity cubes lies in their accessibility and the ability to create them with readily available materials.

    Understanding the different methods allows for a personalized approach to construction, catering to individual preferences and skill levels.

    Methods for Infinity Cube Creation

    Various methods exist for constructing paper infinity cubes, each with its own set of steps and challenges. Some methods leverage the concept of a modular approach, breaking down the cube into smaller, manageable units. Other methods rely on more complex folding patterns, resulting in a single, continuous piece of paper.

    • Modular Construction: This method involves creating multiple identical paper units, which are then assembled to form the final infinity cube. This approach often proves more accessible for beginners, providing a clear structure and reduced complexity in the folding process. The modular design allows for a clear visual understanding of the pieces’ interactions, facilitating a straightforward assembly process.
    • Single-Piece Folding: This approach utilizes a single sheet of paper to form the entire infinity cube. The folding patterns for this method tend to be more intricate and complex, demanding greater attention to detail and a more thorough understanding of the geometric principles. This method can yield a highly satisfying result, showcasing a more streamlined and elegant approach to the cube’s creation.

    Comparing Methodologies

    Method Pros Cons
    Modular Construction Easier to learn, less complex folding patterns, better for beginners, greater visual clarity of the individual units More time-consuming due to multiple parts, potential for errors in assembly
    Single-Piece Folding Potentially more aesthetically pleasing, more compact, faster once mastered More challenging to learn, intricate folding patterns, higher potential for errors in the folding process

    Step-by-Step Procedure for Single-Piece Folding

    This detailed procedure Artikels the construction of a paper infinity cube using a single-piece folding method.

    1. Prepare the Paper: Select a square piece of paper. The size of the paper will influence the overall dimensions of the cube. A larger sheet will result in a larger cube.
    2. Initial Folds: Begin by folding the paper in half along the diagonal to form a triangle. Then, fold the triangle in half again to form a smaller triangle. These initial folds create the foundation for the subsequent geometric steps.
    3. Advanced Folds: Continue by making folds according to the specific folding pattern. This involves complex folding techniques, often including additional creases and rotations. These folds will ultimately create the shape of the infinity cube.
    4. Assembly: Carefully unfold the paper and align the different segments. This step often involves precise adjustments and manipulations to ensure all the segments align correctly. It is essential to pay close attention to the intricate creases to avoid misalignment.
    5. Final Adjustments: Once all segments are aligned, carefully and meticulously fold the paper according to the pattern. This step involves precision and attention to detail. Ensure that all the folds and creases are accurately executed to guarantee a structurally sound and well-formed infinity cube.

    Designing a Paper Infinity Cube Template

    Make an Infinity Cube Out of Paper

    Crafting a precise template is crucial for building a sturdy and aesthetically pleasing infinity cube. A well-designed template ensures that all the necessary cuts and folds are accurate, leading to a cube that seamlessly assembles and displays the captivating infinity effect. This section will delve into the essential steps for creating a scalable and accurate template.Creating a template involves careful consideration of dimensions and angles.

    The template serves as a blueprint, dictating the precise shapes and sizes of the paper components. Understanding the geometric principles behind the infinity cube is fundamental to designing a functional and visually appealing template.

    Creating a Simple Template

    A simple infinity cube template can be designed using a square base. The base square dictates the overall size of the cube. By carefully calculating the necessary cuts and folds, we can transform this square into the intricate structure of the infinity cube. Accurate measurements are paramount to avoid errors in assembly. The crucial part is understanding how the individual components fit together, ensuring the smooth transition between faces.

    Adjusting the Template for Different Sizes

    Scaling the template for different sizes is a straightforward process. Simply adjust the dimensions of the base square to accommodate the desired size. Maintaining the same angle ratios between the cuts and folds is essential to ensure that the cube retains its structural integrity and infinity effect, regardless of the size. For instance, doubling the base square’s side length will result in a larger infinity cube, while halving it will create a smaller one.

    Maintaining the proportional relationships is vital for the accurate assembly.

    Creating a Scalable Template

    A scalable template is a valuable asset for creating infinity cubes of various sizes. One effective method is to use a ratio-based approach. Define the proportions of the components relative to the base square. This method ensures consistency in the construction, regardless of the chosen size. For example, a ratio of 1:√2 for the side lengths will maintain the correct proportions for a square base to a side face.

    This way, the template can be easily adjusted for different cube sizes.

    Ensuring Accuracy in the Template Design

    Precise measurements are vital for an accurate infinity cube template. Using a ruler and compass, or a dedicated design software, is crucial for obtaining precise measurements. Employing a ruler and compass for initial design ensures accuracy and minimizes errors. The precision ensures that the pieces interlock flawlessly and that the cube’s infinity effect is maintained. The use of construction paper with high quality will also assist in accuracy.

    Using a CAD program can assist in complex designs, where a ruler and compass might not be sufficient.

    Importance of Precise Measurements

    Precise measurements directly impact the final appearance and functionality of the infinity cube. Even small discrepancies can significantly affect the assembly process and the final result. Using precise measurements ensures the cube’s components fit together perfectly, allowing for smooth transitions and a visually appealing infinity effect. This is particularly important for creating cubes with intricate designs or those that need to maintain their form.

    Using a digital measuring tool such as a caliper or micrometer will ensure greater accuracy in the design.

    Variations and Enhancements

    Beyond the basic infinity cube, the possibilities for creative design are vast. This section explores diverse approaches to crafting unique and captivating paper infinity cubes, incorporating patterns, colors, and decorative elements to elevate the project from a simple geometric exercise to a truly personalized artistic expression. Experimentation and ingenuity are key to achieving truly exceptional results.The beauty of the paper infinity cube lies in its adaptability.

    By exploring variations in design and construction, you can transform the cube into a statement piece, a personalized gift, or even a functional decorative item. Adding patterns, colors, and textures allows you to tailor the cube to your personal taste and the specific project’s needs.

    Unique Paper Infinity Cube Designs

    Different designs offer distinct aesthetics and visual appeal. Consider variations in the cube’s proportions, the complexity of the folds, and the overall structure. For example, an elongated or flattened infinity cube will possess a different aesthetic than a standard, square infinity cube. This alteration in form can significantly impact the overall visual impact of the final product.

    Ever wanted to craft a mesmerizing infinity cube from paper? It’s surprisingly easier than you think, and a fun project to tackle. Plus, understanding the intricate folding patterns involved in creating such a shape might actually offer some insights into the dynamic nature of isik kural moon in gemini , which I find fascinating. Ultimately, building this paper cube is a great way to unwind and explore spatial relationships, much like the cosmos itself!

    Furthermore, employing intricate folding patterns can create a visually striking design, adding depth and complexity to the cube’s form.

    Incorporating Patterns and Colors

    Patterns and colors can dramatically transform the visual appeal of an infinity cube. Employing a variety of colors, like a gradient or a contrasting color scheme, will add visual interest and make the cube stand out. Patterns can be applied using different techniques such as symmetrical designs, stripes, or intricate geometric patterns. The choice of pattern and color palette is entirely dependent on personal preference and the desired aesthetic.

    The use of colored paper, or even applying paint or markers to the completed cube, can elevate the visual appeal and introduce an artistic touch.

    Creating Complex and Intricate Designs

    Increasing the complexity of the infinity cube’s design involves exploring more elaborate folding patterns and incorporating additional layers or elements. This could involve introducing more folds, altering the arrangement of the faces, or adding additional components that contribute to the overall structure of the cube. By adding more intricate elements, the design can evolve from a simple shape into a more detailed and captivating piece.

    Folding an infinity cube out of paper is surprisingly satisfying, a fun little project. It’s a bit like uncovering a hidden message, and reminds me of the hunt for the actual easter egg important ready player one, actual easter egg important ready player one – you never know what intricate detail might be waiting to be discovered.

    I’m going to have to give this paper infinity cube project a try; it seems like a perfect way to spend an afternoon.

    For example, integrating a repeating pattern onto the faces, or adding a hidden compartment or a secret opening, will add complexity to the cube.

    Employing Decorative Elements

    Decorative elements can further enhance the visual appeal and uniqueness of the infinity cube. Embellishments like beads, sequins, or other small decorative elements can be incorporated into the design, adding texture and visual interest. This could also involve adding small decorative elements on the surface of the cube, such as small charms, cutouts, or intricate patterns. Adding a unique, personalized touch with embellishments can enhance the design’s visual impact.

    Adding Finishes and Textures

    Adding different finishes or textures to the paper infinity cube can elevate the cube’s overall appearance and tactile experience. Applying a sealant or varnish to the paper can protect the design and enhance its visual appeal. Experimentation with different types of paper, such as textured paper or cardstock, can introduce visual interest. Using specialized techniques, such as embossing or debossing, can add a unique and elegant touch to the surface of the cube.

    Applying different textures, or embossing patterns, can contribute significantly to the final look.

    Troubleshooting and Common Mistakes

    Building a perfect paper infinity cube can be challenging, but understanding common pitfalls and their solutions will significantly improve your success rate. Thorough preparation and attention to detail during the folding and assembly process are crucial for achieving a sturdy and well-formed cube. This section will address potential issues and provide practical advice to avoid them.

    Identifying Misaligned Layers

    Incorrectly aligned layers during the folding process are a frequent source of problems. Misalignment can lead to uneven edges and a distorted cube shape. Recognizing these misalignments early in the construction process is key to correcting them before they become insurmountable.

    • Visual Inspection: Carefully examine each layer as you fold it. Ensure the creases and markings align precisely with the preceding layers. A misplaced crease can cause significant problems further down the assembly process. If a layer is misaligned, immediately correct the mistake before proceeding.
    • Precise Folding Techniques: Practicing the folding techniques diligently is essential. Precisely following the instructions and ensuring all folds are perpendicular to each other minimizes the risk of misalignment. Experimenting with different folding methods can also highlight areas where misalignment is more prone to occur.
    • Refolding Layers: Sometimes, a single layer that’s misaligned can affect the entire structure. In such cases, refolding the affected layer(s) is necessary to maintain consistency and correct alignment. Careful attention to detail is essential during the refolding process.

    Dealing with Crease Errors

    Creases that are not sharp or consistent can lead to weak points in the infinity cube. These weak points can manifest as warping or a tendency for the cube to collapse under pressure.

    • Sharp Creases: Employing a bone folder or a similar tool for crease making will help create sharp creases that are crucial for structural integrity. This method will minimize the risk of uneven or fuzzy creases.
    • Consistency in Creases: Ensure that each crease is consistent in depth and sharpness. Uneven creases can compromise the overall structural stability of the cube. This consistency is vital for the cube’s strength and durability.
    • Refolding Technique: If a crease is not as sharp as required, refolding the affected area with precision is a reliable approach. This helps to create a sturdy crease, strengthening the structure of the infinity cube.

    Avoiding Paper Distortion

    Paper distortion can occur due to improper handling or storage. Distorted paper can lead to a misaligned cube or a warped shape. Careful handling of the paper is essential.

    • Handling the Paper: Carefully handle the paper during the folding process. Avoid creasing or bending the paper excessively. Using light, consistent pressure will minimize distortion.
    • Storage: Proper storage of the paper sheets is essential to prevent unwanted distortion. Avoid storing the paper in areas with high humidity or extreme temperatures. This will ensure the paper maintains its structural integrity.

    Achieving a Sturdy Infinity Cube

    A sturdy infinity cube will withstand handling and display its intricate design without collapsing.

    • Paper Quality: Using thicker, stiffer paper will significantly enhance the cube’s structural integrity. This will prevent the cube from warping under pressure or during handling. Experiment with different types of paper to find one that offers a good balance between sturdiness and ease of folding.
    • Double-checking the Instructions: Carefully review the instructions before starting the folding process. Double-checking the instructions and ensuring each step is followed precisely will contribute to the success of your cube.
    • Practice: Constructing multiple infinity cubes will provide valuable insights into the folding process and identify areas for improvement. Practice and experience can significantly enhance the sturdiness of the cube.

    Illustrative Examples

    Make an Infinity Cube Out of Paper

    Turning a simple idea into a tangible object is often easier said than done. This section provides concrete examples of infinity cubes, demonstrating different approaches to design and construction using paper. From straightforward geometric patterns to intricate paper cuts and vibrant color gradients, these examples will help you visualize the possibilities and inspire your own creations.

    Simple Geometric Pattern

    A basic infinity cube, perfect for beginners, uses a simple geometric pattern. Imagine a grid of squares, alternating in color or shading, forming a repeating pattern on the paper template. This creates a clean, recognizable structure that is easy to follow when cutting and assembling. The key is a consistent and clear pattern that allows for easy folding and connection of the various components.

    This is a great starting point to understand the fundamental geometry of the cube.

    Gradient Color Scheme

    Adding visual interest can be achieved through a gradient color scheme. The paper template can transition smoothly from a light shade to a darker one, creating a mesmerizing effect. This can be a linear gradient, moving from light to dark along one axis of the cube, or a more complex gradient that transitions across multiple faces. By carefully considering the color placement and transitions, you can create a unique visual experience, setting your cube apart from the others.

    Intricate Paper Cuts

    For a more advanced design, consider intricate paper cuts. This involves cutting out shapes, patterns, or even text from the paper template. These intricate details can add depth and complexity to the cube, and add a personal touch to the design. The paper cuts can form a design on the face of the cube, adding visual interest, or even creating a pattern that extends to several faces of the cube.

    The design possibilities are vast, ranging from simple geometric patterns to more elaborate floral or abstract designs.

    Making an infinity cube out of paper is surprisingly satisfying, a little project that keeps you occupied. The intricate folds and shapes, though, sometimes make you appreciate the quiet nights in the dark, when the mind can wander, and the only sounds are the soft rustle of the pages or the quiet hum of your thoughts. Finding the right inspiration, like maybe listening to nights in the dark , can really help you focus on the task and appreciate the quiet beauty of the infinity cube’s final form.

    Examples of Infinity Cube Designs

    To illustrate the diversity of infinity cube designs, imagine the following examples:

    • Design 1: A cube with a repeating pattern of triangles, each triangle a different shade of blue. The pattern extends across all faces of the cube, forming a vibrant mosaic-like effect.
    • Design 2: A cube with a gradient color scheme, transitioning from a soft peach color at the top to a deep crimson at the bottom. The gradient is applied to each face, creating a visually stunning transition.
    • Design 3: A cube with intricate paper cuts that form a series of interconnected circles. The circles are cut out from the faces of the cube, adding depth and a sense of movement to the overall design.

    Imagine these designs as physical objects; you can picture the intricate details and color variations in your mind. These examples represent just a starting point, and countless variations and combinations are possible.

    Including Images Without External Links

    To include images without external links, the images would need to be embedded directly into the document. This method allows for the images to be displayed without the need for a separate file location. The exact implementation depends on the platform or software being used to generate the final output.

    Materials and Tools

    Crafting a mesmerizing infinity cube from paper requires a keen eye for detail and the right tools. Choosing appropriate materials and having the right tools at hand significantly impacts the outcome of your project. The quality of materials directly translates to the cube’s durability, aesthetics, and overall success. This section will delve into the essential materials and tools needed for this exciting paper-based project.

    Necessary Materials

    A successful paper infinity cube relies on the right materials. Selecting the correct paper type and ensuring adequate quantities are crucial for a smooth construction process. The paper’s weight and texture will influence the cube’s strength and visual appeal. Different types of paper lend themselves to various aesthetics, enabling you to create unique infinity cubes.

    • Paper: A crucial element for any paper craft project, the type of paper you choose impacts the cube’s look and sturdiness. Cardstock, with its enhanced thickness, is ideal for providing structural integrity and preventing the cube from warping. Construction paper offers a vibrant range of colors and textures, while printer paper is suitable for simpler designs, though it might require additional support.

    • Scissors or Craft Knife: Precise cutting is essential for clean, crisp edges and intricate shapes. A sharp craft knife is excellent for intricate cuts, while scissors are generally more suitable for larger, simpler cuts. Safety precautions, like using a cutting mat, should be observed when using a craft knife.
    • Ruler or Straight Edge: Maintaining straight lines is key to the cube’s accuracy and aesthetic appeal. A ruler provides a consistent guide for precise measurements, which are crucial for the folding and assembly of the cube. A straight edge, like a piece of cardboard, can also be used.
    • Pencil or Pen: Marking lines, measurements, and templates is a crucial step in this process. A pencil or pen is used for sketching out your design, making markings for cutting, and creating templates.
    • Glue or Adhesive: For joining different pieces of paper and ensuring the cube’s structural integrity, a reliable glue or adhesive is necessary. Strong glue is essential for holding the intricate pieces together and ensuring the cube’s longevity.

    Paper Types

    The choice of paper directly affects the final product’s look and longevity.

    • Cardstock: Known for its thickness and durability, cardstock is an excellent choice for creating sturdy and long-lasting infinity cubes. Its rigidity prevents the cube from warping or collapsing during use.
    • Construction Paper: Construction paper offers a wide array of vibrant colors and textures, allowing for creative designs and unique visual appeal. Its slightly thinner consistency may require more support for complex designs.
    • Printer Paper: Printer paper, while readily available, is typically thinner than cardstock or construction paper. It may not be the best choice for intricate designs or if you desire a durable infinity cube. Its use is more suited to simpler designs or prototypes.

    Tools, Make an Infinity Cube Out of Paper

    Using the correct tools can significantly improve the construction process and enhance the overall result.

    • Cutting Tools: A sharp craft knife and a pair of scissors are indispensable for precision cutting. The selection depends on the intricacy of the design.
    • Measuring Tools: Rulers or straight edges are essential for ensuring accurate measurements and straight lines. Accuracy is critical for maintaining the cube’s shape and symmetry.
    • Marking Tools: A pencil or pen allows you to mark lines and templates clearly. The visibility of these markings is essential for a successful construction process.

    Material Importance

    The quality of materials directly impacts the success and longevity of your infinity cube.

    • Quality Materials: High-quality cardstock ensures the cube maintains its shape and integrity. A durable material will stand up to handling and resist warping.
    • Appropriate Quantities: Ensure you have enough of each material to complete the project without running out. Overestimating quantities is preferable to encountering shortages during construction.

    Material List

    This table Artikels the materials and quantities needed for constructing a standard infinity cube.

    Material Description Quantity
    Cardstock Heavyweight paper for strength 1 sheet (or more, depending on design)
    Scissors For precise cutting 1 pair
    Craft Knife For intricate cuts 1
    Ruler For precise measurements 1
    Pencil For marking and templates 1
    Glue Stick For bonding paper pieces 1
    Cutting Mat For protecting your work surface 1

    Interactive Design Options

    Crafting an infinity cube from paper is more than just following instructions; it’s about engaging with the design process in a way that fosters creativity and understanding. This section dives into interactive tools and resources to help you personalize your cube-building experience. From choosing the right paper to exploring folding techniques, these options will empower you to create a unique and satisfying final product.Choosing the right paper, folding techniques, and even the construction sequence can significantly impact the final product.

    This section will provide the tools and information needed to tailor the process to your preferences.

    Flowchart for Paper Infinity Cube Construction

    A flowchart provides a visual guide for navigating the construction process, making it easier to follow and troubleshoot potential issues. It clearly Artikels each step, from gathering materials to completing the final fold. This systematic approach ensures a smooth and satisfying experience.

    Start --> Gather Materials --> Choose Paper Type --> Design Template --> Cut Out Template --> Fold Template --> Assemble Cube --> Final Check --> Complete
     

    Comparison of Paper Types

    Different paper types react differently during the folding process. Understanding these variations allows you to choose the paper best suited for your desired aesthetic and build quality. The table below Artikels some common paper types and their associated properties.

    Paper Type Thickness Stiffness Folding Properties Suitability for Infinity Cube
    Cardstock Medium High Good fold retention Excellent
    Construction Paper Thin Medium Moderate fold retention Good
    Regular Printer Paper Thin Low Poor fold retention Poor (may require more complex reinforcement)
    Bristol Board Medium-High High Excellent fold retention Excellent

    Steps in Infinity Cube Construction

    A clear step-by-step guide can make the entire process more accessible. The table below Artikels the fundamental stages of the construction process.

    Step Description
    1 Gather all necessary materials (paper, scissors, ruler).
    2 Select and prepare the chosen paper type for folding.
    3 Download and print the prepared template.
    4 Carefully cut out the template according to the dimensions.
    5 Follow the template’s instructions for folding the individual sections.
    6 Precisely join the folded sections to form the infinity cube structure.
    7 Verify the integrity of the structure, ensuring all connections are secure.

    Tools and Materials Summary

    A concise summary of essential tools and materials can streamline the preparation phase. This table presents a quick overview of the necessary components.

    Category Item
    Paper Cardstock, construction paper, or Bristol board
    Cutting Tools Scissors, craft knife, or X-ACTO knife
    Measuring Tools Ruler, measuring tape, or digital caliper
    Auxiliary Tools Pencil, eraser, or marker for template design

    Folding Techniques

    Different folding techniques can be used to achieve distinct visual effects and structural integrity. The table below presents several examples.

    Folding Technique Description Example Image (Conceptual Description):
    Basic Fold Simple fold along a straight line A flat sheet of paper is folded in half along a straight crease.
    Valley Fold Fold with a crease that is pushed inwards A fold that creates a valley-like indentation.
    Mountain Fold Fold with a crease that is pushed outwards A fold that creates a mountain-like peak.
    Reverse Fold Fold in the opposite direction of the basic fold A fold that mirrors the basic fold but in the opposite direction.

    Final Conclusion

    From basic designs to intricate patterns, this guide provides a comprehensive approach to making your own infinity cube. The included illustrative examples, material lists, and interactive design options will help you through every stage of the project, from planning to completion. So, gather your supplies and get ready to embark on a creative journey to build your very own infinity cube, a testament to your ingenuity and precision.