Tag: Minecraft

  • Make a Christmas Tree on Minecraft A Guide

    Make a Christmas Tree on Minecraft A Guide

    Make a Christmas Tree on Minecraft! This guide dives deep into the festive world of Minecraft, showing you how to craft stunning Christmas trees. From basic spruce trees to elaborate designs, we’ll cover everything you need to create a truly magical winter wonderland in your game. We’ll explore different crafting techniques, decorating tips, and even community-inspired creations. Get ready to transform your Minecraft world into a winter wonderland!

    Minecraft Christmas trees offer a fantastic opportunity to express your creativity and build a truly festive atmosphere. This guide will walk you through the process of creating a beautiful tree, from selecting the right materials to decorating it with festive flair. Whether you’re a seasoned Minecraft player or just starting out, you’ll find something valuable within these pages.

    Introduction to Minecraft Christmas Trees

    Minecraft, a game built on blocks, has fostered a unique and vibrant Christmas tradition. Players, inspired by real-world celebrations, have adapted the spirit of the holiday into the game’s pixelated world. This adaptation, though digitally rendered, reflects the core values of the season – community, creativity, and the joy of togetherness. From simple saplings to elaborate decorations, Minecraft Christmas trees are a testament to player ingenuity and the game’s enduring appeal.The Minecraft Christmas tradition, though not formally documented, has evolved organically over the years.

    Players have adopted various methods of decoration, reflecting their creativity and their connection to the real-world holiday. The common thread remains the same – the desire to celebrate the season within the game’s environment.

    Common Decoration Methods

    Minecraft players employ a range of methods to decorate their Christmas trees, from simple to elaborate. Some players opt for the classic approach of stringing colorful lights, others use various types of items to create a more personalized theme, while others use specific blocks to give the tree a unique visual identity.

    • Simple Decorations: Basic decorations include placing items like redstone lamps, pumpkins, or different colored wool for a simple but festive look. This is often a quick way to add some color to the tree and is ideal for players looking for a fast and easy approach.
    • Themed Decorations: Some players choose a specific theme, such as a winter wonderland, a festive village, or a holiday-themed event. This involves selecting decorations consistent with the chosen theme, creating a more cohesive and elaborate presentation. For example, a winter wonderland theme might include snow blocks, icicles, and white wool.
    • Block-Based Decorations: Players can utilize various blocks like glass panes, leaves, and different coloured wool to create intricate patterns or designs on their trees. This method is particularly useful for those who want to express their creativity through unique designs and patterns.

    Materials for Tree Construction

    Creating a Minecraft Christmas tree requires specific materials. The process begins with selecting a suitable tree base. This is followed by procuring the necessary decorations. Careful selection of materials is essential for a festive and visually appealing display.

    • The Tree Base: A common method involves planting a large, tall, and sturdy tree, typically a spruce or fir. This forms the foundation for the decorations.
    • Decorations: The choice of decorations is vast and depends on the player’s preference and creativity. Items like redstone lamps, pumpkins, coloured wool, or other available blocks can be used to add a festive touch. The use of these materials creates a visual impact that resonates with the spirit of Christmas.

    Common Methods for Creating a Christmas Tree

    Players typically follow these steps when constructing a Christmas tree in Minecraft:

    1. Location Selection: Choosing a suitable location in the game world is essential. A visually prominent area is usually chosen to display the tree.
    2. Tree Planting: A large spruce or fir tree is planted to serve as the base of the Christmas tree. This foundational step provides the framework for the festive decorations.
    3. Decoration Placement: Decorations are strategically placed on the tree, following the player’s chosen theme and design. This step involves careful selection of colors, shapes, and sizes to maximize the festive appeal.

    Crafting a Simple Christmas Tree: Make A Christmas Tree On Minecraft

    Crafting a festive Christmas tree in Minecraft adds a touch of holiday cheer to your virtual world. This guide provides a step-by-step process for building a basic, yet beautiful, Christmas tree, suitable for beginners and seasoned players alike. It details the different block types you can use, ensuring you have the right materials to decorate your digital home.

    I’m currently obsessed with making a Christmas tree in Minecraft. It’s surprisingly satisfying, especially with all the little details you can add. Speaking of satisfying things, the soundtrack for “Big Little Lies” is dropping this Friday! big little lies soundtrack coming this friday promises a fantastic soundtrack to enjoy while I’m meticulously crafting my digital Christmas masterpiece.

    I’m aiming for a truly epic tree this year. Hopefully, the soundtrack will help set the mood.

    Step-by-Step Construction

    To create a visually appealing Christmas tree, follow these steps:

    • Select a suitable location for your tree. Ensure there’s enough space around it for further decorations and activities. Clear any obstacles that may hinder your tree’s placement.
    • Gather the necessary materials. The materials required will be discussed in the next section. This step involves acquiring the needed blocks for your tree’s structure.
    • Create a sturdy base. This is crucial for the stability of your tree. Start by placing blocks in a triangular shape, gradually increasing the size as you progress upwards. This creates a wide base that can support the weight of the tree.
    • Build the trunk. Construct a solid column of blocks from the base upwards, representing the trunk of your tree. Ensure the trunk is centered and straight to maintain the tree’s symmetry.
    • Add the branches. Start layering blocks from the trunk upwards in a progressively smaller triangular shape. This will create the effect of a traditional Christmas tree.
    • Decorate the tree. Now you can decorate your tree with other blocks or items to create a more festive appearance. This can include lanterns, leaves, or even hanging items.

    Material Requirements

    This table Artikels the necessary materials and quantities for a basic Christmas tree:

    Material Quantity
    Spruce Log 5
    Spruce Sapling 1
    Spruce Wood 10

    These materials are commonly found in forests within Minecraft. Consider gathering additional blocks for decoration and embellishments. Different types of wood blocks will result in different colors and textures, enabling more creative designs.

    Advanced Christmas Tree Designs
    Make a Christmas Tree on Minecraft

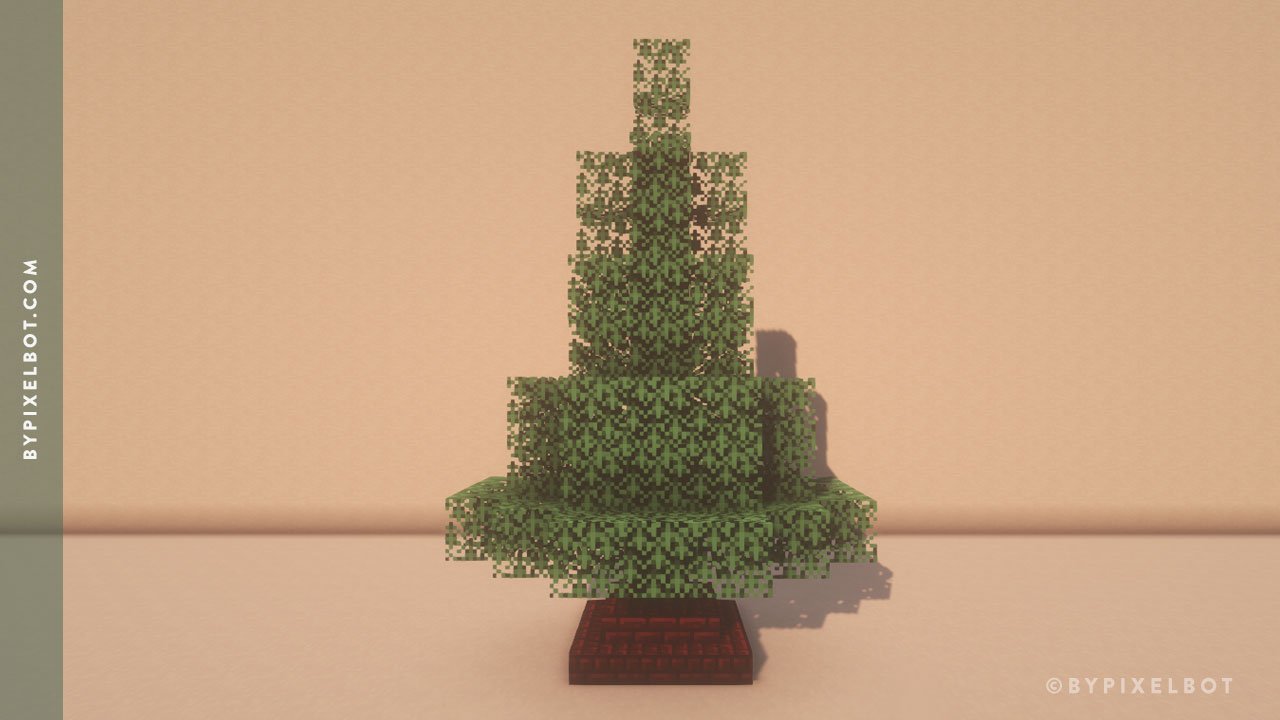
    Crafting a magnificent Minecraft Christmas tree transcends the basic spruce or birch. Elevating your festive display involves intricate construction techniques, clever decorating methods, and unique base designs. This exploration delves into the artistry of creating truly exceptional Christmas trees in the virtual world.Advanced designs require a shift from simple placement to a more involved approach. The possibilities are as varied as the player’s imagination.

    The use of multiple blocks, careful arrangement, and creative decorating elevate the visual impact.

    Intricate Construction Techniques

    Crafting elaborate trees involves careful planning and precise block placement. Consider using different types of blocks to create tiered structures, mimicking natural tree shapes or incorporating architectural elements. This meticulous approach transforms a simple structure into a captivating centerpiece. Utilizing stairs, slabs, and fences can introduce interesting geometric patterns and textures.

    Advanced Decorating Methods

    Beyond basic ornaments, elaborate decoration adds a personal touch and visual appeal. Using items like coloured wool, banners, or even custom-made signs to add layers of color and patterns is crucial. For instance, crafting intricate patterns with coloured wool around the base of the tree creates a stunning focal point. Adding lights, if you are able to make them, along the branches will dramatically enhance the tree’s glow.

    Unique Base Designs

    The base of the tree is often overlooked, yet it significantly impacts the overall aesthetic. A unique base design can be a crucial element in the design of an advanced Christmas tree. Instead of a plain flat base, consider constructing a platform using various blocks. A stone or brick platform creates a sturdy and visually appealing base.

    Using stairs, slabs, or even a curved design adds an extra layer of complexity. Consider incorporating a small, decorative fireplace or a miniature village scene at the base to enhance the visual impact.

    Comparing Tree Types

    Tree Type Description Materials
    Spruce A classic evergreen with conical shape, often found in forested areas. Spruce logs, spruce leaves, and optionally, spruce planks for decorations.
    Birch A slender tree with a smooth white bark, found in various biomes. Birch logs, birch leaves, and birch planks for decorations.
    Jungle A large tree with broad leaves and unique features, found in jungle biomes. Jungle logs, jungle leaves, and jungle planks for decorations.
    Dark Oak A large tree with dark bark and dark leaves. Dark oak logs, dark oak leaves, and dark oak planks for decorations.

    This table provides a quick comparison of common tree types, highlighting their distinct appearances and the materials required to construct them. This allows players to choose a tree type that best suits their overall Christmas tree design. Different biomes in Minecraft offer diverse types of trees, each with its own unique aesthetic, and the appropriate materials for each tree type are readily available within the Minecraft world.

    Decorating a Minecraft Christmas Tree

    Transforming your Minecraft Christmas tree from a simple structure into a festive masterpiece is all about the decorations. This step adds personality and visual appeal, making your holiday display truly unique. Careful selection and placement of ornaments are key to achieving the desired aesthetic.Effective decoration enhances the overall experience, turning a basic tree into a focal point of the holiday celebration.

    From classic red and green to more adventurous themes, the possibilities are endless.

    Available Decoration Items

    Decorating a Minecraft Christmas tree involves a variety of items, each offering a distinct visual effect. The game’s diverse inventory provides ample options to customize your tree’s appearance.

    Ever wanted to craft a festive Christmas tree in Minecraft? It’s surprisingly satisfying! While you’re decking the digital halls, it got me thinking about the Marvel Cinematic Universe and Elizabeth Olsen’s recent comments on elizabeth olsen reckons scarlet witch is more powerful than vision. Makes you wonder if the enchantment of a virtual tree can compare to the power of a supervillain, right?

    Back to the pixelated pines, though. Let’s get those trees decorated!

    • Wool: Available in a wide spectrum of colors, wool is a versatile choice for ornaments. Different colors create a vibrant and cheerful display, perfectly complementing a Christmas theme.
    • Items with Christmas Theme: Minecraft’s holiday content offers themed items. These include items like carved pumpkins, lanterns, and other special Christmas-themed items. Their presence adds an authentic festive touch, creating a more cohesive display.
    • Stained Glass Panes: Stained glass panes, especially in festive colors like red and green, add a touch of elegance. Their transparency allows light to filter through, creating a mesmerizing effect, particularly when placed strategically in the tree.
    • Redstone Lamps: Redstone lamps provide a striking, warm glow. Their unique design and color contrast can be used creatively to highlight specific areas or create an eye-catching focal point.
    • Other Items: Consider items like bells, leaves, and snowballs to complement the Christmas theme. These add depth and visual interest, particularly when used in combination with other ornaments.

    Hanging Ornaments Effectively

    Strategically placing ornaments enhances the visual appeal of your Christmas tree. A well-placed ornament draws the eye and contributes to the overall aesthetic.

    • Even Distribution: Distribute ornaments evenly across the tree to avoid creating empty or overloaded areas. This creates a balanced and harmonious visual effect.
    • Varying Sizes and Shapes: Use a mix of sizes and shapes to add visual interest. Large, bold ornaments paired with smaller, delicate ones create a dynamic display.
    • Placement by Level: Hang ornaments at varying levels to add depth and dimension to the tree. This makes the tree appear more full and prevents a flat or uniform appearance.
    • Consider the Tree’s Shape: The placement should take into account the tree’s branches, ensuring ornaments don’t obstruct each other’s visibility.

    Decorating the Base and Surroundings

    Enhancing the base and surroundings of your Christmas tree complements the overall holiday atmosphere. This step creates a more immersive and visually appealing display.

    • Base Decoration: A red carpet or a layer of snow at the base of the tree enhances the overall presentation. These additions create a sense of festive ambiance and set the tone for the entire display.
    • Surrounding Area: Consider the surroundings and add decorations such as small snow-covered shrubs or lanterns to create a more comprehensive and immersive scene. These additions complement the Christmas tree and complete the festive atmosphere.

    Decoration Ideas and Visual Impact

    The following table showcases different decoration ideas and their potential visual impact on your Minecraft Christmas tree.

    Decoration Description Visual Effect
    Red Carpet A red carpet placed at the base of the tree. Creates a warm and inviting atmosphere, adding a touch of classic holiday elegance.
    Snow A layer of snow covering the base and surrounding area. Creates a winter wonderland effect, enhancing the festive mood and adding a touch of realism.

    Creating a Festive Atmosphere

    Transforming your Minecraft Christmas tree from a simple structure into a captivating centerpiece requires more than just crafting and decorating. Creating a festive atmosphere involves strategically employing lighting and adding complementary elements that evoke the spirit of the season. This section delves into techniques to enhance your tree’s visual appeal and create a truly immersive holiday experience.Adding ambiance and visual interest is crucial for a truly captivating Christmas scene.

    Employing a variety of lighting options, combined with strategically placed holiday elements, elevates the overall aesthetic. This allows players to fully appreciate the spirit of the holidays within their Minecraft world.

    Lighting Options, Make a Christmas Tree on Minecraft

    Creating a warm and inviting atmosphere relies heavily on lighting. Minecraft’s lighting system allows for dynamic and creative expression, moving beyond simply illuminating the tree. Experimenting with different light sources and intensities will significantly alter the overall effect.

    • Candles: Torch-like candles, whether placed directly on or near the tree, offer a soft, warm glow. Placing them in groups or patterns creates a cozy and intimate feel, ideal for smaller or less elaborate trees. Using different colored lanterns can provide a touch of visual interest.
    • Lanterns: Lanterns offer a more substantial light source than candles. They can be placed on branches, around the base of the tree, or even suspended from higher areas to cast an ambient glow. Different designs and materials of lanterns offer variations in lighting effects.
    • Glowstone: Glowstone blocks provide a bright, almost ethereal light. Strategically placed glowstone, or even glowstone dust, around the tree and in the surrounding area can dramatically illuminate the scene. Consider placing glowstone in areas where it casts light on the tree and surrounding landscape.
    • Glow Berries: These berries emit a softer, gentler light compared to glowstone, ideal for creating a subtle glow. They are less intense, offering a more delicate and less harsh illumination, especially when placed in clusters.

    Additional Holiday Elements

    Enhancing the festive atmosphere goes beyond just lighting. Adding supplementary elements brings the scene to life.

    • Snow: Snowfall can dramatically enhance the festive feel, particularly when combined with other elements. Generate a realistic snowfall effect or a gentle snowfall to highlight the festive atmosphere. This enhances the scene’s depth and immersive quality.
    • Holiday Decorations: Consider using items like carved pumpkins, reindeer antlers, or various holiday-themed decorations. These decorations, scattered around the tree and the surrounding area, add a sense of festivity and warmth. Consider crafting or finding unique decorations that suit the overall theme.
    • Snowflakes: Falling snowflakes add a sense of magic and wonder. Using a combination of light and snowy particles can create a captivating and dynamic visual effect. This can be accomplished using command blocks or other creative methods.
    • Reindeer: Adding carved reindeer, or models, near the tree can add a sense of whimsy and holiday spirit. These elements add character and depth to the scene.

    Types of Lighting

    Different lighting types offer various visual effects. Choosing the right type of light is crucial for creating the desired ambiance.

    Building a festive Christmas tree in Minecraft is always a blast. It’s a great way to unwind after a long day, especially if you’re inspired by the recent Kanye West appearance on the Drink Champs podcast – you can check out the livestream kanye west returns to drink champs podcast watch the livestream for yourself. Plus, crafting that perfect tree adds a satisfying level of detail to your virtual holiday décor.

    So, grab your Minecraft tools and get decorating!

    • Warm Light: Warm lighting, like candles or lanterns, creates a cozy and inviting atmosphere, ideal for a family-friendly gathering. This warm glow promotes a feeling of comfort and festivity.
    • Cool Light: Cool lighting, like glowstone, can create a more dramatic and exciting effect, perfect for a party or gathering with friends. This creates a sense of celebration and excitement.
    • Ambient Light: Ambient lighting, achieved with various combinations of the other options, provides a soft, overall glow that enhances the overall mood of the scene. This soft light is ideal for highlighting the tree and its decorations.

    “A cozy and warm atmosphere, created by the soft glow of candles and lanterns, is perfect for a relaxed holiday celebration.”

    Community Creations and Inspiration
    Make a Christmas Tree on Minecraft

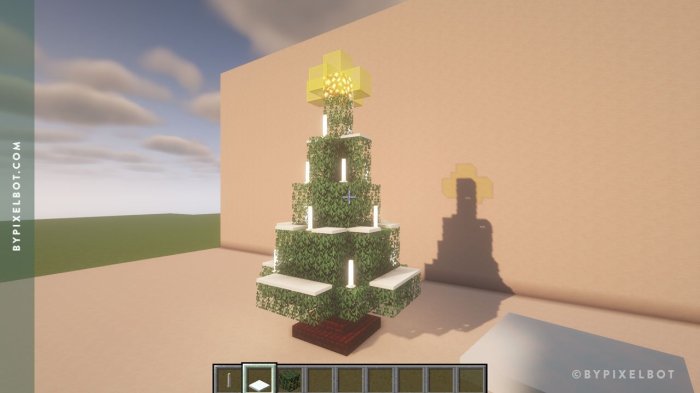
    The Minecraft community is renowned for its creativity, and Christmas is no exception. Players consistently astound with their elaborate and imaginative Christmas tree designs, pushing the boundaries of what’s possible in the game. These creations often incorporate unique elements and styles, transforming standard trees into festive masterpieces.The sheer variety of Christmas tree designs in Minecraft is inspiring. Players take inspiration from real-world traditions and blend them with the unique possibilities offered by the game’s building tools.

    This creative spirit fosters a vibrant and engaging online community where players share their creations, inspiring others and leading to a constant evolution of the holiday aesthetic within the game.

    Examples of Creative Christmas Tree Designs

    A rich tapestry of styles and variations emerges from the community’s creativity. From simple, classic designs to intricate, elaborate structures, the possibilities are endless. Players showcase their artistry by incorporating various elements, such as unique materials, custom lighting, and themed decorations. This exploration of different aesthetics creates a truly festive atmosphere.

    Popular Styles and Variations

    • Modern: Modern Minecraft Christmas trees often feature sleek, minimalist designs. They typically use a single, consistent material for the tree’s structure, like polished obsidian or smooth stone. Modern trees frequently incorporate minimal decorations, relying on the unique textures of the materials themselves to create a visually appealing effect. For example, a modern tree might be a tall, perfectly symmetrical spruce tree with strategically placed lanterns, crafted from carved pumpkins or intricately designed stone carvings.

    • Traditional: Traditional Minecraft Christmas trees often evoke a cozy, classic feel. These trees frequently utilize a variety of materials, such as wood, snow, and stone, to create a rustic and homely ambiance. They might incorporate traditional ornaments, such as carved wooden balls or miniature snowmen, or use the game’s built-in holiday decorations, like snowballs, to accent the design. Think of a towering fir tree crafted from dark oak logs, decorated with glowing redstone lamps and snow-covered branches.

    • Festive: This style is characterized by its exuberance and use of bright colors. These trees are frequently constructed from colorful blocks, like stained glass, colored wool, or even dyed terracotta, which give a very celebratory feel. They usually incorporate numerous ornaments, like hanging lanterns or glowing fungi, for a truly dazzling effect. An example might be a Christmas tree made of stained glass blocks, each colored in a festive hue, with numerous hanging lanterns and decorated with glowing fungi to create a festive and colorful spectacle.

    Incorporating Unique Elements

    Players frequently go beyond standard designs, incorporating unique elements into their creations. These elements can range from unusual building techniques to custom-made decorations. This demonstrates the creative spirit and willingness of players to personalize their Minecraft Christmas trees.

    Table of Community Christmas Tree Styles

    Style Description Visual Example
    Modern Sleek, minimalist designs using a single consistent material, like polished obsidian or smooth stone, with minimal decorations. A tall, perfectly symmetrical spruce tree with strategically placed lanterns, crafted from carved pumpkins or intricately designed stone carvings.
    Traditional Evoking a cozy, classic feel using a variety of materials (wood, snow, stone) and traditional ornaments (carved wooden balls, miniature snowmen) or the game’s built-in holiday decorations. A towering fir tree crafted from dark oak logs, decorated with glowing redstone lamps and snow-covered branches.
    Festive Exuberant and vibrant designs using bright colors (stained glass, colored wool, dyed terracotta) and numerous ornaments (hanging lanterns, glowing fungi) for a dazzling effect. A Christmas tree made of stained glass blocks, each colored in a festive hue, with numerous hanging lanterns and decorated with glowing fungi.

    Challenges and Troubleshooting

    Building a magnificent Minecraft Christmas tree can sometimes encounter unexpected hurdles. From structural weaknesses to decorating dilemmas, understanding potential problems and their solutions is key to crafting a truly festive display. This section dives into common issues and provides practical fixes, ensuring your Christmas tree stands tall and proud throughout the holiday season.Troubleshooting Minecraft Christmas trees involves anticipating and addressing various potential problems.

    Careful planning and execution are vital for a successful build, and understanding potential pitfalls is essential for a smooth and enjoyable experience.

    Identifying Common Issues

    Minecraft Christmas trees, like their real-world counterparts, can face challenges during construction and decoration. Understanding these issues empowers you to anticipate problems and implement effective solutions. Common problems include the tree’s structural integrity, the stability of ornaments, and preventing the entire structure from collapsing.

    Solutions for Structural Issues

    A fundamental concern is the tree’s stability. A poorly constructed base can lead to the entire structure collapsing under its own weight or external forces. The most common structural issues stem from the type of blocks used and the overall shape of the tree. Using a sturdy foundation is crucial.

    • Employing strong materials: Blocks like oak logs, spruce logs, or even stone bricks form a more robust base. Using a single block foundation for a tall tree can be problematic; use multiple blocks to distribute weight effectively. Avoid using lightweight blocks like leaves or sand for the base.
    • Strategically placing support beams: Adding support beams within the tree’s structure, especially near the base and the middle section, is often a good practice. This can involve adding additional blocks of the same type as the tree itself or using other solid materials. Use a pattern of support beams to ensure stability.
    • Creating a broad base: A wider base provides more surface area to distribute the weight of the tree and its decorations, reducing the likelihood of tipping. A wider base, while visually appealing, is a fundamental requirement for a stable tree. A wide base also allows for more space for additional decorations.

    Addressing Ornament Issues

    Ornament stability is another key concern. Heavy ornaments placed too high on the tree can create an imbalance, increasing the risk of them falling.

    • Using appropriate ornaments: Light, small ornaments are less likely to cause problems compared to heavier, larger ones. Selecting lighter, more aerodynamic ornaments will reduce the chances of them falling off. Using a variety of ornament sizes and weights is crucial for achieving stability.
    • Strategic placement: Positioning ornaments closer to the base and avoiding overly concentrated areas can mitigate the risk of ornaments falling. Cluster ornaments near the bottom and spread out ornaments as you go up.
    • Securing ornaments: Using a small amount of sticky-type or similar material to temporarily hold ornaments in place, particularly those that are fragile, is often beneficial. Using a lightweight adhesive can help ensure the ornaments remain affixed.

    Preventing Tree Collapse

    Preventing the tree from falling down is a crucial aspect of a successful build. Improper construction can lead to a sudden collapse, potentially damaging the surrounding area. This can be prevented by careful planning and execution.

    • Employing a sturdy base: Ensure the tree’s foundation is strong enough to support its weight. Reinforcing the base is a necessary step to prevent collapse.
    • Adding internal support: Including internal support structures, such as additional blocks or scaffolding, is often recommended. Adding internal supports helps reinforce the structure and improves its overall stability.
    • Careful decoration: Avoid overloading the tree with heavy decorations. Distribute the weight of the ornaments evenly to minimize the stress on any one part of the tree.

    Troubleshooting Table

    Issue Description Fix
    Tree Falling The entire tree structure collapses. Strengthen the base, add internal support beams, and distribute the weight of ornaments evenly.
    Ornament Falling Decorations fall off the tree. Use lighter ornaments, strategically place them closer to the base, and secure them with a light adhesive if necessary.

    Concluding Remarks

    In conclusion, crafting a Christmas tree in Minecraft is a rewarding experience, blending creativity, resourcefulness, and festive cheer. We’ve explored various approaches, from simple spruce trees to intricate, community-inspired designs. Remember, the key is to have fun and personalize your creation! Whether you opt for a traditional approach or a modern twist, your Minecraft Christmas tree will be a unique masterpiece.

    May your holiday season in Minecraft be filled with joy and creativity!
  • Find Your Coordinates in Minecraft A Guide

    Find Your Coordinates in Minecraft A Guide

    Find Your Coordinates in Minecraft sets the stage for a deep dive into the essential navigational tools within the game. Understanding Minecraft coordinates is crucial for everything from simple navigation to complex construction and resource gathering. This guide will equip you with the knowledge to master these coordinates, unlocking a whole new level of Minecraft gameplay.

    We’ll explore various methods for locating coordinates, from in-game tools to third-party resources. The different coordinate systems used in Minecraft will be explained, allowing you to interpret coordinate values effectively. We’ll also delve into the practical applications of coordinates, including navigation, building, and resource discovery. Finally, we’ll cover advanced techniques and visual representations to optimize your Minecraft experience.

    Introduction to Finding Coordinates in Minecraft

    Find Your Coordinates in Minecraft

    Minecraft, a game of boundless exploration, relies heavily on coordinates to navigate its vast and intricate world. Understanding these coordinates is crucial for efficiently completing tasks, building elaborate structures, and engaging in various in-game activities. Knowing how to find and use coordinates unlocks a new level of control and efficiency in this pixelated universe.Coordinates in Minecraft are essentially a set of three numbers (x, y, z) that pinpoint a specific location within the game world.

    These numbers represent the position of a block in relation to a central origin point. They are fundamental to the game’s functionality, enabling players to precisely locate resources, travel between distant points, and establish accurate building plans.

    Understanding Minecraft Coordinates

    Minecraft coordinates are a three-dimensional system that precisely locate blocks in the game. The x and z coordinates determine the horizontal position, while the y coordinate specifies the vertical position. The origin (0, 0, 0) is typically the starting point for a new world, but this can vary based on the world generation. Positive values in x and z indicate movement east and north, respectively, while negative values represent west and south.

    Positive y values indicate upward movement, and negative values indicate downward movement. The system allows for precise placement of blocks, allowing for elaborate designs and efficient travel.

    Methods for Obtaining Coordinates

    Several methods exist for determining coordinates in Minecraft. The most straightforward approach is using the in-game compass. The compass displays the coordinates of the player’s current position. Alternatively, a variety of in-game tools and utilities can be used. For instance, many mods and third-party applications provide advanced coordinate displays and other features.

    Some tools also allow for exporting or sharing coordinates, enabling collaboration among players.

    Uses of Coordinates in Minecraft

    Coordinates play a vital role in numerous aspects of the Minecraft experience. They are indispensable for navigating vast distances, locating specific resources, and precisely positioning structures.

    Finding your coordinates in Minecraft is crucial for navigating vast landscapes. It’s all about those numbers, right? Speaking of navigating, did you hear Amy Schumer’s take on the Star Barbie movie? amy schumer talks star barbie movie She seems to think it’s pretty awesome, which, in my opinion, just makes finding those coordinates in the game that much more important! Seriously, knowing your coordinates is key to finding that perfect diamond mine.

    • Efficient Exploration: Coordinates aid in precise navigation, allowing players to easily return to previously visited locations. For example, finding the coordinates of a valuable resource allows players to return to that location without getting lost.
    • Accurate Building: Precise placement of structures, from simple houses to elaborate castles, relies on understanding and utilizing coordinates. The ability to reproduce structures in exact locations, based on coordinates, is a significant advantage for players.
    • Resource Management: Discovering the coordinates of valuable resources like diamonds, ores, or rare items allows for efficient resource collection and management. The accurate location of resources allows players to return to the spot repeatedly and gather more materials.
    • Multiplayer Collaboration: Coordinates facilitate communication and collaboration among players in multiplayer environments. Sharing coordinates enables players to meet at specific locations, build together, or coordinate complex tasks.

    Examples of Coordinate Usage

    The significance of coordinates is evident in various Minecraft activities. For instance, locating a specific dungeon or treasure chest using coordinates saves valuable time and effort. Planning a large-scale project, such as a complex building or a network of tunnels, becomes significantly more manageable with the aid of precise coordinates.

    Activity Coordinate Application
    Finding a rare resource Using coordinates to precisely locate the resource’s position and quickly return to it.
    Building a large structure Precisely placing blocks based on coordinates to ensure the structure is aligned and matches the intended design.
    Traveling to a distant location Using coordinates to quickly navigate to the destination without getting lost, especially when the location is unfamiliar or in a vast world.

    Methods for Locating Coordinates

    Finding your precise location within the vast world of Minecraft is crucial for various tasks, from building intricate structures to navigating complex dungeons. Understanding different coordinate systems and utilizing in-game tools are essential skills for any Minecraft adventurer. This section details the methods available for locating your coordinates.

    In-Game Compass

    The in-game compass is a fundamental tool for orienting yourself within the Minecraft world. While it doesn’t directly display coordinates, it provides crucial directional information. By noting the compass’s orientation relative to cardinal directions (north, south, east, west), you can estimate your position in relation to known landmarks. This method is helpful for quickly determining your general location. For instance, if you know a specific landmark is due east, the compass can aid in confirming that direction and help to understand your relative position.

    Using the /locate Command

    The `/locate` command is a powerful tool for finding the coordinates of specific structures. It requires knowing the name of the structure you want to find. For example, `/locate stronghold` will reveal the coordinates of the nearest stronghold. This method is highly efficient for locating specific points of interest, like villages, strongholds, or ancient ruins. You can then use these coordinates to travel directly to the desired location.

    Utilizing Maps

    Minecraft maps can be used to determine coordinates. Minecraft maps, whether generated in-game or from third-party tools, often display a grid system. By observing the grid lines and their corresponding coordinates, you can ascertain your location. Maps are especially helpful for large-scale exploration and planning, providing a visual representation of your surroundings and allowing you to pinpoint locations accurately.

    Third-Party Tools, Find Your Coordinates in Minecraft

    Several third-party tools provide a comprehensive view of your Minecraft coordinates, including location overlays and visual representations. These tools often integrate with the game client to display coordinates directly on the screen. These tools are especially beneficial for those seeking an alternative way to access and manage coordinates.

    Comparative Analysis of Methods

    Method Advantages Disadvantages
    In-Game Compass Simple, readily available, good for general direction. Only provides relative direction, not precise coordinates.
    `/locate` Command Efficient for locating specific structures, direct travel. Requires knowing the structure’s name, can be slow for very large worlds.
    Maps Visual representation, useful for planning, good for large-scale exploration. Accuracy depends on map quality, can be cumbersome to use for real-time navigation.
    Third-Party Tools Often provide precise coordinates, overlay on game view, convenient. Requires installing and using external software, potential compatibility issues.

    Understanding Coordinate Systems

    Find Your Coordinates in Minecraft

    Minecraft’s world is a vast 3D space, and understanding its coordinate system is crucial for navigating and interacting with it effectively. Knowing how coordinates work allows you to precisely pinpoint locations, teleport to specific points, and even design complex structures. This section delves into the intricacies of the Minecraft coordinate system, explaining the X, Y, and Z axes and their roles in defining positions within the game.The Minecraft coordinate system is a fundamental aspect of the game’s functionality.

    It provides a structured way to represent locations within the game world, allowing for precise positioning and interaction. It’s essential for tasks like building, exploring, and using commands.

    The Minecraft Coordinate System

    The Minecraft coordinate system is a 3-dimensional system, using three axes: X, Y, and Z. Each axis represents a direction of movement within the game world. These axes are crucial for accurately locating any point within the game.

    X, Y, and Z Axes

    The X-axis in Minecraft runs horizontally from west to east. Positive X values move you further east, while negative X values move you further west. The Y-axis runs vertically, from the bottom of the world to the top. Positive Y values move you upwards, and negative Y values move you downwards. The Z-axis also runs horizontally, from south to north.

    Positive Z values move you further north, and negative Z values move you further south. These axes, when combined, define any location in the Minecraft world.

    Coordinates and Locations

    Coordinates in Minecraft directly correspond to specific locations in the game world. A set of coordinates (X, Y, Z) uniquely identifies a point in space. For example, the coordinates (10, 64, 20) represent a location 10 units east, 64 units above the ground level, and 20 units north of a chosen origin point.

    Figuring out your coordinates in Minecraft can be tricky, but knowing them is essential for navigating the vast world. It’s like having a map, and it’s super useful! Speaking of maps, did you hear about the reunited replacements lineup confirmed? reunited replacements lineup confirmed That’s awesome news for fans, and it makes me think about the various dimensions you can explore in the game – knowing your coordinates in Minecraft really does open up the possibilities.

    Hopefully, you’ll be able to find your way around those newly discovered regions with your coordinates.

    Interpreting Coordinate Values

    Interpreting coordinate values is straightforward. Positive X values are east, negative X values are west; positive Y values are up, negative Y values are down; positive Z values are north, negative Z values are south. The Y-value usually represents the height above ground level.

    Examples of Coordinate Sets

    Here are some examples illustrating different coordinate sets and their corresponding locations:

    • (0, 64, 0): This coordinate represents the ground level at the origin point. It’s the starting position for many players.
    • (10, 70, 20): This coordinate is 10 blocks east, 70 blocks above ground level, and 20 blocks north of the origin.
    • (-5, 32, -15): This coordinate is 5 blocks west, 32 blocks above ground level, and 15 blocks south of the origin.

    Coordinate Systems Across Minecraft Versions

    The core coordinate system has remained consistent across various Minecraft versions. However, some minor changes might exist in the way the game handles the world’s dimensions or specific features.

    Minecraft Version Coordinate System Key Differences
    Early Versions Standard 3D coordinate system Potentially different rendering or chunk loading techniques, but the fundamental principle of the coordinate system remained the same.
    Current Versions Standard 3D coordinate system Continued consistent use of the coordinate system, with enhancements in game mechanics and features that don’t affect the underlying coordinate structure.

    Practical Applications of Coordinates

    Understanding Minecraft coordinates empowers players to navigate the game world with precision and efficiency. Beyond simply knowing where you are, coordinates unlock a vast array of capabilities, from simple navigation to complex construction and resource gathering. This section dives deep into the practical applications of coordinates in Minecraft.

    Navigation in Minecraft

    Coordinates are fundamental for precise navigation. Instead of wandering aimlessly, players can use coordinates to teleport to specific locations, saving significant time and effort. Knowing the coordinates of a desired location allows for instant travel, whether it’s to a friend’s base, a prominent landmark, or a vital resource point. For instance, a player can note the coordinates of a stronghold and return quickly, avoiding the risk of getting lost.

    Building and Construction in Minecraft

    Coordinates facilitate precise building and construction. When constructing elaborate structures, knowing the precise coordinates of each block is essential for aligning elements and maintaining symmetry. Players can precisely place blocks, create complex designs, and arrange items according to a blueprint, relying on coordinates as a reference system. This is particularly helpful for intricate structures like castles or elaborate redstone contraptions.

    Finding Resources in Minecraft

    Coordinates are invaluable for locating and collecting resources. Knowing the coordinates of a specific resource location, such as a vein of diamonds or a rare ore, allows for rapid retrieval. Players can mark the coordinates of resource-rich areas for future reference, ensuring they can return to those locations swiftly and efficiently. This is particularly useful for repetitive resource gathering tasks.

    Complex Tasks Requiring Coordinate Knowledge

    Many complex tasks in Minecraft rely heavily on coordinates. These tasks can range from meticulously designing and building intricate redstone contraptions, requiring precise block placement and circuit activation based on coordinate-based timing, to creating complex automated systems for farming or crafting. For example, designing a precise system for automated ore processing in a large-scale mining operation requires accurate coordinates for each component.

    Strategies for Efficient Use of Coordinates

    Several strategies can enhance the efficient use of coordinates. One key strategy involves meticulously documenting the coordinates of significant locations and resources in a notebook or digital document. Using a dedicated coordinate system, for example, a grid system for the entire map, can facilitate more complex designs and layouts. Another strategy is utilizing in-game tools like the command block, allowing for automated coordinate retrieval and placement.

    Using a coordinate system for inventory management, marking coordinates for specific crafting recipes, can also improve efficiency.

    Frequently Asked Questions About Using Coordinates

    • What is the format of coordinates in Minecraft? Minecraft coordinates are represented as X, Y, Z values, specifying the position of a block in the 3D world. X represents the horizontal position, Y the vertical position, and Z the other horizontal position.
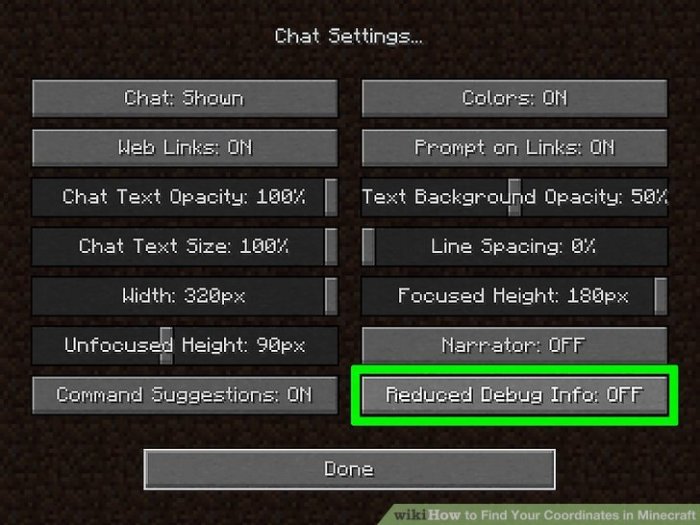
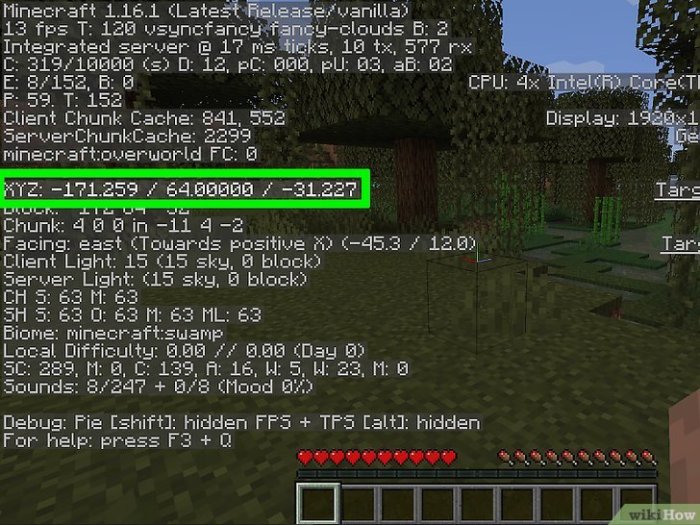
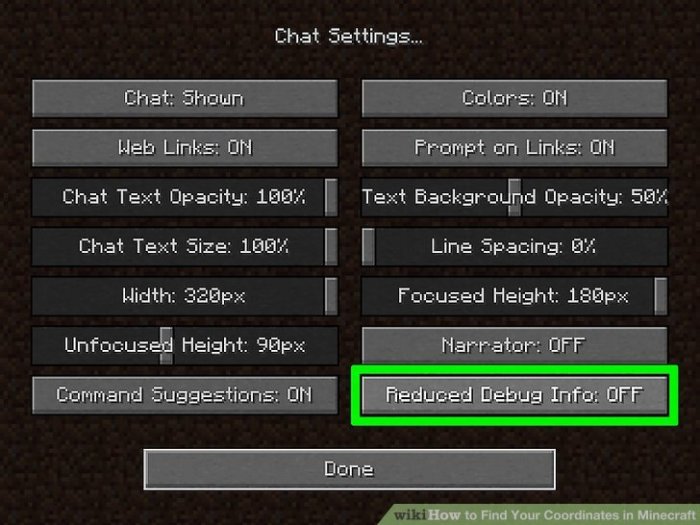
    • How do I find my current coordinates in Minecraft? The in-game user interface typically displays the current coordinates, usually accessible through the chat or a designated menu.
    • Can I share coordinates with other players? Yes, players can share coordinates with each other through chat or other communication methods.
    • How do I use coordinates in redstone circuits? Coordinates are used in redstone circuits to control the activation and deactivation of various components based on time or specific trigger locations.

    Advanced Techniques

    Mastering coordinates in Minecraft unlocks a world of possibilities beyond simple exploration. Advanced techniques leverage coordinates for intricate redstone contraptions, automated tasks, and large-scale project management. This section dives into these applications, showcasing how coordinates empower players to create truly sophisticated and dynamic structures.Understanding precise coordinate locations becomes crucial when designing complex mechanisms and structures. Precise measurements allow for accurate placement of blocks and circuits, ensuring smooth operation of intricate redstone contraptions and automated tasks.

    Advanced Crafting and Redstone Engineering

    Precise coordinate placement is paramount for intricate redstone mechanisms. Knowing the coordinates of components allows for precise routing of signals, ensuring that complex contraptions function as intended. For instance, a complex redstone clock requires careful placement of repeaters, comparators, and other components, all facilitated by knowing their precise coordinates. This precision translates to more complex and sophisticated redstone designs, allowing for automated tasks and intricate systems.

    Large-Scale Projects

    Managing large-scale projects in Minecraft requires a sophisticated understanding of coordinates. Dividing a project into sections with defined coordinate boundaries enables teams to work collaboratively, ensuring seamless integration of different parts. This approach is essential for mega-structures, intricate redstone networks, or elaborate farms. For example, a sprawling farm can be sectioned off using coordinates to automate harvesting and resource management across different areas.

    Automated Tasks

    Coordinates are the backbone of automated tasks in Minecraft. Precisely defined coordinates allow for automated delivery of resources, farming, or even intricate combat scenarios. Using command blocks and scripting, players can leverage coordinates to control the actions of various entities and objects. For example, a farm can be automated to automatically harvest crops and deliver them to a designated storage location.

    Figuring out your coordinates in Minecraft can be tricky, but it’s essential for navigating vast landscapes. Speaking of navigating, I just had to check out this amazing performance by Donald Glover (Childish Gambino) with Reggie Watts and James Corden on the Late Late Show. This show was hilarious and totally blew me away. Getting those coordinates in Minecraft is just as crucial as knowing your latitude and longitude when exploring the digital world, right?

    Examples of Automated Tasks

    • Automated Farming: Define a specific area for crops using coordinates. Command blocks trigger harvesting and transport to storage locations based on these coordinates. This automated system can significantly reduce the time spent on manual farming.
    • Automated Resource Gathering: Designate specific areas for mining using coordinates. Command blocks can automatically gather resources from these areas and transport them to designated locations. This is ideal for large-scale resource gathering.
    • Automated Entity Movement: Using coordinates, command blocks can control the movement of entities like villagers, mobs, or even players. This allows for automated delivery of items or for controlling the behavior of mobs in a specific area.

    Advanced Minecraft Coordinate Techniques

    Technique Description Use Case
    Coordinate-based Farming Dividing a farm into sections using coordinates for efficient resource management and automation. Large-scale farms, automated harvesting and delivery.
    Precise Redstone Circuits Utilizing coordinates to accurately place redstone components, enabling intricate and complex mechanisms. Automated crafting systems, elaborate clockwork mechanisms.
    Large-Scale Structure Planning Dividing a project into manageable sections using coordinates for better collaboration and construction management. Mega-structures, intricate castles, complex networks.
    Automated Mob Management Using coordinates to control the movement and actions of mobs using command blocks. Controlling mob spawns, managing hostile mobs.

    Visual Representation of Coordinates: Find Your Coordinates In Minecraft

    Understanding coordinates in Minecraft is crucial for planning and executing complex projects. Whether it’s building intricate structures or mapping out vast territories, visualizing these numerical values in a spatial context significantly simplifies the process. This section delves into various methods for visualizing coordinates, emphasizing their practical applications and importance in complex Minecraft projects.Visualizing coordinates transforms abstract numerical data into tangible representations, facilitating a more intuitive understanding of the Minecraft world.

    This allows players to effectively plan and execute projects, whether it’s creating elaborate structures or navigating vast terrains. We’ll explore different methods for creating these visualizations, from simple maps to complex schematics.

    Examples of Maps Showing Coordinates in Minecraft

    Minecraft’s in-built compass and the minimap display the coordinates in the top-left corner. These in-game tools are rudimentary but effective for quickly determining a location. Furthermore, many third-party tools and mods provide more detailed map overlays, potentially showing coordinates for every block or significant structure.

    Creating Custom Maps with Marked Coordinates

    Creating custom maps with marked coordinates is a straightforward process. Various map-editing software and digital drawing tools can be used. Players can digitally trace their Minecraft world, labeling key structures or significant points with their corresponding coordinates. The added benefit of custom maps is the ability to annotate and record important information beyond simple location markers.

    Significance of Visualizing Coordinates for Complex Projects

    Visualizing coordinates becomes paramount when working on intricate projects. Complex structures, intricate layouts, and extensive networks necessitate a visual representation of coordinates to maintain clarity and consistency. It helps in troubleshooting issues, ensuring alignment, and facilitating collaborative efforts.

    Using a Coordinate System to Create a Schematic of a Building

    A coordinate system forms the bedrock of a schematic. To create a schematic of a building, map the X, Y, and Z coordinates of every block in the structure. These coordinates can then be used to recreate the building in another location or on a different server. This process ensures accuracy and enables the building’s reproduction in a new environment.

    Table Comparing Different Ways to Visually Represent Coordinates

    Method Description Pros Cons
    In-game minimap Built-in Minecraft tool Simple, readily available Limited detail, not customizable
    Custom Maps (digital) Using software to create a map High detail, customizable, annotations possible Requires software, time to create
    Schematic (text-based) Listing coordinates of blocks Precise, easily transferred Less intuitive than a visual representation

    Detailed Description of a Hypothetical Minecraft World Using Coordinates

    Consider a hypothetical Minecraft world, “The Crystal Caverns.” The central hub, a large obsidian fortress (X: 1000, Z: 500), is surrounded by various structures. A network of interconnected tunnels (X: 900-1100, Z: 450-550) leads to several treasure chambers. A sprawling farm (X: 1200, Z: 600) provides food for the inhabitants, with a distinct layout and easily identifiable plots.

    The visualization of these coordinates would aid in efficiently navigating and utilizing this complex world.

    Conclusive Thoughts

    Mastering coordinates in Minecraft opens up a world of possibilities. By understanding the various methods, coordinate systems, and practical applications, you can navigate the game with ease, build impressive structures, and discover resources efficiently. This guide provides a comprehensive overview, empowering you to become a more skilled and strategic Minecraft player. From simple navigation to complex automation, this guide provides the tools and techniques needed to unlock the full potential of Minecraft.

  • Make a Rainbow Sheep in Minecraft A Guide

    Make a Rainbow Sheep in Minecraft A Guide

    Make a Rainbow Sheep in Minecraft is a fascinating project for any Minecraft enthusiast. This guide dives deep into the crafting process, exploring various dye combinations and breeding methods to achieve the vibrant, colorful sheep. We’ll cover everything from the essential crafting recipes to potential creative uses, helping you create a truly unique addition to your Minecraft world.

    This detailed guide will provide a comprehensive approach to crafting and breeding a rainbow sheep, from gathering materials to understanding the visual representation in the game. We will explore all aspects, including crafting recipes, dye combinations, and even the breeding process to achieve the desired rainbow effect. Get ready to create a truly spectacular sheep!

    Crafting Recipes

    Make a Rainbow Sheep in Minecraft

    Crafting a rainbow sheep in Minecraft is a fun and creative endeavor. It involves a series of steps, utilizing various dyes and wool to achieve the vibrant colors of a rainbow. This process allows players to personalize their Minecraft world with unique and visually appealing creatures.

    Required Materials

    To craft a rainbow sheep, you’ll need a variety of materials. These materials are crucial for the crafting process, enabling players to create a visually stunning creature. The most important materials include wool and dyes in various colors. The availability of these materials and the combination of colors determine the outcome of the crafting process.

    Crafting Recipe

    Crafting a rainbow sheep requires a meticulous approach to color selection and dye application. There isn’t a single, predefined recipe, but rather a combination of wool and different colored dyes. The process is iterative; players need to experiment with different combinations to achieve the desired rainbow effect. This iterative approach involves selecting the right colors to produce the rainbow effect.

    Dye Combinations for Rainbow Effect

    To achieve the rainbow effect, players need to strategically combine different dyes. The sequence of dye application is important. The sequence dictates the final color of the sheep, determining the overall look and feel of the crafted creature. The specific order in which the dyes are applied directly affects the final color. For instance, applying red dye followed by orange dye will result in an orange-red shade, while applying blue followed by green will produce a greenish-blue hue.

    Careful attention to dye combinations is essential for creating a true rainbow effect.

    Comparison to Other Sheep Variations

    Standard sheep in Minecraft come in a single color. Dyeing a sheep allows for a vast range of color variations, far beyond the natural colors found in the game. Crafting a rainbow sheep pushes the creative boundaries of the game, as it involves intricate color combinations to achieve a visually impressive creature. This process allows for the creation of a sheep that stands out from the standard sheep variations.

    Crafting Table

    Item Quantity Description
    Wool 1 Any color wool. The starting material for the sheep.
    Dye (Red) 1 Used to add a vibrant red hue.
    Dye (Orange) 1 Used to achieve an orange tone.
    Dye (Yellow) 1 Adds a bright yellow color.
    Dye (Green) 1 Used to add a vibrant green color.
    Dye (Blue) 1 Adds a rich blue color.
    Dye (Indigo) 1 Adds a deep indigo color.
    Dye (Violet) 1 Used to achieve a vibrant violet hue.

    Dye Combinations

    Crafting a rainbow sheep in Minecraft requires a deep understanding of dye combinations. This section delves into the various dye colors available, the specific mixes needed for a vibrant rainbow effect, and potential challenges in achieving a perfect result. Mastering these techniques will allow you to create truly unique and visually stunning sheep for your Minecraft world.

    Dye Colors and Minecraft IDs

    Minecraft offers a wide array of dye colors, each with a unique Minecraft ID. These IDs are crucial for crafting recipes and for precise identification in the game. Knowing the dye IDs enables you to quickly locate and use the correct color in your creations.

    • Black (ID 3): A deep, rich shade.
    • Red (ID 14): A vibrant, fiery color.
    • Green (ID 2): A lush, natural hue.
    • Brown (ID 1): A warm, earthy tone.
    • Blue (ID 4): A cool, calming shade.
    • Purple (ID 5): A regal, mysterious color.
    • Cyan (ID 6): A light, refreshing color.
    • Light Gray (ID 7): A neutral, subtle tone.
    • Gray (ID 8): A slightly darker, more substantial shade.
    • Pink (ID 9): A sweet, feminine color.
    • Lime (ID 10): A bright, citrus-like shade.
    • Yellow (ID 11): A sunny, cheerful color.
    • Light Red (ID 12): A slightly brighter version of red.
    • Orange (ID 13): A warm, inviting color.
    • Magenta (ID 15): A vibrant, fuchsia-like color.
    • Lime (ID 16): A similar shade to the previously listed lime.

    Rainbow Sheep Dye Combinations

    To create a rainbow sheep, you’ll need a precise combination of dyes. The following table Artikels the most effective methods, along with the resulting colors. The process involves carefully blending different dye colors to achieve the intermediate shades required for a full rainbow effect.

    Dye Combination Resulting Color Minecraft ID
    Red + Yellow Orange 13
    Red + Blue Purple 5
    Blue + Green Cyan 6
    Green + Yellow Lime 10
    Red + Green Brown 1
    Yellow + Blue Magenta 15
    Yellow + Light Gray Light Yellow Not a Standard Dye
    Blue + Light Gray Light Blue Not a Standard Dye

    Color Mixing Process

    The color mixing process involves applying different dye colors to the sheep. Start with a base color, and then apply additional dye colors to achieve the desired intermediate shades. The result will vary slightly depending on the initial color chosen. For example, mixing red and yellow will result in a specific shade of orange, and the intensity of that orange will depend on the initial amount of red and yellow used.

    Mixing different shades can lead to unique and surprising outcomes.

    Challenges in Achieving a Perfect Rainbow

    Achieving a perfect rainbow effect on a sheep can be challenging. The blending of colors might not always result in the expected shade, leading to variations in color intensity and saturation. The game’s color palette might not offer a perfect representation of every shade in the visible spectrum, resulting in minor discrepancies. Experimentation and practice are key to mastering these nuances.

    Consider using multiple dye colors to fine-tune the shades and achieve a more vibrant rainbow effect.

    Sheep Breeding

    Breeding sheep in Minecraft is a fundamental aspect of the game, allowing players to create and expand their herds. Understanding the process, particularly regarding color inheritance, is crucial for achieving specific genetic outcomes, like creating a rainbow sheep. This process, while not inherently complex, requires knowledge and strategy.The Minecraft sheep breeding mechanic is straightforward. Two sheep of the same breed can be bred if they are within a specific range of each other.

    A player can manually bring the sheep together using appropriate tools, then watch them breed. This process, when successful, yields a new sheep.

    Breeding Normal Sheep

    Sheep breeding in Minecraft follows a simple process. Two sheep must be placed within a certain distance from each other. The game’s mechanics will handle the rest. This process is crucial for expanding a herd and for obtaining sheep with desired characteristics.

    Breeding Rainbow Sheep

    Unfortunately, rainbow sheep cannot be bred directly. The game does not recognize the “rainbow” color as a distinct breed. Rainbow sheep are created by dyeing a standard sheep using various dyes to achieve a multicolored appearance. There is no direct inheritance of this specific color pattern.

    Making a rainbow sheep in Minecraft is pretty cool, right? While I’m busy crafting those vibrant woolly wonders, I just heard that Amerie is releasing her first new album in nine years! amerie announces first new album in 9 years It’s definitely a good distraction from the sheep-dyeing process. Back to the rainbow sheep, anyone know the best dye recipes?

    Color Inheritance

    The color of a resulting sheep from breeding is determined by a combination of factors. The parent sheep’s colors influence the offspring’s appearance. However, the exact combination isn’t predictable. It’s more akin to a random selection from the parents’ color palette. There isn’t a formula to predict the exact shade of the offspring.

    Crafting a rainbow sheep in Minecraft is pretty cool, right? It’s a fun little project, but sometimes I need a bigger adventure, like the one Sampa the Great is embarking on in his return journey. Check out sampa the great the return for more details. Back to the sheep, though – finding the right dyes for that vibrant hue is key to a truly spectacular rainbow sheep!

    Factors Influencing Resulting Color

    Several factors influence the final color of the resulting sheep. The primary factors are the colors of the parent sheep. The game’s algorithm blends these colors, potentially leading to various outcomes. The combination of colors can result in a wide range of appearances, from solid colors to mottled patterns.

    Increasing Likelihood of Rainbow-Colored Sheep

    Given the non-inheritable nature of the rainbow color, strategies for increasing the likelihood of obtaining a rainbow-colored sheep involve a different approach. It centers on acquiring the necessary dyes and applying them to sheep. Players should focus on gathering various dyes to use in crafting the rainbow effect. Breeding for specific colors (e.g., black, white, or red) can be done, which is helpful for achieving specific aspects of a rainbow-colored sheep.

    Repeated dyeing with various dyes will ultimately increase the chances of achieving the rainbow appearance, although there is no guarantee of success.

    Functionality and Uses: Make A Rainbow Sheep In Minecraft

    Make a Rainbow Sheep in Minecraft

    Rainbow sheep, a vibrant addition to Minecraft’s animal roster, offers unique functionalities beyond simple aesthetics. Their inherent color diversity, derived from dyed wool, provides a significant advantage in various crafting and creative endeavors. They serve as a valuable resource, enabling players to explore a wide spectrum of possibilities, from practical applications to elaborate creative projects.

    Basic Functionality

    Rainbow sheep, like regular sheep, provide wool. However, the key distinction lies in their readily available, diverse range of colors. This inherent color variety makes them a versatile resource for crafting, particularly in projects requiring multiple shades of wool. The wool from rainbow sheep can be used for crafting various items, enabling players to create a visually appealing and diverse range of items.

    Unlike other sheep types, the rainbow sheep offer a readily available source of multicolored wool without the need for individual dyeing. This efficiency contributes to their overall practicality.

    Creative Applications

    Rainbow sheep excel in creative projects due to their inherent color diversity. Their wool, readily available in a spectrum of hues, allows for the creation of intricate designs and elaborate structures. This capability surpasses the limitations of standard sheep, whose wool is confined to a single color, limiting design options.

    Creative Uses

    • Decorative Purposes: Rainbow sheep are exceptional for decorative purposes. Their colorful wool can be used to create elaborate patterns on structures, or even to design entire themed environments. Imagine a rainbow sheep farm in the middle of a lush meadow, with wool used to craft colorful carpets and cushions. The versatility of the wool allows for the creation of intricate and beautiful designs, adding a splash of vibrant color to any Minecraft landscape.

    • Crafting Materials: Rainbow sheep are an excellent source of various crafting materials. Their wool, in its diverse array of colors, allows for the creation of intricate patterns and designs in crafted items. Imagine crafting a vibrant patchwork quilt using wool from a rainbow sheep. This enables players to explore a wide range of creative possibilities in item design and aesthetics.
    • Trading Items: The diverse colors of rainbow sheep wool make them valuable trading items. Players can exchange their wool for other rare resources or crafting components. The unique aesthetic appeal of rainbow sheep wool can make them a sought-after commodity in the in-game economy. Players can leverage this uniqueness to trade and gain access to other items and resources.

      This dynamic trade system can encourage cooperation and economic activity within the Minecraft community.

    Comparison to Other Sheep

    Compared to regular sheep, rainbow sheep offer a significant advantage due to their pre-dyed wool. This eliminates the need for separate dyeing processes, streamlining crafting and reducing resource consumption. In contrast, regular sheep require dyes to produce different colors, making rainbow sheep a more efficient resource for players seeking a variety of wool colors. This efficiency and time-saving feature make them particularly useful for large-scale crafting projects.

    Crafting a rainbow sheep in Minecraft is surprisingly satisfying. It’s a great way to add a touch of whimsy to your world, but sometimes, you just need a little extra motivation, like the ones slitherher not sorry the ones slitherher not sorry. After all, a vibrant rainbow sheep is just the beginning of your Minecraft adventures.

    Now, back to the rainbow sheep-making process!

    Additional Information

    Rainbow sheep, a delightful addition to Minecraft’s vibrant animal population, offer a unique crafting opportunity. Beyond their aesthetic appeal, these special sheep have practical uses and interesting breeding behaviors. This section delves deeper into their characteristics, limitations, and overall place within the Minecraft ecosystem.

    Special Considerations and Limitations

    Crafting rainbow sheep requires a specific combination of dyes, making them not as readily available as standard sheep. This crafting method, while not overly complex, necessitates gathering and combining dyes in the right proportions. Furthermore, the dye combinations for rainbow sheep are not directly transferable to other crafting recipes. In essence, the crafting process for rainbow sheep is a dedicated one.

    Breeders should be mindful of the dye requirements, ensuring the necessary dyes are on hand before attempting to craft a rainbow sheep.

    Rainbow Sheep Breeding

    Rainbow sheep breeding, unlike normal sheep breeding, does not produce more rainbow sheep. Instead, offspring inherit the base colors of their parents, meaning that a rainbow sheep will only pass on the color of the dye used for the rainbow pattern, not the full spectrum. This characteristic distinguishes them from normal sheep, where offspring inherit colors from both parents.

    The process of breeding rainbow sheep requires careful selection of parents and awareness of the inheritance pattern to maintain the rainbow aesthetic.

    Historical Context and Lore

    While Minecraft doesn’t explicitly detail a specific lore surrounding rainbow sheep, their inclusion suggests an evolution of crafting and dye mechanics within the game. Their introduction signifies a progression in the game’s ability to create unique and visually appealing entities through crafting and breeding. This adds a layer of creative flexibility to the game’s mechanics, encouraging players to explore different possibilities.

    Methods for Obtaining Rainbow Sheep

    The primary method for obtaining rainbow sheep is through crafting. Players must gather the necessary dyes and combine them in the proper ratios. This method is the only guaranteed way to acquire rainbow sheep. Alternatively, players may discover naturally occurring rainbow sheep, though this is highly unlikely.

    Comparison Table

    Characteristic Rainbow Sheep Normal Sheep
    Color Rainbow Various solid colors (white, black, brown, etc.)
    Dye Requirements Requires specific dye combinations for crafting. No dye requirements; colors are inherent.
    Breeding Inheritance Offspring inherit base dye color from parents. Offspring inherit color from both parents.
    Obtaining Method Crafting Natural spawning and breeding.

    Visual Representation

    The visual appeal of a Minecraft creature is crucial for player engagement. A well-designed rainbow sheep would not only be visually stunning but also contribute to the game’s overall aesthetic. This section details the visual characteristics, patterns, and generation methods of the rainbow sheep.Visualizing a rainbow sheep requires a deep understanding of color theory and texture mapping. The rainbow effect needs to be seamless and aesthetically pleasing within the Minecraft world.

    We’ll explore various approaches to achieve this, including color gradients, patterns, and the integration with existing Minecraft textures.

    Rainbow Sheep Patterns

    The visual appeal of a rainbow sheep hinges on its color patterns. These patterns will need to be distinct enough to easily identify the sheep as a rainbow sheep, yet subtle enough not to detract from the core aesthetics of Minecraft. The patterns should not overwhelm the player’s experience.

    • Striped Pattern: This pattern features vertical stripes of different colors, transitioning smoothly from one shade to the next. Imagine stripes of red, orange, yellow, green, blue, indigo, and violet, seamlessly blending together to create a vibrant rainbow effect. This style could work well with a subtle texture, allowing the stripes to be the primary focus.
    • Spotted Pattern: The spotted pattern involves circular spots of varying colors, arranged in a way that evokes a rainbow effect. The spots could be concentrated in a central area or scattered across the sheep’s body. This pattern will need to balance the spots’ vibrancy with the overall Minecraft style.
    • Gradient Pattern: This pattern employs smooth color transitions, gradually shifting from one color to the next. The gradient effect can be applied to the entire sheep, creating a rainbow-colored hue. The gradient should avoid harsh transitions and instead focus on subtle color shifts, blending the rainbow colors seamlessly.

    Generating Visual Representation

    To effectively represent the rainbow sheep, a careful consideration of color gradients and textures is essential. The rainbow effect must be achievable within the limitations of Minecraft’s rendering engine.

    • Color Gradients: Implementing color gradients for the sheep’s fur will create a smoother, more natural rainbow effect. Tools like image editors can help in defining these gradients, ensuring a fluid transition between colors. The gradient should avoid abrupt shifts, preserving the smooth transition between hues, characteristic of a rainbow.
    • Texture Mapping: Minecraft’s texture mapping system will need to accommodate the new rainbow sheep. Using pre-existing Minecraft textures as a base for the new sheep will help ensure a consistent look and feel within the game’s environment. The texture must be integrated in a way that doesn’t create noticeable visual inconsistencies.

    Shades and Hues, Make a Rainbow Sheep in Minecraft

    Choosing appropriate shades and hues is critical to achieving a visually appealing rainbow effect. The shades should complement each other, creating a vibrant and balanced rainbow.

    • Primary Colors: The primary colors of the rainbow (red, yellow, and blue) should be used as a foundation for the sheep’s coloration. Using these will help maintain a familiar rainbow appearance, keeping it identifiable to players familiar with the spectrum.
    • Secondary Colors: The secondary colors (orange, green, and purple) will be crucial for the rainbow’s vibrancy. The inclusion of secondary colors is essential to create a complete and recognizable rainbow effect. They will also contribute to the sheep’s visual appeal.
    • Tertiary Colors: Tertiary colors will add complexity to the rainbow sheep’s appearance. These colors will be used to further define the various shades within the spectrum. The inclusion of tertiary colors will add depth to the visual experience.

    Visual Learner Description

    For visual learners, a step-by-step approach to visualizing the rainbow sheep is essential. Detailed descriptions, combined with visual aids, will facilitate understanding.

    • Step-by-Step Instructions: A detailed guide, accompanied by images or screenshots, will show the color transition process from one shade to another. This approach will make the concept easier to grasp. The instructions should be presented in a clear and concise manner.
    • Color Charts: Including color charts with the various shades and hues will help in visualizing the rainbow sheep’s appearance. The charts should clearly indicate the color transitions and the different types of rainbow patterns.
    • Examples: Providing multiple examples of rainbow sheep patterns (striped, spotted, gradient) will allow for a diverse understanding of the possibilities. These examples will be helpful in visualizing the potential designs for the rainbow sheep.

    Closing Summary

    In conclusion, crafting a rainbow sheep in Minecraft is a rewarding experience, blending creative crafting with the joy of breeding and visual representation. By following the comprehensive guide, you can easily bring this vibrant creature to life in your Minecraft world. The various dye combinations and breeding strategies discussed provide a satisfying challenge, and the end result will be a stunning addition to your world.

    Enjoy your rainbow sheep adventure!

  • Craft a Hopper in Minecraft A Complete Guide

    Craft a Hopper in Minecraft A Complete Guide

    Craft a Hopper in Minecraft sets the stage for an in-depth exploration of this versatile block. We’ll delve into its fundamental mechanics, crafting process, and various applications, from simple redstone circuits to complex automated systems. Prepare to unlock the true potential of hoppers in your Minecraft adventures.

    This comprehensive guide will walk you through crafting a standard hopper, understanding its functionality in transporting items, and its interactions with other blocks and redstone. We’ll cover common issues, advanced applications, and even comparisons with alternative item transport methods.

    Introduction to Minecraft Hoppers

    Minecraft hoppers are essential redstone components for managing item flow. They act as conduits, allowing items to move between containers, chests, and other hoppers. Understanding their functionality and different types is crucial for creating efficient and complex redstone circuits. Their basic mechanics involve transferring items in a specific direction, triggered by various conditions.Hoppers are fundamental to automated item collection and distribution in Minecraft.

    They can be integrated into complex systems, automating tasks such as sorting, transporting, and storing items. This opens up a wide range of creative possibilities for building sophisticated structures and gameplay experiences.

    Types of Hoppers

    Hoppers come in two primary variations: standard and powered. Standard hoppers function based on gravity and proximity to other containers. Items fall from a higher to a lower location. Powered hoppers, on the other hand, operate based on a redstone signal. This allows for precise control over item flow and can bypass the limitations of standard gravity-based movement.

    Basic Hopper Mechanics

    Hoppers transfer items in a specific direction. An item will only move from one hopper to another if the destination hopper is lower or closer to the source. If a hopper has an item and there’s an empty space in front of it, the item will be moved. This simple principle underlies many intricate redstone systems.

    Hopper Redstone Circuits

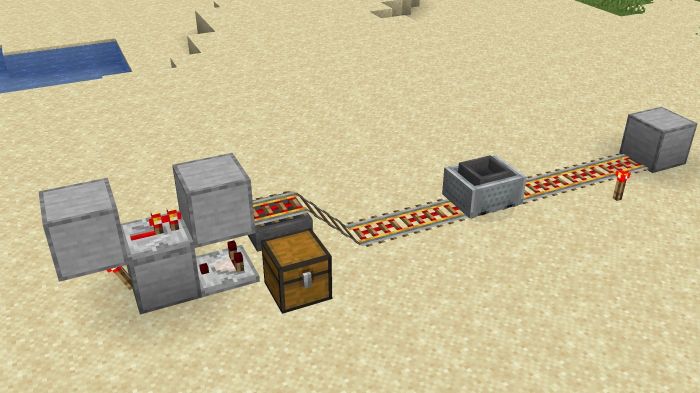
    Hoppers can be incorporated into various redstone circuits. For example, they can trigger actions based on the presence or absence of items, creating automated systems. This opens up many opportunities for designing intricate and automated tasks, such as automated farms, mining automation, or complex sorting systems.

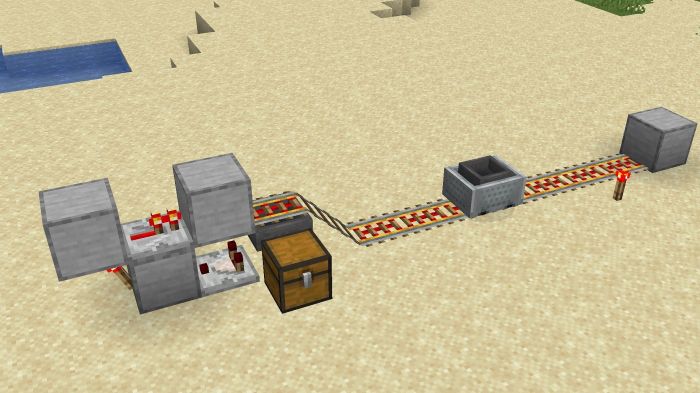
    Item Collection System

    This system demonstrates a basic method of collecting items.

    Component Description
    Hopper Collects items from a chest.
    Chest Stores the collected items.
    Powered Repeater Provides a consistent redstone signal to the hopper.

    The system works by using a powered hopper to continuously collect items from a chest. The powered repeater ensures a stable redstone signal to the hopper.

    A simple diagram illustrating this system is as follows:[Imagine a diagram with a chest positioned above a hopper. A powered repeater is connected to the hopper. The chest and hopper are connected by an arrow showing the item flow from the chest into the hopper.]The chest is positioned above the hopper to ensure items naturally fall into the hopper.

    The powered repeater maintains the redstone signal needed for the hopper to function. This simple example showcases a foundational application of hoppers.

    Crafting a Hopper

    Hoppers are essential for efficient resource management in Minecraft. They act as conduits for transferring items between containers, chests, and other hoppers. Understanding how to craft them is crucial for optimizing storage and logistics in your Minecraft world. Crafting a hopper requires specific materials and a crafting table, but the process is straightforward once you know the recipe.

    Crafting a hopper in Minecraft is surprisingly straightforward, especially once you get the hang of it. It’s a useful block for automating storage and transport, a bit like the intricate, rhythmic interplay of a band like Lambchop, whose former bassist, Marc Trovillion , recently passed. You’ll need some iron ingots and a few other components, and then you’re set to create a sophisticated storage system in your world.

    It’s a great way to organize your resources and make your Minecraft experience more efficient.

    Materials Required

    Crafting a hopper necessitates gathering the required resources. Iron ingots and iron nuggets are the primary components. Iron is obtained through smelting iron ore. A crafting table is also needed for the crafting process.

    Crafting Recipe

    The recipe for a hopper is relatively simple. The following diagram displays the precise arrangement of materials within the crafting grid:

    [ ] [Iron Ingot] [ ]
    [Iron Ingot] [ ] [Iron Ingot]
    [ ] [Iron Ingot] [ ]
    

    Three iron ingots are required, arranged in a horizontal line with one in the center row. This precise configuration is vital for the crafting process.

    Crafting Steps

    To craft a hopper, follow these steps using a crafting table:

    • Open your crafting table.
    • Place the three iron ingots in the crafting grid as shown in the recipe diagram. Ensure the arrangement aligns with the recipe specifications.
    • The crafted hopper will appear in the output slot of the crafting table.
    • Click on the hopper in the output slot to collect it.

    Efficient Material Gathering

    Gathering the required materials for crafting a hopper efficiently is key to maximizing your crafting time. Explore the following strategies:

    • Mining for Iron Ore: Iron ore is found underground. Look for caves and mineshafts. Using a pickaxe to mine the ore efficiently is crucial. For greater efficiency, consider using a mining helmet to gain better visibility in dark areas.
    • Smelting Iron Ore: Smelt the mined iron ore in a furnace to obtain iron ingots. Furnaces can be placed in a strategic location for easy access to smelted materials.
    • Automated Mining: If you have advanced structures, consider automated systems like redstone circuits or hoppers themselves to gather and transfer iron ore and smelted iron ingots.

    Hopper Functionality and Uses

    Hoppers, a fundamental building block in Minecraft, are crucial for efficient item transport. They are more than just conduits; their functionality expands to interact with various elements of the game world, including chests, other hoppers, and redstone circuits. Understanding their nuances allows for complex automation and resource management systems.

    Hoppers operate by transferring items between containers. Their efficiency and adaptability make them essential for large-scale crafting, farming, and redstone projects. This section delves into how hoppers function, highlighting their behavior with different blocks and how redstone significantly alters their performance.

    Hopper Item Transfer Mechanism

    Hoppers act as intermediaries, transferring items from one container to another. They work on a first-in, first-out (FIFO) basis. If a hopper receives an item from a source, it attempts to place it into a destination. This transfer is often instant, but delays can occur if the destination is full or unavailable. Items are transferred one at a time unless the source and destination are very close to each other, allowing for faster and more efficient transport.

    Hopper Interactions with Other Blocks

    Hoppers exhibit unique behavior when encountering various blocks. For example, when a hopper is connected to a chest, the hopper will attempt to pull items from the chest if the hopper’s inventory is empty. Conversely, if the chest is full and the hopper has space, the hopper will place items into the chest. This interaction is crucial for automating item storage and retrieval.

    Similarly, connecting a hopper to another hopper creates a chain, allowing for extended item transport networks. The process of transferring items between hoppers is generally seamless, though slight delays might occur based on the item type and inventory space available.

    Crafting a hopper in Minecraft is surprisingly satisfying, especially when you consider the intricate mechanics involved. It’s like a miniature, automated logistics system, and the way it interacts with other blocks is fascinating. This reminds me of the concept of “wire change becomes us,” wire change becomes us , where seemingly simple changes can dramatically alter the way we approach things.

    Ultimately, mastering the hopper’s use in Minecraft can be a powerful tool for efficiently managing resources in the game.

    Hopper Interactions with Redstone

    Redstone significantly alters the behavior of hoppers. A powered hopper functions as a unidirectional conduit, pushing items from a source into a destination. This unidirectional movement means that the hopper only transfers items in one direction. Unpowered hoppers, on the other hand, act as bidirectional conduits, transferring items in both directions. This ability to control the direction of item flow is essential in redstone contraptions.

    Redstone Control of Hopper Behavior

    Redstone signals directly influence a hopper’s function. A powered hopper will always attempt to transfer items to the destination. If the destination is full or inaccessible, the powered hopper will continue to try to place the item. In contrast, an unpowered hopper will only transfer items if there is both a source and a destination. This control mechanism allows for intricate automation systems, enabling players to create customized item-transport systems tailored to their needs.

    Powered vs. Unpowered Hopper Performance Comparison

    Scenario Unpowered Hopper Powered Hopper
    Item Transfer from Chest to Hopper Transfers if the hopper has space Transfers regardless of hopper inventory
    Item Transfer from Hopper to Chest Transfers if the chest has space Transfers regardless of chest inventory
    Item Transfer between two Hoppers Transfers in both directions Transfers in one direction
    Redstone Signal Presence No effect on transfer Significantly influences transfer direction
    Inventory Space Limited by inventory space Not limited by inventory space, but potentially limited by redstone circuit’s signal timing

    This table highlights the key differences in the performance of powered and unpowered hoppers across various scenarios. Powered hoppers, while not necessarily faster, offer greater control and can bypass inventory limitations in the destination. Unpowered hoppers, in contrast, offer flexibility in both directions but are subject to the limitations of inventory space.

    Advanced Hopper Applications

    Craft a Hopper in Minecraft

    Hoppers, seemingly simple containers, unlock a vast array of possibilities in Minecraft’s redstone systems. Beyond basic item transfer, they become crucial components for complex automated tasks, enabling efficient resource management and intricate logistical networks. This section dives into sophisticated applications, showcasing how hoppers can be integrated into automated farms, sorting systems, and intricate delivery networks.

    Hoppers excel at managing items beyond simple storage. Their ability to transfer items between containers, even those not directly adjacent, opens doors to intricate automated systems. The combination of hoppers with other redstone components empowers players to create self-sufficient and highly organized worlds.

    Automated Item Sorting Systems

    Automated item sorting systems leverage hoppers’ ability to discriminate based on item type and stack size. Sophisticated designs can sort items into different chests or containers based on specific criteria. This automation is vital for managing large inventories, enabling players to separate resources or crafting components with speed and accuracy. Consider a system that automatically sorts ores based on their type into different storage areas.

    Automated Item Delivery Systems

    Automated item delivery systems are a cornerstone of advanced redstone construction. These systems utilize hoppers, powered rails, and command blocks to ensure precise and efficient movement of items across vast distances. A common example is a system that automatically delivers resources to a crafting station, freeing up player time for other tasks.

    Automated Farms

    Hoppers significantly enhance the efficiency of automated farms. They can be integrated into complex systems that automate the entire process, from planting to harvesting and storing the yield. The use of hoppers in these systems eliminates the need for constant manual intervention, making farms highly self-sufficient.

    Table of Automated Farming Systems

    Farming System Components Description
    Automatic Wheat Farm Hoppers, dispensers, farmland, water source Wheat plants are automatically watered and harvested, with hoppers collecting the wheat and moving it to storage.
    Automated Potato Farm Hoppers, dispensers, farmland, water source, chests Potatoes are automatically planted, grown, and harvested, with hoppers delivering the harvested potatoes to storage.
    Automated Carrot Farm Hoppers, dispensers, farmland, water source, chests Carrots are automatically planted, grown, and harvested, with hoppers delivering the harvested carrots to storage.
    Automated Sugar Cane Farm Hoppers, dispensers, farmland, water source, chests Sugar cane is automatically harvested, with hoppers delivering the harvested sugar cane to storage.

    Troubleshooting Hopper Issues

    Craft a Hopper in Minecraft

    Hoppers, while a crucial component in Minecraft automation, can sometimes malfunction. Understanding the common problems and their solutions is essential for smoothly running automated systems. This section delves into the troubleshooting process for hopper-related issues, providing clear explanations and actionable steps to diagnose and resolve them.

    Troubleshooting hoppers effectively involves a methodical approach. It’s crucial to identify the specific problem before attempting a solution. Sometimes, the issue might be a simple oversight, while others could stem from complex interactions within the automation network. This guide aims to equip players with the knowledge to pinpoint and resolve common hopper malfunctions.

    Common Hopper Malfunction Causes

    Various factors can contribute to hoppers not functioning as expected. These include incorrect placement, insufficient space, conflicting interactions with other blocks, and issues with the automation network design.

    Incorrect Hopper Placement and Orientation

    Hoppers are directional. They only transfer items in a specific direction. If a hopper is not positioned correctly to receive or dispense items from the source or destination, it will fail to function as intended. Ensure the hopper’s output is pointed towards the intended recipient, and the input is aligned with the source of the items. Incorrect placement often leads to items being “stuck” or failing to move through the system.

    Consider the direction of item flow in your entire automation setup.

    Insufficient Space and Item Stacking Issues

    Hoppers require sufficient space to transfer items efficiently. If the hopper’s input or output area is blocked or overcrowded, items can get jammed, causing the hopper to stop working. Make sure there’s enough room for items to move freely between the source and destination. Consider the capacity of the hopper and the rate of item flow in your automated system.

    If items are being stacked in an unconventional manner, this can disrupt the smooth flow of items through the system.

    Conflicting Block Interactions

    Other blocks in your automation system can cause conflicts with hoppers. For example, chests, furnaces, and other machines can interact with hoppers in unpredictable ways, leading to unexpected behavior. Ensure that no blocks are obstructing the hopper’s input or output pathways. For example, a wall between a hopper and a chest can prevent the hopper from functioning. If hoppers are directly connected to each other, ensure there are no blocks impeding the flow of items between them.

    Automation Network Design Issues

    Complex hopper systems are prone to errors in design. Incorrect connections, loops, or conflicting signals can cause hoppers to malfunction. Review your entire automation network, checking for any logical errors in the placement or sequence of the hoppers and other components. Carefully consider the directionality of each hopper and the order in which items should flow through the system.

    For instance, a closed loop of hoppers may result in items endlessly cycling without ever reaching their intended destination.

    Troubleshooting Guide

    Problem Possible Cause Solution
    Hoppers not transferring items Incorrect placement, blocked pathways, insufficient space, conflicting block interactions, automation network issues Verify correct orientation and placement. Clear any blockages. Ensure sufficient space. Check for conflicting blocks. Review the automation network design for logical errors.
    Items getting stuck Insufficient space, conflicting block interactions, automation network issues Increase the space around the hopper. Check for obstructions. Review the automation network design.
    Items not reaching destination Incorrect placement, blocked pathways, automation network issues Verify correct orientation. Remove any blockages. Check for loops or conflicting connections.
    Items cycling endlessly Closed loop in the automation network Identify and correct the closed loop in the automation network. Break the loop to allow items to reach their destination.

    Creative Hopper Designs

    Hoppers in Minecraft, while simple in their design, unlock a wealth of possibilities for automation. Beyond basic storage and transport, they can form the backbone of complex and efficient systems. This section explores a sophisticated automated smelting system, demonstrating how creativity can transform these simple mechanisms into powerful tools for resource management.

    Crafting an automated smelting system using hoppers offers several advantages over manual smelting. It significantly increases efficiency, freeing up player time and resources for other tasks. It also allows for continuous processing of resources, reducing downtime and maximizing output. This is particularly beneficial in large-scale operations or for players who want to significantly accelerate the rate at which they collect resources.

    Automated Smelting System

    This design focuses on automating the smelting process, ensuring a constant flow of resources. The system consists of three key components: input, smelting, and output. Efficient movement of resources between these stages is crucial for maximum output.

    Input Station

    A dedicated input area collects raw materials. This area uses a combination of hoppers, chests, and a dispenser to ensure consistent input. The dispenser, triggered by a redstone signal, automatically pushes items into the hopper system. The chest serves as a buffer to prevent overloading the system and maintain a steady supply of raw materials. The hopper system connects the chest to the smelting area, ensuring materials are transferred without interruption.

    Smelting Area

    This section utilizes a furnace connected to a hopper. The hopper collects smelted items from the furnace and sends them to the output area. This setup ensures a continuous flow of processed resources.

    Output Station

    The output station employs a second hopper system to transfer processed items to a designated output chest. This area is crucial for storing the finished products. A separate chest is used for the storage of processed items, ensuring that the output area does not get overloaded. This separation maintains order and ensures uninterrupted processing.

    Redstone Circuitry

    A simple redstone circuit controls the dispenser, ensuring that items are moved to the smelting area at a regular rate. A comparator compares the items in the input chest to a predetermined threshold, and activates the dispenser only when the chest has enough items to keep the furnace busy. The signal from the comparator is sent to a redstone torch which powers the dispenser.

    This setup prevents the system from overworking the furnace, preventing block damage and maintaining stability.

    Component Description
    Input Chest Stores raw materials.
    Dispenser Automated transfer of raw materials.
    Furnace Processes raw materials into finished products.
    Output Chest Stores finished products.
    Hoppers Transfer items between components.

    Diagram

    (Imagine a diagram here. It would show the input chest, dispenser, hoppers connecting to the furnace, and the output chest. Arrows would indicate the flow of items.)

    Crafting a hopper in Minecraft is surprisingly straightforward, but mastering the intricacies of the game’s inventory system can be tricky. Just like learning to efficiently position your hands on a keyboard Position Hands on a Keyboard for typing, understanding the correct placement of items is key to crafting a functional hopper. Once you get the hang of it, crafting a hopper becomes a breeze!

    Description of the diagram: The diagram visually represents the automated smelting system. The flow begins with raw materials in the input chest. The dispenser automatically pushes the items into the system, then the hoppers carry them to the furnace. The furnace processes the items, and the hoppers carry the finished products to the output chest.

    Construction Guide

    1. Establish the Input Area: Position the input chest and place a dispenser above it. Connect the chest to a hopper, and the hopper to the dispenser. Connect a comparator to the hopper and a redstone torch to the comparator.
    2. Create the Smelting Area: Place the furnace and connect a hopper to its output. Ensure that the hopper is positioned to catch the smelted items.
    3. Construct the Output Area: Position the output chest and connect it to a hopper. The hopper should be placed to collect items from the furnace hopper.
    4. Wire the Redstone Circuitry: Connect the comparator to the redstone torch, which will power the dispenser. Adjust the comparator settings to ensure a consistent item flow to the furnace.
    5. Test and Refine: Test the system to ensure that items are being transferred smoothly between stages. Adjust the redstone circuit and placement of hoppers as needed to optimize the process.

    This detailed system provides a significant increase in efficiency and output compared to manual smelting, especially in large-scale operations.

    Comparison with Other Item Transport Mechanisms

    Hoppers, while powerful in Minecraft, aren’t the only way to move items. Understanding their strengths and weaknesses compared to other methods like chests and conveyors is crucial for efficient and strategic world building. This comparison highlights when hoppers excel and when other options are more suitable.

    Chests, conveyors, and hoppers each offer unique advantages and disadvantages for transporting items. Understanding these distinctions is vital for optimizing item flow in your Minecraft world.

    Hoppers vs. Chests

    Chests are simple storage containers. Their primary function is to hold items. Hoppers, in contrast, are designed for automated item transfer. Chests excel in straightforward storage, but their passive nature limits their efficiency for complex setups. Hoppers, on the other hand, facilitate automatic item movement, making them superior for intricate logistical systems.

    • Chests are excellent for simple, static storage. They’re ideal for areas where items are placed and retrieved manually. However, they lack the automated transfer capabilities required for larger-scale, automated systems.
    • Hoppers are far more efficient for transferring items between different containers or locations. Their automated functionality allows for sophisticated item flow setups, but they are less effective for static storage.

    Hoppers vs. Conveyors

    Conveyors are linear item transporters. They move items in a single direction along a predetermined path. Hoppers, however, can transfer items in various directions and between multiple destinations. Conveyors are excellent for straightforward linear pathways, but they lack the flexibility of hoppers for more intricate networks.

    • Conveyors are suitable for simple, linear item transport. They’re efficient for moving items along a single path but lack the versatility of hoppers for complex setups.
    • Hoppers excel in complex item distribution systems. Their ability to transfer items between multiple containers and locations makes them more versatile, allowing for more intricate logistics in your Minecraft world. They can even facilitate a circular item movement pattern.

    Comparative Analysis Table

    Transport Method Advantages Disadvantages Best Use Cases
    Chests Simple storage, easy to use Manual retrieval, no automated transfer Temporary storage, small-scale inventories
    Conveyors Linear item movement, efficient for straight paths Limited to a single direction, inflexible Moving items in a straight line, conveyor belts
    Hoppers Automated item transfer, flexible directions, multiple destinations Can be complex to set up, less efficient for simple transfers Automated item sorting, intricate logistical networks, item distribution across multiple locations

    Hopper Integration with Other Mods: Craft A Hopper In Minecraft

    Hoppers, the essential item transport conduits in Minecraft, often benefit from enhancements offered by various mods. These add-ons can drastically alter how hoppers function, improving efficiency, adding new capabilities, or even introducing unforeseen conflicts. Understanding these interactions is crucial for maximizing the potential of your hopper systems in a modded Minecraft environment.

    Popular mods frequently introduce new items, blocks, and behaviors that affect item handling. This can lead to intricate interactions with hoppers, either boosting their efficiency or creating unexpected consequences. Knowing how these interactions work can significantly improve your modded Minecraft experience, preventing frustrating bugs and unlocking powerful new strategies.

    Impact of Resourceful mods

    Resourceful mods often introduce new ore types and crafting recipes, which can significantly impact hopper functionality. For example, a mod adding a new type of enchanted iron ore might cause hoppers to prioritize those ores over standard iron, affecting the efficiency of your mining and smelting operations. These mods can also introduce new blocks with unique interaction mechanics, potentially creating unexpected pathways for items to flow through.

    Advanced Mod Interactions with Hoppers

    Many mods extend the functionality of hoppers, enabling more sophisticated item handling systems. For instance, a mod specializing in automation might provide a hopper-compatible sorting mechanism. This mechanism allows hoppers to categorize items based on properties like damage value or custom tags, enabling the creation of highly complex and specialized automated factories. These integrations can improve efficiency, enabling specialized production chains and intricate inventory management.

    Example: The “Automated Assembly” Mod, Craft a Hopper in Minecraft

    Consider the “Automated Assembly” mod, which introduces specialized assembly blocks. This mod allows items to be processed and combined in a structured manner. The hoppers in this mod integrate with the assembly blocks, allowing them to receive raw materials, collect intermediate products, and output finished goods. This integration allows the hoppers to precisely track and deliver items needed at each stage of the assembly process.

    This detailed process allows for a more efficient and controlled flow of materials, making it possible to achieve intricate assembly tasks in a controlled environment. Hoppers now become integral parts of the assembly line, facilitating precise and efficient material handling.

    Potential Conflicts and Troubleshooting

    While mods can enhance hopper functionality, they can also introduce conflicts. Incompatibilities between mods can lead to unexpected behavior, where items might get stuck, disappear, or not flow as intended. This can be especially problematic when trying to integrate complex automation systems. Careful testing and understanding of mod interactions are essential to avoid these issues. If conflicts arise, consulting mod documentation or online forums can provide valuable solutions and workarounds.

    Mod Impact on Efficiency and Effectiveness

    The impact of mods on hopper efficiency and effectiveness is significant and varies greatly depending on the specific mod. Some mods may marginally improve efficiency by adding new item handling features, while others can significantly boost efficiency by enabling complex automated systems. The addition of advanced features like sorting, processing, or custom tags can result in substantial improvements in the overall throughput and organization of your modded Minecraft inventory management.

    However, unexpected conflicts can hinder efficiency if not properly addressed.

    Summary

    From basic crafting to sophisticated automated farms, this guide provides a thorough understanding of Minecraft hoppers. You’ll master their function, learn how to troubleshoot issues, and discover creative applications for these essential blocks. So, gear up, and get ready to build some amazing automated systems in Minecraft!

  • Build a Horse Stable in Minecraft Your Ultimate Guide

    Build a Horse Stable in Minecraft Your Ultimate Guide

    Build a Horse Stable in Minecraft! This comprehensive guide walks you through crafting the perfect equine haven. From detailed design considerations to crafting resources and maximizing functionality, we’ll cover everything you need to create a stable that’s both beautiful and practical. Get ready to house your equine companions in style!

    Imagine a magnificent stable, meticulously crafted, nestled within your Minecraft world. This guide provides detailed plans, from basic layouts to elaborate designs. We’ll explore various materials, architectural styles, and features to create a stable that truly stands out.

    Design Considerations: Build A Horse Stable In Minecraft

    Crafting a magnificent horse stable in Minecraft transcends mere functionality; it’s an opportunity to showcase architectural prowess and artistic flair. Careful planning is key to creating a stable that is both visually appealing and practical, seamlessly integrating with your existing world or village. This section delves into various design considerations, offering a multitude of options to inspire your equine-themed construction project.Thorough planning, including consideration of space requirements, material choices, and aesthetic preferences, will ensure a stable that serves both the practical needs of your horses and enhances the overall beauty of your Minecraft world.

    Addressing these factors ensures that your creation stands out from the typical Minecraft structures, becoming a distinctive feature.

    Stable Layouts

    Different stable layouts cater to various needs and preferences. The shape and size directly impact the number of horses accommodated and the available storage space. Rectangular structures are simple and efficient, while more complex shapes, like L-shaped or U-shaped layouts, can maximize space utilization. Consider the number of horses you intend to keep and the amount of storage needed when choosing a layout.

    Circular or hexagonal stables, though more intricate, can add a unique visual appeal.

    Stable Sizes and Shapes

    A small stable, perhaps 3×3 blocks, might suffice for a single horse, including basic storage. A medium-sized stable, 5×5 blocks or larger, is ideal for multiple horses and greater storage. For larger stables, 7×7 or more, you can incorporate multiple stalls, a tack room, and a feeding area. The shape of the stable can also impact its aesthetic.

    A long, narrow stable might look more like a barn, while a square or rectangular one feels more contained and cozy.

    Architectural Styles

    The architectural style can be adapted to fit your Minecraft world’s theme. A rustic, wooden stable would be ideal for a woodland environment. A more modern, stone or brick structure could fit into a futuristic or urban setting. Even incorporating elements of medieval castles or ancient ruins can create a unique and captivating stable. Consider the surrounding terrain and the overall aesthetic you are aiming for.

    Materials and Blocks

    Material choices significantly impact both the practicality and aesthetic of your stable. Wood, while aesthetically pleasing, is susceptible to damage. Stone and brick offer durability and a more substantial look. Using different coloured materials for different sections, like using light grey stone for the walls and a darker grey stone for the roof, can provide visual appeal and contrast.

    You can also consider more advanced materials like glass or obsidian for windows and special features, providing both practicality and visual appeal.

    • Wood: Provides a rustic look, but is prone to damage. Suitable for smaller stables or those in wooded areas.
    • Stone: Offers durability and a classic aesthetic. Excellent for larger stables or those needing greater longevity.
    • Brick: Provides a sturdy and visually appealing structure.

      Ideal for stables in towns or villages.

    • Glass: Offers a modern and spacious feel. Use for windows or other transparent features.
    • Obsidian: Provides a sleek and dark aesthetic. Excellent for adding a touch of sophistication.

    Integrating the Stable

    Integrating a stable into an existing Minecraft world or village can enhance the immersion and realism. Place it near a farm or a horse breeding area to reflect its purpose. Consider placing it near a village for community engagement, or integrate it into a larger farm complex for a more extensive design. You can even incorporate it into a larger castle or fortress for an even more grand structure.

    Strategically positioning the stable will significantly enhance its impact on your Minecraft world.

    Decorative Elements

    Personalizing your stable is essential to make it truly unique. Add decorative elements like banners, paintings, or crafted signs to personalize the space. Consider using flowers, vines, or torches to enhance the visual appeal. Using different coloured wool or stained glass panes for windows can significantly enhance the aesthetic. The choice of decorative elements will reflect your personal style and the atmosphere you wish to create within the stable.

    Building a horse stable in Minecraft can be surprisingly satisfying, especially when you’ve got the right resources. But sometimes, the most intricate projects require a little extra care, like washing a human hair weave. Learning how to properly care for your weave is key to maintaining its health and beauty, just as building a stable requires thoughtful planning.

    You can find helpful tips on how to wash a human hair weave Wash a Human Hair Weave to ensure it lasts a long time. After all that, it’s back to Minecraft, and the joy of a well-built stable for your equine friends!

    • Banners: A simple yet effective way to add color and personality.
    • Paintings: Showcase your artistic skills or reflect the theme of your stable.
    • Signs: Display important information or add personal touches.
    • Flowers/Vines: Enhance the natural aesthetic and create a sense of life.
    • Torches: Provide lighting and add visual interest.

    • Wool/Stained Glass: Offer varied colors to enhance the visual appeal of windows.

    Crafting and Resources

    Build a Horse Stable in Minecraft

    Building a sturdy horse stable in Minecraft requires careful planning and efficient resource management. Understanding the necessary materials and their acquisition methods is crucial for a successful project. This section delves into the crafting recipes, resource types, and optimal strategies for gathering materials, providing a comprehensive guide for any aspiring stable builder.

    Crafting Recipes for the Stable

    Minecraft stables are constructed using various blocks. Understanding the required crafting recipes for each block is essential for efficient building. These recipes dictate the specific materials and quantities needed to create each component. The crafting table is the central hub for these processes.

    Required Resources, Build a Horse Stable in Minecraft

    The construction of a stable demands a range of materials. These include different types of wood, stone, and specialized blocks. Choosing the right materials significantly impacts the overall aesthetic and structural integrity of the stable.

    • Wood: Various wood types, such as oak, spruce, birch, jungle, acacia, and dark oak, are used for basic construction elements. Each wood type provides different aesthetic options for the stable’s exterior. Different wood types may require different quantities for the same structural component.
    • Stone: Stone blocks, such as cobblestone, and various stone variants, are vital for foundational structures and certain decorative elements. Stone’s durability contributes to the stable’s longevity.
    • Special Blocks: Items like chests, doors, and pressure plates are integral for functionality. These enhance the usability and practicality of the stable, allowing for storage and controlling access.

    Resource Quantities for Varying Stable Sizes

    The amount of resources required directly correlates with the size and complexity of the stable. A small stable will necessitate fewer resources than a large, elaborate structure.

    Building a horse stable in Minecraft can be a rewarding project, but sometimes you encounter a bit of a snag. Like when you need to get a water pump working properly. Learning how to effectively “Prime a Water Pump” Prime a Water Pump is crucial for a functional stable, ensuring a constant water supply for your equine friends.

    A properly working water pump is essential for a successful horse stable build, after all!

    Stable Size Wood Stone Chests Doors
    Small 20-30 logs 10-15 cobblestone 1-2 chests 2-3 doors
    Medium 40-50 logs 20-30 cobblestone 2-3 chests 4-5 doors
    Large 60-80 logs 30-40 cobblestone 3-4 chests 6-8 doors

    Efficient Resource Gathering

    Efficient resource gathering is key to minimizing the time spent on the construction process. Exploring different biomes and utilizing tools effectively are crucial steps. Specific biomes, like forests, offer abundant wood resources. Likewise, mountainous areas often contain significant stone deposits. Employing tools like axes and picks significantly accelerates the gathering process.

    Alternative Resource Acquisition Methods

    Sometimes, certain resources may be scarce in the immediate area. Alternative methods exist to acquire necessary resources, ensuring that construction doesn’t stall. Trading with other players or utilizing crafting recipes to transform existing resources into the desired materials are useful methods.

    Functionality and Features

    Crafting a functional horse stable in Minecraft goes beyond just aesthetics; it’s about creating a safe and efficient environment for your equine companions. This section delves into the practical aspects of designing a stable that seamlessly integrates with your Minecraft world, from housing multiple horses to implementing advanced features. A well-designed stable allows for easy management and enhances the overall experience of horse ownership within the game.A robust stable design should prioritize both the immediate needs of the horses and the long-term potential for expansion and customization.

    Careful planning for storage, feeding, and management will result in a stable that effectively accommodates your growing equine population. This includes not only the stalls but also areas for grooming, potential breeding, and blacksmithing, should you choose to incorporate these elements.

    Horse Stalls and Management

    A well-organized stable requires individual stalls for each horse. These should be spacious enough for the horse to move freely, but also secure enough to prevent escape. The stalls should include a comfortable bedding area, allowing for rest and preventing injuries. Multiple stalls can be arranged in a linear fashion or in a more complex layout, depending on the size of the stable.

    Consider using fences or walls to create clear boundaries between stalls.

    Feeding Troughs and Automated Systems

    Feeding troughs are crucial for maintaining the health of your horses. They should be large enough to accommodate the daily feed requirements of each horse. For convenience and efficiency, consider integrating automated feeding systems. This could involve hoppers, dispensers, or custom-built mechanisms that deliver food to the troughs automatically, ensuring your horses are always well-fed. A simple automated system can dramatically reduce the time spent on manual feeding, freeing you up for other tasks.

    Storage and Organization

    A well-organized stable requires dedicated storage areas for hay, grain, tack, and other essential supplies. Consider using chests, hoppers, and custom-built storage structures to maximize space and ensure everything is easily accessible. Clear labeling and a logical layout will help you quickly locate items when needed. This ensures a seamless and efficient operation. For example, a designated area for saddles and harnesses can prevent clutter and reduce the risk of misplacing equipment.

    Security Measures

    Adding security measures is an important aspect of a well-designed stable. Consider using fences, reinforced walls, or even traps to prevent unwanted intruders from entering the stable. These security measures are vital for the safety of your horses and to maintain a safe and secure environment.

    Blacksmith Shop and Breeding Area

    Expanding on the core functionality, integrating a blacksmith shop can provide services for repairing horse tack and equipment. This could involve a simple anvil, crafting table, and necessary resources. A dedicated breeding area can enhance the stable’s functionality, enabling horse breeding and the management of foals. This area can be designed with separate enclosures and resources to facilitate the breeding process.

    Building a horse stable in Minecraft is surprisingly satisfying, especially when you consider the meticulous planning involved. You need to gather resources, design the layout, and even account for the aesthetics! It’s a bit like creating a digital equine haven, and then, listening to some tunes to get you in the mood, check out this track about a bear by skrillexp oo bear would you ever skrillexp oo bear would you ever.

    The music will undoubtedly fuel your creativity as you finalize the stable’s design and furnishings, and hopefully, your digital horses will appreciate the effort!

    A well-equipped blacksmith shop and breeding area contribute to the overall value and practicality of the stable.

    Easy Access and Management

    The layout of the stable should prioritize easy access and management. Paths should be wide enough for easy movement, allowing for quick and efficient checks on each horse. Clear signage and designated areas for specific tasks will improve efficiency. The goal is to create a stable where managing your horses is simple and straightforward. A well-thought-out design ensures your horses’ comfort and your ease of management.

    Visual Representation

    Building a Minecraft horse stable isn’t just about function; it’s about crafting a visually appealing structure that reflects the desired aesthetic. From humble beginnings to elaborate designs, the visual representation of the stable can significantly enhance the overall experience. This section explores various design approaches, from simple and rustic to intricate and modern, and how these choices impact both the appearance and practicality of the stable.Different architectural styles offer unique visual appeals and can be adapted to various Minecraft landscapes.

    Understanding these styles allows players to create stables that match their personal preferences and the environment they’re building in. By considering both aesthetics and functionality, the stable can become a centerpiece of the Minecraft world.

    Different Visual Representations

    Various designs cater to different aesthetics and functional needs. Simple stables, often consisting of a single, enclosed area, are ideal for basic housing. More complex designs can incorporate multiple stalls, hay storage, and even decorative elements. These variations offer a range of visual choices, allowing players to craft a stable that perfectly suits their needs and creativity.

    • Simple Stables: These are basic rectangular or square structures, often with a single entrance. They’re straightforward to build and ideal for smaller horse populations or as part of a larger farm complex. Visual appeal is kept minimal, prioritizing function.
    • Complex Stables: These can incorporate multiple stalls, separated by partitions. Additional features like hay storage areas, tack rooms, and even decorative elements like intricate roofs or balconies, increase the visual appeal and functionality.
    • Medieval Stables: These designs typically feature a steeply pitched roof, stone or wood walls, and a large, imposing entrance. This style evokes a sense of antiquity and grandeur, creating a visual statement. Think of a fortified barn or stable from historical illustrations.
    • Rustic Stables: These stables utilize natural materials like wood and stone, often with exposed beams and natural textures. They offer a warm, inviting feel and blend well with wooded or countryside settings. Imagine a charming log cabin-style structure.
    • Modern Stables: These utilize clean lines, modern materials like glass and metal, and minimalist designs. They present a sleek, contemporary aesthetic, well-suited for a more futuristic or technologically advanced Minecraft world.

    Architectural Styles

    Different architectural styles influence the visual representation of the stable, offering unique characteristics and aesthetics. Each style evokes a distinct mood and atmosphere, enabling players to personalize their stable to fit their vision.

    • Medieval: Characterized by thick walls, high roofs, and imposing features, medieval stables often evoke a sense of strength and protection. Imagine a large stone structure with crenellations, or battlements, on the roof. The overall impression is one of robust and sturdy construction.
    • Rustic: Rustic stables often employ natural materials like wood and stone, with an emphasis on natural textures. Exposed beams and natural wood siding contribute to a warm and welcoming atmosphere. The design is often inspired by traditional farmhouses.
    • Modern: Modern stables emphasize clean lines, smooth surfaces, and the use of advanced materials. Glass walls and metal roofs are frequently used to create a sleek and futuristic aesthetic. The overall impression is one of sophistication and innovation.

    Design Comparison Table

    This table Artikels the key strengths and weaknesses of various stable designs, considering both aesthetics and functionality.

    Design Style Materials Used Functionality Image Description
    Simple Wood, logs Basic horse housing, easily expandable A rectangular structure with a simple roof and a single entrance. Walls are made of wood planks.
    Medieval Stone, cobblestone, wood Sturdy and imposing, potentially multiple stalls A large, rectangular structure with a high, steeply pitched roof made of wooden planks. Walls are constructed of stone or cobblestone blocks.
    Rustic Wood, logs, stone, planks Warm and inviting, blends well with nature A structure with exposed wooden beams, natural stone accents, and a slightly sloped roof made of wooden planks.
    Modern Glass, metal, smooth stone Sleek and sophisticated, potentially advanced features A structure with a minimalist design using glass panels, metal roofing, and smooth stone walls. Features minimal ornamentation.

    Lighting and Decoration

    Proper lighting and decoration significantly enhance the visual appeal of the stable. Lighting should illuminate the interior without being overly harsh, while decorations add personality and character.

    • Lighting Options: Torches, lanterns, and even glowstone can be used to create warm, inviting light. Strategically placed torches can highlight key areas, while lanterns create a more diffused glow. Glowstone provides a bright, even light, perfect for illuminating larger spaces. Consider using a mix of these for varied effects.
    • Decoration Ideas: Hay bales, saddles, horse figurines, and banners can add character and personality. Placing these elements thoughtfully creates a cohesive and appealing design. Consider adding small details like well-placed buckets or tools for a rustic or medieval feel. Using items like stained glass can add a modern or medieval feel.

    Integration and Expansion

    Build a Horse Stable in Minecraft

    Building a Minecraft horse stable is a rewarding project, but its value truly shines when integrated into a larger world. This section explores different methods of seamlessly incorporating the stable into an existing Minecraft environment, allowing for expansion and modification to suit evolving gameplay. From simple additions to significant upgrades, the stable can adapt to the player’s changing needs and preferences.The key to a successful integration lies in careful planning.

    Consider the surrounding environment and the stable’s intended role within the world. Will it be a central hub for a village, a secluded retreat for a player’s personal herd, or something in between? These considerations will guide the design decisions for both initial construction and future expansions.

    Integrating into Existing Worlds

    The stable’s integration should be natural and aesthetically pleasing. Avoid jarring contrasts between the stable and the surrounding landscape. Consider the existing structures and vegetation when placing the stable. For example, if the area has a dense forest, place the stable near the edge of the forest, with trees incorporated into the design. If the location is open, you could surround it with fields or create a small, enclosed pasture.

    Mimicking the existing terrain ensures a more harmonious integration into the world.

    Expanding the Stable

    Expanding the stable should be a thoughtful process, maintaining the original aesthetic. A simple addition might be a separate tack room, equipped with crafting tables for saddles and harnesses. An upgraded stable could include a grooming area with a wash station for cleaning horses. A more elaborate expansion might incorporate a small arena for training or racing horses.

    Expansion plans should always be designed to enhance the stable’s functionality without detracting from its initial appeal.

    Accommodating Growing Horse Populations

    A well-planned stable design can accommodate a growing horse population. Consider incorporating multiple stalls, each with its own feeding trough and space for grooming. A significant expansion could include a separate paddock area for exercising and grazing. Adding multiple stable doors or larger entryways can improve the flow of horses through the stable. This will allow for efficient management of the growing horse herd.

    Adding Rooms and Features

    The stable’s aesthetic should be maintained during room additions. A hayloft can be added to store hay and other supplies, while a blacksmith’s forge could be integrated for creating custom horse equipment. A small office or a storage room for additional supplies could improve functionality. The design should be seamless, blending new elements into the existing stable structure without compromising the initial vision.

    Visual Representation and Integration with Surroundings

    The surrounding environment should complement the stable’s design. Incorporate trees, bushes, and other decorative elements that harmonize with the overall theme. For example, if the stable is located in a mountainous region, consider incorporating rock formations and waterfalls. If it’s a village stable, integrate structures that are typical for the region, such as houses or shops. The surrounding environment should enhance the stable’s appeal and make it a natural part of the Minecraft world.

    Ultimate Conclusion

    Building a horse stable in Minecraft is more than just a project; it’s a journey of creativity and resourcefulness. This guide has equipped you with the knowledge and inspiration to design and build a stable that reflects your style and gameplay. From simple designs to elaborate expansions, you’re empowered to create the ultimate equine sanctuary in your Minecraft world.

  • Build a Chair in Minecraft A Complete Guide

    Build a Chair in Minecraft A Complete Guide

    Build a Chair in Minecraft, a surprisingly complex project! This comprehensive guide delves into every aspect of crafting and placing chairs in the Minecraft world. From basic designs to intricate masterpieces, we’ll cover everything you need to know to create functional and visually appealing seating for your Minecraft adventures.

    Imagine crafting a cozy armchair in your Minecraft home, or a sleek, modern design for a shop you’re building. This guide walks you through the process, providing detailed crafting recipes, design variations, and even troubleshooting tips for any issues you might encounter.

    Introduction to Minecraft Chair Building

    Minecraft, a sandbox game renowned for its creative possibilities, allows players to craft an impressive array of objects, including chairs. While not a crucial element for gameplay, crafting chairs offers a fulfilling creative outlet, demonstrating player ingenuity and attention to detail. This exploration delves into the diverse world of Minecraft chair building, encompassing materials, construction steps, and design variations.Minecraft’s chair building capabilities are remarkably versatile.

    Players can craft chairs from a range of materials, each with unique aesthetic qualities. The process, though straightforward, allows for personalized designs, reflecting the player’s creativity. The potential for unique and intricate chair designs is substantial, opening up a realm of decorative and functional furniture possibilities within the game.

    Materials for Chair Construction

    Various materials can be used for chair construction in Minecraft. Wood, a readily available resource, is often a starting point for basic designs. Crafting tables and furnaces are essential to turn raw materials into usable components. More elaborate chairs might involve stone, iron, or even more exotic materials like diamonds or netherite. Each material offers a distinct aesthetic.

    Crafting Steps for a Basic Chair

    The general steps for crafting a basic chair in Minecraft involve gathering materials, creating the chair’s components, and assembling them. First, the appropriate wood or other materials are collected. These materials are then processed through crafting tables to create the chair’s essential parts like legs, seats, and backs. Finally, the components are assembled according to the chosen design.

    Chair Design Variations

    Minecraft chair designs range from simple to complex and decorative. A simple chair might use basic wood planks for all components. More complex chairs can incorporate intricate designs using different types of wood, or even incorporate other materials for a unique look. Decorative chairs might involve the use of dyes or other decorative blocks to enhance their visual appeal.

    Creating a Basic Chair Design

    To build a basic chair, start with a simple design using planks from a chosen type of wood. The legs are usually four sturdy wooden planks arranged in a square shape. A plank is placed on top of the legs for the seat. A plank or two can be added to create a backrest, depending on the desired chair design.

    For example, a simple wooden chair can be crafted by using four wooden planks for the legs, one plank for the seat, and one plank for the back. The choice of wood affects the chair’s visual appeal. A simple chair design can be made quickly and easily.

    Detailed Crafting Recipes

    Crafting chairs in Minecraft goes beyond simply gathering materials. Understanding the different crafting recipes unlocks a wide array of styles, each with varying durability and aesthetic appeal. This section delves into the specifics of creating chairs, offering detailed crafting recipes for various designs.

    Crafting Recipes for Chair Styles

    Different chair styles require specific materials and crafting steps. A well-organized table outlining these recipes allows for easy comparison and efficient crafting. The table below presents several common chair designs and their associated crafting requirements.

    Chair Style Materials Quantities Crafting Steps
    Simple Wooden Chair Wooden Planks 6 Place 6 wooden planks in a 2×3 crafting grid.
    Wooden Chair with Backrest Wooden Planks, Wooden Slabs 8 Planks, 4 Slabs Combine 4 wooden planks and 4 wooden slabs in a 2×2 crafting grid.
    Stone Chair Stone Bricks 6 Place 6 stone bricks in a 2×3 crafting grid.
    Stone Chair with Backrest Stone Bricks, Stone Slabs 8 Bricks, 4 Slabs Combine 4 stone bricks and 4 stone slabs in a 2×2 crafting grid.
    Iron Chair Iron Ingots 6 Place 6 iron ingots in a 2×3 crafting grid.
    Iron Chair with Backrest Iron Ingots, Iron Slabs 8 Ingots, 4 Slabs Combine 4 iron ingots and 4 iron slabs in a 2×2 crafting grid.

    Common Chair Designs and Recipes

    This section lists common chair designs, alongside their associated crafting recipes, emphasizing their variations in terms of materials, durability, and aesthetic impact.

    • Simple Wooden Chair: This chair, crafted from wooden planks, is a foundational design. Its simplicity makes it a quick and easy build, perfect for beginners. Its durability is modest, susceptible to damage from environmental factors and player actions. The aesthetic is plain, but can be customized with different colors or textures.
    • Wooden Chair with Backrest: Adding a backrest enhances both durability and aesthetic appeal. This design, utilizing wooden planks and slabs, provides a more comfortable and substantial chair compared to the basic wooden chair. The increased durability comes at the cost of more materials and a slightly more complex build.
    • Stone Chair: Stone chairs offer a more durable option than wooden chairs, ideal for areas prone to player damage or environmental hazards. The stone materials provide a sturdy foundation, making it resilient against various factors. The design lacks the intricate details found in other chair styles, resulting in a simpler aesthetic.
    • Stone Chair with Backrest: This design offers a balance of durability and aesthetic appeal. The stone backrest increases the chair’s resistance to damage while maintaining a basic design, making it a practical choice for a variety of situations.
    • Iron Chair: Iron chairs represent a substantial step up in durability compared to wooden and stone counterparts. The use of iron ingots makes them resistant to damage and weathering, making them suitable for long-term use or high-traffic areas. The aesthetic is plain, and not as intricate as other styles.
    • Iron Chair with Backrest: The iron chair with a backrest, incorporating iron ingots and slabs, offers superior durability and comfort. This design makes it a good choice for demanding situations, balancing sturdiness with a slightly more complex build. The iron material creates a sturdy and strong chair.

    Tools and Resources for Efficient Chair Construction

    Efficient chair construction requires a well-equipped inventory and a strategic approach. Gathering the necessary materials and using appropriate tools significantly speeds up the chair-building process. An axe for wood, pickaxe for stone and iron, and furnace for smelting are essential for efficient crafting. A crafting table is needed for all designs. This approach streamlines the process, reducing wasted time and effort.

    Chair Design Variations and Enhancements: Build A Chair In Minecraft

    Build a Chair in Minecraft

    Crafting a chair in Minecraft transcends mere functionality; it’s an opportunity to express creativity and personalize your virtual abode. Beyond the basic stool or simple chair, a wealth of design possibilities awaits, opening doors to unique styles and aesthetics. From rustic charm to futuristic flair, the options are virtually limitless. This section dives into the exciting world of chair design variations, exploring methods for customization and enhancement.Beyond the fundamental chair blueprint, numerous avenues for personalization and creative expression exist.

    Adding intricate details or adjusting the overall structure allows for unique chair designs tailored to specific needs or preferences. This detailed exploration provides the tools to transform a simple chair into a masterpiece, reflecting your Minecraft world’s personality.

    Chair Design Table

    Understanding the building blocks is crucial for crafting distinctive chairs. This table Artikels different chair designs, encompassing variations in style, materials, and complexity.

    Design Name Materials Description
    Simple Wooden Chair Wooden planks A basic, straightforward chair ideal for starting out.
    Rustic Wooden Chair Wooden planks, logs, vines A chair incorporating natural elements, perfect for a woodland or cabin aesthetic.
    Modern Metal Chair Iron bars, gold ingots A sleek and contemporary design featuring metallic elements, great for a futuristic or industrial environment.
    Enchanted Chair Various enchanted materials, including diamonds, emeralds A luxurious and elaborate chair with added enchantment effects for a royal or magical touch. This design showcases advanced crafting techniques.
    Decorated Wooden Chair Wooden planks, dyed wool, stained glass panes A basic wooden chair enhanced with decorative elements, such as colourful wool and stained glass panes.

    Customization Methods

    Decorating and customizing a chair in Minecraft involves several approaches. The most effective method is to combine materials and structures to achieve the desired look.

    • Dyeing: Dyeing wool or other fabric-like materials allows for a wide spectrum of color choices, adding vibrant pops to the chair’s appearance. The color can complement or contrast with the chair’s primary material, enhancing its aesthetic appeal.
    • Stained Glass: Stained glass panes provide a unique decorative touch. These panes can be used to add intricate patterns or colors to the chair, creating a visually appealing and sophisticated look. The combination of stained glass and wood is particularly effective.
    • Additional Structures: Incorporating structures like vines, leaves, or even small decorative blocks adds depth and dimension to the chair. This creates an organic feel or evokes specific themes.
    • Enchantment Effects: Applying enchantments to the chair itself or the materials used in its construction can enhance the chair’s appearance and functionality, giving it special properties. This adds an element of magic and sophistication.

    Unique and Creative Chair Designs, Build a Chair in Minecraft

    Crafting truly unique chair designs requires thinking outside the box. Examples include incorporating intricate carvings into the wood, creating chair backs with intricate patterns, or using a variety of materials in an unexpected combination.

    • The “Spiderweb Chair”: A chair made from cobwebs, decorated with glowing spider eyes, would fit perfectly in a spooky or gothic-themed area. The eerie effect is further enhanced by the use of cobwebs and their eerie glow.
    • The “Starry Night Chair”: A chair with a design inspired by Vincent van Gogh’s “The Starry Night,” featuring a dark wooden base and a backrest with a sky of stars made of glowstone and lapis lazuli. This design embodies artistic expression within the game.
    • The “Rainbow Chair”: This chair incorporates a vibrant range of dyed wool, strategically placed to create a captivating rainbow effect. The combination of bright colours provides a cheerful and inviting atmosphere.

    Modifying Chair Designs

    Adapting chair designs to specific needs involves considering the desired functionality and aesthetic. Adjusting the height, width, or shape of the chair can be achieved by altering the structure. For instance, a taller chair can be crafted for use in a higher-level building, while a wider chair can accommodate multiple people.

    • Height Modification: Adjust the number of chair legs or the overall height of the chair’s structure to fit the environment. A taller chair is suitable for a multi-story building, while a lower chair fits a ground-level setting.
    • Armrest Addition: Adding armrests to a chair provides support and comfort, transforming a basic design into a more functional one. This feature is essential for a more ergonomic chair.
    • Backrest Customization: A chair with a backrest can provide greater support and comfort. The backrest can be customized with various materials or designs.

    Adding Intricate Details

    Intricate details elevate a chair’s design beyond basic functionality, creating a more aesthetically pleasing and visually appealing piece. This can involve detailed carvings, patterns, or the strategic use of smaller decorative items.

    • Carvings: Carving patterns or designs into the chair’s wood provides a touch of artistry and sophistication. This method involves using tools to create intricate patterns.
    • Pattern Layouts: Laying out patterns or designs using materials like stained glass, wool, or other decorative blocks creates visual appeal. The pattern should align with the chair’s overall style.
    • Combination of Materials: Combining different materials to create textures and visual contrasts elevates the chair’s design. The contrast between smooth and rough textures can be particularly effective.

    Chair Placement and Integration

    Crafting a chair in Minecraft is only half the battle. Effective placement is crucial for maximizing its aesthetic and functional value within your world. Proper integration with existing structures creates a cohesive and believable environment, transforming a simple chair into a focal point or a subtle element of your design. This section explores the art of placing and integrating your meticulously crafted chairs into the diverse landscapes of Minecraft.Effective chair placement transcends mere functionality; it’s about enhancing the overall ambiance and narrative of your Minecraft world.

    Careful consideration of location, surrounding structures, and the desired aesthetic impact will elevate your builds from ordinary to extraordinary. A well-placed chair can subtly hint at the inhabitants’ personality, the purpose of the structure, or even the time of day.

    Building a chair in Minecraft can be surprisingly satisfying, but sometimes you just need a break from pixelated furniture and delve into something a bit… more conceptual. Like checking out the incredible collaboration between Lil B, Doom, and GZA on their Marvel comic book covers, lil b doom gza get marvel comic book covers. Once you’ve absorbed the artistic vision of those covers, you’ll probably be inspired to go back to building that chair in Minecraft with a fresh perspective.

    Methods for Chair Placement

    Various methods exist for placing chairs in Minecraft, ranging from straightforward placement to more intricate techniques that integrate them seamlessly with the environment. Understanding these methods will provide you with the flexibility to tailor your chair placement to your specific design goals. Consider the surrounding structures, the texture and color of the blocks, and the lighting conditions to achieve the desired visual impact.

    • Direct Placement: This is the most straightforward approach. Simply place the chair on a flat surface, such as a floor or a table. This method is ideal for quick and easy integration into existing structures. Ensure the chair aligns with the surrounding architecture for a consistent aesthetic.
    • Elevated Placement: Placing the chair on raised platforms, such as small stone or wooden structures, or even on stacked blocks, creates a sense of height and visual interest. This is a useful technique for highlighting a chair in a large space or for emphasizing a particular area.
    • Integration with Furniture: Integrating chairs with existing furniture, such as tables or desks, enhances the functionality and visual appeal of the surrounding area. This technique is ideal for creating a sense of a lived-in space, like a home or a shop.

    Selecting Appropriate Locations

    Choosing the right location for your chair is critical to its visual impact. The surroundings significantly influence the overall impression. Consider factors such as the surrounding environment, the size and scale of the area, and the intended function of the chair. Analyzing these factors will allow you to make informed decisions about chair placement.

    • Space and Scale: Consider the size of the room or area where you want to place the chair. A small chair in a large room might get lost, while a large chair in a small room could overwhelm the space. Balance the scale of the chair with the surrounding environment for a visually harmonious outcome.
    • Surrounding Environment: The environment surrounding the chair greatly influences its aesthetic impact. A chair placed in a lush forest will have a different feel than a chair placed in a desert or a snowy biome. Harmonize the chair with the surrounding natural or man-made elements.
    • Lighting Conditions: Natural and artificial light sources can dramatically alter the appearance of a chair. Place the chair strategically to maximize the use of available light, creating a brighter and more inviting atmosphere. A well-lit chair can draw attention and create a focal point.

    Aesthetic Impact of Different Chair Placements

    Different chair placements can evoke diverse aesthetic moods. Careful consideration of the style and context of the placement can dramatically alter the perceived atmosphere. The placement can convey different moods, whether casual, formal, or whimsical.

    • Formal Settings: Chairs placed in formal settings, such as houses or grand halls, should be aligned with the overall architectural design. This approach creates a sense of order and formality.
    • Casual Settings: Chairs in casual settings, like a cozy living room or a campfire area, can be placed more freely, reflecting a sense of relaxed comfort. They might be scattered or grouped together, creating a sense of spontaneity.
    • Functional Integration: For functional areas, such as a shop or a work area, the chair placement should prioritize accessibility and ease of use. Chairs should be positioned for efficient work or interaction, while maintaining a visually pleasing arrangement.

    Creating Functional and Visually Appealing Chair Arrangements

    Crafting a functional and visually appealing arrangement requires a combination of planning and execution. Careful planning will prevent awkward placement and will ensure the desired aesthetic. Balance and symmetry are crucial for creating a visually appealing environment.

    • Symmetry and Balance: Symmetrical arrangements create a sense of order and formality. Use symmetry as a guide when placing chairs, ensuring they are balanced and aligned in relation to the surrounding structures.
    • Focal Points: Strategically place chairs to create focal points within the structure. These focal points can draw attention and enhance the overall visual appeal.
    • Flow and Movement: Create a sense of flow and movement within the arrangement. The placement of chairs can guide the viewer’s eye and create a dynamic visual experience.

    Integrating Chairs into Structures

    Integrating chairs into various structures, such as houses, shops, or forts, is an essential aspect of Minecraft world-building. Understanding the principles of integration ensures a seamless and visually appealing environment. The integration of chairs should enhance the overall structure and not detract from it.

    • Houses: Incorporate chairs into living areas, dining rooms, and other spaces to create a sense of lived-in comfort and functionality. Choose chair styles that match the overall design aesthetic of the house.
    • Shops: Use chairs to create seating areas in shops to accommodate customers or visitors. Consider the style of chair that best fits the shop’s ambiance and target audience. Placement of chairs can influence customer flow and comfort.
    • Forts: Chairs can be used to add a touch of practicality and comfort to a fort, creating a sense of a fortified home base. Consider the strategic placement of chairs in relation to defense points and key areas within the fort.

    Troubleshooting and Common Problems

    Building a chair in Minecraft, while seemingly straightforward, can present unexpected challenges. Understanding potential issues and their solutions is crucial for successful chair construction. This section delves into common problems and provides practical troubleshooting methods.Careful attention to detail, coupled with a systematic approach, will minimize construction hurdles and ensure a satisfying chair-building experience. The following sections will detail common problems, provide solutions, and offer answers to frequently asked questions to help you navigate any difficulties.

    Identifying Common Construction Issues

    Incorrect block placement, particularly in the chair’s support structure, is a frequent source of instability. Missing or misplaced blocks can lead to a chair that collapses under even minimal weight. Misaligned support beams or incorrectly placed legs can result in an uneven chair, making it difficult to use or aesthetically displeasing. Furthermore, issues with block selection or inappropriate material choices can impact the chair’s durability and overall appearance.

    Troubleshooting Methods

    Troubleshooting chair-building problems involves a systematic approach. First, visually inspect the chair for any obvious misalignments or missing blocks. If necessary, carefully dismantle the chair section by section to identify the problematic area. Then, re-evaluate the design, ensuring accurate placement of blocks based on the intended design. Using a schematic or a visual reference is invaluable in resolving discrepancies.

    If a design is proving too complex, a simpler design approach may be a better option.

    Frequently Asked Questions (FAQs)

    • Q: My chair collapses easily. What’s wrong?

      A: A common cause of chair collapse is inadequate support. Ensure that the legs are firmly anchored and that the support structure is robust enough to withstand the chair’s intended weight. Check for misaligned blocks, especially in the base or supporting beams. Using stronger materials, like oak or jungle wood, might be a better solution for a chair that is meant to support weight.

    • Q: How can I prevent my chair from wobbling?

      A: Wobbling chairs often stem from uneven leg placement. Ensure that each leg is placed firmly on a stable foundation and that the support beams are precisely aligned. Using a level tool or a straight edge can assist in ensuring even leg placement and prevent wobbling. This is important for both aesthetics and function.

    • Q: My chair looks different than the design I envisioned. How can I fix it?

      A: Review the design blueprints or visual references to confirm the correct block placement and alignment. Carefully compare the construction process with the design to identify and rectify any discrepancies. A well-planned layout is essential to achieve the desired chair design.

    Addressing Conflicts with Existing Structures

    Integrating a chair into an existing Minecraft environment requires careful planning. Consider the chair’s size and shape in relation to surrounding structures to avoid collisions or obstructions. Strategically place the chair to maintain both aesthetic appeal and functionality within the environment. Pre-planning and visual assessment of the space are crucial in preventing issues.

    • Potential conflicts: Narrow walkways, overhanging structures, or nearby walls might cause placement issues. Always carefully examine the surrounding environment before placing a chair.
    • Solutions: Adjust the chair’s design or location to avoid obstructions. Use alternative materials or designs to reduce the chair’s size or profile to better fit the space. Consider the surrounding structures and plan accordingly.

    Advanced Techniques and Strategies

    Beyond the basics of chair construction, mastering advanced techniques unlocks a world of possibilities in Minecraft chair design. These strategies allow for intricate designs, efficient material usage, and even strategic advantages in gameplay. By understanding these methods, players can create truly unique and functional chairs that complement their Minecraft world.Advanced chair construction requires a deeper understanding of the game’s mechanics and a willingness to experiment with various materials and tools.

    This section dives into techniques for creating complex designs, maximizing efficiency, and optimizing chair placement for strategic benefit.

    Building a chair in Minecraft can be surprisingly satisfying, but sometimes you just need a break from pixelated furniture-making. For a dose of real-world entertainment, check out the Mountain Goats’ hilarious performance on watch the mountain goats perform get famous on colbert. Then, once you’ve had your fill of musical mayhem, you can always return to crafting those perfect Minecraft chairs.

    Complex Chair Designs

    Crafting intricate chairs requires meticulous planning and an understanding of Minecraft’s building blocks. A well-structured approach involves dividing the chair into smaller, manageable components. For example, a complex chair with curved backs or intricate legs might be easier to build by constructing the backrest first, then the seat, and finally the legs. This approach minimizes errors and allows for adjustments as needed.

    Building a chair in Minecraft can be surprisingly satisfying, but sometimes I need a little creative escape. Like, I’ve been completely captivated by this amazing Phoebe Bridgers cover of Conor Oberst’s “Mamah Borthwick” – a sketch, check out the video here. Back to Minecraft, though, I’m determined to craft the most elaborate, comfortable chair in the game.

    I think a bamboo chair would be the perfect blend of style and practicality.

    Advanced designs can include multiple materials to create visual interest and functionality, like combining wood with stone for a more substantial or fortified chair.

    Advanced Tools and Techniques

    Beyond basic tools like pickaxes and shovels, specialized tools like shears, buckets, and even dispensers can dramatically improve chair construction efficiency. Shears can precisely trim bushes or flowers for unique decorations, while buckets are crucial for collecting materials like water or lava. Dispensers can be programmed to automatically place blocks, drastically reducing construction time, particularly for repetitive tasks like crafting a large number of identical chairs.

    Material Optimization

    Different materials offer unique benefits in chair design. Wood, for instance, is a common and versatile material. Using planks of different types can provide variations in colour and aesthetics. Stone or metal can be incorporated to create sturdier, more durable chairs. For example, a chair made with reinforced stone or iron can withstand more damage in combat situations.

    Combining materials in innovative ways can create visually striking and functional chairs, adding a personal touch to a player’s Minecraft world.

    Maximizing Efficiency

    Creating chairs efficiently involves understanding material requirements and utilizing the right tools. Players should develop strategies to collect resources effectively. Utilizing chests and inventory management can prevent losing materials and keep the crafting process flowing smoothly. For complex chair designs, creating a detailed blueprint can help visualize the construction process and reduce errors.

    Strategic Placement

    Optimizing chair placement involves considering the chair’s intended purpose. In combat situations, strategically placing chairs can offer defensive advantages, providing cover or a vantage point for attacking enemies. This can be achieved by positioning the chair near resources or in areas that are important for player control. In crafting areas, positioning chairs near crafting tables or furnaces can improve workflow and reduce the need for constant movement.

    Visual Representation of Chair Designs

    Build a Chair in Minecraft

    Crafting a chair in Minecraft isn’t just about functionality; it’s about aesthetics. This section dives into a visual exploration of various chair designs, showcasing their unique appeal and potential for integration into your Minecraft world. Different designs cater to different playstyles and creative visions.

    Chair Design Variations

    A wide array of chair designs can be achieved using various materials and crafting techniques. The visual appeal of a chair often hinges on the materials used and the specific design elements. This table provides a glimpse into the diversity of chair designs achievable within Minecraft.

    Chair Name Image Description Brief Description
    Simple Wooden Chair A basic wooden chair, constructed from planks of wood. The seat and backrest are simple, rectangular shapes, meeting at a right angle. The legs are also simple, straight wooden posts. This is the most basic chair design, easily constructed using common materials.
    Elegant Wooden Chair Similar to the simple wooden chair, but with a slightly more refined design. The seat and back are slightly curved, and the legs are carved with simple decorative grooves. Adds a touch of elegance to the basic design with subtle carvings and curves.
    Stone Throne A sturdy chair constructed entirely of stone blocks. The seat and back are carved with intricate patterns, giving a regal appearance. The legs are thick, stone pillars. This design emphasizes strength and regal aesthetics.
    Iron-Framed Chair A chair with an iron frame. The seat and back are crafted from wood planks, but the frame is made from iron bars, giving a strong and durable appearance. Combines the strength of iron with the warmth of wood, creating a durable and visually interesting design.
    Cozy Woven Chair A chair constructed from woven plant materials. The seat and back are made of intertwined vines and other plant-like materials. The legs are either thin wooden poles or are simply anchored into the ground. Ideal for a rustic or natural-themed environment, providing a unique and inviting visual.
    Modern Chair A sleek chair design, constructed from polished stone or obsidian. The seat and back are smooth and have a minimalist aesthetic. The legs are smooth, pillar-like shapes. A modern and stylish design, perfect for a minimalist or modern-themed environment.
    Giant Chair A chair constructed using large, thick wooden beams and planks. The chair is proportionally oversized, giving a comical or unique visual impact. Suitable for comedic effect, large-scale environments, or a bold statement.

    Enhancements and Considerations

    Beyond the fundamental designs, numerous enhancements can elevate the aesthetic appeal of Minecraft chairs. Consider incorporating custom dyes, unique textures, and intricate patterns to make your chair truly stand out. The use of specialized crafting tables can allow for intricate patterns and textures that would be difficult to achieve with basic tools. Adding these details significantly improves the overall visual appeal of the chair.

    Final Thoughts

    Crafting a chair in Minecraft is more than just a simple task; it’s an opportunity to unleash your creativity and build functional and visually appealing structures. Whether you’re aiming for a simple stool or an elaborate throne, this guide has you covered. Now get out there and start building!