Tag: iOS

  • Reset Network Settings on iPhone A Comprehensive Guide

    Reset Network Settings on iPhone A Comprehensive Guide

    Reset Network Settings on iPhone is a crucial troubleshooting step for various connectivity issues. This guide delves into the process, from understanding different reset types to preparing your iPhone and handling post-reset actions. We’ll cover everything from common Wi-Fi and cellular problems to advanced scenarios and security considerations, ensuring a smooth and secure reset experience.

    Whether you’re facing slow internet speeds, lost connections, or Bluetooth pairing woes, this guide will walk you through the process of resetting your iPhone’s network settings, and offer valuable tips to ensure a successful outcome. We’ll examine the various types of network resets available, and explain the impact of each on your connected accounts and devices. Understanding these nuances is key to making informed decisions when tackling network issues.

    Understanding the Reset Network Settings Process

    Resetting network settings on your iPhone can be a useful troubleshooting step for various connectivity issues. This process essentially erases your iPhone’s saved network configurations, forcing it to reconnect to Wi-Fi and cellular networks. It’s important to understand the different types of resets and their implications before proceeding.

    Step-by-Step Reset Procedure

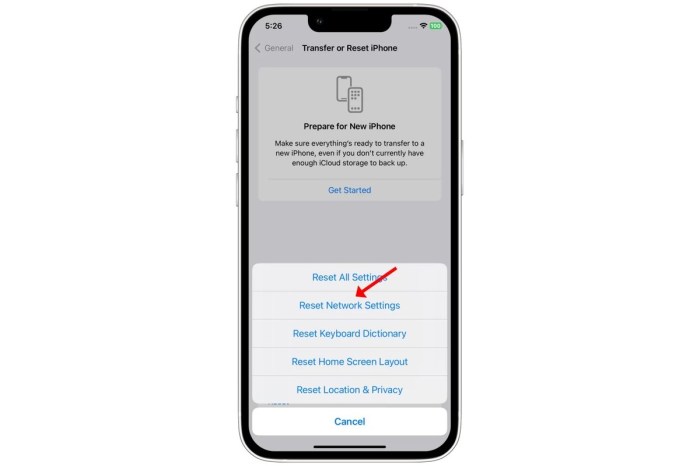
    To reset your iPhone’s network settings, follow these steps:

    • Open the Settings app on your iPhone.
    • Tap on “General.”
    • Scroll down and tap on “Transfer or Reset iPhone.”
    • Tap on “Reset.”
    • Tap on “Reset Network Settings.”
    • Enter your passcode if prompted.
    • Confirm the reset by tapping “Reset Network Settings” again.

    Your iPhone will now disconnect from all Wi-Fi networks and cellular data connections. The process typically takes a few minutes.

    Types of Network Resets

    Resetting network settings on an iPhone offers different options. A full reset affects all network configurations, while targeted resets only impact specific aspects.

    • Full Network Reset: This option removes all saved Wi-Fi networks, cellular data settings, VPN configurations, and Bluetooth pairings. This is a comprehensive approach to restoring default network settings.
    • Targeted Resets (e.g., Wi-Fi or Cellular): These selective resets offer more granular control. For instance, a Wi-Fi reset clears saved Wi-Fi networks, allowing you to reconnect to them from scratch. Similarly, a cellular reset restores your cellular data settings to default.

    Impact on Connected Accounts and Devices

    Resetting network settings typically does not affect your connected accounts, such as iCloud, or apps. However, some third-party apps might require re-authentication or re-pairing with your device after the reset. Also, any saved Bluetooth pairings will be removed, and you’ll need to re-pair those devices.

    Comparison of Full vs. Targeted Resets

    The table below highlights the key differences between a full network reset and targeted resets.

    Reset Type Impact on Wi-Fi Impact on Cellular Data Impact on Other Settings
    Full Reset Removes all saved Wi-Fi networks; you must reconnect. Resets cellular data settings; you must reconfigure. Removes VPN configurations, Bluetooth pairings, and other network-related settings.
    Targeted (Wi-Fi) Removes saved Wi-Fi networks; you must reconnect. No impact on cellular data. No impact on other network-related settings.
    Targeted (Cellular) No impact on Wi-Fi. Resets cellular data settings; you must reconfigure. No impact on other network-related settings.

    Troubleshooting Network Issues

    Resetting your iPhone’s network settings can be a powerful tool for resolving various connectivity problems. However, it’s crucial to understand when a reset is the right solution and what other potential causes might be at play. Knowing these factors can save you time and frustration.This section dives deeper into common network problems a reset might address, and importantly, when a reset won’t be the answer.

    Sometimes, a frustratingly slow iPhone connection needs a good reset. A quick Network Settings reset can often fix those connection hiccups. If you’re looking for something a bit more upbeat to listen to while you wait for the reset to complete, you might enjoy the new song from Kipp Stone Tata, check it out here: kipp stone tata new song listen.

    It’s a great way to pass the time while your phone sorts itself out. Just remember to back up your important data before performing any iPhone resets.

    We’ll also explore potential underlying issues and how to diagnose them effectively. Understanding the various diagnostic methods is vital for finding the root cause of your network problems.

    Common Network Problems Resolved by a Reset

    A network reset can often resolve issues arising from corrupted network settings. This includes problems with Wi-Fi connectivity, cellular data issues, VPN configuration errors, and incorrect proxy settings. In many cases, a simple reset can restore a stable connection, eliminating the need for more complex troubleshooting.

    Network Problems a Reset Might Not Fix

    While a reset can be effective for configuration errors, it won’t address hardware problems. Examples include a faulty SIM card, a damaged antenna, or issues with the cellular tower’s signal. Software glitches unrelated to network settings, such as corrupted app data or system glitches, also won’t be resolved by resetting network settings. Moreover, problems originating outside the iPhone, like internet service provider outages, will remain unresolved.

    Potential Causes of Network Issues Beyond Faulty Configuration

    Network issues can stem from various factors beyond incorrect settings. A weak or inconsistent Wi-Fi signal from the router, for example, can lead to intermittent connectivity problems. Similarly, interference from other electronic devices operating on the same frequency can affect the strength of your wireless connection. A crowded Wi-Fi network can also result in slower speeds and connection dropouts.

    In cellular data scenarios, network congestion or a poor cellular signal reception area could be contributing factors.

    Methods for Diagnosing Network Problems

    Different methods offer varying levels of insight into network issues. Checking for Wi-Fi or cellular signal strength using the iPhone’s built-in settings is a quick preliminary step. More detailed diagnostics might involve using a network analysis tool or consulting your internet service provider (ISP) for troubleshooting advice, especially if the problem is consistent. Using a Wi-Fi analyzer app can pinpoint issues with your router’s signal or identify interference from other devices.

    If you suspect a cellular issue, checking signal bars and contacting your carrier for any service disruptions is recommended.

    Importance of Backing Up Data Before a Reset

    Backing up your data is crucial before performing any reset. A network reset will not delete your personal data, but it can affect app configurations and settings. This includes saved Wi-Fi passwords, VPN connections, and other network-related data. Ensure your data is safely stored in iCloud or a local backup. This precaution prevents any potential loss of important information.

    Steps to Take if the Reset Fails

    If the reset fails to resolve the network issue, it indicates a problem that extends beyond the network configuration. First, review your internet service provider’s status page to check for any outages or maintenance. Consider contacting your carrier or your router’s manufacturer for support if the issue persists. If the issue is localized, consulting an IT professional might be necessary.

    Preparing for the Reset

    A network reset on your iPhone can be a powerful troubleshooting tool, but it’s crucial to prepare thoroughly. This involves understanding what the reset will do, backing up critical data, and ensuring you have a plan to restore your settings afterward. A well-planned reset minimizes potential disruptions and maximizes the chances of a smooth transition.The reset process essentially erases your network settings, requiring you to reconnect to Wi-Fi and cellular networks.

    This often resolves connectivity issues, but a crucial aspect is proactively preparing for this change. Careful planning ensures you don’t lose important information or face unexpected challenges.

    Essential Checks Before Initiating a Reset

    Before diving into the reset process, it’s wise to perform some preliminary checks. This helps ensure the reset is the appropriate solution and that you’ve taken necessary precautions. These checks should be performed methodically, and each step verified before proceeding.

    • Verify all essential network connections are functioning correctly. This includes checking Wi-Fi, cellular data, and Bluetooth, to make sure everything is running as expected.
    • Ensure all your desired apps are running as expected. This helps you to avoid surprises during the reset.

    Verifying Network Connections

    A thorough check of your current network connections is vital. This step helps determine if the reset is truly necessary or if a different approach might resolve the problem.

    • Test Wi-Fi connectivity by trying to access websites and other online resources.
    • Verify cellular data access by checking data usage, or by making and receiving calls. This will help you determine the current status of your cellular network connection.
    • Confirm Bluetooth is working correctly by attempting to connect Bluetooth devices, such as headphones or car audio systems.

    Disconnecting from Wi-Fi and Cellular Data

    Disconnecting from Wi-Fi and cellular data is critical before performing the reset. This prevents unexpected data loss or conflicts during the reset process.

    • Turn off Wi-Fi by navigating to Settings > Wi-Fi and toggling the switch to the “Off” position.
    • Turn off cellular data by navigating to Settings > Cellular and toggling the switch to the “Off” position.

    Backing Up Important Data

    Backing up your data before resetting network settings is essential to avoid data loss. A robust backup strategy safeguards crucial information.

    • Back up your contacts, photos, videos, and other important data to iCloud, a computer, or an external storage device. This ensures you don’t lose your vital information.

    Securing Accounts and Data

    Protecting your accounts and data is a crucial part of the preparation process. A structured approach helps ensure that your personal information is secure.

    Account Security Steps
    iCloud Review and update your iCloud password.
    App Stores Ensure your app store passwords are secure and up-to-date.
    Email Confirm email passwords are secure and up-to-date.
    Other Important Accounts Review and update passwords for all other essential accounts.

    Post-Reset Actions

    Resetting your iPhone’s network settings is a powerful troubleshooting tool, but it’s crucial to understand the steps required to reconnect and reconfigure your devices afterward. This section will guide you through the process of reconnecting to Wi-Fi, cellular networks, Bluetooth devices, and VPN connections, along with potential issues and their solutions.

    Resetting network settings on your iPhone can sometimes be a lifesaver for frustrating connection issues. But sometimes, a deeper dive into system memory management is needed. For instance, clearing the RAM on your iPad or iPhone, as detailed in this helpful guide Clear the RAM on an iPad or iPhone , can resolve similar performance hiccups. Ultimately, resetting network settings on your iPhone can often be a simple and effective solution, resolving those stubborn connectivity problems.

    Reconnecting to Wi-Fi and Cellular Networks

    After the reset, your iPhone will need to scan for available Wi-Fi and cellular networks. This process typically involves selecting your preferred network from the list of available options and entering the password if required. For cellular networks, your iPhone will automatically connect to your carrier’s network, assuming proper service is available in your area.

    Re-entering Network Settings

    The re-entry of network settings involves re-inputting the necessary details for your Wi-Fi and cellular connections. This typically includes entering the network name (SSID) and password for your Wi-Fi network. For cellular, the iPhone will automatically configure itself based on your carrier’s network settings. Ensure you have the correct network credentials to avoid connection issues.

    Re-Pairing Bluetooth Devices

    The process of re-pairing Bluetooth devices after a network reset involves a similar procedure to initial pairing. This often requires selecting the device from a list of available Bluetooth devices on your iPhone and then entering the pairing code if needed. If the device doesn’t appear in the list, check if the device is turned on and within Bluetooth range.

    Resetting network settings on your iPhone can sometimes be a lifesaver, especially if you’re having connectivity issues. It’s a surprisingly simple process, but sometimes it can feel a bit like a digital detox. You might even find yourself thinking about other digital tools, like adding swatches in Photoshop. Add Swatches in Photoshop is a great way to streamline your design workflow, but don’t forget that a simple network reset can often resolve those annoying connection problems, too.

    So, if you’re still struggling with your iPhone’s Wi-Fi, give it a try!

    Re-configuring VPN Connections

    Re-configuring VPN connections involves re-entering the VPN server address, username, and password. The specific procedure depends on the type of VPN service you’re using. Refer to the VPN provider’s documentation for detailed instructions. Remember to choose the correct VPN protocol for optimal security and performance.

    Common Post-Reset Issues and Resolutions, Reset Network Settings on iPhone

    After a network reset, some common issues may arise. One such issue is the inability to connect to a Wi-Fi network. This could be due to an incorrect password or a network name change. Another potential problem is difficulty re-pairing Bluetooth devices. This can be resolved by ensuring both devices are turned on and within range.

    If you face difficulties re-configuring VPN connections, double-check your VPN provider’s instructions and ensure the correct credentials are entered.

    Advanced Scenarios

    Resetting network settings on your iPhone can be a powerful troubleshooting tool, but it’s crucial to understand its implications, especially in complex situations. This section dives into advanced scenarios where a reset might be necessary and how to navigate potential complications. From specific problem types to the impact on connected devices and locked iPhones, we’ll cover it all.A network reset isn’t a magic bullet.

    It’s a significant step, and understanding the potential consequences—particularly in cases involving sensitive data or multiple devices—is paramount. This section aims to equip you with the knowledge to make informed decisions.

    Specific Problems Requiring a Reset

    Network resets are not a one-size-fits-all solution. They are most effective when other troubleshooting steps have failed. Problems like persistent Wi-Fi connection issues, intermittent cellular connectivity, or strange network behavior that resists other fixes are prime candidates for a network reset. In such situations, a reset can help isolate the problem to the network configuration itself.

    Impact on Connected Devices

    A network reset on your iPhone affects other devices on the network. This is because the reset essentially removes and re-establishes the iPhone’s network configuration. If you’re part of a home network with multiple devices, expect temporary disruptions in connectivity. For example, smart home devices might lose their connection or require manual re-pairing. This is temporary, as the devices will reconnect after the iPhone reconfigures its network settings.

    In some cases, devices may require you to re-enter network credentials.

    Recovering Lost Network Settings

    Unfortunately, there’s no foolproof way to recover lost network settings after a reset. The reset action discards the previous configuration, so it’s essential to take precautions. This is why careful preparation, as discussed in previous sections, is so important. If you’ve backed up your network settings or meticulously documented them before the reset, this process will be much smoother.

    However, without prior records, restoring your network configuration becomes challenging.

    Restoring Previous Network Configurations

    Various approaches exist for restoring previous network configurations, each with its own level of complexity. If you have a backup of your network settings, restoring from the backup is the easiest and most reliable method. However, if you haven’t backed up your network settings, manual re-entry of the network details is the only option. This involves meticulously remembering and re-entering all network details, including Wi-Fi passwords and cellular APNs.

    The method of choice depends entirely on the availability of prior backups and meticulous record-keeping.

    Impact on a Locked iPhone

    Resetting network settings on a locked iPhone can present unique challenges. If the iPhone is locked and you don’t have the passcode, you won’t be able to access the settings necessary to initiate the reset. This means that you’ll be unable to re-configure the network settings until the iPhone is unlocked. Therefore, the process of resetting the network configuration on a locked iPhone is effectively impossible.

    Security Considerations

    Resetting your iPhone’s network settings can be a useful troubleshooting step, but it’s crucial to understand the potential security implications. This process essentially wipes the slate clean on network configurations, which, while beneficial for resolving issues, can also expose your device to vulnerabilities if not handled carefully. Knowing the potential risks and how to mitigate them is essential to maintaining a secure connection.Network resets often involve removing security protocols and configurations that were previously in place to protect your device and personal information.

    This can leave your device susceptible to various security threats if proper precautions are not taken. Understanding the specifics of these risks and implementing appropriate safeguards will ensure that your iPhone remains secure even after a reset.

    Potential Security Risks

    Network resets can inadvertently compromise your device’s security by removing critical security measures. These measures, such as Wi-Fi passwords, VPN configurations, and even two-factor authentication settings, are often erased during the reset process. This can lead to unauthorized access to your network and sensitive data.

    Examples of Potential Risks

    • Compromised Wi-Fi Network: If you rely on a secured Wi-Fi network for banking or sensitive online transactions, resetting your network settings will remove the saved Wi-Fi credentials. This means you’ll need to re-enter the password, potentially exposing the network to unauthorized access during this process if security measures aren’t in place to prevent it. This is especially true for public Wi-Fi networks, where security is often compromised.

    • Exposure to Malware: If your device has existing malware or spyware, resetting network settings might not remove the malware entirely. The malware could potentially exploit vulnerabilities during the reset to further infiltrate the device or obtain access to your sensitive data.
    • Loss of VPN Connection: If you use a VPN for enhanced security and privacy while using public Wi-Fi, resetting your network settings will disconnect you from your VPN. This means you’ll lose the added layer of security provided by the VPN until you reconnect.

    Mitigation Strategies

    Taking proactive steps to safeguard your device during and after a network reset is crucial. It’s essential to prioritize security to prevent potential risks.

    • Backup Data: Before initiating a network reset, back up all important data on your device. This ensures that you don’t lose any critical information during the reset process. Consider using iCloud or iTunes for comprehensive backups.
    • Secure Wi-Fi Network: If you use a secured Wi-Fi network, ensure that the password is strong and difficult to guess. Avoid using easily guessable passwords, like birthdays or names. Employ a strong password management tool.
    • Two-Factor Authentication: Enable two-factor authentication whenever possible for all accounts and applications that support it. This adds an extra layer of security beyond just a password.
    • Verify Network Security: After resetting network settings, carefully review and reconfigure all your network connections. Ensure you have strong passwords and utilize appropriate security protocols.

    Impact on Security Protocols

    Network resets can affect various security protocols in different ways.

    • Wi-Fi Security: Resetting settings might remove saved Wi-Fi passwords, requiring re-entry and potentially exposing the network to vulnerabilities. It’s critical to secure your Wi-Fi connection again using strong, unique passwords.
    • VPN Configurations: Resetting network settings will disconnect you from any active VPN connections. Reconnect to the VPN after the reset to restore the enhanced security.
    • Cellular Data Security: While cellular data security isn’t directly affected by a network reset in the same way as Wi-Fi, it’s still essential to maintain secure data usage habits. Avoid using public Wi-Fi for sensitive transactions if possible.

    Summary Table

    Potential Security Risks Mitigation Strategies
    Compromised Wi-Fi Network Use strong, unique passwords; secure the Wi-Fi network; use VPN when necessary.
    Exposure to Malware Regularly scan your device for malware; back up data before reset.
    Loss of VPN Connection Reconnect to the VPN after the reset.
    Exposure to unauthorized access Ensure strong passwords, use secure networks, and enable two-factor authentication where available.

    iPhone Models and Variations: Reset Network Settings On IPhone

    Reset Network Settings on iPhone

    Resetting network settings on your iPhone can be a straightforward process, but the specific steps might vary slightly across different models and iOS versions. Understanding these nuances is crucial to ensure a smooth and successful reset, avoiding potential complications.Different iPhone models might have slightly varying hardware configurations, which could affect network performance. This means the way your iPhone interacts with cellular towers, Wi-Fi networks, and Bluetooth devices can subtly differ from one model to another.

    These minor variations can influence how a network reset affects the device’s operation.

    Comparison of Network Reset Procedures Across iPhone Models

    Different iPhone models, even within the same generation, might have slightly different hardware configurations. This can lead to subtle differences in the way the reset process affects the device’s operation. For instance, older models with limited RAM might experience slightly longer reset times. Newer models with more powerful processors might handle the reset procedure more quickly. While these differences are usually insignificant for the average user, technical experts might find them noteworthy.

    Variations in the Reset Process Based on iOS Versions

    The iOS version installed on your iPhone can significantly impact the network reset process. Newer iOS versions often incorporate optimizations that improve the efficiency of the reset procedure. Older iOS versions might have different user interfaces or steps, which could require slightly different approaches during the reset process. Consider that older iOS versions might not have the advanced features of newer versions, making the process slightly less streamlined.

    Specific Considerations for Older iPhone Models

    Older iPhone models might have limitations in terms of processing power and memory. This can lead to longer reset times and potential instability during the procedure. When performing a network reset on an older model, it’s advisable to have a stable power source available. Consider the potential for the device to become unresponsive or exhibit unusual behavior during the reset.

    Be prepared for slightly longer reset durations on older devices.

    Unique Challenges Associated with Specific iPhone Models

    Certain iPhone models, due to their hardware limitations or design characteristics, might encounter unique challenges during a network reset. These challenges could involve compatibility issues with specific Wi-Fi standards or cellular network technologies. For instance, a model with a less sophisticated Wi-Fi chip might experience difficulties connecting to newer Wi-Fi standards, which could be a unique challenge during the reset.

    Table Summarizing iOS Version Compatibility with Network Reset Methods

    This table provides a general overview of the compatibility of different iOS versions with various network reset methods. Note that this table is not exhaustive and specific scenarios might require further investigation.

    iOS Version Compatibility with Network Reset Methods Specific Considerations
    iOS 15 and above Generally compatible with all standard network reset methods. Potentially optimized reset procedures for enhanced speed and stability.
    iOS 14 Compatible with all standard network reset methods. Minor differences in user interface compared to newer versions.
    iOS 13 and below Generally compatible with standard network reset methods. Potential for longer reset times due to processing limitations.

    Final Conclusion

    Reset Network Settings on iPhone

    In conclusion, resetting your iPhone’s network settings can be a powerful tool for resolving connectivity problems. By following this comprehensive guide, you’ll gain a clear understanding of the process, from preparation to post-reset actions. Remember to back up your data, carefully consider the different reset types, and address any potential security concerns. This detailed guide empowers you to confidently tackle network issues and keep your iPhone connected and secure.

  • Add Favorites to Your iPhone A Comprehensive Guide

    Add Favorites to Your iPhone A Comprehensive Guide

    Add Favorites to Your iPhone sets the stage for a detailed exploration of organizing your iPhone. From contacts and apps to websites and photos, learning how to add and manage favorites can significantly enhance your iPhone experience. This guide covers everything from basic methods to advanced customization, troubleshooting common issues, and leveraging the power of your iPhone’s built-in features for a more efficient workflow.

    Understanding how to effectively add favorites on your iPhone can streamline your daily tasks and make your device more personalized. This comprehensive guide will walk you through various methods, including long-presses, dedicated buttons, and menu options, to help you effortlessly organize the elements you use most frequently.

    Understanding iPhone Favorites

    The iPhone’s “Favorites” feature is a powerful tool for streamlining your interactions with various content types. It allows you to quickly access frequently used contacts, apps, websites, and even photos, saving you valuable time and effort. This feature is especially useful for organizing your digital life and making it more efficient.The “Favorites” feature on an iPhone is a personalized collection of frequently accessed items.

    It allows users to quickly find and interact with content they use regularly, be it contacts, apps, websites, or photos. This curated collection can greatly enhance your daily digital workflow, promoting a smoother and more intuitive user experience.

    Ever wanted to quickly access your favorite Halloween recipes or spooky decorations? Adding favorites to your iPhone is a super helpful trick, especially when planning a big bash like Throw a Halloween Party. You can easily bookmark those awesome websites and social media posts that you want to re-visit, making your iPhone a handy resource. This simple feature saves you time and effort, just like organizing your Halloween party preparations.

    Definition of iPhone Favorites

    Favorites on an iPhone are a curated list of frequently accessed items. This personalized list streamlines user interactions by providing direct access to important contacts, applications, websites, and photos. This feature caters to the user’s specific needs and preferences, allowing for a tailored experience.

    Types of Items in iPhone Favorites, Add Favorites to Your iPhone

    The “Favorites” section can include various types of content, tailored to individual needs. This allows for diverse organization and easy retrieval. Here’s a breakdown of the common types:

    • Contacts: Frequently contacted individuals are easily accessible, allowing for rapid communication.
    • Apps: Essential applications are quickly launched, enhancing productivity and efficiency.
    • Websites: Frequently visited websites are readily available, saving time and effort in navigating the web.
    • Photos: Important photos are easily retrievable, preserving memories and crucial visual information.

    User Applications of iPhone Favorites

    Users leverage the “Favorites” feature in numerous ways. The personalized nature of the feature allows for a tailored user experience. For example, business professionals might add frequently contacted clients, while students might add their favorite study resources.

    • Communication: Quickly access contacts for calls or messages, optimizing communication.
    • Productivity: Quickly access essential applications, enhancing productivity and efficiency.
    • Information Retrieval: Access frequently visited websites for quick information lookup.
    • Memory Preservation: Quickly locate important photos, preserving cherished memories.

    Importance of Organizing Content with Favorites

    Organizing content with favorites on an iPhone provides significant benefits. A curated selection of frequently accessed items leads to a streamlined workflow.

    • Enhanced Efficiency: Direct access to essential items reduces search time and effort.
    • Improved Workflow: Streamlined access to important information enhances overall efficiency.
    • Personalized Experience: The curated list caters to individual preferences and needs.

    Advantages of a Dedicated Favorites Section

    A dedicated favorites section on the iPhone offers several advantages. This feature provides a centralized location for frequently used items.

    • Time Savings: Quickly access essential items, eliminating the need for extensive searches.
    • Reduced Cognitive Load: The dedicated space streamlines information retrieval, reducing mental effort.
    • Improved User Experience: A curated list of favorites enhances the overall experience, making the iPhone more intuitive and user-friendly.

    How iPhone Favorites Enhance User Experience

    The “Favorites” feature significantly enhances user experience. This feature provides a personalized space for frequent items.

    • Intuitive Navigation: The curated list simplifies access to essential information, enhancing user interaction.
    • Personalized Interface: The personalized list adapts to user preferences and behavior.
    • Increased Efficiency: Direct access to frequent items streamlines the workflow and saves time.

    Comparison Across iPhone Models

    The “Favorites” feature is generally consistent across various iPhone models. The fundamental functionality remains largely unchanged, but subtle differences may exist in implementation. These differences can include the placement of the feature in the interface.

    Simple User Flow Diagram for Adding Favorites

    [A simple, text-based diagram of the user flow, like a numbered list, would be placed here. For example:

    • Open the desired app (e.g., Contacts).
    • Select the contact to add to favorites.
    • Tap the “Add to Favorites” button.
    • The contact is now added to the Favorites list.]

    Methods for Adding Favorites

    Adding favorites on your iPhone allows quick access to frequently used contacts, apps, and websites. This streamlined approach saves time and effort by placing essential resources at your fingertips. Understanding the various methods for adding items to your favorites ensures optimal use of these features.Efficient management of your iPhone’s favorites is crucial for enhanced productivity and personalized organization.

    Different methods cater to various preferences and contexts, offering flexibility in how you save your favorite items.

    Different Methods for Adding Favorites

    Several methods exist for adding items to your iPhone favorites, each with its own set of steps. Choosing the appropriate method depends on the type of item you want to add and the interface you’re using.

    Method Description Example App/Feature
    Long Press Hold down on the item for a brief period. A contact in the Contacts app. Contacts App
    Dedicated Button Specific buttons in certain apps allow direct addition to favorites. An app in the App Library. App Library
    Menu Options Some items offer a dedicated “Add to Favorites” option in a context menu. A website in Safari. Safari, specific apps.

    Adding Contacts to Favorites

    To add a contact to favorites, use the long-press method. Long-press the contact’s name in the Contacts app. A context menu will appear, and you should see an option to add the contact to favorites. Select this option to save the contact.

    Adding Apps to Favorites

    The App Library provides a dedicated “Add to Favorites” button for apps. Locate the desired app in the App Library. Tap the app icon and a dedicated “Add to Favorites” button will appear.

    Adding Websites to Favorites

    Adding websites to your favorites involves using Safari’s menu options. Open the website in Safari. Tap the “Share” button (it typically looks like a square with an upward-pointing arrow). From the share sheet, select “Add to Home Screen.” A confirmation prompt will appear, and selecting “Add” will save the website to your home screen.

    Adding Photos to Favorites

    To add a photo to favorites, follow these steps:

    1. Open the Photos app.
    2. Locate the photo you want to add.
    3. Tap and hold the photo to bring up the context menu.
    4. Select “Add to Favorites.”

    Features and Functionality

    Add Favorites to Your iPhone

    iPhone favorites offer a powerful way to quickly access frequently used apps, contacts, websites, and other items. This feature streamlines workflow and saves time by providing direct access to essential resources. Understanding how favorites are displayed, managed, and accessed is crucial for maximizing their benefits.Display and Management of FavoritesFavorites are displayed in a manner that’s intuitive and easy to navigate.

    Ever wanted to quickly access your favorite apps on your iPhone? Adding favorites is a simple way to streamline your phone use. Speaking of streamlining, did you know you can make delicious cake pops without sticks? Check out this fantastic tutorial on Make Cake Pops Without Sticks for a fun and creative twist. It’s a great way to get creative with your baking, and afterwards, you can easily add those new favorite recipes to your iPhone’s bookmarks or favorites list!

    The specific layout and visual presentation of favorites vary depending on the type of item. For example, app favorites are often shown as icons in a grid-like format on the home screen. Contacts and websites, on the other hand, might appear as entries in a list or within a contact app. The display format is tailored to facilitate quick identification and selection.

    The management of favorites involves adding, removing, and organizing items into folders or subfolders to categorize and improve overall accessibility.Accessing FavoritesAccessing favorites is a straightforward process. Users can tap on the favorite item directly from the displayed location, or use a dedicated favorites section or menu to quickly reach the desired item. For instance, tapping on a favorite app icon on the home screen immediately launches the app.

    Speaking of organizing your digital life, adding favorites to your iPhone is a game-changer. It’s super helpful for quickly finding your go-to apps, music, and contacts. While you’re diving into that, have you heard about Radiohead reissuing Kid A and Amnesiac with a new album of unreleased tracks? You have to listen to them if you say the word, check out the details here.

    Once you’ve sorted through all that amazing new music, remember to use that handy favorite feature to keep your most-used apps easily accessible on your iPhone!

    Similarly, selecting a contact from the favorites list opens the contact information.Organizing and Removing FavoritesFavorites are organized and managed through folders and subfolders, which allow for categorization. Users can create folders to group related items together. Items within a folder are typically displayed in a list or grid format, allowing users to locate items quickly. To remove a favorite, users can either individually delete it from the specific location or delete the entire folder.Search FunctionalitySearch functionality is often integrated into the favorites system.

    This allows users to locate specific items by typing a or phrase related to the item. The search function searches within the context of the favorites, making it easier to find specific contacts, apps, or websites.Use of Folders and SubfoldersFolders and subfolders offer a structured way to organize favorites. For instance, users can create a folder for work contacts, another for family contacts, and further subdivide the work folder by department.

    This hierarchical organization makes it easy to locate and access the desired contact. Creating folders also makes it easier to find specific favorites and manage them in a more organized manner.Limitations of the Favorites SystemOne limitation of the favorites system is the storage capacity. The number of favorites a user can add is potentially limited, depending on the iPhone model and storage capacity.

    Another limitation is the type of items that can be added to the favorites. For example, a user might not be able to add a specific note or document to their favorites list.Accessibility Features for Adding FavoritesThe accessibility features of adding favorites are often integrated with the device’s general accessibility settings. These settings may include options to enlarge the display or customize the navigation for easier access to favorite items.

    Users with visual or motor impairments may find these features helpful in managing and accessing their favorites.

    Troubleshooting and Common Issues: Add Favorites To Your IPhone

    Add Favorites to Your iPhone

    Adding items to your iPhone’s favorites can sometimes run into hiccups. This section dives into common problems users encounter and provides practical solutions. Understanding these issues can save you time and frustration when trying to organize your digital life.Troubleshooting favorite items on your iPhone requires a methodical approach. Identifying the specific problem is crucial before attempting a solution.

    This section will cover common problems, potential conflicts with other settings or apps, and methods to resolve issues related to specific apps or features. We’ll also explore how to reset your favorites list as a last resort.

    Items Missing from Favorites List

    Sometimes, items you’ve meticulously added to your favorites simply vanish. This can be frustrating, especially if those items were important to your workflow or organization. Several factors can contribute to this issue.

    • Incorrect data entry: Double-check that you’ve entered the correct information, such as the precise website address or app name, when adding the item to your favorites. Typos or slight variations can prevent the item from being recognized. For example, if you’re trying to add a website, ensure the URL is correctly typed.
    • App or system glitches: Occasionally, bugs or temporary system glitches can disrupt the favorite-saving process. Restarting your iPhone or updating the app responsible for adding the item can often resolve these temporary issues.
    • Data corruption: In rare cases, corrupted data in the operating system or a specific app can prevent items from appearing in the favorites list. A full reset of the favorites list might be required.

    Conflicts with Other Settings or Apps

    Certain settings or apps might inadvertently interfere with your favorites list. Understanding these potential conflicts can prevent future problems.

    • Background app refresh: Some apps may not save favorites correctly if their background refresh settings are interfering with the system’s ability to store the data. Disabling unnecessary background app refresh can resolve this issue.
    • Incompatible apps: Some third-party apps might not fully integrate with the iOS favorites system, leading to issues with saving or retrieving items. Check the app’s documentation or contact the developer for potential solutions.
    • Data synchronization issues: If you use iCloud or other syncing services, ensure your settings are configured correctly to prevent conflicts with your favorite items.

    Resolving Issues with Specific Apps or Features

    Specific apps might have their own unique ways of handling favorites. This section will provide solutions to problems with particular apps.

    • Web browser favorites: If a website isn’t appearing in your browser’s favorites, ensure you’ve added the item using the correct method within the browser’s settings. Clearing browser cache and cookies can sometimes resolve the issue. Ensure the website is accessible from the internet.
    • Email accounts: If you can’t find an email in your favorites, review your email client’s settings for favorite management. Some email clients may have specific requirements for adding or organizing favorites.

    Resetting the Favorites List

    As a last resort, you can reset the favorites list. This action will remove all items from your favorites.

    • Important Considerations: Resetting your favorites list will permanently delete all items. Make sure you have backed up your favorites or have copies of important items before proceeding.
    • Process: The process for resetting the favorites list varies slightly depending on the app or feature. Refer to the app’s documentation or your iPhone’s settings for the specific steps.

    Advanced Usage and Customization

    Taking your iPhone favorites beyond the basics opens up a world of possibilities for enhanced organization and efficiency. Beyond simply adding items, you can now strategically group, sort, and share your favorites, transforming them into powerful tools for specific tasks. This section dives into the advanced techniques for maximizing your favorite items.Customizing your favorites isn’t just about aesthetics; it’s about streamlining your workflow.

    By implementing custom categories, sorting methods, and sharing strategies, you can elevate your iPhone experience to meet your unique needs. This advanced approach is particularly beneficial for users who frequently interact with specific sets of information or locations.

    Sharing Favorites

    Sharing favorites extends their usefulness beyond individual devices. This feature allows you to easily distribute curated collections to others. For instance, you can share a list of favorite restaurants with a friend or family member, or a set of frequently visited locations with a travel companion. This feature is particularly useful for collaboration and information sharing.

    Importing/Exporting Favorites

    The ability to import and export favorites provides flexibility for managing your data across different devices or platforms. If you’ve meticulously crafted a collection of favorite contacts or websites on one iPhone, you can easily transfer that collection to another device or even a computer. This is valuable for maintaining consistency and continuity in your favorite data.

    Customizing Organization

    Creating custom categories allows you to tailor your favorites to your specific needs. Imagine creating a category for “Work Contacts” that houses your business associates, or “Favorite Recipes” to store culinary inspirations. This focused approach allows you to easily locate and access the specific information you need.

    Custom Categories for Favorites

    You can create custom categories to group related items. For example, if you frequently visit specific locations, you can create a category like “Travel Destinations” to store information about hotels, restaurants, and attractions in that area. This tailored approach ensures that your favorites are neatly organized, accessible, and relevant to your needs.

    Using Favorites for Specific Tasks

    Beyond general organization, you can use favorites for specific tasks. For instance, a frequent traveler might use favorites to store frequently visited locations, flight information, and hotel bookings. This ensures quick access to essential travel details. By associating favorites with a task, you can make it easier to manage your activities and stay organized.

    Customization Options for Favorites

    The table below illustrates various customization options available for organizing your favorites.

    Option Description Example
    Custom Folders Create folders for grouping related favorites Work Contacts, Family Members, Shopping Locations
    Sorting Organize favorites by date added, last accessed, or alphabetically Sort by last accessed for frequently visited locations, or alphabetically for contacts
    Sharing Share curated collections of favorites with others Share a list of favorite restaurants with a friend
    Importing/Exporting Transfer favorites between devices or platforms Transfer a list of favorite websites from one iPhone to another

    Summary

    In conclusion, mastering the art of adding favorites on your iPhone empowers you to curate a personalized digital ecosystem. By understanding the various methods, features, and troubleshooting steps, you can unlock a more streamlined and intuitive iPhone experience. This guide provides a robust foundation for optimizing your iPhone, ensuring you can quickly access the information and applications that matter most to you.

  • Screenshot on iPhone SE A Comprehensive Guide

    Screenshot on iPhone SE A Comprehensive Guide

    Screenshot on iPhone SE: Unlocking the power of capturing moments on your iPhone SE. This guide dives deep into every aspect of screen capturing, from basic techniques to advanced methods. Learn how to effortlessly capture everything from simple images to complex layouts, ensuring you never miss a vital detail again.

    We’ll explore various methods for taking screenshots, covering standard and alternative techniques, and comparing their efficiency. We’ll also delve into the nuances of screenshot formats, resolutions, and file sizes. Saving, managing, editing, and troubleshooting common issues will be addressed thoroughly, along with advanced strategies for capturing specific elements or entire web pages.

    Capturing Screenshots

    Taking screenshots on your iPhone SE is a straightforward process, vital for sharing information, documenting issues, or simply saving interesting visuals. This guide details various methods for capturing screenshots, from the standard approach to alternative techniques, providing a comprehensive overview of speed, ease, and functionality.

    Standard Screenshot Methods, Screenshot on iPhone SE

    The standard method for capturing screenshots on the iPhone SE involves a combination of hardware buttons. This approach is often the quickest and most accessible way to capture images of your screen.

    Method Steps
    Standard 1. Press and hold the Side button (located on the right side of the phone) and the Volume Down button simultaneously.
    2. The screen will flash briefly, and a small preview of the screenshot will appear in the bottom-left corner.
    3. The screenshot is automatically saved to your Photos app.

    Alternative Screenshot Methods

    While the standard method is often sufficient, there are alternative methods available that offer more control or customization.

    Method Steps
    Using Control Center 1. Swipe down from the top-right corner of the screen to access Control Center.
    2. Tap the Screenshot button.
    3. The screenshot is saved to your Photos app.
    Using AssistiveTouch 1. If AssistiveTouch is enabled, locate and tap the AssistiveTouch button.
    2. Select “More” > “Screenshot.”
    3. The screenshot is saved to your Photos app.

    Comparison of Screenshot Methods

    The standard method, using the Side and Volume Down buttons, is generally the fastest and most straightforward. It requires minimal steps and is ideal for quick captures. Using Control Center offers a more visual approach, as you can see the button immediately. AssistiveTouch provides an alternative for users who prefer a different interface or have limited finger dexterity.

    Advantages and Disadvantages of Each Method

    Each screenshot method possesses unique advantages and disadvantages. The standard method is incredibly fast and intuitive, but it requires simultaneous button presses. Using Control Center offers a more visible action and is good for those who want a visual trigger. AssistiveTouch is beneficial for users who have limited physical dexterity or prefer a different method for control.

    Screenshot Formats and Resolutions

    Screenshot on iPhone SE

    Understanding the different screenshot formats and resolutions available on your iPhone SE is crucial for optimizing file size, quality, and usability. Knowing the options empowers you to choose the best format for your specific needs, whether it’s sharing a quick image or archiving a detailed document. The iPhone SE, like other Apple devices, provides flexibility in these settings.

    Image Formats Supported

    The iPhone SE, like other Apple devices, primarily supports the PNG and JPEG formats for screenshots. PNG (Portable Network Graphics) is a lossless format, preserving all image details. JPEG (Joint Photographic Experts Group) is a lossy format, compressing the image, which results in smaller file sizes but potentially some loss of quality. This trade-off between file size and image quality is a key consideration when choosing a format.

    Common Resolutions

    Screenshots on the iPhone SE are typically captured at resolutions that match the display’s native resolution. This ensures high-quality images without excessive file sizes. Common resolutions for screenshots are dependent on the screen size and pixel density.

    Impact on File Size and Quality

    The choice of format significantly impacts the file size and quality of the screenshot. Lossless formats like PNG retain all image details, resulting in larger file sizes. Lossy formats like JPEG, on the other hand, compress the image, leading to smaller file sizes but potentially some loss of quality, especially in areas with fine details or gradients. For simple snapshots, JPEG might suffice, but for images requiring high fidelity, PNG is the better choice.

    Table of Formats, Resolutions, and File Sizes

    Format Resolution File Size (approx.)
    PNG 1920 x 1080 pixels (example) 1-5 MB (variable, dependent on image complexity)
    JPEG 1920 x 1080 pixels (example) 0.5-2 MB (variable, dependent on image complexity and compression level)

    Note: File sizes are approximate and can vary significantly based on the complexity of the screenshot’s content. For instance, a simple screenshot of text might have a smaller JPEG file size compared to a complex image with intricate details.

    Changing Default Screenshot Format and Resolution

    Unfortunately, users cannot directly change the default screenshot format or resolution. The iPhone SE, like other Apple devices, automatically determines the optimal format and resolution based on the content of the screenshot. If you need to alter the format, you will need to manually edit the image after capture using image editing software.

    Taking screenshots on my iPhone SE is pretty straightforward, but sometimes I need a quick distraction. For instance, while figuring out the best angle for a screenshot, I often find myself wanting to listen to something new, like the latest collaboration between Nicki Minaj and Ariana Grande. Check out their new song “Bed” listen to nicki minaj and ariana grandes new song bed.

    Once I’m done jamming, I’m back to mastering the perfect iPhone SE screenshot technique.

    Saving and Managing Screenshots

    Screenshots are invaluable for capturing information, sharing ideas, and troubleshooting issues. Understanding how to save and manage these digital snapshots efficiently is crucial for anyone who uses their iPhone SE regularly. Proper organization ensures easy retrieval when needed, preventing valuable data from getting lost in a sea of images.Efficiently managing your screenshots allows you to quickly find the specific image you need, whether it’s a complex technical diagram or a quick reference note.

    Taking screenshots on the iPhone SE is pretty straightforward, but sometimes you need a little extra oomph, especially when trying to keep your FWB interested. Keep Your FWB Interested is a great resource for those seeking tips on how to spice up that relationship. Knowing how to capture those key moments, though, is still important for the iPhone SE user, so mastering the screenshot function remains a valuable skill.

    This streamlined approach to saving and organizing screenshots is key to maintaining a well-structured digital environment.

    Different Saving Methods

    Screenshots on an iPhone SE can be saved in various ways, each with its own advantages. The default method is usually the most straightforward, but alternative approaches provide more control over file management.

    • The default method automatically saves screenshots to the Photos app. This is the most common and convenient approach for quick access to captured images. This method provides a readily available repository for all your screenshots, making them easily accessible within the Photos app.
    • Screenshots can also be saved to a designated folder in iCloud Drive. This approach ensures your screenshots are backed up to iCloud, providing a secure and readily available backup option. The accessibility of the screenshots depends on your iCloud settings and whether you’ve enabled iCloud Drive.
    • Manual saving options allow users to save screenshots to specific folders on the device. This method gives you more control over the storage location of your screenshots. This can be particularly useful for categorizing screenshots by project, task, or other relevant criteria. This often requires some user initiative to organize them correctly.

    Screenshot Organization and Storage Locations

    Proper organization is essential to locate specific screenshots quickly. The default location for saved screenshots is the Photos app, which provides a centralized repository for all images captured on your iPhone SE. This location is generally easy to access, but alternative storage methods offer greater flexibility and organization.

    Saving Option Location Ease of Access
    Default (Photos App) Photos app library High
    iCloud Drive iCloud Drive folder Moderate, depends on iCloud settings
    Manual Save Designated folder on device Moderate, depends on folder structure

    Screenshots saved to iCloud Drive are accessible across multiple devices linked to your iCloud account. This is useful for maintaining consistency and access to your screenshots across different devices.

    Retrieving Saved Screenshots

    Locating saved screenshots is straightforward. If saved to the Photos app, use the Photos app search functionality. Filter by date, s, or even by people/objects within the image. For screenshots saved to iCloud Drive, navigate to the iCloud Drive folder on your device and search through the files. If screenshots were manually saved to a specific folder, locate the folder in the appropriate location on your device.

    The ease of retrieval depends on the chosen saving method and the organization of the folder.

    Editing and Sharing Screenshots

    Taking screenshots on your iPhone SE is just the first step. The real power comes from editing and sharing those captures. This section delves into the various methods available for enhancing and disseminating your screenshots, empowering you to transform simple captures into impactful visual communication.

    Screenshot Editing Methods

    Several methods allow you to modify your iPhone SE screenshots. Direct editing tools within the Photos app provide basic enhancements. Third-party apps offer more advanced options for image manipulation.

    • Built-in Photos App Editing: The Photos app, accessible through the Photos app icon on your iPhone SE, allows for basic edits like cropping, rotating, and adjusting brightness. These tools are straightforward and effective for minor adjustments. This feature is readily available and simple to utilize, making it an ideal choice for quick edits.
    • Third-Party Apps: Numerous third-party apps provide advanced editing capabilities. These applications offer a broader range of tools, including filters, text overlays, drawing tools, and more. Examples include Snapseed, Photopea, and many others found in the App Store. Their functionality depends on the specific app chosen.

    Sharing Screenshots

    Sharing screenshots is crucial for communication and collaboration. A variety of options are available, ranging from simple sharing to sophisticated collaboration.

    • Built-in Sharing Options: The built-in sharing options in the Photos app provide seamless sharing across various platforms, including Messages, Mail, and social media apps. This method is highly convenient for quick sharing with contacts.
    • Dedicated Apps: Many messaging apps and social media platforms offer integrated screenshot sharing features. For example, using a dedicated platform like Slack for team communication or Instagram for visual content sharing. This approach enables direct integration within the platform’s workflow.
    • Other Services: For more specialized sharing, consider using services like Dropbox, Google Drive, or similar cloud storage platforms. These services are ideal for sharing screenshots with individuals or groups outside your immediate communication network.

    Adding Annotations and Highlights

    Annotating screenshots enhances clarity and provides context. The iPhone SE’s built-in tools or third-party apps allow for this.

    • Built-in Annotation Tools: The Photos app provides basic annotation tools. These tools are often limited to adding text or shapes to the image. This feature can be used for quick, informal annotations.
    • Third-Party Apps: Many third-party apps offer more comprehensive annotation options. These applications often include tools for drawing, highlighting, and adding text with varied formatting. These tools allow for more nuanced communication and clarity in the annotations.

    Screenshot Editing Tools Comparison

    The following table compares different screenshot editing tools based on their features and ease of use.

    Tool Features Ease of Use
    Photos App (iOS) Basic cropping, rotation, brightness adjustment Very Easy
    Snapseed Advanced adjustments, filters, drawing tools Medium
    Photopea (web-based) Extensive editing tools, including advanced layers Medium-High

    Annotating a Screenshot

    The process for annotating a screenshot varies based on the chosen tool.

    1. Open the screenshot in the desired app (e.g., Photos).
    2. Select the annotation tool (e.g., text tool, highlighter).
    3. Add the annotation by positioning and customizing it as needed.
    4. Save the annotated screenshot.

    Troubleshooting Screenshot Issues

    Screenshot on iPhone SE

    Taking screenshots on your iPhone SE is generally straightforward, but occasional issues can arise. This section details common problems and provides solutions to help you resolve them quickly. Understanding the potential causes and troubleshooting steps will empower you to efficiently capture and manage your screenshots.Troubleshooting screenshot problems is crucial for ensuring smooth operation. A well-defined approach allows for efficient identification and resolution of issues, saving time and frustration.

    Having a systematic approach to identifying and addressing these issues is key to optimizing your screenshot experience.

    Common Screenshot Issues and Their Causes

    A variety of factors can contribute to screenshot problems. Sometimes, the issue is a simple software glitch, while other times, it might indicate a deeper hardware problem. Understanding these potential causes is essential to effectively troubleshoot the problem.

    Troubleshooting Steps for Different Screenshot Methods

    Different methods of capturing screenshots may require unique troubleshooting approaches. This section details steps tailored to specific screenshot techniques.

    Screenshots Not Saving

    Several reasons can prevent screenshots from saving. A full storage device, corrupted files, or software glitches can all contribute to this problem. The solutions Artikeld below address these potential causes.

    • Check Storage Space: Ensure sufficient storage space is available on your iPhone SE. Delete unnecessary files or apps to free up space. A full storage device can prevent screenshots from being saved properly. If the storage is full, consider cloud storage services or transferring files to a computer.
    • Check for Corrupted Files: Sometimes, corrupted files in the system can interfere with the screenshot process. Restarting your iPhone SE can often resolve this issue by clearing temporary files.
    • Software Update: Outdated software or apps can cause unexpected issues. Ensure your iPhone SE has the latest operating system and app updates installed. A recent update might fix the issue.

    Screenshots Appearing Blank

    A blank screenshot usually points to a software glitch or a hardware issue. Troubleshooting involves checking software settings and performing device resets.

    • Check Device Settings: Verify that the screenshot function is not disabled in the settings. Ensure the relevant toggles or options are enabled. If the screenshot function is disabled, enabling it will resolve the issue.
    • Restart Your iPhone SE: A simple restart can often fix temporary glitches that prevent screenshots from displaying correctly. A restart clears temporary files and resets the device’s settings.
    • Check for Hardware Problems: If the issue persists after checking settings and restarting, the problem might be related to hardware. Consider seeking professional repair if the blank screenshots persist.

    Categorized Troubleshooting Table

    This table summarizes common screenshot issues, their potential causes, and troubleshooting steps.

    Taking screenshots on my iPhone SE is pretty straightforward, but I’ve been pondering how to best capture complex ideas. Recently, I’ve been deeply moved by the mach hommy interview pray for haiti legacy mach hommy interview pray for haiti legacy and the importance of capturing moments for future reflection. Hopefully, this inspires me to find a more efficient way to document my thoughts and ideas using my iPhone SE’s screenshot capabilities.

    Issue Cause Troubleshooting
    Screenshots not saving Full storage, corrupted files, outdated software Check storage space, delete unnecessary files, restart device, update software
    Screenshots appearing blank Software glitch, disabled screenshot function, hardware problems Check device settings, restart device, check for hardware issues

    Advanced Screenshot Techniques

    Taking screenshots is more than just capturing the entire screen. Advanced techniques allow you to target specific elements, capture extensive documents, and even snag content that extends beyond the visible screen area. These methods are essential for precise documentation, sharing specific information, and archiving complex data.

    Targeting Specific Screen Elements

    To capture specific elements, rather than the whole screen, you can use the “select” or “crop” feature within your screenshot tools. Many apps, like the native screenshot tool on iOS, offer the ability to Artikel a rectangular area or use a more complex selection method to isolate the desired portion of the screen. This is particularly helpful when you want to capture a specific graphic, a detailed table from a web page, or a complex part of an app’s interface.

    Capturing Long Documents or Web Pages

    Capturing extensive documents or lengthy web pages requires more than a single screenshot. You need to utilize the scrolling feature of the device to capture multiple portions of the content, then combine the images using image editing software or dedicated tools. This approach ensures that no part of the important information is missed and that the complete document or page is archived.

    Common image editors or dedicated screenshot tools provide functions to stitch the captured portions together.

    Capturing the Entire Screen, Including Elements Outside the Viewport

    Many apps and websites have content that extends beyond the initial viewport, meaning parts of the page or app are hidden and won’t be visible in a regular screenshot. To capture this hidden content, utilize the scrolling functionality within the app or website. Take screenshots at each stage of the scrolling process, ensuring that the hidden portions are captured.

    Image editing software or dedicated tools can then combine the screenshots to create a comprehensive capture of the entire document or webpage.

    Advanced Methods Using Screen Capture Tools

    Specialized screen capture tools, both desktop and mobile, offer a wider array of features for capturing complex screens. These tools may allow for timed screenshots, custom-shaped selections, and integrations with other applications for more elaborate capturing tasks. Specific features vary by tool. For example, some may allow you to automatically capture the entire process of a user interface, while others provide enhanced editing options.

    Tools like these are useful for creating detailed guides or tutorials.

    A Comprehensive Guide for Different Scenarios

    Taking screenshots effectively involves adapting your method to the situation. For simple captures, the built-in screenshot tool is often sufficient. However, for extensive web pages or documents, a multi-screenshot approach with image stitching is required. For specific elements on a screen, using the selection tool is efficient. Specialized screen capture tools provide further options, depending on your needs.

    Below is a table summarizing the methods for various scenarios.

    Scenario Method
    Simple screen capture Built-in screenshot tool
    Long documents/web pages Multi-screenshot capture and stitching
    Specific screen elements Selection/crop tools
    Complex captures (e.g., dynamic processes) Specialized screen capture tools

    Conclusive Thoughts: Screenshot On IPhone SE

    In conclusion, this comprehensive guide has provided a detailed look at capturing screenshots on your iPhone SE. From fundamental techniques to advanced strategies, we’ve covered it all. Whether you’re a seasoned user or just starting out, this resource will empower you to capture and manage your screenshots effectively. Remember to explore the various methods and adjust them to your specific needs.

    We hope this guide has been helpful in your journey to master screenshot capture on your iPhone SE.