Tag: DIY

  • Make a Memory Box A Keepsake Journey

    Make a Memory Box A Keepsake Journey

    Make a Memory Box: A journey into preserving precious moments. This project isn’t just about assembling items; it’s about crafting a tangible representation of your life’s narrative, a treasure trove of cherished memories. From carefully selecting photos and letters to designing a personalized container, this guide will walk you through creating a meaningful keepsake.

    Delve into the process of selecting, organizing, and preserving memories in a beautiful and meaningful way. We’ll explore various materials, design concepts, and organizational strategies to help you create a unique memory box that will stand the test of time. Discover the emotional depth of this craft and learn how to share these memories with loved ones.

    Understanding the Concept of a Memory Box

    A memory box is more than just a container; it’s a tangible representation of our past, a carefully curated collection of cherished moments. It acts as a personal time capsule, holding fragments of our lives that evoke powerful emotions and remind us of who we were, and who we are becoming. The process of creating and maintaining one fosters a deeper connection with our history.Creating a memory box is a deeply personal journey, a process of reflection and selection.

    It allows us to relive significant moments, from joyous celebrations to quiet moments of contemplation. It’s about recognizing the importance of these experiences and preserving them for future reference.

    Purpose and Significance

    A memory box serves as a repository for precious memories, fostering a sense of nostalgia and connection to the past. It allows us to revisit cherished moments and relive emotions associated with those events. The act of collecting and organizing memories within the box strengthens our connection to our personal history and can be a powerful tool for personal growth.

    Examples of Memories to Store

    The contents of a memory box can vary widely, reflecting the individual’s unique experiences. These can include photographs, letters, ticket stubs, concert programs, mementos, or even small objects that symbolize specific events. For instance, a faded ticket stub from a first concert can evoke the excitement of youth. A handwritten letter from a loved one can bring a sense of warmth and connection.

    A worn-out teddy bear from childhood could hold a wealth of comforting memories.

    Types of Memory Boxes

    Memory boxes can take various forms, from the traditional physical box to the more modern digital archive. Physical memory boxes are tangible containers that hold physical mementos. Digital memory boxes utilize technology to store and share memories, often in the form of photo albums, online scrapbooks, or video recordings. Each type offers unique advantages in terms of accessibility, preservation, and sharing.

    Emotional Connection

    The emotional connection to a memory box is profound. The act of collecting and arranging items within the box evokes feelings associated with each memory. Holding a cherished photograph, for example, can trigger a flood of emotions, reminding us of the joy, love, or even sorrow associated with that specific moment. The tactile experience of touching items adds a layer of depth to the emotional connection.

    Comparison with Other Memory Preservation Methods

    Compared to other methods of memory preservation, such as journaling or video recordings, a memory box offers a unique sensory experience. Journaling provides a detailed written account of events, while video recordings capture visual and auditory details. However, a memory box combines these elements with the tactile and visual experience of physical objects. This multi-sensory approach often creates a more profound and evocative connection to the past.

    Making a memory box is a fantastic way to preserve precious moments. It’s like capturing a fleeting feeling and tucking it away for later. You could even include something like a queen ant, carefully collected and documented in a similar way to Catch a Queen Ant , a fascinating little creature with its own unique life cycle.

    This helps you remember the process of collecting it as well as the memory itself. Ultimately, the memory box becomes a tangible representation of your journey, a personalized time capsule.

    The tangible nature of a memory box allows for a more intimate and personalized connection with the memories it holds, unlike a purely digital record.

    Materials and Supplies for Crafting a Memory Box

    Crafting a memory box is more than just collecting items; it’s a journey of preserving cherished moments and creating a tangible representation of your life’s narrative. The materials you choose play a crucial role in the box’s aesthetic appeal and the overall experience it offers. Careful selection of materials can elevate the box from a simple container to a truly meaningful keepsake.The right materials not only enhance the physical appearance of the memory box but also contribute to its emotional resonance.

    Selecting items that evoke strong feelings and memories is essential for transforming the box into a personal sanctuary. This process involves considering not only the aesthetic appeal but also the sentimental value each item holds. Choosing the right containers and embellishments is key to creating a box that resonates with the memories it encapsulates.

    Essential Materials

    The core materials for a memory box are the container, decorative elements, and sentimental objects. A sturdy and visually appealing container is the foundation. Decorative elements like fabric, paper, or paint can personalize the box and create a unique aesthetic. Finally, sentimental objects, such as photographs, letters, or small mementos, are the heart of the memory box, adding emotional depth to the entire experience.

    Aesthetic Choices and Customization

    Customization options are vast and depend entirely on your preferences. You can choose from a variety of colors, patterns, and textures for the container and decorative elements. Embellishments such as ribbons, buttons, and lace can add a touch of elegance and personality. Consider the overall theme of the memories you wish to encapsulate, and let that guide your choices.

    For example, a vintage-themed memory box might feature a wooden container, lace trim, and sepia-toned photographs. Conversely, a modern memory box could utilize a sleek metal container, with geometric patterns and contemporary art prints.

    Making a memory box is a fantastic way to preserve cherished moments. Thinking about all the amazing music, like the lineup for Animal Collective, Godspeed You! Black Emperor, Deerhunter, Diplo, Chromatics, and Glass Candy playing at MusicfestNW, this year’s lineup is shaping up to be epic. It’s a great way to capture these incredible moments in a physical form to relive them later, just like a memory box would.

    Types of Containers

    A wide array of containers can serve as memory boxes, each with its own unique characteristics. Cardboard boxes are budget-friendly and versatile, suitable for a variety of memory types. Wooden boxes offer a classic and elegant touch, suitable for special occasion memories. Fabric-lined boxes create a soft and cozy atmosphere, perfect for storing delicate items. Glass containers, due to their transparency, are ideal for showcasing cherished items.

    Making a memory box is a great way to preserve those special moments. While you’re crafting it, why not put on some chill tunes like Gucci Mane’s new mixtape, El Gato the Human Glacier ? The perfect soundtrack to help you reflect on those cherished memories as you assemble your box. It’s a fantastic way to add a little extra ambiance to the process.

    Ultimately, the choice depends on the desired aesthetic and the type of items to be stored.

    Sentimental Objects

    The inclusion of sentimental objects is critical to the memory box’s purpose. These objects should be carefully selected to evoke specific memories and emotions. Photos, letters, tickets, and small mementos can all hold significant meaning and create a powerful connection to the past. Choosing objects that evoke strong feelings and memories is key to transforming the box into a personal sanctuary.

    Alternative Decoration Materials

    Beyond traditional embellishments, various alternative materials can add unique character to your memory box. Dried flowers, pressed leaves, or small sculptures can add a touch of nature and creativity. Fabric scraps, patterned papers, and even beads can be used to create intricate designs and patterns. These alternative materials can reflect your personal style and add a layer of individuality to the box.

    Materials Suitability Table

    Material Description Suitability
    Cardboard Sturdy and versatile General use, inexpensive
    Fabric Soft and decorative Lining, embellishments, adding texture
    Wood Durable and elegant Special occasion boxes, adding a classic touch
    Glass Transparent and delicate Showcasing items, creating a display

    Designing and Organizing the Memory Box: Make A Memory Box

    Make a Memory Box

    A memory box isn’t just a container; it’s a tangible representation of cherished moments. Designing its layout and meticulously organizing its contents are crucial steps in preserving these memories for future reflection and enjoyment. This process allows us to engage with our past, present, and future in a profound way, fostering a deeper understanding of ourselves and the people around us.Careful planning ensures the box becomes a meaningful repository, not just a jumbled collection of items.

    By thoughtfully structuring the box and selecting appropriate items, you transform it into a personal time capsule, a source of joy and connection.

    Basic Layout for a Memory Box, Make a Memory Box

    The design of your memory box should reflect the types of memories you want to preserve. A basic layout might include sections for photographs, letters, mementos, and even small notes or ticket stubs. Consider creating designated spaces for specific types of memories, such as vacations, milestones, or relationships. This organization allows for easier retrieval and exploration of particular memories.

    Clear labeling of these sections can enhance the overall experience.

    Selecting Items for the Memory Box

    Careful selection of items is key to the memory box’s success. Start by considering the types of memories you wish to encapsulate. Ask yourself what truly represents significant moments or relationships. Don’t just collect items; select those that evoke strong feelings or carry special meaning. This process requires reflection and emotional connection to the items you choose.

    Prioritize quality over quantity.

    Preserving and Protecting Items

    Preserving the items inside the memory box is vital to maintaining their integrity. Proper storage methods will ensure longevity and prevent damage. For example, photographs should be carefully mounted or placed in acid-free sleeves. Sensitive documents and papers should be stored in archival-quality folders. Think about the potential for fading, warping, or deterioration, and take measures to prevent these issues.

    This meticulous care will guarantee that the contents remain as pristine as possible.

    Creating a Narrative within the Box

    Creating a narrative within the memory box elevates its significance. Think of the stories behind the items you choose. Include handwritten notes, anecdotes, or descriptions of events that happened. These narratives add context to the items and transform the box into a personalized scrapbook. The more detailed the descriptions, the richer the experience for the future viewer.

    Categorizing Memories

    Categorizing memories within the memory box facilitates easier retrieval and exploration. Common methods include:

    • Chronological: Arranging items by date or time period. This approach provides a linear progression of events, offering a sense of the passage of time.
    • Thematic: Grouping items based on themes or topics. For example, you might create sections for “Family Vacations,” “School Years,” or “Significant Relationships.” This allows for focused exploration of particular experiences.
    • Personal: Categorizing items based on their individual significance to you. This method is highly personal and reflects the importance of specific memories to the individual. This allows for exploration and reflection on what shaped you as a person.

    Organizational Systems for a Memory Box

    Different organizational systems can enhance the memory box’s usability. Here’s a table illustrating various methods:

    System Description Advantages
    Chronological Arranging items by date or time period. Easy to follow the progression of events.
    Thematic Grouping items based on themes or topics. Focused exploration of particular experiences.
    Personal Categorizing items based on individual significance. Meaningful and insightful to the owner.

    Preserving and Displaying Memories Inside

    Make a Memory Box

    Crafting a memory box isn’t just about collecting items; it’s about preserving the stories they tell. This crucial step ensures your cherished mementos remain intact for future generations to appreciate. Proper preservation and display techniques transform a simple box into a time capsule, a tangible link to the past.Effective preservation goes beyond simply placing items in a box.

    It involves understanding the unique needs of each item and employing suitable methods to prevent damage or deterioration. Thoughtful display enhances the storytelling aspect, allowing each piece to contribute to the overall narrative of your memory box.

    Preservation Methods for Physical Items

    Careful preservation methods are essential for maintaining the integrity of your memories. Using appropriate materials and techniques will ensure your items remain in pristine condition for years to come. Protecting these tangible links to the past ensures they can be enjoyed for generations.

    • Photographs: Mounting photographs on acid-free boards is a crucial step to prevent fading and deterioration. Acid-free materials are specifically designed to not react with the chemicals in photographs, preserving their vibrancy. This method is particularly important for preserving old or valuable photographs, as the quality of the paper and inks can degrade over time. Carefully selecting mounting boards and using archival-quality adhesive ensures the long-term integrity of the images.

    • Letters and Documents: Archival-quality envelopes and folders are vital for preserving letters, documents, and other paper items. These materials are specifically designed to resist acidity and other environmental factors that can damage paper. Using acid-free tissue paper or acid-free sleeves can also protect fragile documents from dust, dirt, and moisture.
    • Small Objects: Display cases or boxes are perfect for preserving small, delicate items. These containers protect objects from dust, light, and damage. Choose materials that won’t react with the objects inside, ensuring their long-term preservation. For particularly delicate items, consider using specialized display cases with climate control features.

    Display Techniques for Effective Storytelling

    The way you display items significantly influences how your memory box tells its story. A well-organized and thoughtfully presented collection enhances the viewer’s experience and allows the memories to resonate more deeply. A curated display brings the narrative to life.

    • Photographs: Arrange photographs in a chronological order or by theme. Use acid-free mounting boards to showcase photos effectively. Displaying them in a visually appealing manner, like a timeline or a thematic grouping, will engage viewers and enhance the storytelling. Consider using matting to highlight specific photographs and create visual interest.
    • Letters and Documents: Display letters and documents using archival-quality folders or display cases. Arrange them in a logical sequence to maintain the narrative flow. For example, letters from a particular period could be grouped together. Include captions or labels to provide context for each item and help viewers understand the story behind the document.
    • Small Objects: Display small objects using display cases or boxes, keeping in mind the delicate nature of the items. Arrange them in a way that showcases their beauty and adds to the story. A thematic arrangement, for instance, grouping items that relate to a specific event, can further enhance the visual narrative.

    Suitable Containers for Different Items

    Choosing the right container for each item is crucial for its preservation. Consider the size, shape, and material of the container to ensure it protects the item and enhances its presentation. The container plays a critical role in protecting and highlighting the items.

    • Photographs: Acid-free albums, boxes, or portfolios are ideal for displaying photographs in an organized manner. These containers provide protection and allow for a visually appealing presentation.
    • Letters and Documents: Archival-quality folders, boxes, or portfolios are perfect for organizing and preserving letters and documents. These materials protect the paper from damage and deterioration.
    • Small Objects: Display cases, small boxes, or decorative containers provide a secure and attractive way to showcase small objects. Choose containers that are appropriate for the size and type of object.

    Preservation Methods Table

    | Item | Preservation Method | Description ||—|—|—|| Photographs | Mounting on acid-free boards | Protects from fading and damage || Letters | Storing in archival-quality envelopes | Preserves ink and paper integrity || Small objects | Using display cases or boxes | Protects from dust, light, and damage |

    Sharing and Reflecting on Memories

    Creating a memory box is more than just collecting items; it’s a journey of personal discovery and connection. The process of selecting, organizing, and preserving these mementos fosters a unique relationship with the past. It’s a tangible representation of cherished moments, and the act of sharing and reflecting on these memories deepens their impact.Sharing these curated treasures allows for a powerful exchange of stories and emotions.

    It bridges gaps between generations, and strengthens bonds with loved ones. The act of reflection, triggered by these carefully chosen items, provides a unique lens through which to view past experiences, fostering personal growth and understanding.

    Stories of Memory Box Creation

    Many individuals have found profound meaning in creating memory boxes. A grandmother, meticulously assembling a box filled with photographs and letters from her children and grandchildren, discovered a newfound appreciation for the love and support within her family. This act of preservation transformed her perspective on the passage of time and the enduring nature of family bonds. Another person, inspired by a lost photograph, sought to document their own memories of a cherished trip, creating a detailed box filled with maps, tickets, and personal notes.

    This project served as a reminder of the significance of travel and the importance of capturing fleeting moments. Each story is unique, but the common thread is a powerful connection to the past.

    Importance of Sharing Memories

    Sharing memories with others enriches the experience for everyone involved. A shared laugh over a childhood photograph or a reflective discussion about a significant event can strengthen bonds and create lasting connections. When memories are shared, they become a part of the collective narrative of a family or community, weaving together individual stories into a rich tapestry of shared history.

    The process of recounting memories and hearing others’ perspectives fosters empathy and understanding.

    Methods for Reflecting on Memories

    Reflecting on memories in a memory box can take various forms. One can simply sit and examine the contents, allowing the items to trigger personal reflections. Writing down thoughts and feelings associated with each item or creating a narrative based on the contents can further deepen the reflective process. Looking at photographs and reading handwritten letters can transport you back in time, rekindling emotions and sensations.

    Engaging in conversations with others about the memories represented in the box can lead to deeper understanding and appreciation.

    Emotional Benefits of Creating and Revisiting a Memory Box

    Creating a memory box can offer a multitude of emotional benefits. The act of collecting and organizing items can be a therapeutic exercise, allowing one to process emotions and gain closure. Revisiting these memories, particularly through the physical objects within the box, can evoke powerful feelings of nostalgia and comfort. These tangible reminders of past experiences can provide a sense of grounding and connection to one’s identity and heritage.

    The process can also be a source of joy, peace, and contentment.

    Comparing and Contrasting Sharing Experiences

    Sharing memories with different people can lead to varied experiences. Sharing with a close friend might involve laughter and shared understanding, while sharing with a family member could evoke a sense of connection and family history. Sharing with a stranger or someone who wasn’t directly involved in the memory can open a window to a new perspective. These different interactions can highlight the diverse ways in which memories are perceived and interpreted.

    Benefits of Reflecting on Memories in a Memory Box

    Benefit Description
    Emotional connection Reconnecting with past feelings and emotions associated with the memory.
    Sense of nostalgia Experiencing feelings of longing, warmth, and fondness for the past.
    Personal growth Gaining perspective on past events, recognizing personal development, and understanding how experiences have shaped who you are today.

    Closing Notes

    Crafting a memory box is a deeply personal and rewarding experience. It’s about more than just preserving objects; it’s about preserving feelings, connections, and stories. This guide offers a comprehensive framework for creating a memory box that reflects your unique journey and allows you to revisit cherished moments. Let your memories live on, beautifully preserved within a tangible keepsake.


  • Install a Gas Fireplace Your Guide

    Install a Gas Fireplace Your Guide

    Install a Gas Fireplace: This comprehensive guide walks you through every step of the process, from choosing the perfect fireplace to ensuring a safe and efficient installation. We’ll explore different types, fuel options, safety considerations, and the environmental impact, equipping you with the knowledge to make informed decisions.

    Whether you’re a seasoned DIY enthusiast or a homeowner tackling this project for the first time, this guide will be your reliable companion. We’ll break down the installation process into manageable steps, providing clear instructions and detailed explanations. Safety will be paramount, and we’ll delve into potential hazards and preventative measures.

    Introduction to Gas Fireplaces

    Install a Gas Fireplace

    Gas fireplaces have become a popular choice for homeowners seeking a warm and inviting ambiance. They offer a convenient alternative to traditional wood-burning fireplaces, providing a quick and efficient way to heat a room. Beyond simple warmth, gas fireplaces come in various styles, each with its own set of advantages and disadvantages. This exploration delves into the different types, fuel sources, benefits, and potential drawbacks of these modern heating solutions.Gas fireplaces are a significant upgrade from traditional wood-burning alternatives.

    They offer greater convenience and safety, allowing homeowners to enjoy the ambiance of a fire without the hassle of wood storage, maintenance, and potential chimney issues.

    Types of Gas Fireplaces

    Gas fireplaces encompass a wide variety of designs and installations. Understanding the different types available is crucial for selecting the best fit for your home and personal preferences. These range from classic log sets to sleek, modern linear models.

    • Log Sets: These fireplaces often mimic the appearance of a traditional wood-burning fireplace, using realistic-looking gas logs and often incorporating decorative elements. They are popular for their aesthetic appeal and are often suitable for various room styles.
    • Linear Fireplaces: These models feature a long, continuous flame that often runs along a wall or a section of a room. They are known for their sleek design and often allow for a more modern look. This design can effectively heat larger spaces due to the efficient distribution of the heat.
    • Wall-mounted Fireplaces: Designed to be installed directly on a wall, these are typically compact and efficient, taking up minimal space while still providing warmth and ambiance.

    Fuel Types

    Gas fireplaces utilize various fuel sources. The choice of fuel often impacts the cost of installation, maintenance, and the overall efficiency of the fireplace.

    • Natural Gas: This is the most common fuel source for gas fireplaces, often directly connected to the home’s existing natural gas pipeline. This provides a consistent and readily available fuel supply, making it a popular option.
    • Propane: For homes without natural gas access, propane gas is a viable alternative. Propane fireplaces require a propane tank, which necessitates regular refills and potential storage space considerations. Propane is also often more expensive than natural gas.

    Benefits of Gas Fireplaces

    Gas fireplaces offer several advantages over other types of heating solutions.

    Installing a gas fireplace can be a rewarding project, transforming a room with its warm glow. While you’re admiring the cozy ambiance, consider putting on some chilled tunes, like the mellow soundscapes of the minimal wave tapes volume 2. The perfect background music for the soothing process will enhance the whole experience. After all, a properly installed gas fireplace adds a touch of elegance and comfort to any home.

    • Convenience: Gas fireplaces provide a quick and easy way to heat a room. They require minimal effort to operate compared to wood-burning alternatives, as they are simple to ignite and maintain.
    • Efficiency: Gas fireplaces are designed for efficient heat output, allowing for controlled temperature and minimal wasted energy.
    • Cleanliness: Gas fireplaces produce minimal soot or ash, eliminating the need for frequent cleaning and maintenance.

    Drawbacks of Gas Fireplaces

    Despite the advantages, gas fireplaces also have some drawbacks to consider.

    • Cost of Installation: Installing a gas fireplace can be a substantial investment, requiring professional installation to ensure safety and compliance with local regulations.
    • Potential Safety Concerns: Gas fireplaces, if not properly installed and maintained, can pose safety risks related to gas leaks or improper operation. Regular safety checks are essential to mitigate these concerns.

    Comparison Table

    Type Fuel Pros Cons
    Log Sets Natural Gas/Propane Aesthetically pleasing, often mimics traditional wood-burning fireplaces Can be more expensive to install, less efficient heat distribution compared to linear models.
    Linear Natural Gas/Propane Sleek design, efficient heat distribution, suitable for larger spaces May not be suitable for all aesthetics, installation can be complex
    Wall-mounted Natural Gas/Propane Space-saving design, often a cost-effective option May not provide the same heat output as larger models, less visually striking

    Installation Process

    Installing a gas fireplace is a significant undertaking that requires careful planning, meticulous execution, and adherence to safety regulations. It’s crucial to understand the entire process from initial preparation to final connections to ensure a safe, efficient, and aesthetically pleasing installation. Incorrect installation can lead to safety hazards, performance issues, and potential damage to your home. Properly trained and licensed professionals are highly recommended for this task.

    Initial Preparation, Install a Gas Fireplace

    Before any installation work begins, thorough preparation is paramount. This involves assessing the area where the fireplace will be installed, confirming adequate venting and gas supply, and ensuring the necessary permits are obtained. Proper planning minimizes potential complications and ensures a smooth installation process. The installation area must be clear of obstructions, allowing for easy access and movement of equipment.

    • Verify the gas supply line’s capacity and suitability for the fireplace’s needs. Consult with local gas companies to confirm the required pressure and flow rate.
    • Determine the proper location for the venting system, considering factors like height, clearance, and accessibility. Ensure the vent system aligns with local building codes.
    • Obtain necessary permits and inspections from the local authorities to ensure compliance with building codes and safety regulations. Failure to do so could lead to costly delays or even project rejection.
    • Inspect the existing framing and ensure it can support the fireplace’s weight and installation requirements. Reinforcements might be necessary in certain cases.

    Safety Precautions

    Safety should be a top priority throughout the entire installation process. Understanding and adhering to safety precautions is crucial for avoiding potential accidents and ensuring the well-being of all involved. Never compromise safety for convenience or speed.

    • Always turn off the gas supply to the area before starting any work related to gas lines. This is an absolute necessity to prevent accidental gas leaks.
    • Ensure proper ventilation throughout the installation area. Adequate airflow helps to prevent the accumulation of flammable gases.
    • Wear appropriate safety gear, including gloves, safety glasses, and sturdy footwear, to protect yourself from potential hazards during the installation process.
    • Never work alone, especially when dealing with gas lines or electrical connections. Always have a second person present to assist with tasks and monitor safety procedures.

    Installation Steps

    The installation process involves a series of carefully orchestrated steps. Following these steps in the correct order is essential for a successful and safe installation.

    Installing a gas fireplace can be a fantastic upgrade for any home, adding warmth and ambiance. While you’re enjoying the cozy atmosphere, why not crank up the volume with some seriously good tunes like keep it goin louder ft nina sky and ricky blaze ? It’s a perfect way to set the mood for those chilly evenings, complementing the new fireplace’s inviting glow.

    Just remember to prioritize safety when handling gas appliances.

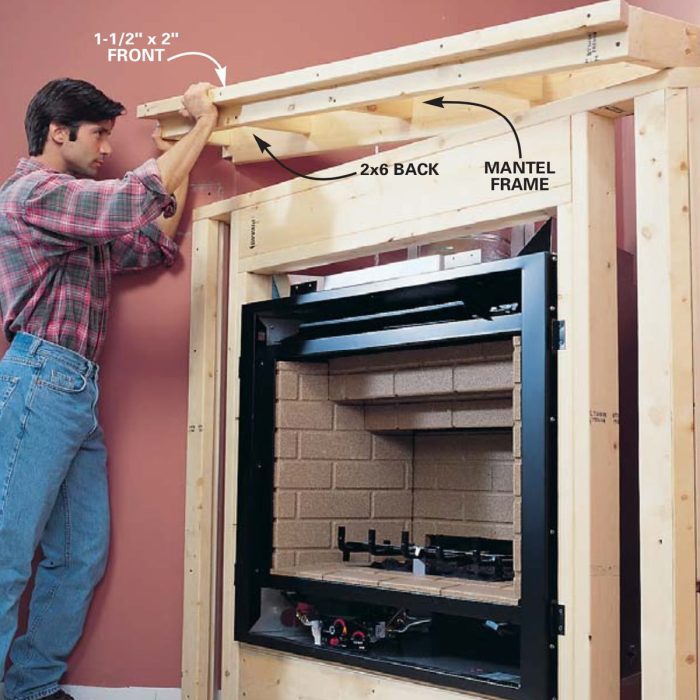
    1. Framing and Structure Preparation: Carefully mark the fireplace’s location and cut the necessary openings in the wall or floor. Reinforce the framing to support the fireplace unit’s weight. Ensure the structural integrity of the area.
    2. Plumbing Connections: Connect the gas supply line to the fireplace’s gas valve, ensuring a secure and leak-proof connection. Use approved fittings and follow manufacturer’s instructions carefully.
    3. Venting System Installation: Install the venting system according to the manufacturer’s instructions and local codes. Proper venting is critical for safe and efficient gas combustion.
    4. Fireplace Assembly: Assemble the fireplace components according to the manufacturer’s instructions. Pay close attention to the alignment and proper placement of all parts.
    5. Electrical Connections: Connect the electrical components, if any, to the fireplace and ensure proper grounding. Use approved electrical wiring and connectors.
    6. Final Checks and Inspections: Perform a thorough check for leaks, ensuring all connections are secure and sealed. Request a final inspection from the local gas and building authorities.

    Tools and Materials

    The following table Artikels the tools and materials required for each stage of the installation process.

    Step Tool Material Description
    Framing and Structure Preparation Measuring tape, saw, level, drill Framing materials, screws, anchors Tools for marking and cutting openings. Materials for reinforcement.
    Plumbing Connections Adjustable wrench, pipe cutter, Teflon tape Gas pipe, fittings, gas valves Tools for connecting gas lines and materials for leak-proof connections.
    Venting System Installation Vise grips, measuring tape Vents, flashing, insulation Tools for securing vents and materials for weatherproofing and insulation.
    Fireplace Assembly Screwdrivers, adjustable wrench Fireplace components, screws Tools for assembling the fireplace.

    Safety Considerations

    Installing a gas fireplace is a rewarding project, but safety should always be paramount. Understanding potential hazards and implementing preventive measures is crucial for a safe and enjoyable experience. This section details essential safety considerations to ensure a risk-free installation and operation.Properly installed and maintained gas fireplaces are generally safe. However, potential hazards exist, particularly if the installation or maintenance procedures are not followed meticulously.

    Careless handling of gas lines, inadequate ventilation, or faulty components can lead to significant risks. This section focuses on mitigating these risks by highlighting safety precautions and best practices.

    Potential Hazards of Gas Fireplaces

    Gas fireplaces, while aesthetically pleasing, present inherent safety risks if not handled correctly. These risks stem from the flammable nature of natural gas or propane used in the appliance. Faulty connections, inadequate ventilation, or improper installation can lead to gas leaks, fires, or carbon monoxide poisoning. It’s critical to identify potential hazards to mitigate them effectively.

    Importance of Proper Ventilation

    Adequate ventilation is essential for safe gas fireplace operation. Incomplete combustion of the gas can produce carbon monoxide, a colorless, odorless, and toxic gas. Insufficient ventilation can lead to dangerous levels of carbon monoxide accumulating in the room, posing severe health risks. Ensure the fireplace is installed in a location with adequate air exchange to prevent the buildup of harmful gases.

    Preventing Gas Leaks

    Gas leaks are a serious concern, potentially leading to explosions or fires. Regular inspections of gas lines, connections, and fittings are crucial to prevent leaks. Inspecting the gas supply lines for any cracks, corrosion, or loose connections is vital. Leaks can occur at various points, including the gas supply pipe, the gas valve, and the appliance itself.

    Installing a gas fireplace can be a rewarding DIY project. It’s a great way to add warmth and ambiance to your home. Before you start, however, you might want to make sure your Spotify account is all set up – Log in to Spotify to ensure you’ve got your favorite tunes ready to play as the fire crackles.

    Once you’ve got that sorted, you can focus on getting your new gas fireplace installed properly and safely.

    Frequent visual checks and professional inspections are necessary to ensure the safety of the gas lines.

    Handling Gas Leaks

    In the unfortunate event of a gas leak, immediate action is critical. Never attempt to approach or ignite the area if a leak is suspected. First, evacuate the building immediately. Alert the appropriate authorities, such as the fire department or gas company, and follow their instructions precisely. Turn off the gas supply at the main valve if it is accessible and safe to do so.

    Never use any open flames or electrical devices near the leak until the gas company personnel have confirmed the leak is contained and resolved.

    Maintaining Gas Fireplace Safety

    Regular maintenance is crucial for maintaining the safety of your gas fireplace. Professional inspections are essential to detect and address potential problems. Perform visual inspections regularly for signs of damage or wear to the gas lines, components, and the appliance itself. Follow the manufacturer’s guidelines for cleaning and maintenance procedures.

    Safety Checks Before and After Installation

    Regular safety checks are essential for ensuring the gas fireplace remains operational safely.

    Check Procedure
    Gas supply line integrity Visually inspect for cracks, corrosion, or loose connections.
    Gas appliance connections Verify all connections are tight and secure.
    Ventilation system Ensure adequate air intake and exhaust for proper combustion.
    Carbon Monoxide (CO) detector Verify the presence and functionality of the CO detector.
    Gas valve operation Test the gas valve operation to ensure proper shut-off mechanisms.
    Post-Installation Inspection Have a qualified technician perform a final inspection.

    Maintenance and Troubleshooting: Install A Gas Fireplace

    Keeping your gas fireplace in top condition requires regular maintenance. Neglecting this can lead to safety hazards, reduced efficiency, and costly repairs down the line. A well-maintained fireplace will provide years of enjoyable warmth and ambiance.Regular maintenance is crucial for the safe and efficient operation of a gas fireplace. It ensures that the appliance functions as intended, minimizes the risk of malfunctions, and helps to extend its lifespan.

    By following a simple maintenance routine, you can significantly reduce the chance of costly repairs and enjoy a reliable source of warmth and comfort.

    Importance of Regular Maintenance

    Regular maintenance is essential to prevent potential problems and ensure safe operation. It involves inspecting and cleaning various components to maintain optimal performance and prevent gas leaks, carbon monoxide buildup, and other safety issues. Proper maintenance also enhances the efficiency of the fireplace, optimizing its heat output and reducing energy consumption.

    Common Maintenance Procedures

    A regular maintenance schedule involves several key procedures. These include checking the gas supply lines for leaks, ensuring proper airflow, and cleaning the heat exchanger and burner assembly. Regular inspections of the pilot light and ignition system are vital for consistent operation. Furthermore, proper ventilation is critical for the safe and efficient operation of the fireplace, preventing dangerous buildups of combustion gases.

    • Gas Supply Line Inspection: Visually inspect all gas supply lines for any signs of damage, leaks, or corrosion. Use a soapy water solution to detect leaks, as a small bubble indicates a potential leak. If any issues are found, contact a qualified professional immediately.
    • Airflow Check: Ensure proper airflow to the fireplace by inspecting the vents and openings. Blockages can impede combustion and reduce efficiency. Keep the area around the fireplace clear of obstructions.
    • Heat Exchanger and Burner Cleaning: Clean the heat exchanger and burner assembly regularly to remove soot and debris. This helps maintain optimal heat transfer and prevents inefficient operation. Follow the manufacturer’s instructions for safe cleaning procedures.
    • Pilot Light and Ignition System Inspection: Inspect the pilot light and ignition system to ensure proper function. Ensure the pilot light is lit and the ignition system is operating correctly. Address any issues immediately.
    • Ventilation Check: Ensure proper ventilation to prevent the buildup of combustion gases. Check for any obstructions in the venting system and make sure the vents are unobstructed.

    Troubleshooting Common Gas Fireplace Issues

    Troubleshooting common issues can often be done safely and effectively by homeowners. By understanding the potential causes of problems, you can identify and fix many issues without professional intervention. A thorough understanding of the system’s components will enable homeowners to diagnose problems more accurately and effectively.

    1. Pilot Light Won’t Light: Verify the gas supply, ensure the igniter is functioning correctly, and check for any obstructions in the gas line or burner assembly. If the problem persists, contact a qualified professional.
    2. Fireplace Won’t Ignite: Check for proper airflow, gas supply, and ignition system issues. Ensure the igniter is functioning correctly and that there are no blockages. If the problem persists, consult a professional.
    3. Unusual Noises: Unusual noises, such as clicking, popping, or hissing, may indicate a problem with the igniter, gas valve, or burner assembly. Check for loose connections or obstructions and contact a professional if the issue persists.

    Troubleshooting Procedure Example

    To troubleshoot a gas fireplace that won’t ignite, first, ensure the gas supply is turned on and check the gas valve for any obstructions. Next, verify that the pilot light is properly lit. If the igniter clicks but the pilot light won’t light, inspect the igniter’s electrodes for cleanliness. If the issue persists, consult a qualified technician.

    Problem Cause Solution Prevention
    Pilot light won’t stay lit Low gas pressure, dirty burner, or faulty igniter Check gas pressure, clean burner, replace igniter if needed Regular cleaning and inspection of burner and igniter
    Fireplace won’t ignite Blocked air intake, faulty igniter, low gas pressure Clear air intake, replace igniter, check gas pressure Regular cleaning and inspection of air intake and igniter
    Hissing or popping sounds Loose connections, gas leaks, or faulty valve Tighten connections, check for leaks, replace valve if needed Regular inspection of connections and valves

    Choosing a Gas Fireplace

    Choosing the right gas fireplace for your home is a significant decision, impacting both aesthetics and functionality. It’s crucial to consider various factors to ensure the fireplace seamlessly integrates into your existing décor and provides the desired ambiance and warmth. A well-chosen fireplace can elevate a room, while a poorly chosen one can detract from the overall design.Selecting a gas fireplace involves more than just picking a pretty face.

    Careful consideration of size, style, features, and budget are vital to achieving a harmonious and efficient addition to your living space. Understanding these factors will help you make an informed decision that perfectly complements your home’s unique characteristics.

    Factors to Consider

    A comprehensive evaluation of the available options is crucial for a successful installation. Factors such as the fireplace’s overall aesthetic appeal, compatibility with the room’s existing design, and its functional capabilities significantly influence the decision-making process.

    • Aesthetic Harmony: Matching the fireplace’s style to the room’s existing design is paramount. A modern fireplace in a traditional room would likely clash, while a rustic fireplace in a contemporary setting could achieve a striking juxtaposition.
    • Room Dimensions: The fireplace’s size should be proportionate to the room’s dimensions. A massive fireplace in a small room can overwhelm the space, while a compact fireplace in a large room might appear insignificant. Careful measurement and planning are crucial to avoid such issues.
    • Desired Features: Consider the specific features you desire, such as different types of fuel sources, adjustable heat settings, and various decorative options. A fireplace with multiple features will enhance its functionality, but can also increase the overall cost.
    • Budget Constraints: Gas fireplaces vary significantly in price, ranging from budget-friendly models to high-end, elaborate designs. Establishing a realistic budget early on will help narrow down the selection and prevent financial overruns.

    Styles, Sizes, and Features

    Gas fireplaces come in a wide array of styles, sizes, and features, allowing for customization to match any desired aesthetic.

    • Styles: Gas fireplaces are available in a diverse range of styles, including traditional, contemporary, rustic, and modern. Careful consideration of the existing home decor will help determine the most suitable style.
    • Sizes: Gas fireplaces are offered in various sizes, from compact units suitable for smaller rooms to larger models designed for expansive living spaces. The size of the fireplace should be proportionate to the room’s dimensions to ensure a balanced look.
    • Features: Features can include adjustable heat settings, different fuel sources (e.g., natural gas, propane), decorative glass options, and remote controls. These options can significantly enhance the fireplace’s usability and visual appeal.

    Brand and Model Comparisons

    Comparing different brands and models is crucial for finding the ideal fireplace. Researching customer reviews and examining technical specifications will help determine the best fit for your needs.

    Design Features Dimensions (approx.) Price Range (USD)
    Traditional Mantel Adjustable heat, remote control, decorative glass 36″W x 48″H x 18″D $1,500 – $3,000
    Modern Sleek Built-in thermostat, remote control, hidden controls 48″W x 60″H x 12″D $2,500 – $5,000
    Rustic Log Set Natural gas, adjustable heat, electronic ignition 42″W x 54″H x 24″D $1,800 – $4,500
    Contemporary Wall-Mount Propane gas, variable heat, remote control 30″W x 42″H x 8″D $1,000 – $2,500

    Cost and Budget

    Install a Gas Fireplace

    Installing a gas fireplace is a significant investment, and understanding the associated costs is crucial for budgeting. Factors like the type of fireplace, features, installation complexity, and local labor rates all influence the final price tag. Careful planning and research can help you avoid unpleasant surprises and stay within your budget.

    Average Installation Costs

    The average cost for installing a gas fireplace ranges from $3,000 to $8,000. This broad range encompasses various factors, including the size and complexity of the fireplace, the materials used, and the labor costs. Installation in a new home often involves more extensive work than retrofitting an existing space.

    Costs of Different Gas Fireplace Types

    Different types of gas fireplaces have varying price points. For instance, a simple, traditional gas fireplace with basic features will likely cost less than a more sophisticated model with features like remote control, enhanced flames, or specialized venting systems. The materials used and the level of customization also affect the overall cost.

    Cost Breakdown Examples

    A typical cost breakdown for a gas fireplace installation might include the cost of the fireplace itself, professional installation labor, venting materials (if required), and any necessary modifications to the existing structure. For example, a more complex installation involving a custom mantel, chimney modifications, or extensive plumbing work will naturally increase the overall cost. Similarly, the price of the fireplace itself can vary considerably depending on the manufacturer and the features.

    Estimated Gas Fireplace Installation Costs

    Item Cost Notes
    Fireplace unit (basic model) $1,500 – $3,000 Price varies greatly based on size, features, and brand.
    Installation labor $1,500 – $3,500 Labor costs depend on the complexity of the installation and local rates.
    Venting system (if needed) $500 – $1,500 Chimney work or venting modifications can add significantly to the cost.
    Plumbing and gas line connections $500 – $1,000 These costs vary depending on the complexity of the gas line connection.
    Permitting and inspections $100 – $500 Local regulations influence permitting fees.
    Total Estimated Cost $4,000 – $9,000 A broad estimate covering various installation scenarios.

    Environmental Impact

    Gas fireplaces, while offering a cozy ambiance, come with environmental considerations. Understanding their impact on the environment, alongside comparisons to other heating methods, is crucial for responsible decision-making. Choosing a heating source involves evaluating factors beyond just comfort and cost.Gas fireplaces, like any fuel-burning appliance, release emissions into the atmosphere. The type of gas used, the efficiency of the fireplace, and even the maintenance practices play significant roles in determining the environmental footprint.

    Comparing their impact with alternative heating options reveals a nuanced picture.

    Gas Type and Emissions

    Different types of natural gas have varying emission profiles. Methane, the primary component of natural gas, is a potent greenhouse gas. Propane, another common gas used in fireplaces, also releases greenhouse gases, although the specific composition and concentrations may differ. Furthermore, incomplete combustion, often a byproduct of improper maintenance or appliance design, can lead to the release of harmful pollutants like carbon monoxide and nitrogen oxides.

    Understanding these differences helps in making informed choices.

    Comparison to Other Heating Options

    Electric heating, often touted as environmentally friendly, relies on electricity generation, which, depending on the source, may not always be carbon-neutral. Wood-burning stoves, while often perceived as a more natural heating source, contribute to air pollution through particulate matter emissions. Furthermore, their environmental impact also depends on the source of the wood and the efficiency of the stove.

    Energy Efficiency of Gas Fireplaces

    The efficiency of gas fireplaces is a crucial factor in evaluating their environmental impact. Highly efficient models, often incorporating advanced combustion technologies, minimize the amount of fuel wasted as emissions. This is reflected in the efficiency rating of the appliance, typically expressed as a percentage. For instance, a 90% efficient fireplace uses 10% less fuel to produce the same amount of heat compared to a 70% efficient one.

    Higher efficiency ratings directly translate to lower greenhouse gas emissions and a reduced environmental impact.

    Environmental Impact Comparison

    Heating Source Emissions Energy Efficiency
    Natural Gas Fireplace (High Efficiency) Methane, nitrogen oxides (variable based on combustion efficiency) 90%+ (typical)
    Electric Resistance Heating Emissions from electricity generation (variable depending on source) 95%+ (typical)
    Wood-Burning Stove (High Efficiency) Particulate matter, carbon monoxide (variable based on combustion efficiency) 60-80% (typical)

    Note: Efficiency percentages are approximate and can vary based on model and usage. Emissions are general indicators and can vary based on specific conditions and maintenance practices.

    Visual Representations

    Gas fireplaces, whether modern or traditional, offer a captivating visual appeal that transforms a room. Their design choices, from the materials used to the layout of the installation, greatly influence the overall aesthetic and ambiance. Understanding these visual elements is crucial to choosing a fireplace that complements your home’s style and personality.

    Modern Gas Fireplace Installation

    Modern gas fireplaces often feature sleek, minimalist designs. Materials used in these installations frequently include high-quality metal, such as brushed stainless steel or polished aluminum, for the fireplace enclosure and surround. Glass panels, often tempered and heat-resistant, are common, allowing for a clear view of the flames. The layout is frequently integrated into the existing room design, blending seamlessly with the architecture.

    For instance, a modern installation might feature a floating mantel or a recessed fireplace built into a wall, maximizing space and minimizing visual clutter. The fireplace’s design can often include integrated lighting systems, enhancing the ambiance.

    Traditional Gas Fireplace Design

    Traditional gas fireplaces evoke a cozy and inviting atmosphere. These installations often incorporate intricate details, such as ornate mantels, decorative surrounds made of stone, brick, or tile, and detailed metalwork. The overall design often emphasizes warmth and craftsmanship, evoking a sense of heritage. The fireplace’s layout is typically more prominent in the room, acting as a focal point, and the design frequently incorporates a larger, more substantial hearth.

    Many traditional designs incorporate cast iron or wood accents.

    Gas Fireplace in a Contemporary Setting

    A gas fireplace in a contemporary setting can be a stylish centerpiece. Consider a setting with clean lines and a neutral color palette. The fireplace itself might feature a minimalist design with a large glass viewing area. The surround could be a sleek, light-colored stone or a modern tile pattern that matches the room’s decor. The surrounding lighting should be carefully considered to highlight the fireplace’s beauty.

    Ambient lighting, such as recessed lighting or strategically placed sconces, can complement the fireplace’s design.

    Gas Fireplace Designs

    Different gas fireplace designs offer various aesthetic possibilities. One design might showcase a linear, elongated fireplace, while another could feature a more rounded, curvaceous shape. Some designs emphasize the hearth and surround, creating a warm, inviting focal point. Other designs focus on the flames, using a larger glass viewing area for maximum visual impact. The fireplace’s finish, whether polished metal, stone, or tile, can also be tailored to match the surrounding room’s design.

    Installation in a Living Room

    A gas fireplace in a living room adds a unique element to the space. The installation can be a focal point or integrated into the existing decor. For example, in a living room with a warm, rustic theme, a stone-encased gas fireplace with a wood-burning mantelpiece might complement the existing design. The surrounding decor should complement the fireplace’s style.

    Warm wood tones, comfortable seating, and soft lighting can create a cozy atmosphere. If the room’s design is contemporary, a modern gas fireplace with clean lines and a neutral color palette would work well. Natural lighting and ambient lighting fixtures can be integrated with the design to maximize the visual impact of the fireplace.

    Final Review

    In conclusion, installing a gas fireplace is a significant undertaking, but with careful planning, adherence to safety guidelines, and a well-researched approach, it can be a rewarding home improvement project. This guide has provided a comprehensive overview of the entire process, from initial selection to ongoing maintenance. Remember to prioritize safety throughout the entire installation and remember that ongoing maintenance is key to long-term enjoyment of your new fireplace.

  • Paint with Metal Flake Paint A Guide

    Paint with Metal Flake Paint A Guide

    Paint with Metal Flake Paint unlocks a world of shimmering possibilities. This guide dives deep into the fascinating world of metal flake paint, exploring its diverse applications and techniques. We’ll examine different types of flakes, from the silvery shimmer of aluminum to the warm glow of gold, and discover how to achieve stunning visual effects. From surface preparation to application methods, we’ll cover everything you need to know to confidently use metal flake paint in your projects.

    Whether you’re a seasoned DIY enthusiast or a curious beginner, this comprehensive guide provides a solid foundation for understanding metal flake paint. We’ll explore the various properties of different metal flake paints, comparing their appearance, durability, and cost. The guide also delves into the specific techniques and tools required for applying metal flake paint, along with troubleshooting tips and maintenance advice.

    Introduction to Metal Flake Paint

    Paint with Metal Flake Paint

    Metal flake paint is a specialized type of decorative paint that incorporates metallic particles, called flakes, into a base paint. These flakes create a shimmering, lustrous effect, adding depth and visual interest to surfaces. This unique characteristic sets it apart from standard paints, offering a wide range of aesthetic possibilities. The interplay of light on the flakes produces a captivating visual impact, suitable for a variety of applications.This paint’s distinctive appearance is achieved through the incorporation of metallic flakes.

    These flakes are carefully selected and dispersed throughout the paint, ensuring a consistent and aesthetically pleasing finish. The resulting texture and sheen are not found in other types of paint, making it a popular choice for projects requiring a touch of visual flair.

    Key Characteristics of Metal Flake Paint

    Metal flake paint stands out due to its unique aesthetic properties. The incorporation of metallic flakes gives it a distinct visual appeal that is absent in other types of paint. This characteristic allows for customization and the creation of visually engaging surfaces. The interplay of light on the flakes produces a dynamic effect that changes depending on the viewing angle and the ambient lighting.

    Types of Metal Flakes

    A wide variety of metallic flakes are used in metal flake paints, each contributing to a unique aesthetic. The most common types include aluminum, copper, and gold flakes. These metals offer diverse visual effects, ranging from the cool shimmer of aluminum to the warm tones of gold. The choice of flake type is often dictated by the desired visual outcome.

    • Aluminum flakes provide a silvery sheen, suitable for a wide range of applications. Their affordability makes them a popular choice for general use.
    • Copper flakes create a rich, warm copper-toned effect, ideal for decorative purposes. Their unique color adds a touch of sophistication.
    • Gold flakes offer a luxurious golden appearance, often used in high-end decorative projects. The shimmering effect of gold flakes enhances the visual appeal of any surface.

    Applications of Metal Flake Paint

    Metal flake paint finds application in diverse industries and projects. Its unique properties make it suitable for both decorative and functional purposes. From automotive refinishing to architectural design, its versatility is evident.

    • Automotive Refinishing: Metal flake paint is frequently used in automotive refinishing to add a touch of elegance and customization to vehicles. The metallic sheen enhances the visual appeal of the car.
    • Architectural Design: In architecture, metal flake paint can be used to create stunning decorative accents on buildings, from facades to interior trim. The interplay of light on the flakes can dramatically change the aesthetic of the structure.
    • Marine Applications: Metal flake paint can be applied to boats and other marine vessels for decorative and protective purposes. The durability of the paint is critical in this environment.
    • Industrial Applications: Metal flake paint can be used for specialized industrial applications, where durability and visual impact are required. This could include machinery or equipment needing a striking and long-lasting finish.

    Comparison of Metal Flake Paint Properties

    The table below highlights the key differences in properties between aluminum, copper, and gold flake paints.

    Feature Aluminum Flake Paint Copper Flake Paint Gold Flake Paint
    Appearance Silvery Copper-toned Golden
    Durability High High High
    Cost Medium High Very High
    Application General purpose Decorative Decorative

    Techniques for Applying Metal Flake Paint

    Metal flake paint adds a captivating touch of shimmer and visual depth to any project. Mastering its application, however, requires understanding the specific techniques and considerations involved. Proper surface preparation and paint application methods significantly impact the final aesthetic and durability of the finished product.Applying metal flake paint effectively involves careful attention to detail at each stage. The right approach yields a professional, long-lasting finish that showcases the unique beauty of the metallic flakes.

    Surface Preparation for Metal Flake Paint

    Proper surface preparation is crucial for achieving a flawless finish. A well-prepared surface ensures the metal flake paint adheres firmly and evenly, preventing chipping and peeling. Thoroughly cleaning the surface to remove dust, dirt, grease, and loose particles is essential. This can be achieved using a suitable cleaner, followed by thorough rinsing and drying. Ensure the surface is free of any imperfections, such as cracks, holes, or bumps.

    These need to be filled and sanded smooth. Priming the surface with a suitable primer is another critical step. This creates a consistent base for the metal flake paint to adhere to, improving its longevity.

    Methods for Applying Metal Flake Paint

    Different methods are available for applying metal flake paint, each with its own advantages and disadvantages. The choice depends on the desired outcome and the surface being painted.

    Brush Application

    Using a brush for metal flake paint allows for precise control and detailed application. For fine details or intricate designs, a brush is ideal. A high-quality brush, specifically designed for the viscosity of metal flake paint, is recommended. A natural bristle brush is often favored for its ability to maintain its shape and effectively distribute the paint.

    This precision comes at the cost of speed, making it a slower approach than spray application.

    Spray Application

    Spraying metal flake paint provides rapid coverage across large surfaces. This is particularly useful for projects with extensive areas needing to be painted. Choosing the right spray equipment is critical. An air compressor, an appropriate spray gun, and high-quality paint are needed for optimal results. Proper technique is key to preventing uneven coverage or splattering.

    The distance between the spray gun and the surface should be maintained consistently throughout the application process. Spraying requires practice to achieve a uniform finish.

    Tools and Equipment

    The necessary tools and equipment for metal flake paint application vary based on the chosen method. For brush application, high-quality brushes and paint trays are essential. For spray application, an air compressor, spray gun, and safety equipment like a respirator and eye protection are crucial. Additional tools, such as sanding materials and fillers, might be required for surface preparation.

    Step-by-Step Procedure for Applying Metal Flake Paint to Wood

    This procedure Artikels the steps involved in applying metal flake paint to a wooden surface.

    1. Clean the wood surface thoroughly to remove dust, dirt, and any loose particles. Use a suitable cleaner and ensure complete drying.
    2. Fill any cracks or holes with wood filler, allowing it to dry completely.
    3. Sand the filled areas smooth to create a consistent surface.
    4. Prime the wood surface with a suitable primer, ensuring complete drying.
    5. Apply a thin, even coat of metal flake paint using a brush or spray gun, following the manufacturer’s instructions.
    6. Allow the paint to dry completely before applying additional coats (if necessary).

    Comparison of Application Methods, Paint with Metal Flake Paint

    Method Pros Cons
    Brush Precise application, control over detail Time-consuming, slower coverage
    Spray Fast coverage on large surfaces Potential for uneven coverage, requires skill and practice

    Effects and Visual Aspects of Metal Flake Paint

    Metal flake paint offers a captivating array of visual effects, transforming surfaces from mundane to mesmerizing. Its inherent sparkle and shimmer are highly sought after for a wide range of applications, from automotive detailing to decorative crafts. Understanding how light interacts with the metallic flakes is crucial to achieving the desired aesthetic.The interplay of light and metal flakes in paint is what gives it its unique character.

    As light strikes the flakes, they reflect and scatter light, creating a dazzling array of visual effects. The size and shape of the flakes, combined with the base coat color, play a significant role in shaping the overall aesthetic impact.

    Visual Impact on Different Surfaces

    Metal flake paint dramatically alters the appearance of various surfaces. On smooth surfaces like metal panels or furniture, the flakes create a captivating, shimmering effect. On textured surfaces, the flakes accentuate the existing patterns and contours, often producing a more dramatic visual impact. This effect can be further enhanced by the angle of the light source. For example, in automotive applications, strategically placed metal flake paint can highlight the curves and contours of the vehicle, enhancing its aesthetic appeal.

    Light Interaction with Metal Flakes

    The way light interacts with the metal flakes is a key element in determining the final visual effect. The size and shape of the flakes, along with the angle of the light source, influence the intensity and distribution of the reflected light. Smaller flakes tend to produce a more subtle shimmer, while larger flakes create a more pronounced sparkle.

    The reflective nature of the metal flakes also affects how the paint interacts with surrounding colors, creating a dynamic interplay of light and shadow.

    Types of Visual Effects

    Metal flake paint enables a diverse range of visual effects. A subtle shimmer is achieved with fine flakes, while medium flakes create a moderate sparkle. Coarse flakes produce a dramatic sparkle, often used for decorative accents. The chosen color and pigment of the base coat also play a significant role in enhancing the visual appeal of the flakes.

    A darker base coat will amplify the reflective properties of the flakes, creating a more intense sparkle.

    Role of Color and Pigment

    The color and pigment of the base coat strongly influence the overall effect. The base color serves as a backdrop for the metallic flakes, influencing how the flakes are perceived. Darker base coats often amplify the sparkle of the flakes, while lighter colors create a more subtle shimmer. Careful consideration of the base coat color and pigment is essential to achieve the desired visual impact.

    Flake Size and Achievable Effects

    The size of the metal flakes directly impacts the visual effect. This table demonstrates the relationship between flake size and the achievable effect.

    Flake Size Effect Example Application
    Fine Subtle shimmer Furniture, decorative accents where a delicate sheen is desired.
    Medium Moderate sparkle Car parts, interior design elements, where a noticeable sparkle is required.
    Coarse Dramatic sparkle Decorative accents, custom finishes, where a strong visual impact is desired.

    Surface Preparation and Considerations

    Proper surface preparation is crucial for achieving a durable and aesthetically pleasing metal flake paint finish. A well-prepared surface ensures excellent adhesion, preventing the paint from flaking, chipping, or peeling over time. This section delves into the specifics of surface preparation, highlighting the importance of various treatments and the suitability of different materials for metal flake paint.Surface preparation isn’t just about aesthetics; it’s a critical step in the process.

    A poorly prepared surface can lead to premature failure of the paint finish, requiring costly and time-consuming repairs. Therefore, meticulous attention to detail during surface preparation is paramount for longevity and optimal results.

    Importance of Surface Preparation for Metal Flake Paint

    A properly prepared surface creates a strong foundation for metal flake paint. This means removing any loose, flaking, or deteriorated material that could compromise the paint’s adherence. The goal is to achieve a clean, stable surface that allows the paint to bond effectively. This will significantly improve the longevity and aesthetic appeal of the final finish.

    Different Surface Treatments for Optimal Paint Adhesion

    Various surface treatments are crucial for maximizing paint adhesion and ensuring a high-quality finish. These include sanding, cleaning, priming, and degreasing. Sanding smooths the surface, while cleaning removes dirt, dust, and debris. Priming creates a uniform base for the paint, improving its adhesion. Degreasing is important to eliminate any oily or greasy substances, which can prevent paint from adhering properly.

    Metal flake paint is seriously cool, offering a unique shimmer. Thinking about the way the light catches the tiny metallic particles, I’m reminded of the striking aesthetic of the new Frank Ocean white collection new frank ocean white. The way the color plays across different surfaces is something I’d love to experiment with in my next metal flake paint project.

    It definitely inspires some new ideas for layering and texture.

    Suitable Surfaces for Metal Flake Paint

    Metal flake paint can be applied to a variety of surfaces, but the specific preparation and treatment required will vary depending on the material. Wood, metal, and plastic are common surfaces that can benefit from metal flake paint applications, but each material demands a different approach to achieve optimal results. Careful consideration of the material’s properties is essential for a durable and lasting finish.

    Factors Influencing Durability and Longevity of Metal Flake Paint Finishes

    The durability and longevity of metal flake paint are significantly influenced by factors such as surface preparation, the quality of the paint itself, environmental conditions, and proper application techniques. For example, a well-prepared surface with a suitable primer will enhance the paint’s resistance to chipping and flaking, while harsh weather conditions or improper application can negatively impact the finish.

    Surface Preparation Steps for Different Materials

    Proper surface preparation is crucial for achieving a long-lasting and aesthetically pleasing finish. Different materials require different approaches. The following table Artikels the general steps for preparing various surfaces for metal flake paint application.

    Material Preparation Steps
    Wood Thoroughly sand the surface to remove imperfections and ensure a smooth finish. Apply a suitable primer to improve paint adhesion.
    Metal Clean the metal surface thoroughly to remove any dirt, rust, or debris. Remove any rust with appropriate methods, then apply a suitable metal primer.
    Plastic Thoroughly clean the plastic surface, removing any dirt or grease. Degrease the surface to ensure proper adhesion. Apply a suitable plastic primer if necessary.

    Troubleshooting and Maintenance

    Metal flake paint, with its captivating visual effects, requires careful application and subsequent maintenance to preserve its beauty and longevity. Understanding potential issues and their solutions is crucial for achieving a flawless and enduring finish. Proper maintenance procedures will ensure your metal flake masterpiece remains vibrant and intact for years to come.

    Common Application Issues

    Troubleshooting application issues is key to achieving a professional-looking finish. Uneven coverage and flaking are common problems that can be easily addressed with proper preparation and technique. Paying attention to these issues early on can prevent significant problems later.

    • Uneven Coverage: Inconsistent application of metal flake paint can result in areas with varying degrees of flake density. This often stems from insufficient surface preparation, inadequate mixing, or improper application techniques. Ensure the surface is thoroughly cleaned and primed. Properly mix the paint to ensure consistent flake dispersion. Apply the paint in thin, even coats, allowing each coat to dry completely before applying the next.

    • Flaking: Flaking is a sign of improper adhesion between the paint and the substrate. Insufficient surface preparation or inadequate drying times between coats are common causes. Thoroughly clean the surface, ensuring all contaminants and loose particles are removed. Ensure adequate drying time between coats. Using a high-quality primer specifically designed for metal flake paint can enhance adhesion.

      Playing with metal flake paint is seriously cool, like a whole new dimension of artistic expression. It’s almost like Kanye West inviting James Blake to collaborate – a surprising and exciting fusion of two distinct styles, creating something fresh and unique. The metallic shimmer really elevates the final piece, much like the potential for a new sound in music.

      Kanye West invites James Blake to collaborate is a testament to that, showing how different elements can combine for a powerful outcome. The vibrant, almost otherworldly quality of metal flake paint makes it truly captivating.

    Maintenance Procedures

    Regular maintenance is vital for preserving the beauty and integrity of metal flake paint finishes. Protective measures and careful handling are key components in prolonging the life of the finish.

    Playing with metal flake paint is surprisingly satisfying, almost like a mini-masterpiece in progress. But sometimes, achieving a truly spectacular effect requires a bit of a cheat code, much like Pass an Exam Without Studying. You might need to experiment with different layering techniques and lighting to find the perfect combination. Then, you can marvel at the final, dazzling result, knowing you unlocked the secrets of the paint, just as you might have with a hidden study trick.

    The beauty of metal flake paint is its ability to reveal new layers of creativity.

    • Protecting from Damage: Metal flake paint is susceptible to damage from scratches, impacts, and harsh cleaning agents. Proper protection is essential. Covering the painted surface during construction or maintenance work can prevent accidental damage. Use soft cloths and mild cleaning solutions to prevent scratching or abrasion. Consider applying a protective sealant or clear coat to create an extra layer of protection.

    • Addressing Chipping and Scratching: Chipping and scratching can occur due to impact or abrasion. Addressing these issues promptly is crucial to maintain the finish’s visual appeal. For minor chipping, carefully fill the gaps with a matching touch-up paint and smooth it out. For deeper scratches, a more extensive repair might be needed. Consult a professional painter for major damage.

    Cleaning and Touch-up

    Regular cleaning and appropriate touch-up techniques are vital for maintaining the integrity of the metal flake paint finish.

    • Cleaning: Use mild, non-abrasive cleaning solutions. Avoid harsh chemicals that could damage the paint. Soft cloths or microfiber cleaning cloths are recommended. Apply the cleaning solution to the surface and wipe gently. Thoroughly rinse the area and dry completely.

    • Touch-up: Maintain a touch-up kit with a matching metal flake paint for addressing minor imperfections or damages. Carefully match the existing paint to ensure seamless integration. Apply the touch-up paint in thin, even coats and allow it to dry thoroughly. Avoid excessive force or pressure when applying touch-up paint.

    Projects and Applications

    Metal flake paint’s versatility transcends simple aesthetics; it’s a powerful tool for transforming various projects, from subtle home décor enhancements to dramatic automotive and industrial applications. Its unique ability to reflect light and create shimmering effects allows for a wide range of creative expressions. This section explores diverse uses and techniques for achieving stunning results.Metal flake paint offers a rich palette of possibilities for both functional and decorative projects.

    Its application extends far beyond the typical paint job, impacting the look and feel of everything from furniture to vehicles to industrial equipment. The reflective nature of metal flakes adds a unique visual dimension, making it a go-to choice for projects demanding a touch of the extraordinary.

    Home Décor Projects

    Metal flake paint can elevate ordinary furniture and accessories to extraordinary pieces. Its use in furniture refinishing is particularly impactful. A simple wooden chest, for example, can be transformed with a coat of metal flake paint in a color like copper or gold. This can create a sophisticated, antique-inspired look, or a modern, glamorous feel. Consider using a metallic flake paint to highlight specific areas of the piece for a focal point.

    Automotive Applications

    The automotive industry leverages metal flake paint for a variety of purposes, including enhancing the appearance of car parts and creating unique visual effects. A common application is to accentuate trim pieces, bumpers, or specific areas of a car body, adding a touch of elegance or a bold statement. Metal flake paint can also be used to create custom designs on cars.

    This might involve applying the paint in intricate patterns or using different flake sizes and colors to achieve a unique visual effect.

    Industrial Applications

    Metal flake paint’s durability makes it suitable for industrial applications. It can be used to protect metal surfaces and enhance their visual appeal. Consider the use of metal flake paint on machinery or industrial equipment to enhance its visual appeal. Metal flake paint can also be used to add visual identification to different parts of machinery or to create distinctive branding for a company.

    This is particularly effective in situations where visual differentiation is crucial. For instance, metal flake paint can be used to mark different sections of a large factory floor, making it easier to navigate and identify specific areas.

    Enhancing Objects and Structures

    The application of metal flake paint can dramatically enhance the aesthetic of various objects and structures. For example, consider using it on a metal sculpture or a metal railing. The metallic shimmer can highlight the intricate details of the design, adding a sense of depth and richness to the piece. The same effect can be achieved on a metal gate or a fence, adding a touch of sophistication and visual appeal.

    Specific Project Examples

    • Refurbishing a metal door: Sand the door, prime it, and apply several thin coats of metal flake paint. Allow each coat to dry completely before applying the next. Consider adding stencils or patterns for a more personalized look.
    • Customizing a motorcycle: Metal flake paint can be used to highlight specific parts of the motorcycle, such as the handlebars, gas tank, or rims. A multi-colored flake paint scheme can create a unique visual effect, highlighting specific design elements.

    Outcome Summary: Paint With Metal Flake Paint

    Paint with Metal Flake Paint

    In conclusion, Paint with Metal Flake Paint offers a wealth of creative possibilities. By understanding the different types of metal flakes, application techniques, and surface preparation, you can unleash your creativity and achieve stunning visual effects. From home décor to automotive and industrial applications, the versatility of metal flake paint is truly remarkable. Remember, careful surface preparation and proper application are key to achieving a durable and long-lasting finish.

    Experiment, explore, and let your imagination run wild with metal flake paint!

  • Hang a Garland Outside Your Outdoor Decorating Guide

    Hang a Garland Outside Your Outdoor Decorating Guide

    Hang a Garland Outside is your comprehensive guide to transforming your outdoor space with the magic of garlands. From choosing the perfect garland to mastering the art of hanging and maintenance, this post will equip you with the knowledge and inspiration to create breathtaking outdoor displays. We’ll explore different garland types, suitable locations, hanging techniques, and seasonal variations, so you can deck your halls (or your porch, garden, or patio) for any occasion.

    This guide will cover everything from selecting durable materials to understanding safety precautions when working with heights. You’ll find detailed instructions, helpful tips, and creative ideas to make your outdoor garland displays truly unique and lasting. Get ready to bring your outdoor space to life!

    Choosing the Garland

    A well-chosen garland can transform an outdoor space, adding a touch of festive cheer or a subtle touch of elegance. Selecting the right garland involves considering several factors, from the material and color to the intended aesthetic and the specific outdoor environment. This guide will help you navigate the various options available and make an informed decision for your project.The key to a successful outdoor garland is understanding its intended use and the environment it will inhabit.

    Different materials react differently to sun, rain, and temperature fluctuations. Choosing the right garland ensures your investment will last and continue to enhance your space for years to come.

    Garland Types for Outdoor Use

    Various types of garlands are suitable for outdoor use, each offering unique visual appeal and durability. Natural materials like pine boughs, evergreen sprigs, and berry clusters provide a classic, rustic touch, often used in winter holidays. Fabric garlands, with their vibrant colors and patterns, are versatile and can be adapted for any season or theme. Metal and plastic options offer a modern twist, allowing for intricate designs and bold colors, suitable for year-round use.

    Material Durability and Weather Resistance

    The longevity of an outdoor garland depends heavily on the material’s resistance to the elements. Natural materials like wood and wicker, while beautiful, may not be the most durable choice for prolonged outdoor exposure. These materials can easily fade, warp, or rot. Plastic and metal, however, are generally more resistant to weathering, offering longer lifespan. Fabric garlands require careful consideration; while they can be quite festive, they might need additional protection, such as weather-resistant coatings, to withstand harsh weather.

    Festive and Non-Festive Garland Options

    Garlands are not solely for holidays. For example, a simple, muted-color fabric garland can add a touch of elegance to a garden path, while a string of twinkling lights can illuminate a patio during the evening. For the holidays, consider pine cone garlands, which bring a natural touch to the winter ambiance, or a vibrant red and green garland for a Christmas display.

    Matching Garland to Outdoor Aesthetic

    Matching the garland to your existing outdoor aesthetic is crucial. If your home boasts a traditional style, a wicker or natural garland might be a perfect fit. A modern home might benefit from a sleek metal or plastic garland. A more rustic or bohemian style could embrace the charm of natural materials like wood or dried flowers.

    Consider the color palette of your outdoor space when choosing a garland to create a cohesive and visually appealing environment.

    Garland Material Comparison Table

    Material Durability Weather Resistance Cost Aesthetic Appeal
    Plastic High High Medium Versatile, modern
    Paper Low Low Low Rustic, festive
    Fabric Medium Medium (with treatment) Medium Vibrant, diverse
    Metal High High Medium-High Modern, sleek
    Wood Medium Medium (depending on treatment) Medium Rustic, natural

    Preparing the Space

    Choosing the perfect location for your garland is crucial for maximizing its visual impact and ensuring its longevity. A well-placed garland can elevate the festive ambiance of a room, while a poorly chosen spot can diminish its effect. Consider the surrounding environment, architectural details, and the overall aesthetic you’re aiming for.Careful consideration of the space’s structural integrity is essential to avoid accidents and ensure the garland’s safety.

    A secure and stable location minimizes the risk of damage or injury. This involves a thorough evaluation of the support available and the potential for movement or shifting. Proper preparation of the area also involves practical steps like cleaning and ensuring the area is ready to receive the garland without interference.

    Selecting the Ideal Hanging Location

    Proper placement of the garland significantly impacts its visual appeal and the overall festive atmosphere. Factors like lighting, architectural features, and visibility should be considered. Good lighting enhances the garland’s sparkle and color, while architectural details can be beautifully highlighted by strategic placement. Visibility ensures that the garland is prominently displayed and easily appreciated.

    Assessing Structural Integrity

    Before hanging any garland, carefully evaluate the structural integrity of the chosen location. Look for sturdy supports, ensuring the chosen location can bear the weight of the garland without risk of damage or displacement. Examine the ceiling or wall for any cracks or weak points. This proactive step helps to avoid potential accidents and ensures the long-term safety of the garland and the environment.

    Hanging a garland outside is a simple way to add a touch of festive cheer. It’s a great way to bring a little bit of the outdoors in and create a welcoming atmosphere. Thinking about the sheer power and athleticism of Calvin Johnson, a wonderful beast , it’s easy to see how something as seemingly small as a garland can bring a burst of joy and vibrancy.

    A perfect addition to any home’s exterior décor, it’s a quick and easy project to brighten up your surroundings.

    Preparing the Area

    Thorough preparation of the space before hanging a garland enhances its visual impact and safety. Cleaning the area ensures a smooth surface for the garland to rest on, removing any debris that could interfere with the hanging process. Trimming branches or foliage, if necessary, improves the garland’s aesthetic and allows for a clean and well-defined presentation. Proper marking of the placement points aids in accurate hanging and helps maintain alignment.

    Safety Precautions and Support Requirements

    • A sturdy, level surface is essential for hanging a garland. Consider the weight of the garland and the material it is made of. A heavy garland requires more robust support than a light one.
    • Using appropriate hanging hardware is critical to prevent damage to the structure and ensure the garland’s safety. Hooks, clips, or other appropriate fixtures should be used for support, depending on the garland’s weight and the surface it is being attached to. For example, a heavy, intricate garland made of glass or metal might require stronger, more secure hanging mechanisms than a simple, lightweight garland made of fabric or paper.

    • Safety measures like securing the garland to prevent accidental detachment are paramount. Use appropriate fasteners to ensure the garland remains securely attached throughout the display period.

    Example Table: Garland Hanging Preparation

    Location Structural Support Requirements Necessary Safety Precautions
    Ceiling Strong hooks, brackets, or wires capable of holding the garland’s weight. Ensure hooks are firmly anchored and securely attached to prevent falling.
    Mantels Secure brackets or hooks designed for mantelpieces, considering the mantel’s weight capacity. Ensure the garland’s weight does not exceed the mantel’s load limit.
    Walls Strong adhesive strips or specialized wall-hanging hardware appropriate for the garland’s weight. Use appropriate adhesives or hardware suited to the wall material and garland weight.

    Hanging the Garland

    Hang a Garland Outside

    Transforming your chosen garland into a festive display requires careful execution. Proper hanging ensures the garland’s longevity and aesthetic appeal. This step-by-step guide will equip you with the knowledge and techniques to hang your garland with confidence and precision.The right approach to hanging a garland depends on several factors, including the garland’s material, the structure of the space, and your personal preferences.

    Whether you opt for a simple, symmetrical arrangement or a more elaborate, dynamic design, the methods Artikeld below will help you achieve a beautiful and lasting result.

    Methods for Attaching the Garland

    Different attachment methods cater to various garland types and surfaces. Understanding the options will allow you to select the most appropriate technique for your project.

    • Using Hooks: Hooks are ideal for hanging garlands on railings, fences, or other structures with pre-existing hooks. Ensure the hooks are strong enough to support the weight of the garland and are securely attached to the surface. Use appropriate size hooks to avoid damage or slippage. For example, if you’re hanging a delicate, lightweight garland, small, fine hooks would be a good choice.

      If the garland is heavy, use sturdy hooks.

    • Employing Clips: Clips are versatile and suitable for a variety of surfaces, including branches, walls, or railings. They provide a quick and easy way to attach the garland without causing damage to the structure. Choose clips that match the garland’s material and size. Ensure the clips are firmly engaged to prevent slippage or damage.
    • Utilizing Adhesives: Adhesives are a good choice for hanging garlands on smooth surfaces like walls or ceilings. Select an adhesive specifically designed for outdoor use or the material of the garland to avoid damage or peeling. Apply a thin layer of adhesive to the back of the garland, ensuring proper adhesion to the surface. Carefully press the garland against the surface to secure it.

      This method is suitable for hanging garlands on trees or other natural surfaces, offering an attractive aesthetic.

    Necessary Tools and Supplies

    Gathering the right tools and supplies will streamline the hanging process and prevent potential complications.

    • Garland: Your chosen garland is, of course, essential.
    • Hooks/Clips/Adhesive: Select appropriate attachments based on the garland and surface.
    • Measuring Tape: Accurate measurements are crucial for a symmetrical arrangement.
    • Scissors/Utility Knife: Useful for trimming the garland to fit or for cutting adhesive strips.
    • Level (optional): For hanging the garland straight and ensuring even spacing.
    • Gloves (optional): Protect your hands when handling the garland or adhesives.

    Safety Considerations

    Prioritizing safety is paramount during the hanging process. Understanding potential hazards and taking necessary precautions will ensure a smooth and secure installation.

    • Working at Heights: If hanging the garland from a high place, use a sturdy ladder or scaffolding and ensure proper footing. Never compromise safety for speed or convenience.
    • Electrical Hazards: Avoid hanging garlands near electrical wires or outlets to prevent accidents.
    • Sharp Objects: Exercise caution when handling sharp objects like scissors or utility knives.
    • Weather Conditions: If hanging the garland outdoors, consider the weather forecast and take precautions to protect the garland from rain or strong winds.

    Hanging Procedures

    This structured approach will help you hang the garland efficiently and safely.

    1. Planning the Arrangement: Visualize the desired layout before starting to hang the garland. This will save time and prevent mistakes.
    2. Marking the Placement: Use a measuring tape and level to mark the placement of hooks, clips, or adhesive points on the surface.
    3. Attaching the Garland: Apply the chosen method to attach the garland to the surface, ensuring a secure hold.
    4. Checking the Alignment: Regularly check the alignment and spacing of the garland to maintain the desired aesthetic.
    5. Troubleshooting: If problems arise, refer to the solutions below. For example, if the garland slips, ensure the hooks are secure, the adhesive is properly applied, or the clips are correctly fastened.

    Maintaining the Garland: Hang A Garland Outside

    A beautiful garland, meticulously chosen and artfully hung, deserves the same care and attention to maintain its splendor and extend its life. Proper maintenance is key to preserving its vibrant colors and preventing premature wear and tear. This section delves into the essential practices for keeping your garland looking its best, from cleaning to storage.Maintaining a garland’s quality requires a proactive approach.

    By following the best practices Artikeld below, you can ensure your festive decorations remain beautiful and usable for many years to come. This proactive approach will prevent costly replacements and ensure your investment is worthwhile.

    Cleaning and Care Procedures

    Garlands crafted from different materials require unique cleaning methods. Understanding these distinctions is crucial for preventing damage and maintaining the garland’s aesthetic appeal. Different cleaning techniques are vital to preserve the garland’s integrity and beauty.

    • Natural Fiber Garlands (e.g., pine, cedar): These garlands often benefit from gentle brushing with a soft-bristled brush to remove dust and debris. For more stubborn dirt, a damp cloth can be used, ensuring the cloth is wrung out thoroughly to prevent water damage. Avoid using harsh chemicals or excessive water, as these can weaken the natural fibers.
    • Artificial Fiber Garlands (e.g., plastic, metallic): These garlands are often more resilient and can be cleaned with a mild detergent solution. Mix a small amount of mild dish soap with lukewarm water and use a soft cloth to gently wipe down the garland. Thorough rinsing is essential to prevent residue buildup. Avoid using abrasive cleaners or scrubbing, which can damage the artificial fibers.

    • Mixed Material Garlands: When dealing with garlands featuring a combination of natural and artificial materials, prioritize gentle cleaning methods. Separate the different components and clean them individually using the appropriate techniques described above. This strategy ensures the longevity of the entire garland.

    Preventing Weather Damage

    Protecting your garland from harsh weather conditions is essential for its longevity. Specific measures can safeguard your investment from the elements. Exposure to the elements can quickly diminish the beauty and lifespan of your garland.

    • Rain and Snow: To prevent water damage, consider storing the garland indoors during periods of heavy rain or snowfall. If the garland must remain outdoors, ensure it is positioned in a sheltered location, away from direct exposure to precipitation. Materials like plastic and metallic coverings are less susceptible to water damage than natural fibers. Proper storage and covering can mitigate the impact of these elements.

    • Wind: High winds can cause damage to the garland, especially if it’s not securely fastened. Use appropriate fasteners and secure the garland to prevent it from being blown away or damaged by the wind. Consider using weighted elements or stakes to anchor the garland and reduce the impact of high winds.

    Storage Practices

    Proper storage techniques are essential to preserve the quality of your garland for future use. This meticulous care ensures that the garland remains intact and beautiful for future use.

    • Cleaning and Drying: Thoroughly clean and dry the garland before storing it. Ensure all moisture is removed to prevent mold or mildew growth. Remove any loose or broken pieces to prevent further damage.
    • Storage Location: Store the garland in a cool, dry place away from direct sunlight and extreme temperatures. Avoid storing it in areas with high humidity, as this can lead to damage and decay. A storage area that is well-ventilated and not subject to extreme temperature fluctuations is ideal.
    • Protective Measures: Wrap the garland in acid-free tissue paper or use a protective covering to prevent damage during storage. Avoid using plastic wrap, as this can trap moisture and promote mold growth. Consider a suitable storage container to prevent crushing or damage to the garland’s structure.

    Maintenance Comparison Table

    This table summarizes the different garland maintenance procedures, outlining the steps and necessary supplies for each method.

    Garland Type Cleaning Method Supplies Needed Storage Method
    Natural Fiber Gentle brushing, damp cloth Soft-bristled brush, damp cloth Acid-free tissue paper, cool, dry storage
    Artificial Fiber Mild detergent solution, soft cloth Mild dish soap, lukewarm water, soft cloth Protective covering, cool, dry storage
    Mixed Material Separate components, gentle cleaning Appropriate cleaning supplies for each material Individual protective coverings, cool, dry storage

    Inspirational Ideas

    Garlands, when strategically placed and creatively designed, can transform any outdoor space into a captivating and welcoming environment. Beyond the basic aesthetic appeal, they can evoke specific moods and themes, adding depth and personality to your outdoor décor. This section explores various inspirational ideas for incorporating garlands into your outdoor design, from simple enhancements to elaborate displays.Outdoor garland displays offer a canvas for personal expression.

    Whether you envision a rustic charm, a whimsical fantasy, or a sophisticated elegance, garlands can be tailored to match your vision. Different types of garlands, combined with thoughtful lighting and thematic elements, can create unique and memorable outdoor settings.

    Creative Garland Uses

    Garlands are not limited to simple decorative functions. They can serve as functional elements, adding a touch of elegance and organization to outdoor spaces. For instance, a delicate floral garland draped across a pergola can create a charming backdrop for a romantic dinner. A string of lanterns intertwined with a leafy garland can highlight a pathway, making it safe and aesthetically pleasing.

    Similarly, a woven garland can be incorporated into a rustic fence or trellis, adding a touch of warmth and natural beauty.

    Decorative Themes

    A well-chosen theme can elevate a garland display from simple decoration to a captivating experience. A whimsical fairy garden theme can be achieved by using pastel-colored garlands with miniature figurines and fairy lights. A rustic theme might incorporate twine or burlap garlands accented with wooden accents and string lights. A sophisticated contemporary theme could involve sleek metallic garlands and modern lighting fixtures.

    Consider the mood you want to create and select a theme that resonates with your style.

    Combining Garland Types

    Combining different types of garlands can lead to a unique and personalized design. For example, a mix of leafy garlands with string lights, combined with a burlap garland and lanterns, can create a warm and inviting atmosphere. Adding a touch of elegance can be achieved with a combination of metallic garlands and colorful floral garlands. A delicate mix of these types of garlands could be perfect for a garden party, offering a balance of textures and colors.

    This approach allows for a dynamic display that is both visually appealing and personalized.

    Hanging a garland outside always brightens up the place, a simple act of festive cheer. It’s a great way to get into the spirit of things, especially around the holidays. Speaking of festive, did you hear about the new director and composer for Paul McCartney’s animated film, High in the Clouds ? It’s inspiring to see such creative projects in motion, and maybe that’ll get me motivated to hang some extra garlands this year! It’s a small thing, but a nice way to bring a little joy to the neighbourhood.

    Lighting Options

    Lighting plays a crucial role in enhancing the beauty of a garland display. String lights, lanterns, and fairy lights can be incorporated into or alongside garlands, creating a warm and inviting ambiance. Warm-toned lights can evoke a cozy atmosphere, while cool-toned lights can create a more contemporary feel. Consider the time of day you want to enjoy your display when choosing your lighting options.

    Unique Garland Designs

    • Rustic Farmhouse Entryway: A garland crafted from dried wildflowers and grasses, hung across a rustic wooden archway, accented with lanterns and string lights, creates a welcoming and inviting entrance.
    • Bohemian Garden Pathway: A tapestry of woven plant garlands, interspersed with colorful beaded garlands, and adorned with fairy lights along a winding pathway, adds a touch of magic and whimsy to the garden.
    • Coastal Cottage Porch: A combination of seagrass garlands, combined with white-painted wood garlands and nautical-themed lanterns, can create a tranquil and serene coastal atmosphere for a porch.
    • Elegant Garden Arbor: A cascading garland of white and ivory roses, complemented by subtle fairy lights, can create a romantic and elegant ambiance around a garden arbor.

    These are just a few examples, and the possibilities are endless. By experimenting with different materials, colors, and lighting, you can craft a garland display that truly reflects your personal style and the unique character of your outdoor space.

    Hanging a garland outside always feels so festive, a little touch of autumnal cheer. Plus, with the announcement of Death Cab for Cutie’s fall tour, death cab for cutie announce fall tour , I’m already picturing cozy nights listening to their music under the twinkling lights of my garland. It’s the perfect way to embrace the crisp air and celebrate the upcoming season.

    Seasonal Variations

    Garlands, more than just festive decorations, are a dynamic way to express the spirit of each season. Adapting garland displays to reflect the changing colors, temperatures, and celebratory events of different times of the year can transform your home into a living calendar of joy and beauty. This section explores how to tailor your garland creations to embrace the unique charm of every season.Seasonal garlands provide a visual bridge between the natural world and our homes.

    They’re more than just decorative elements; they’re a way to bring the spirit of the season indoors, connecting us to the rhythms of the year. From vibrant autumn leaves to snowy winter themes, we can create displays that capture the essence of each season.

    Holiday-Themed Garlands

    Holiday-themed garlands, such as those for Christmas, Hanukkah, or Diwali, often feature specific colors and symbols. Christmas garlands typically use deep reds, greens, and golds, incorporating elements like pine cones, holly berries, and ornaments. Hanukkah garlands might incorporate blue and gold, along with menorah shapes. Diwali garlands often use warm oranges, golds, and reds, featuring diyas or rangoli patterns.

    The specific symbols and colors associated with each holiday are essential in creating a recognizable and authentic atmosphere.

    Garlands for Other Seasons

    Spring and summer garlands often embrace a brighter palette, featuring pastel colors, flowers, and foliage. Spring garlands may incorporate pastel shades of pink, purple, and yellow, with delicate blossoms and sprigs of greenery. Summer garlands could incorporate vibrant hues of red, orange, and yellow, with flowers and fruits. These seasonal garlands often reflect the bounty and vibrancy of the warmer months.

    Creating Seasonal Garland Displays

    Creating a garland display for a particular holiday or season requires careful consideration of color scheme and accessories. For example, a fall garland could use warm, earthy tones like burnt orange, deep reds, and golds, accented with gourds, pumpkins, and fall leaves. A spring garland might incorporate pastel shades like lavender, mint green, and peach, with delicate flowers, and flowering vines.

    Color Schemes and Accessories, Hang a Garland Outside

    The color scheme of a garland is crucial to its seasonal identity. For example, a Christmas garland typically features deep reds, greens, and golds, while a summer garland might use vibrant blues, yellows, and greens. Accessories, such as ornaments, figurines, or other decorative elements, further enhance the theme. A winter garland might include icicles, snowflakes, or miniature snowmen, while a summer garland might feature miniature birds or butterflies.

    Seasonal Garland Examples

    Season Color Scheme Accessories Description
    Autumn Burnt orange, deep reds, golds Pumpkins, gourds, fall leaves A warm and inviting display, evoking the beauty of fall foliage.
    Winter Deep blues, whites, silvers Icicles, snowflakes, miniature snowmen A serene and peaceful display, mirroring the tranquility of winter.
    Spring Pastels (pinks, purples, yellows) Delicate flowers, flowering vines A vibrant and refreshing display, celebrating the arrival of spring.
    Summer Vibrant blues, yellows, greens Miniature birds, butterflies, fruits A joyful and lively display, reflecting the energy of summer.

    These examples showcase how the choice of colors and accessories can powerfully convey the essence of a particular season. By understanding these principles, you can create displays that are not only beautiful but also evocative of the spirit of the season.

    Final Wrap-Up

    Hang a Garland Outside

    In conclusion, hanging a garland outside can be a rewarding experience that elevates your outdoor aesthetic. By carefully considering the garland type, preparation, hanging methods, and seasonal adjustments, you can create stunning displays that will delight you and your guests. Remember to prioritize safety and enjoy the process of bringing your vision to life! From festive holidays to casual evenings, garlands can add a touch of charm and personality to any outdoor setting.

  • Get Stickers off Wood A Complete Guide

    Get Stickers off Wood A Complete Guide

    Get Stickers off Wood, a common household conundrum, is tackled in this comprehensive guide. Whether it’s stubborn adhesive labels, decals, or posters stuck to your beloved wooden furniture, this guide provides the knowledge and methods to remove them safely and effectively without damaging the wood. We’ll explore various wood types, different sticker types, and a range of removal techniques, from gentle approaches to advanced strategies for intricate designs.

    From identifying the right tools to understanding safety precautions, we’ll walk you through every step of the process, ensuring a successful and damage-free removal experience. Learn how to prepare your wood surface, clean up afterward, and troubleshoot any issues that may arise along the way.

    Introduction to Removing Stickers from Wood

    Removing stickers from wooden surfaces is a common task, whether it’s removing old price tags from furniture, unwanted decals from doors, or remnants of promotional materials. This process can be straightforward, but a careful approach is essential to avoid damaging the wood’s finish or structure. Understanding the type of sticker, the wood’s composition, and the best removal techniques is crucial for a successful and damage-free outcome.Proper sticker removal from wood involves more than just pulling; it’s a process of identifying the right tools and techniques to prevent scratches, splinters, or permanent marks.

    The choice of method will depend on the type of sticker, the material of the wood, and the overall desired outcome.

    Types of Stickers

    Various types of stickers can be found on wooden surfaces. These include, but are not limited to, price tags, promotional decals, decorative stickers, and even remnants of labels. Each type might require a different approach to removal to avoid damaging the wood. For example, a thick, pressure-sensitive sticker will likely need a more forceful removal method than a thin, easily removable sticker.

    Wood Materials

    Different types of wood have varying levels of hardness and density. Knowing the material is essential for selecting the right removal technique. Common wood types include:

    • Plywood: A composite material made of thin layers of wood glued together. Its layered structure can make it more prone to damage if not handled carefully.
    • Hardwood: Known for its strength and durability. However, hardwoods can still be scratched or damaged if the removal process is not handled properly.
    • Medium-density fiberboard (MDF): A manufactured wood product that is less dense than hardwood but still requires a gentle approach to avoid damaging the surface.

    Importance of a Proper Approach

    A proper approach to sticker removal from wood is critical to preserving the wood’s integrity and aesthetic appeal. Improper methods can lead to:

    • Scratches and damage to the wood’s finish:
    • Splintering of the wood surface, especially on softer wood types.
    • Lifting or tearing of the wood grain if the sticker is not removed gradually.
    • Adhesive residue left on the wood surface, making future cleaning and maintenance difficult.

    Sticker Removal Techniques

    The best removal method depends on the sticker type and the wood’s material. Common techniques include:

    • Using a plastic scraper: A plastic scraper can gently lift stickers without scratching the wood. This method is particularly useful for stubborn stickers or those on delicate surfaces.
    • Applying heat: Heat can soften the adhesive, making it easier to remove the sticker. However, use caution and apply heat gently to prevent burning or warping the wood.
    • Using a sticker removal solution: A specialized sticker removal solution can dissolve the adhesive, allowing the sticker to be peeled away easily. Follow the product instructions carefully to ensure proper application and avoid damaging the wood.

    Precautions

    Always test any removal method on a less visible area of the wood first to avoid unexpected damage. This is particularly important when using heat or chemical solutions.

    Methods for Removing Stickers

    Removing stickers from wood can be a delicate process, requiring careful consideration of both the sticker type and the wood’s surface. A hasty approach can easily damage the wood, leaving unsightly marks or even causing permanent damage. Understanding the various techniques available and choosing the appropriate method for your specific situation is crucial for achieving a successful removal without compromising the integrity of your furniture or decorative pieces.The effectiveness and safety of each method vary depending on the adhesive type of the sticker and the type of wood.

    For instance, a stubborn sticker on a delicate piece of antique furniture will necessitate a gentler approach than a sticker on a sturdy plywood surface. This section will explore different techniques for removing stickers, focusing on preserving the wood’s surface while achieving complete removal.

    Gentle Approaches

    Prioritizing a gentle approach is often the best way to avoid damaging the wood’s surface. Starting with the least abrasive methods and progressing to more assertive techniques is recommended. Often, a simple application of patience and the correct tools will prove more effective than forceful removal. This often involves using solvents or specialized sticker removers, which are gentler than heat or scraping.

    Using a Heat Gun or Hairdryer, Get Stickers off Wood

    Applying heat can loosen the adhesive of some stickers, making removal easier. A heat gun or hairdryer, set to a low or medium setting, can be used to carefully heat the sticker’s adhesive. Be cautious to avoid overheating the wood, as this can cause damage. It’s recommended to use a heat gun or hairdryer at a controlled temperature, ensuring that the heat is applied evenly across the sticker’s surface.

    Test in an inconspicuous area first to gauge the wood’s reaction to the heat. This method is best suited for stickers with a relatively weak adhesive, like those made with paper or plastic.

    Using a Specialized Sticker Remover

    Specialized sticker removers are specifically formulated to dissolve adhesive without harming the underlying surface. These products are designed to penetrate the adhesive and break it down, allowing for easy removal. Apply a small amount of the remover to the sticker, allowing it to sit for the specified time on the product label. Gently scrape away the softened sticker with a plastic scraper or a soft spatula.

    Always test the remover in a hidden area first to confirm it won’t damage the wood.

    Using a Scraper or Putty Knife

    For stubborn stickers, a scraper or putty knife can be used to lift the sticker from the wood. However, this method requires extreme caution to avoid scratching or marring the wood. Place the scraper at a slight angle to the sticker and gently lift, working from one edge to the other. It is crucial to apply a consistent, steady force to avoid damaging the surface.

    Start with a soft-edged scraper, and if necessary, use a harder one. Avoid using a metal scraper directly on the wood to minimize the risk of scratching.

    Comparing Methods

    Method Effectiveness Safety Sticker Type Wood Type
    Heat Gun/Hairdryer Moderate to High Moderate Paper, Plastic Most Wood Types
    Sticker Remover High High Most Types Most Wood Types
    Scraper/Putty Knife High Low Stubborn Stickers Hardwoods, Plywood

    Different methods work best with different types of stickers and wood. A specialized sticker remover is generally the safest and most effective approach for most sticker types and wood surfaces. Heat is a viable option for certain types of stickers, but care must be taken to avoid damaging the wood. For stubborn stickers on hard woods, a scraper might be necessary, but use caution and a soft scraper initially to test.

    Tools and Supplies

    Getting sticker residue off wood requires the right tools and supplies. Choosing the correct approach depends on the type of sticker, the wood’s surface, and the desired outcome. Careful selection and proper application of these tools will save you time, effort, and potential damage to your project.

    Tools for Mechanical Removal

    Mechanical methods often involve scraping or prying the sticker away. The appropriate tools for these techniques depend on the sticker’s size, the wood’s hardness, and the sticker’s adhesion.

    • Utility knife: A versatile tool for cutting and scraping. A utility knife with a replaceable blade is ideal for precision cutting around edges and removing stubborn sticker parts. A standard utility knife with a dull blade will not be effective and may damage the wood surface.
    • Putty knife: A flexible blade that is useful for scraping away stubborn sticker residue. Its flexible nature helps to avoid scratching the wood surface. A wide, flexible putty knife is ideal for large areas of sticker removal, while a narrower one can be used for detailed work.
    • Plastic scraper: A plastic scraper is perfect for delicate surfaces or when you want to avoid scratching the wood. The smooth plastic surface prevents scratches and damage. A plastic scraper can be used on both smooth and textured surfaces.
    • Razor blade/Exacto knife: For precise cutting around edges and detailed work. Choose a razor blade or Exacto knife with a sharp blade to avoid damaging the wood. These tools are useful for removing small pieces of sticker residue or getting into tight corners.

    Tools for Chemical Removal

    Chemical methods are often needed for stubborn stickers. Proper use of solvents is crucial to avoid damaging the wood.

    • Isopropyl alcohol: A common solvent for sticker removal. It’s relatively safe and effective for many types of stickers. Isopropyl alcohol can be used on various wood types and finishes, but always test in an inconspicuous area first.
    • Goo Gone: A commercially available adhesive remover specifically designed for various types of stickers. It’s effective on a range of materials and often leaves the surface clean. It’s important to follow the product instructions for best results.
    • WD-40: A versatile lubricant and solvent that can be effective in softening and removing some stickers. It’s often used for stubborn adhesive, but can potentially damage certain finishes. Always test in a hidden area first.

    Comparing Tool Effectiveness

    Tool Name Description Image Description
    Utility Knife A versatile knife for cutting and scraping. A typical utility knife with a replaceable blade.
    Putty Knife A flexible blade for scraping away residue. A wide, flexible putty knife with a smooth, flat edge.
    Plastic Scraper A scraper with a smooth plastic surface for delicate surfaces. A plastic scraper with a flat, smooth surface.
    Razor Blade/Exacto Knife For precise cutting and detailed work. A sharp razor blade or Exacto knife blade.
    Isopropyl Alcohol A common solvent for sticker removal. A bottle of isopropyl alcohol (often labeled as rubbing alcohol).
    Goo Gone A commercial adhesive remover. A container of Goo Gone adhesive remover.
    WD-40 A lubricant and solvent for sticker removal. A spray bottle of WD-40.

    Substitutes and Considerations

    Sometimes, specialized tools might not be readily available. Consider these substitutes, but be aware of potential drawbacks.

    • Instead of a utility knife, a sharp knife or even a butter knife can be used, but be extra cautious not to damage the wood. A sharp butter knife may be adequate for removing smaller stickers, but for larger stickers or more stubborn residue, a utility knife is recommended.
    • Instead of Goo Gone, white vinegar or a mixture of baking soda and water can be used as a less aggressive alternative for sticker removal. Vinegar may damage some wood finishes, so always test in an inconspicuous area first. Baking soda and water mixture may require more time for removal.

    Specific Sticker Types and Removal Strategies

    Sticker removal from wood surfaces can be a delicate process, requiring careful consideration of the sticker type and its adhesive strength. Understanding the specific nature of the adhesive is key to avoiding damage to the wood’s finish or the underlying material. Different removal methods work best for different sticker types, and knowing which to use can save time and prevent frustration.

    Adhesive Labels

    Adhesive labels, commonly found on furniture or containers, often have a relatively simple adhesive. A gentle approach is often sufficient. Begin by using a soft cloth or a plastic scraper to loosen the edges of the label. Applying a solvent, like rubbing alcohol or a citrus-based cleaner, can help soften the adhesive, but apply sparingly and test in an inconspicuous area first.

    If the label is still resistant, consider using a specialized adhesive remover designed for labels. Work slowly and methodically, ensuring not to apply too much pressure, as this could damage the wood.

    Decals

    Decals, often found on decorative items, frequently have a more robust adhesive than labels. Similar to removing labels, use a soft cloth or scraper to release the edges of the decal. If this proves insufficient, carefully apply a solvent to the adhesive, but be mindful of the wood’s finish. A plastic scraper can be used to gently lift the decal away.

    Removing stickers from wood can be tricky, but careful scraping and the right tools are key. Understanding energy conversions, like converting Kilojoules to Calories, can actually be helpful in certain situations. For example, if you’re trying to calculate the energy required to remove a particularly stubborn sticker, you might find Convert Kilojoules to Calories a useful tool.

    Ultimately, the best way to get those stickers off your wood furniture is still with a little elbow grease and the right technique.

    Some decals may require a combination of methods. Consider starting with a solvent to loosen the adhesive and follow up with a scraper to detach the decal.

    Trying to get those pesky stickers off the wood? It’s a real pain, right? Luckily, there are some great techniques out there, and while I’m researching the best methods, I stumbled across some amazing news – Dead Can Dance have announced a new LP tour! dead can dance announce new lp tour Definitely a cool thing to check out.

    I’m hoping some of these methods will help me get these stickers off the wood so I can properly appreciate the beauty of the wood underneath. Stay tuned for the results!

    Posters

    Posters, often larger and more complex than decals, require a more strategic approach. Start by carefully lifting one corner of the poster. Apply a solvent to the adhesive, being cautious to avoid spreading the solvent too widely, which can damage the wood. Using a plastic scraper or a putty knife (carefully), work along the poster’s edges to lift it off.

    For stubborn adhesives, applying a heat source (such as a hairdryer, used on a low setting and with a considerable distance from the wood) can help soften the adhesive and make removal easier.

    Long-Term Stickers

    Stickers that have been on wood for an extended period may have their adhesive deeply embedded in the wood grain. A combination of techniques might be needed. Begin by applying a solvent, like a citrus-based cleaner or a specialized adhesive remover. Let the solvent work for a sufficient time to soften the adhesive. Then, use a plastic scraper to lift the sticker, working gradually to avoid damage to the wood.

    Repeated applications of solvent and scraping might be necessary.

    Intricate Wood Carvings and Designs

    Removing stickers from intricate wood carvings or designs requires extreme care. Avoid using solvents or heat sources near the carvings, as these can damage the delicate design. Start by using a soft cloth or a plastic scraper to loosen the edges of the sticker. A specialized adhesive remover, if used, must be applied with the utmost care.

    Work in small, controlled sections, and examine the wood frequently to ensure no damage is occurring. Use a toothpick or a similar small tool to carefully lift the sticker from the carvings. A magnifying glass may prove helpful in areas with fine details.

    Different Adhesive Strengths

    Different stickers have different adhesive strengths. A general guideline is to start with gentler methods for weaker adhesives. As the adhesive strength increases, gradually move to more aggressive methods. Using a solvent to soften the adhesive can be effective in most cases. For stronger adhesives, a specialized adhesive remover may be necessary.

    Test the remover on a hidden area first to ensure no damage is caused to the wood’s finish. Remember, patience and meticulous work are key to successfully removing stickers of any strength without causing damage to the wood.

    Safety Precautions and Considerations

    Get Stickers off Wood

    Removing stickers from wood can be a rewarding task, but it’s crucial to prioritize safety. Improper techniques or the use of harsh chemicals can lead to damage to the wood surface, personal injury, or environmental harm. This section details essential safety precautions to ensure a successful and safe sticker removal process.Understanding the potential hazards and taking proactive measures is paramount.

    Whether you’re using heat, solvents, or specialized tools, safety should always be your top priority. By following the Artikeld precautions, you can protect yourself, the surrounding environment, and the integrity of your wooden surfaces.

    Heat Application Safety

    Using heat to soften and loosen stickers requires careful consideration. Direct contact with the wood can cause scorching, warping, or discoloration. A heat gun or hair dryer should be used with caution, keeping a safe distance from the surface. The heat source should be moved frequently to prevent localized heating and damage. Always use a heat-resistant surface to protect the work area from accidental burns.

    Solvent Application Safety

    Solvents, while effective for some sticker types, pose significant risks. Always wear appropriate personal protective equipment (PPE), including gloves, eye protection, and a respirator. Work in a well-ventilated area to minimize exposure to fumes. Apply solvents sparingly and test them in an inconspicuous area first to ensure compatibility with the wood type. Dispose of used solvents according to local regulations.

    Tool Safety

    Using tools like scrapers or razor blades requires careful handling. Sharp tools can cause cuts or abrasions. Ensure proper grip and control when using these tools. Work on a stable surface to avoid accidents. Store tools properly after use to prevent injuries.

    Environmental Protection

    Protecting the environment is crucial. Properly dispose of any chemical waste or solvents according to local regulations. Avoid using chemicals that are harmful to the environment. If you’re using a heat gun, ensure it’s not emitting harmful fumes or causing excessive pollution.

    Safety Hazard Prevention Table

    Safety Hazard Prevention Measure Example
    Burns from heat gun Maintain a safe distance from the wood surface, use a heat-resistant surface, move the heat gun frequently Using a heat gun too close to the wood, causing a burn mark
    Chemical burns/skin irritation Wear gloves, eye protection, and a respirator when using solvents, work in a well-ventilated area, test solvents on a hidden area first Applying a solvent without gloves, leading to skin irritation
    Cuts from sharp tools Use proper grip, maintain a stable work surface, be aware of the blade’s position Using a scraper with improper grip, leading to a cut
    Solvent inhalation Work in a well-ventilated area, use a respirator if needed Working with solvents in a closed area without proper ventilation, leading to inhalation of harmful fumes
    Environmental pollution Proper disposal of chemicals according to local regulations, use environmentally friendly solvents if possible Improper disposal of solvents, leading to environmental contamination

    Wood Surface Preparation and Post-Removal Care: Get Stickers Off Wood

    Sticker removal can sometimes leave behind residue or damage. Proper preparation of the wood surface both before and after removal is crucial for restoring its beauty and protecting it from future problems. Understanding how to clean, condition, and address any potential damage will ensure a smooth and successful outcome.

    Getting stickers off wood can be a real pain, especially if they’re stubborn. I was completely engrossed in trying to remove some tricky ones the other day, and honestly, it got me thinking about the Pearson family attending Jack’s funeral on This Is Us. the pearson family attend jacks funeral on this is us was such a powerful scene, highlighting the emotional weight of loss.

    Anyway, back to the stickers – I eventually found a great method for getting them off without damaging the wood, so I’ll share that in a future post!

    Surface Preparation Before Sticker Removal

    Thorough preparation of the wood surface before sticker removal minimizes the risk of damage during the process. This often involves assessing the wood’s existing condition. For example, if the wood has a protective coating like varnish or polyurethane, it’s crucial to understand how it interacts with the sticker adhesive and the removal methods. Knowing the finish type is essential for selecting the right removal technique.

    Using inappropriate methods can compromise the wood’s integrity, leading to scratches or other imperfections.

    Cleaning and Conditioning the Wood

    After removing the sticker, cleaning and conditioning the wood is essential for restoring its appearance and protecting it. This involves meticulously removing any residual adhesive and ensuring the surface is clean and free of contaminants. Different wood types may require varying cleaning solutions. For instance, softwoods may tolerate harsher solutions than hardwoods. Carefully selecting cleaning agents and using gentle scrubbing techniques is vital.

    Applying a wood conditioner or sealant is a crucial step after cleaning, as it fills in minor imperfections and protects the wood from moisture and further damage.

    Addressing Damage Caused by Removal

    Sticker removal can sometimes lead to damage. This can include scratches, gouges, or adhesive residue. Addressing these issues effectively is crucial for restoring the wood’s original condition. If scratches are shallow, using wood filler can effectively mask the damage. Deep scratches or gouges might require sanding and refinishing.

    For stubborn adhesive residue, employing specialized adhesive removers is necessary. The choice of repair method depends on the severity of the damage.

    Wood Finish Compatibility with Removal Methods

    Wood Finish Suitable Removal Methods Potential Issues Mitigation Strategies
    Varnish Chemical strippers (with caution), heat, or specialized sticker removers Strippers can damage the finish if not used correctly. Heat can cause warping or discoloration. Apply strippers in small areas, monitor the process closely, use low heat if necessary. Sanding and refinishing might be required if significant damage occurs.
    Polyurethane Chemical strippers (with caution), specialized sticker removers, heat (with caution). Similar to varnish, improper use of strippers or heat can damage the finish. Test the stripper in an inconspicuous area first. Use low heat and monitor closely. Consider sanding and refinishing if significant damage occurs.
    Oil-based stain Mechanical methods (scrapers, solvents), specialized sticker removers Solvents can damage the wood if used incorrectly. Test the solvent on a small, hidden area first. Use caution and ventilation when working with solvents.
    Water-based stain Mechanical methods (scrapers), specialized sticker removers, water-based cleaners Water-based stains are generally more resilient to sticker removal methods. Water-based cleaners and scrapers are usually sufficient.
    Natural finish (no added finish) Mechanical methods, specialized sticker removers, gentle cleaning agents. The wood itself might be susceptible to damage. Use extreme caution and minimize force when using scrapers. Employ very gentle cleaning agents.

    The table above provides a general guideline. Always test any method in an inconspicuous area before applying it to the entire surface to avoid potential damage.

    Troubleshooting Common Issues

    Sticker removal can sometimes be tricky, and unexpected problems can arise. Understanding potential pitfalls and their solutions is crucial for a successful and damage-free outcome. This section details common issues encountered during sticker removal from wood and provides effective solutions.Often, the success of sticker removal hinges on careful preparation and the correct application of methods. Recognizing the specific type of sticker and the wood’s characteristics are key to avoiding damage and achieving a pristine finish.

    By addressing potential problems proactively, you can ensure a smooth and efficient removal process.

    Identifying Sticker Types

    Different sticker types react differently to removal methods. Understanding the sticker’s composition (e.g., adhesive type, material) is essential to selecting the right approach. For instance, a vinyl sticker may require a different technique than a paper sticker. Carefully inspecting the sticker before attempting removal helps in choosing the most effective strategy.

    Dealing with Stubborn Adhesive

    Some adhesives are notoriously difficult to remove. This often requires a multi-step approach. For example, applying a solvent-based adhesive remover (like Goo Gone or similar) directly to the adhesive, allowing it to soften and loosen the bond, is a common solution. Following this, scraping or using a specialized tool to lift the sticker can be necessary.

    Protecting the Wood Surface

    It’s important to protect the underlying wood during removal. Using protective coverings (like plastic sheeting or tape) can prevent scratching or marring. Careful handling of tools and the application of pressure are crucial to avoid damaging the wood grain. This step is critical for maintaining the wood’s original beauty.

    Troubleshooting Table

    Potential Issue Cause Remedy
    Sticker residue remains Inadequate adhesive removal or improper scraping Apply a suitable adhesive remover, allow it to sit for a few minutes, and gently scrape or use a specialized tool to lift the sticker.
    Wood surface damage (scratches, gouges) Using too much pressure when scraping, improper tool selection, or inadequate surface protection Reduce pressure, use a different tool (e.g., a soft-edged plastic scraper), or apply a protective covering to the wood before removal.
    Sticker tears or breaks during removal Incorrect removal method for the sticker type or excessive force applied Employ a gentler removal method, such as using a heat gun (for heat-activated adhesives) or a specialized sticker removal tool. Apply pressure gradually and strategically.
    Solvent damage to the wood Improper solvent application or prolonged contact with the wood Use solvents sparingly and only on the adhesive. Avoid prolonged contact. If solvent does come into contact with the wood, immediately rinse the area with water and allow to dry completely. Consider using a solvent-resistant sealant after removal.

    Advanced Techniques and Examples

    Tackling stubborn stickers and tricky wood types requires a bit more finesse. This section dives into advanced methods for removing even the most resilient adhesive residue, catering to different wood types and surface complexities. We’ll explore specialized tools and techniques for curved, irregular, and delicate areas, along with a detailed example of removing a challenging sticker from a wooden chair.

    Specialized Tools for Complex Removal

    Specialized tools can significantly simplify the removal process for stubborn or complex sticker situations. A variety of tools beyond the basic scraper and putty knife are essential. These tools enhance efficiency and minimize damage to the wood surface.

    • Heat Gun or Hair Dryer: Applying controlled heat can soften the adhesive, making it easier to lift or scrape off. Be cautious not to overheat the wood, which can cause warping or discoloration, especially with delicate woods like pine or maple. Always use a low heat setting and monitor the wood closely.
    • Rotary Tool with a Detail Attachment: This tool can be incredibly effective for removing stubborn residue from tight spaces, crevices, and corners, especially when a scraper or putty knife can’t reach. The variable speed and precision of a rotary tool are beneficial for such applications. Ensure the attachment is appropriate for the wood type to avoid scratching.
    • Plastic Spatula or Serrated Knife: These tools can be used to gently pry stickers loose from intricate surfaces without damaging the wood. The flexibility and precision of a plastic spatula can help lift and peel sticker material away from tight spaces without causing damage.

    Removing Stickers from Curved or Irregular Surfaces

    Curved or irregular surfaces pose unique challenges. Direct scraping or prying can be difficult and may damage the surface. These methods provide a safe approach for such cases.

    • Use of a Soft, Non-Abrasive Material: Apply a soft cloth or cotton swab to the curved area, saturated with the adhesive remover. This avoids unnecessary pressure and potential scratches on the surface. This method allows for careful and controlled application of the remover, especially on the curves.
    • Gentle Lifting and Peeling: Work in small sections, using a soft tool like a plastic spatula or a soft cloth to gently lift the sticker, working along the curve. This technique is crucial to avoid scratching or damaging the wood surface. Be patient and methodical to prevent tearing the sticker material.
    • Precise Application of Adhesive Remover: Carefully apply adhesive remover only to the sticker, avoiding contact with the surrounding wood. This method focuses on targeting the adhesive without compromising the integrity of the wood itself.

    Removing a Complex Sticker from a Wooden Chair Armrest: A Detailed Example

    Consider a large, stubborn sticker stuck to a curved wooden chair armrest. The sticker is difficult to remove by hand and has a strong adhesive.

    1. Preparation: Apply a suitable adhesive remover, such as Goo Gone or a citrus-based solvent, to the sticker. Allow the remover to soak into the adhesive for a few minutes. Monitor the wood carefully for any signs of damage from the remover.
    2. Controlled Heat: Use a low heat setting from a heat gun or hair dryer, keeping the distance to the surface adequate to prevent damage to the wood. Avoid direct contact. This method gently softens the adhesive and loosens it from the wood surface.
    3. Gentle Removal: Using a soft plastic spatula, gently lift and peel away the sticker in small sections. Work along the curve, applying pressure only where needed to avoid damage. If necessary, reapply remover to stubborn areas.
    4. Final Steps: After the sticker is removed, wipe the armrest with a clean, damp cloth to remove any residue. Allow the wood to dry completely before applying any protective finish.

    Last Word

    Get Stickers off Wood

    Removing stickers from wood can seem daunting, but this guide has armed you with the knowledge and techniques to tackle any sticker situation. We’ve covered everything from initial assessments to advanced procedures, emphasizing safety and preservation of your wooden surfaces. By following these steps, you can confidently remove stickers and restore your wood to its pristine condition, ready for its next adventure.

  • Build an Escape Room Your Ultimate Guide

    Build an Escape Room Your Ultimate Guide

    Build an Escape Room: Ready to unleash your inner puzzle master? This guide dives deep into crafting an immersive escape room experience, from planning the thrilling narrative to designing mind-bending puzzles and building the physical space. We’ll cover everything you need to know, from theme selection and puzzle types to safety protocols and marketing strategies. Get ready to transform your space into a captivating adventure!

    This comprehensive guide will take you through the entire process, walking you step-by-step from the initial concept to a fully operational and engaging escape room. We’ll explore different room themes, puzzle types, and how to create a cohesive experience. Whether you’re a seasoned escape room enthusiast or a newcomer to the world of puzzle design, this guide will equip you with the knowledge and resources to bring your escape room vision to life.

    Planning the Escape Room

    Crafting an immersive escape room experience requires careful planning and execution. A well-structured room, coupled with engaging puzzles and a compelling narrative, ensures an enjoyable and memorable adventure for players. This detailed exploration delves into the essential components, diverse themes, and strategic design process for creating a truly captivating escape room.A successful escape room hinges on a well-defined structure that allows players to progress through a series of interconnected puzzles.

    This framework should seamlessly blend the physical environment with the narrative, offering a logical path to solving the mystery.

    Room Structure and Interrelation

    The design of an escape room should follow a structured progression. This involves organizing the room into distinct areas, each containing clues and puzzles. A crucial element is the logical flow of information; clues found in one area should lead to the next, fostering a sense of discovery and advancement for players. The layout should be designed to encourage exploration and collaboration, maximizing the players’ engagement and interaction.

    Rooms should be divided into zones, each with a specific set of puzzles and tasks. The challenge level and complexity should gradually increase, maintaining player interest and ensuring an optimal gameplay experience.

    Room Themes and Puzzle Design

    The chosen theme significantly impacts the puzzles and challenges within the escape room. Themes offer a framework for the narrative, guiding the puzzle design and influencing the overall atmosphere. For example, a historical theme will likely involve puzzles that relate to the historical period, while a futuristic theme might incorporate puzzles involving technology and innovation.

    Popular Themes and Puzzle Types

    Various themes resonate with players, each providing a distinct experience. A popular theme is a historical mystery, often involving deciphering codes, solving riddles, and utilizing historical artifacts. Puzzles could include cipher codes, historical documents, and object manipulation challenges. Another theme is a futuristic dystopian setting, which may feature puzzles related to technology, code-breaking, and intricate mechanisms. These themes provide inspiration for the types of puzzles and challenges within the escape room.

    Crafting a Cohesive Storyline

    A compelling storyline is essential to keep players engaged and invested in the escape room’s narrative. The storyline should be integrated seamlessly with the puzzles and challenges. This means that the narrative should provide context and clues, motivating players to solve the puzzles and ultimately reach the room’s goal.

    Design Process: Concept to Completion

    The design process for an escape room involves several distinct steps. It begins with conceiving a compelling theme and narrative. This should be followed by developing the puzzles, ensuring a smooth progression and a logical flow of information. The environment and aesthetics must be carefully planned, ensuring the theme is well-represented. Finally, rigorous testing is crucial to identify and refine any areas where players might struggle or encounter difficulty.

    The entire process is iterative, with continuous refinement based on player feedback and testing.

    • Concept Development: Defining the theme, narrative, and overall atmosphere of the escape room.
    • Puzzle Design: Crafting unique and challenging puzzles that align with the chosen theme and storyline. Consider incorporating a variety of puzzle types, such as logic puzzles, code-breaking puzzles, and physical challenges.
    • Room Design: Creating a visually appealing and immersive environment that reflects the chosen theme. This includes the layout, décor, props, and sound design.
    • Story Integration: Ensuring that the storyline seamlessly connects with the puzzles and challenges, providing context and clues.
    • Testing and Iteration: Rigorous testing of the escape room to identify areas for improvement and refine the experience for players.

    Designing the Puzzles: Build An Escape Room

    Crafting engaging and challenging puzzles is the heart of a successful escape room. Beyond simply being entertaining, the puzzles must be carefully constructed to align with the overall narrative and thematic elements, ensuring a seamless and immersive experience for the players. The puzzle design process requires meticulous planning and consideration of various factors, from the type of puzzles employed to the level of difficulty and the incorporation of technology.A well-designed puzzle sequence should flow logically, building upon previous solutions and leading players towards the final goal.

    This interconnectedness fosters a sense of accomplishment and encourages collaborative problem-solving among the players.

    Puzzle Type Comparison

    Understanding the strengths and weaknesses of different puzzle types is crucial for selecting the right tools for each stage of the escape room experience.

    Puzzle Type Strengths Weaknesses
    Logical Excellent for testing critical thinking and problem-solving skills; often adaptable to diverse themes; can be easily scaled in difficulty. Can become overly abstract or complex if not designed thoughtfully, potentially frustrating players who struggle with the underlying logic.
    Physical Engaging and tangible; often provides a satisfying sense of accomplishment upon completion; highly immersive due to tactile elements. Can be challenging to integrate seamlessly with other puzzle types; requires more physical space and careful consideration of safety.
    Word Stimulates linguistic skills; allows for thematic integration with wordplay and clues; can be compact and portable. May not be suitable for all audiences or themes; relies on players’ vocabulary and understanding of specific terminology; could become repetitive if not diverse in its implementation.
    Combination Combines elements of different puzzle types, offering a more complex and engaging experience for players; creates more opportunities for creative problem-solving. Difficult to balance; requires thorough planning to ensure a cohesive and intuitive solution path; can be more time-consuming to develop.

    Designing Multi-Step Puzzles

    Crafting puzzles with multiple steps requires a strategic approach. Each step should build upon the previous one, providing clues and hints that lead to the next stage.A multi-step puzzle should be designed with clear transitions between steps. Each step should have a clear objective that allows the players to understand the goal. The order of steps should be designed carefully so the solution of one step leads smoothly to the next.

    For example, a combination lock puzzle could be the first step, unlocking a compartment that contains a series of riddles. The solution to the riddles might then lead to a hidden code to unlock another component of the escape room.

    Incorporating Technology

    Integrating technology into puzzles can enhance immersion and offer a modern touch to the escape room experience.Consider incorporating interactive screens, augmented reality applications, or coded locks. Examples include using QR codes that lead to additional clues or utilizing a digital timer that triggers a puzzle sequence. Smartphones or tablets can act as a crucial tool for players to access digital clues or use apps to solve specific puzzles.

    Ensuring Achievability

    The puzzles should be challenging but achievable for the target audience. Consider the age and experience level of the players. Provide adequate hints and clues if necessary, but aim to design the puzzles in a way that players can solve them with a reasonable amount of effort and collaboration.This can be accomplished by providing various levels of difficulty for different puzzles within the escape room.

    Building an escape room is a fun project, requiring meticulous planning and problem-solving skills. Thinking about the intricate puzzles and challenges you’ll need to design, though, also makes me think about the dedication and care needed to maintain a miniature horse, like those featured in Care for a Miniature Horse. Ultimately, both pursuits demand attention to detail and a passion for creating enriching experiences, which are key elements of a successful escape room.

    Also, ensure that the clues and hints are clear, concise, and appropriately placed throughout the experience. For instance, if the target audience is primarily composed of young adults, puzzles should challenge them without overwhelming them.

    Example Puzzle: The Cipher

    This puzzle involves a series of coded messages. Components:* A vintage-style typewriter with a hidden compartment beneath the keyboard.

    Building an escape room is a fun project, requiring creativity and planning. It’s like a puzzle box, but with a story! Speaking of puzzles, did you catch the Daft Punk video premiering their “Lose Yourself to Dance” clip, while presenting an award at the VMAs? watch daft punk premiere lose yourself to dance clip present award at the vmas It’s inspiring to see how music and entertainment can be intertwined in innovative ways, which might spark ideas for your own escape room design.

    Ultimately, an escape room’s success hinges on a compelling narrative and engaging challenges.

    • A series of cryptic symbols displayed on a wall.
    • A small, metal box containing a lock with a numeric code.
    • A handwritten note, seemingly left behind by a previous escapee.

    Solution:

    • The note describes a method for decoding the symbols on the wall using a specific cipher.
    • Players decipher the coded messages, revealing a series of numbers.
    • These numbers correspond to the combination required to open the metal box.
    • The metal box contains a key that unlocks the hidden compartment beneath the typewriter.

    Building the Physical Space

    Transforming a blank space into a captivating escape room requires careful planning and execution. The physical environment is crucial in immersing players and making the puzzles feel tangible and integral to the narrative. This stage involves more than just assembling furniture; it’s about creating a believable and engaging atmosphere that enhances the overall escape room experience.The space should feel lived-in and purposeful, encouraging exploration and problem-solving.

    The choice of materials, construction methods, and even the subtle details of lighting and sound play a pivotal role in achieving this. A well-designed physical space can elevate a simple puzzle into a truly immersive experience.

    Building an escape room is a fun challenge, requiring creative problem-solving and teamwork. Thinking about the intricate puzzles and themed environments needed to immerse players, it’s fascinating how Sufjan Stevens will be performing a live film score. This live performance, as detailed in sufjan to perform live film score , could inspire similar immersive experiences within an escape room.

    The level of detail needed for the music in a film score mirrors the intricate design needed for a well-crafted escape room.

    Materials for Creating Escape Room Environments

    The choice of materials directly impacts the aesthetics, durability, and safety of the escape room. Durable materials are essential for withstanding use and preventing injuries. Wood, for example, can create warm, inviting spaces, while metal provides a more industrial or futuristic feel. Plastic can be used for less substantial elements or as a base for more complex designs.

    Methods for Constructing Intricate Sets and Props

    Building elaborate sets and props requires careful planning and execution. The method chosen depends on the complexity of the prop and the desired aesthetic. For intricate designs, techniques like woodworking, sculpting, and 3D printing can be employed. Using modular systems allows for easy reconfiguration of the space and efficient use of materials.

    Accessibility and Safety in Escape Room Design

    Accessibility is paramount in creating a welcoming and inclusive experience for all players. Consider the needs of players with disabilities, ensuring pathways are clear, accessible, and free of obstacles. Safety is of utmost importance. All materials and construction methods should comply with building codes and safety regulations. Ensure all sharp edges are covered, and that heavy or potentially dangerous objects are securely fastened.

    Regular inspections are critical to maintaining a safe environment.

    Sound Design and Lighting Considerations

    Sound design and lighting play a critical role in enhancing the escape room’s atmosphere. Strategic placement of sound effects and music can create a sense of urgency, tension, or calm, guiding players through the narrative. Appropriate lighting, including spotlights, colored lights, and ambient lighting, is essential for setting the mood and highlighting key elements of the puzzle. Dim lighting in some areas can heighten the sense of mystery, while brighter areas can illuminate critical clues.

    Equipment and Tools for Building the Escape Room

    A well-stocked toolkit is essential for successful escape room construction. A list of necessary equipment and tools includes:

    • Measuring tools (measuring tape, level, etc.): Accurate measurements are crucial for ensuring precision and avoiding errors in construction.
    • Cutting tools (saws, drills, screwdrivers): These tools are necessary for shaping and assembling materials.
    • Fasteners (nails, screws, bolts): These are used to hold pieces together and create a sturdy structure.
    • Paints and finishes (varnish, paint): These are used to add a layer of protection and aesthetic appeal to the escape room.
    • Safety equipment (safety glasses, gloves, etc.): Protecting yourself during construction is a top priority.
    • 3D printers (optional): For creating custom props and intricate details.
    • Work benches and storage: Efficient workspace is essential for organization and preventing injuries.

    Developing the Experience

    Build an Escape Room

    Crafting an escape room experience that’s truly memorable and immersive is a blend of careful planning and a deep understanding of player psychology. It’s not just about puzzles; it’s about creating a narrative, fostering engagement, and ensuring a smooth, enjoyable journey for participants. The goal is to transport players to another world, challenging them mentally and emotionally while leaving them with a positive and lasting impression.A strong experience relies on a well-defined narrative that connects all the elements of the escape room.

    This narrative should be consistent throughout the room, guiding players through a story and enhancing the immersion. Each puzzle should contribute to the overall narrative, building suspense and anticipation, and ultimately leading to a satisfying conclusion.

    Interactive Elements

    Interactive elements are crucial for elevating the escape room experience beyond a collection of puzzles. These elements engage multiple senses, pulling players deeper into the narrative. Integrating physical actions, sound effects, and even smell can significantly enhance the immersive quality. For instance, a puzzle that requires players to manipulate a mechanical device could be accompanied by a subtle whirring sound, or a specific scent could be released when a certain condition is met.

    This multi-sensory approach not only makes the experience more engaging but also creates a stronger emotional connection with the narrative. Consider how the environment itself can be part of the experience.

    Hint and Clue Systems

    Providing hints and clues is an essential part of escape room design. A well-structured system for delivering hints and clues ensures players can progress through the challenges without becoming frustrated. A good system considers different types of hints, ranging from simple suggestions to more detailed explanations. These can be delivered through written notes, audio recordings, or even interactive elements within the room.

    The key is to avoid overwhelming players with too many hints while still allowing them to feel empowered to solve the puzzles. The clues should be strategically placed, adding to the atmosphere and not interrupting the narrative flow.

    Pacing and Difficulty

    Crafting an optimal pacing and difficulty curve is a critical element of a successful escape room. A well-balanced approach allows players to gradually increase their challenges, maintaining their engagement without making them feel overwhelmed or discouraged. Start with easier puzzles that introduce players to the narrative and mechanics of the room. Gradually increase the complexity as they progress, culminating in a final, challenging puzzle.

    The key is to strike a balance between difficulty and player enjoyment. For example, if a room has 5 puzzles, the first 2 should be fairly easy, the next 2 progressively harder, and the final one should be the most challenging, but solvable with persistence.

    Signage and Clear Communication, Build an Escape Room

    Clear signage and communication are paramount for maintaining the flow of the escape room experience. Well-placed and informative signage helps players understand the puzzles, locate necessary items, and navigate the space. Clear instructions prevent confusion and frustration, ensuring a smoother gameplay experience. Signs should be visually appealing and consistent with the overall theme and atmosphere of the room.

    Clear pathways and marked areas also enhance the user experience. For example, directional arrows or clearly marked checkpoints will make it easier for players to move around and locate necessary components.

    Marketing and Promotion

    Build an Escape Room

    Building an escape room is just the first step; a strong marketing strategy is crucial for its success. Effective promotion will attract the right audience, ensuring a steady flow of bookings and a profitable venture. This phase involves understanding the target demographic, creating engaging content, and managing bookings efficiently. A well-defined strategy will set the stage for a thriving escape room experience.Marketing encompasses a wide range of activities, from crafting compelling social media posts to designing targeted advertising campaigns.

    It’s a dynamic process requiring constant adaptation and refinement based on feedback and performance data. Pricing strategies, customer segmentation, and feedback mechanisms play vital roles in achieving a profitable and enjoyable experience for both the business and the customer.

    Marketing Strategy

    A comprehensive marketing strategy should encompass various channels to reach the desired target audience. This includes online platforms, local partnerships, and potentially even community events. Consistency in messaging across all channels is key to building brand recognition. A clear understanding of the target audience is essential to tailor the marketing message for maximum impact.

    Social Media Posts

    Social media platforms are excellent tools for engaging potential customers. Short, attention-grabbing posts that highlight the unique features of the escape room are essential. Use high-quality images and videos to showcase the experience. Run contests and giveaways to boost engagement and generate excitement. Examples include:

    • A post showcasing a captivating puzzle or room design, with a call to book.
    • A behind-the-scenes look at the room creation process, engaging followers with the story behind the escape room.
    • A post announcing a special event or promotion, such as a discount for first-time visitors or a themed night.
    • A post highlighting positive customer reviews and testimonials.

    Advertising Campaigns

    Targeted advertising campaigns on platforms like Facebook, Instagram, and Google can effectively reach a wider audience. These campaigns can be tailored to specific demographics, interests, and locations, ensuring that the message reaches the right people. Consider running A/B testing to optimize ad copy and visuals. Examples include:

    • Targeted ads on Facebook, showing escape room experiences tailored to specific interests.
    • Google Ads with location-based targeting to reach people in the immediate vicinity.
    • Collaborating with local businesses for cross-promotional campaigns to increase visibility.
    • Print ads in local publications or flyers distributed in high-traffic areas.

    Pricing and Customer Segmentation

    Developing a pricing strategy is critical to profitability. Consider factors like the complexity of the escape rooms, the quality of the experience, and the local market rates. Customer segmentation allows for tailored pricing and promotions for different groups, like families, couples, or corporate teams. Analyze competitors’ pricing to ensure competitiveness while maintaining a suitable profit margin.

    Feedback and Improvement

    Collecting feedback is crucial for continuous improvement. Use online surveys, comment sections on social media, and direct feedback forms to gather customer input. Actively address concerns and implement changes to enhance the escape room experience.

    Booking and Reservations

    An efficient booking system is essential for managing reservations. An online platform with a clear booking calendar and secure payment options can streamline the process. Offer various booking options to cater to different needs, such as group bookings, walk-in reservations, and specific time slots.

    Safety and Security

    Building an escape room is thrilling, but safety must be paramount. Thorough planning and meticulous execution of safety protocols are crucial for both the players’ well-being and the preservation of the room’s integrity. This section dives deep into the vital aspects of safety and security, ensuring a smooth and secure experience for everyone.

    Potential Hazards and Risks

    Escape rooms, by their very nature, often involve intricate puzzles and confined spaces. Identifying potential hazards early in the design phase is critical. These can range from tripping hazards within the room’s layout to the potential for injury from sharp objects or poorly secured mechanisms. Properly assessing and mitigating these risks before construction is essential. For example, a poorly designed staircase could lead to player injuries.

    Similarly, a loose piece of furniture or a sharp object hidden within a puzzle could pose a significant safety hazard. Therefore, meticulous planning and testing are crucial.

    Safety Protocols and Procedures

    Establishing clear safety protocols and procedures is vital for the smooth operation of the escape room. These protocols should address everything from emergency exits and evacuation plans to proper handling of potentially hazardous materials or tools used in the construction of the puzzles. For instance, the location of fire extinguishers, first-aid kits, and emergency contacts should be prominently displayed.

    Procedures for handling potentially dangerous materials (such as sharp objects) should be meticulously Artikeld. Regular checks and inspections are critical for maintaining safety standards.

    Securing the Escape Room

    Protecting the escape room from unauthorized access is equally important. A well-designed security system can deter unwanted entry and protect the room’s integrity. This includes physical barriers, surveillance systems, and appropriate access controls. For example, a robust locking system and strategically placed security cameras will deter intruders and provide a record of any unusual activity. The escape room should also have a clear security protocol for staff and volunteers, outlining their roles and responsibilities in maintaining security.

    Safety Guidelines and Emergency Procedures

    A comprehensive set of safety guidelines and emergency procedures is essential. This should include specific instructions for players regarding room etiquette, handling of puzzles, and reporting any issues or concerns. Clear signage and instructions are key in preventing accidents and guiding players safely through the experience. For example, a clearly marked exit route and emergency contact information should be readily visible to players.

    Emergency procedures should be well-rehearsed by staff to ensure a swift and effective response to any unexpected situation.

    Protecting the Escape Room’s Integrity

    Maintaining the integrity of the escape room is essential for the long-term success of the business. This involves preventative measures to protect the room’s physical structure, the puzzles, and the overall experience. Regular maintenance of the escape room, including inspections of the structural integrity and the puzzles, is vital to prevent wear and tear. This should include regular checks for any damage to the structure or the puzzles themselves.

    For instance, using appropriate materials and techniques in puzzle construction can ensure durability and longevity. Regular inspections and maintenance minimize the risk of breakdowns and accidents during the game.

    Escape Room Examples

    Escape rooms are more than just a fun activity; they’re a complex blend of storytelling, puzzle design, and immersive experiences. Understanding successful examples and the elements that drive them can significantly enhance the creation of your own escape room. This section will delve into various successful scenarios, providing insights into themes, puzzles, and the overall experience.

    A Successful Escape Room Scenario: The Lost City of Eldoria

    This escape room, themed around the mythical Lost City of Eldoria, features a rich narrative. Players are tasked with recovering a stolen artifact to prevent the city’s downfall. The room’s design immerses participants in the lost civilization, complete with intricate murals, crumbling ruins, and flickering torches. Puzzles include: deciphering ancient glyphs, manipulating hydraulic mechanisms to open pathways, and solving a series of riddles hidden within the city’s architecture.

    The experience is enhanced by interactive elements like sound effects and ambient lighting, reinforcing the sense of discovery and urgency.

    A Detailed Breakdown: The Heist

    This escape room focuses on a bank robbery gone wrong. The narrative centers on a group of amateur thieves who inadvertently activate a series of security protocols. Players must work together to decipher coded messages, manipulate complex safes, and disable alarms before the authorities arrive. The puzzles are interwoven with the narrative, creating a dynamic experience. One puzzle involves deciphering a series of numbers and symbols hidden within a fake vault, another requires manipulating a complex network of levers and switches.

    This escape room uses a realistic setting to engage players.

    Escape Room Themes and Complexity

    This table categorizes different themes and their associated complexity, ranging from easy to challenging. The complexity is measured by the number and intricacy of the puzzles, the narrative depth, and the overall immersive experience.

    Theme Complexity Description
    Ancient Egypt Medium Players explore ancient tombs, decipher hieroglyphs, and manipulate mechanisms.
    Space Exploration High Players navigate a spaceship, solve equations, and face alien threats.
    Detective Agency Medium Players solve a crime, decipher clues, and interview suspects.
    Historical Mystery High Players unravel a historical mystery, investigate documents, and interpret historical context.

    Design Approaches in Escape Rooms

    Different escape rooms employ diverse design approaches. Some rooms prioritize intricate mechanical puzzles, while others focus on storytelling and narrative immersion. A room focused on mechanical puzzles might employ intricate lock mechanisms and complex contraptions. In contrast, a narrative-driven room might utilize hidden clues, character interactions, and immersive environments. These variations highlight the different ways designers can engage players and create unique experiences.

    Testing and Improvement

    Thorough testing is crucial for identifying areas for improvement. A team should test the room multiple times with diverse groups of players, noting the time taken to complete the puzzles, areas of confusion, and overall experience. The testing process allows for adjustments to puzzles, the narrative, and the overall flow. Observation of player interactions and feedback on the experience is invaluable in refining the escape room to ensure a seamless and enjoyable experience for all participants.

    Epilogue

    From initial planning to final promotion, we’ve covered the essentials for crafting a successful escape room. We’ve explored everything from the intricate design of puzzles to the immersive experience you want to create. Now, armed with this knowledge, you can confidently embark on your escape room adventure. Remember, safety and customer satisfaction are key, so make sure to follow the guidelines and prioritize a great experience for everyone.

  • Build Your Own Air Conditioner A DIY Guide

    Build Your Own Air Conditioner A DIY Guide

    Build Your Own Air Conditioner: This comprehensive guide delves into the exciting world of DIY air conditioning, exploring everything from evaporative coolers to refrigeration-based systems. We’ll cover the potential benefits and drawbacks, necessary resources, and safety precautions. Prepare to dive into the intricacies of designing, constructing, and maintaining your own personalized cooling solution.

    From basic schematics and material selection to troubleshooting potential issues, we’ll provide a practical and detailed approach. Learn about the pros and cons of different systems, and discover how to tailor your design to your specific needs and budget. Get ready to cool things down, literally!

    Introduction to DIY Air Conditioning

    Build Your Own Air Conditioner

    Building your own air conditioning system can be a rewarding project, offering potential cost savings and a deeper understanding of how these systems work. However, it also presents significant challenges, requiring careful planning, precise execution, and a thorough understanding of the potential hazards involved. Successfully tackling a DIY air conditioning project often hinges on a comprehensive grasp of the different types of systems, the necessary resources, and the inherent risks.This guide explores the various avenues for creating a DIY air conditioning solution, highlighting the benefits and drawbacks of each approach.

    It delves into the specific materials, tools, and safety precautions essential for each system type, enabling a more informed decision-making process. We will cover evaporative coolers, DIY swamp coolers, and refrigeration-based systems, providing a comprehensive comparison of their pros and cons.

    Types of DIY Air Conditioning Systems

    DIY air conditioning systems broadly fall into two categories: evaporative cooling and refrigeration-based cooling. Each approach has its own set of advantages and disadvantages.

    Evaporative Coolers

    Evaporative coolers, also known as swamp coolers, are a simpler and often more cost-effective DIY option. They rely on the evaporation of water to cool the air. The process of water evaporation absorbs heat from the surrounding environment, resulting in a decrease in air temperature.

    • These systems typically involve a water reservoir, a fan, and a system of baffles or pads to facilitate water evaporation. They are relatively straightforward to build, with many readily available DIY tutorials available online.
    • Essential materials include a water tank, a fan, a porous material (like wood fiber or fabric), and piping or tubing to channel water. Tools needed may include saws, drills, and measuring equipment.
    • Evaporative coolers are generally less complex to construct than refrigeration-based systems. They require less specialized equipment and are often more accessible to individuals with a basic understanding of home improvement.

    Refrigeration-based Systems

    Refrigeration-based systems, while more complex, offer a potential for greater cooling capacity and control. These systems leverage the principles of thermodynamics, using a refrigerant to absorb heat and transfer it to the outside air.

    • Building a DIY refrigeration-based system requires a deeper understanding of refrigeration cycles and components, including compressors, condensers, evaporators, and expansion valves. Detailed knowledge of safety protocols is crucial due to the use of refrigerants.
    • Necessary resources encompass compressors, refrigerants (with strict adherence to safety regulations), tubing, and specialized fittings. The tools needed are more sophisticated, potentially including specialized tools for working with refrigerant lines and compressors.
    • While offering potentially greater cooling power, these systems present a greater risk of safety issues and require a more advanced skill set compared to evaporative coolers.

    Safety Considerations

    Safety is paramount in any DIY project, especially when dealing with potentially hazardous materials or equipment. Care must be taken to avoid injuries and ensure compliance with safety regulations.

    Building your own air conditioner can be surprisingly rewarding, but sometimes you just need a little chill in your life. Speaking of chill, have you heard about the new Charli XCX Valentine? This new track is seriously giving me some serious inspiration for my DIY AC project. Hopefully, with a little more research, I can get my own air conditioning unit up and running soon!

    • Working with refrigerants requires strict adherence to safety protocols. Improper handling can lead to serious health risks. Always consult safety data sheets (SDS) for specific refrigerants and follow local regulations regarding refrigerant disposal.
    • Electrical components must be installed and maintained correctly to avoid electrical hazards. Ensure proper grounding and insulation to prevent short circuits or shocks.
    • Proper ventilation and protective equipment should be used throughout the project to minimize exposure to potential contaminants.

    Comparison of DIY Air Conditioning Systems

    System Type Pros Cons Complexity
    Evaporative Cooler Relatively inexpensive, easy to construct, effective for mild climates Limited cooling capacity, may not be effective in hot or humid climates, requires water source Low
    Refrigeration-based System Higher cooling capacity, better control over temperature, potentially suitable for diverse climates Higher cost, more complex construction, potential safety hazards associated with refrigerants High

    Design and Planning

    Designing a DIY air conditioning system requires careful planning and consideration of various factors. A well-thought-out design ensures the system is efficient, effective, and meets the specific needs of the space it will cool. This section will detail the crucial aspects of design and planning, including schematic diagrams, materials, tools, and a step-by-step guide.

    Basic Schematic Diagram

    A basic schematic diagram visually represents the flow of the DIY air conditioning system. It illustrates the key components and their interconnections, making the design easier to understand and implement. This diagram helps in visualizing the refrigerant flow, air movement, and the function of each component.

    Example of a basic schematic diagram: A simplified schematic might show a compressor connected to a condenser, which in turn connects to an evaporator. The evaporator would be situated in the area needing cooling, and a fan would circulate the cooled air. Connecting pipes would show the refrigerant’s path. Labels would identify each component (e.g., compressor, condenser, evaporator, expansion valve).

    Factors to Consider, Build Your Own Air Conditioner

    Several factors significantly influence the design and effectiveness of a DIY air conditioning system. Understanding these factors is crucial for a successful project.

    Ever fancied building your own air conditioner? It’s surprisingly doable, requiring some technical know-how and a good understanding of thermodynamics. Diving into a project like this can be quite rewarding, but remember to consider the complexities involved, like the intricacies of bing ruth no home of the mind when dealing with the many factors at play.

    Ultimately, building your own air conditioner is a fascinating challenge for those seeking a unique cooling solution.

    • Climate: The local climate significantly impacts the design. Areas with high humidity may require a dehumidification system, while areas with extremely high temperatures may necessitate a more robust cooling capacity. For example, a system designed for a dry, hot desert climate will differ from one designed for a humid subtropical region.
    • Budget: The budget directly influences the choice of materials, components, and the complexity of the system. A more complex system with higher-quality components will likely cost more. Careful cost analysis and prioritization of needs are essential.
    • Space: The available space dictates the size and layout of the system. Sufficient space is needed for the components, installation, and maintenance. Consider the space needed for the condenser unit and any ductwork required for air distribution.
    • Energy Efficiency: The energy efficiency of the system is crucial. Choosing energy-efficient components, such as high-efficiency compressors and insulation, can minimize operational costs over time. A well-insulated system and strategically placed vents contribute to greater energy efficiency.

    Suitable Materials

    Choosing the right materials is critical for the performance and longevity of the DIY air conditioning system. Materials must withstand the operating conditions and have the necessary properties.

    • Refrigerant: Selecting the correct type of refrigerant is essential. It should be environmentally friendly and compatible with the components. R-22 is a widely used refrigerant but is being phased out due to environmental concerns.
    • Pipes and Tubing: Copper tubing is commonly used for its durability and conductivity. Other materials like PVC might be suitable for specific applications, but copper is generally favored.
    • Insulation: Insulation materials prevent heat transfer and maintain the temperature difference between the inside and outside of the system. Appropriate insulation materials are crucial to achieving efficiency.
    • Electrical Components: The choice of electrical components (wiring, switches, fuses) must adhere to local electrical codes. Over-sized wiring or incorrect fuses can lead to safety hazards and system malfunctions.

    Required Tools

    Having the right tools is essential for a successful DIY project. This list includes tools needed for various aspects of the project, from initial design to final installation.

    • Measuring tools: Measuring tapes, rulers, and levels are crucial for accurate measurements and installations.
    • Plumbing tools: Wrenches, pipe cutters, and soldering equipment (if applicable) are needed for pipe connections.
    • Electrical tools: Screwdrivers, wire strippers, and crimpers are required for electrical connections.
    • Safety equipment: Safety glasses, gloves, and appropriate clothing are vital for personal protection.

    Step-by-Step Design Guide

    Step Action Materials Tools
    1 Determine the size and location of the cooling unit, considering the space available and the climate. Space dimensions, climate data Measuring tape, ruler, level
    2 Select suitable components, including refrigerant, pipes, insulation, and electrical components, based on the design and budget. Refrigerant, pipes, insulation, wiring, switches, fuses Catalogs, online resources, electrical schematics
    3 Create a detailed schematic diagram of the system, including all connections and components. Paper, drawing tools, components list Pencil, ruler, protractor, drafting tools
    4 Calculate the required cooling capacity based on the size of the space and the local climate. Climate data, space dimensions Calculator, online tools

    Construction Methods: Build Your Own Air Conditioner

    Building your own air conditioning system is a rewarding project, but careful construction is crucial. Proper materials and techniques ensure efficient cooling and long-term performance. This section dives into the practical aspects of building various components and addresses essential safety considerations.Different construction methods are available for each component of a DIY air conditioning system. Choosing the right method depends on factors like budget, desired efficiency, and available tools and skills.

    Understanding these options allows you to make informed decisions throughout the entire building process.

    Evaporator Coil Construction

    Copper tubing, often used for its excellent thermal conductivity, is a common material for evaporator coils. A coiled configuration maximizes surface area for heat exchange. This setup is typically soldered to create a leak-proof system, ensuring proper refrigerant flow. Alternatively, pre-fabricated evaporator coils are available, reducing the construction time and complexity, though often at a higher cost.

    Condenser Coil Construction

    Aluminum or copper coils are suitable for condenser coils. The larger surface area compared to the evaporator facilitates efficient heat rejection. For DIY systems, carefully measuring and cutting the coil to the necessary length is vital. The condenser coils are often mounted on a frame for structural support and optimal airflow.

    Ductwork Construction

    Ductwork is essential for directing airflow throughout the house. Insulated metal ductwork offers better efficiency than non-insulated options. Consider using flexible ductwork for easily maneuvering around obstacles in your home. Measure the ductwork carefully to ensure it matches the air handler and vents. Securely attaching ductwork with appropriate fasteners is critical to prevent leaks and ensure proper airflow.

    Insulation Methods

    Proper insulation minimizes heat transfer, which directly impacts the system’s efficiency. Fiberglass insulation is a common choice for its affordability and effectiveness. Spray foam insulation provides a higher level of insulation but requires specialized application. The selection of insulation material should consider the desired level of efficiency and the potential for environmental impact.

    Insulation Material Pros Cons
    Fiberglass Affordable, readily available Can be dusty to work with, less effective than spray foam
    Spray Foam High R-value, airtight seal Specialized application, potentially higher cost

    Component Assembly

    Assembling the components of your DIY air conditioner involves precise steps. First, securely attach the evaporator coil to the refrigerant lines. Next, install the condenser coil, ensuring proper airflow around it. Connecting the refrigerant lines to the compressor is crucial, and the installation of the ductwork completes the airflow system. Proper sealing of all connections is paramount to prevent refrigerant leaks and maintain efficiency.

    A leak in the refrigerant system can significantly reduce the efficiency of your DIY air conditioning system. Regular checks and proper sealing are crucial.

    Safety Precautions

    Working with refrigerants requires caution. Always follow safety guidelines and use appropriate personal protective equipment (PPE). Avoid working in confined spaces without adequate ventilation. Ensure proper handling of electrical components to prevent electrical hazards. Refrigerant leaks can be dangerous; use proper ventilation and safety equipment when handling refrigerants.

    Troubleshooting

    Troubleshooting potential issues during construction is important. If the system isn’t cooling efficiently, check for leaks in the refrigerant lines and ensure proper airflow through the condenser. A lack of airflow can cause reduced cooling. Verify that the electrical connections are secure.

    Operation and Maintenance

    Build Your Own Air Conditioner

    Bringing your DIY air conditioning system to life requires understanding its operational principles and implementing a regular maintenance schedule. Proper operation ensures efficient cooling and a long lifespan for your system. Maintenance prevents breakdowns and optimizes performance, making your home comfortable and energy-efficient.This section details the crucial aspects of operating and maintaining your DIY air conditioning system, from startup procedures to troubleshooting potential issues and energy-saving techniques.

    Operation Principles

    Your DIY air conditioning system, like any refrigeration cycle, relies on the principles of vapor-compression refrigeration. A refrigerant absorbs heat from the indoor air, vaporizes, and then releases this absorbed heat outdoors. The cycle repeats, constantly moving heat from inside to outside. Understanding this cycle is key to optimizing performance.

    Importance of Regular Maintenance

    Regular maintenance is crucial for the longevity and efficiency of your DIY air conditioning system. Neglecting maintenance can lead to decreased cooling capacity, increased energy consumption, and premature component failure. A well-maintained system operates more efficiently and quietly, providing long-term comfort.

    Starting and Operating the System

    A step-by-step guide for starting and operating your DIY air conditioning system is essential.

    1. Check the refrigerant level. Ensure the correct amount of refrigerant is in the system. Insufficient refrigerant will reduce cooling capacity. Excessive refrigerant can cause compressor overload.
    2. Verify electrical connections. Confirm all electrical connections are secure and properly insulated. Faulty wiring can lead to electrical hazards and system malfunction.
    3. Inspect the condensate drain. A clogged condensate drain can cause water to overflow, potentially damaging your home’s interior. Ensure the drain is clear.
    4. Turn on the power. With all checks completed, turn on the power supply to the system.
    5. Monitor the cooling output. Observe the cooling performance and adjust settings as needed.

    Common Maintenance Tasks

    Regular maintenance tasks are vital for preventing problems and maintaining optimal performance.

    • Cleaning the condenser coils. Accumulated dust and debris on the condenser coils can significantly reduce the system’s efficiency. Regular cleaning (e.g., monthly) with a brush and compressed air improves heat dissipation.
    • Checking and cleaning the evaporator coils. The evaporator coils inside the unit should also be checked and cleaned regularly. This can be done with a vacuum cleaner.
    • Inspecting the refrigerant lines. Examine the refrigerant lines for leaks. Refrigerant leaks can lead to reduced cooling capacity and safety hazards.
    • Checking the compressor. Inspect the compressor for any unusual sounds or vibrations. Unusual sounds can indicate a potential problem.
    • Maintaining the outdoor unit. Ensure adequate airflow around the outdoor unit by removing any obstructions. This will maintain optimal cooling performance.

    Potential Problems and Solutions

    Addressing potential issues during operation is crucial.

    • System not cooling:
      • Check the refrigerant level.
      • Inspect for leaks.
      • Ensure the condenser coils are clean.
    • System making unusual noises:
      • Check the compressor for damage.
      • Inspect the motor for problems.
      • Check the refrigerant lines for kinks.
    • System leaking water:
      • Check the condensate drain for clogs.
      • Ensure proper drainage.

    Energy-Saving Techniques

    Implementing energy-saving techniques can significantly reduce operating costs.

    • Use a programmable thermostat. Programmable thermostats allow you to set different temperatures for different times of the day, reducing energy consumption.
    • Seal air leaks around windows and doors. Air leaks can significantly reduce the efficiency of your DIY air conditioning system. Sealing these gaps can save energy.
    • Install proper insulation. Insulating your home can significantly reduce heat transfer and decrease the load on your air conditioning system.
    • Optimize the positioning of the unit. Place the outdoor unit in an area with adequate airflow.

    Environmental Impact

    Building your own air conditioning system can be a rewarding project, but understanding its environmental footprint is crucial. From the refrigerants used to the materials employed in construction, every aspect of DIY air conditioning has an impact on the environment. Careful consideration of these factors ensures a more sustainable approach.The environmental impact of a DIY air conditioning system encompasses a range of factors, from the energy consumption during operation to the materials used in its construction.

    Choosing sustainable materials and refrigerants, and optimizing energy efficiency, are vital for minimizing the overall environmental impact.

    Ever thought about building your own air conditioner? It’s a fascinating DIY project, but sometimes you just need a chill vibe, like listening to some tunes. Check out this awesome track, “zed bias trouble in the streets ft mark pritchard” zed bias trouble in the streets ft mark pritchard , to really get that cool feeling going.

    Regardless of the source of your chill, building your own AC system is a seriously rewarding project, though! It’s all about the process, right?

    Refrigerant Choices and Their Impact

    Different refrigerants have varying global warming potentials (GWP). Selecting refrigerants with lower GWP values is crucial for reducing the system’s contribution to climate change. Hydrofluorocarbons (HFCs), while often used in conventional systems, have high GWP values. In contrast, natural refrigerants like ammonia and carbon dioxide have significantly lower GWP. Proper selection and handling of refrigerants are essential to minimize environmental damage.

    This careful consideration can significantly reduce the system’s environmental footprint.

    Material Sustainability in Construction

    The materials used in the construction of a DIY air conditioning system play a crucial role in its overall environmental impact. Using recycled or sustainably sourced materials reduces the demand on natural resources and minimizes waste. For example, opting for reclaimed wood or recycled metals can lessen the environmental impact of the construction process. Consideration of material lifespan and recyclability is also vital for long-term sustainability.

    Energy Efficiency and Operational Impact

    The energy efficiency of a DIY air conditioning system directly affects its environmental impact. A well-designed and properly maintained system will consume less energy, thereby reducing greenhouse gas emissions. Energy-efficient components, such as high-performance compressors and insulation, can significantly improve the system’s energy efficiency. Proper sealing and maintenance of the system are crucial to avoid leaks, which can lead to increased energy consumption and environmental harm.

    Optimizing the system’s operation for the specific climate and usage patterns is also important.

    Impact on Local Ecosystems

    A DIY air conditioning system can impact local ecosystems in several ways. The energy used to power the system contributes to the emission of greenhouse gases, which can have cascading effects on ecosystems, including temperature changes and shifts in precipitation patterns. The use of certain materials in construction might affect local biodiversity, depending on the extraction and processing methods.

    Minimizing the energy consumption of the system is crucial to limit these effects.

    Safety Considerations

    Building your own air conditioning system is a rewarding project, but it’s crucial to prioritize safety throughout the process. Ignoring safety precautions can lead to serious injuries or property damage. This section Artikels the essential safety measures to follow for a successful and secure DIY air conditioning installation.

    Potential Hazards

    DIY air conditioning work involves various potential hazards. Working with electricity, refrigerants, and potentially high-pressure components necessitates careful attention to detail. Improper handling of these elements can result in electric shocks, chemical burns, refrigerant leaks, and equipment damage. Furthermore, improper installation can lead to reduced efficiency, performance issues, and even safety risks for the system’s operation.

    Safety Procedures and Precautions

    Adhering to established safety procedures is paramount. Before starting any work, thoroughly review the manufacturer’s instructions for the equipment and materials being used. Always disconnect power to the electrical components before any work on the system. Wear appropriate personal protective equipment (PPE), including safety glasses, gloves, and a respirator, especially when working with refrigerants or other chemicals. Proper ventilation is essential when handling refrigerants to prevent inhalation of harmful vapors.

    Having a fire extinguisher readily available is crucial, as well as a first-aid kit for immediate treatment of minor injuries.

    Safe Handling of Refrigerants and Other Chemicals

    Refrigerants, like R-22 and R-410A, are essential components of air conditioning systems. However, they are also potent and potentially hazardous. Always handle refrigerants in a well-ventilated area and avoid skin contact. Use appropriate safety equipment like gloves and safety glasses. Refrigerant leaks can be dangerous and should be addressed immediately by trained professionals.

    Proper disposal methods for refrigerants and other chemicals are vital to prevent environmental contamination.

    Emergency Procedures

    Accidents can happen, even with the best safety precautions. Having clear emergency procedures in place can mitigate potential risks. Familiarize yourself with the location of emergency exits, fire extinguishers, and first-aid supplies. In case of an electrical shock, immediately disconnect the power source and seek medical attention. For refrigerant leaks, evacuate the area and contact a qualified technician.

    For fire, activate the building’s fire alarm system and follow evacuation procedures. Know your local emergency response numbers and be prepared to report any incident promptly.

    Safe Operation and Maintenance

    Regular maintenance is crucial for ensuring the safe and efficient operation of your DIY air conditioning system. Periodically check for leaks in the refrigerant lines and other components. Inspect electrical connections for any signs of damage or wear. Keep the system’s surroundings clean and free from obstructions that could impede airflow. Ensure proper ventilation and avoid overheating the system.

    Consult with qualified professionals for any repairs or maintenance tasks that fall outside your expertise.

    Closure

    In conclusion, building your own air conditioner is a rewarding project that allows for customization and potentially significant energy savings. However, it’s crucial to understand the associated risks and to prioritize safety throughout the process. This guide equips you with the knowledge and tools to make informed decisions, from initial design to final operation. So, are you ready to take on the challenge of crafting your own cooling masterpiece?

  • Take a Radiator Off the Wall A Comprehensive Guide

    Take a Radiator Off the Wall A Comprehensive Guide

    Take a Radiator Off the Wall – it sounds daunting, but with careful planning and the right know-how, it’s achievable. This comprehensive guide covers everything from safety precautions and tool selection to detailed disassembly and reinstallation procedures, making the entire process less intimidating and more manageable. We’ll explore different radiator types, potential problems, and troubleshooting strategies, ensuring you can tackle this project with confidence.

    This guide provides a step-by-step approach to safely removing and reinstalling a radiator. We’ll delve into the specific needs of various radiator types and the essential tools required for each stage of the process. From disconnecting water lines to securing the radiator, we’ll address every crucial aspect, ensuring a successful outcome.

    Safety Precautions

    Taking apart a radiator, while potentially rewarding, comes with inherent risks. Ignoring safety precautions can lead to serious injuries, property damage, or even environmental hazards. This section details crucial safety measures to ensure a safe and successful radiator disassembly project. Following these steps will minimize the risk of accidents and complications.Understanding the potential hazards associated with radiator disassembly is crucial for mitigating risks.

    Taking a radiator off the wall can be a surprisingly involved project. It’s not just about unscrewing a few bolts; you’ve got to consider the plumbing, electrical connections, and the overall impact on the room’s aesthetics. Interestingly, while contemplating such a DIY project, I stumbled across news that the Bruce Springsteen E Street Band will be performing at the Super Bowl, which, frankly, makes me want to immediately tackle that radiator job.

    So, while I’m researching how to best disconnect the heating system, I’ll be also checking out the performance details on bruce springsteen e street band to play super bowl. Hopefully, the energy from the music will inspire me to get that radiator off the wall faster!

    Radiators often contain trapped water, potentially pressurized, and may have concealed electrical connections or hidden components. Improper handling can lead to scalding, electric shocks, or mechanical injuries. Careful preparation and adherence to safety guidelines are essential.

    Potential Hazards and Mitigation Strategies

    Radiator disassembly involves several potential hazards, and careful planning is vital to mitigate them. Water, often under pressure, can cause serious burns if not handled correctly. Metal parts, particularly when hot, can lead to burns or cuts. Potential electrical hazards are present if the radiator has electrical components, which are sometimes concealed within.

    • Water Hazard Mitigation: Always drain the radiator completely before attempting any disassembly. Use appropriate tools for draining, and ensure the water is disposed of safely. If possible, disconnect the radiator from the water supply system to prevent accidental refilling during work. A slow and deliberate approach, checking for leaks at each step, is paramount.
    • Thermal Hazard Mitigation: Allow the radiator to cool completely before touching any metal parts. Using insulated gloves and protective eyewear is essential. A heat-resistant mat or surface beneath the radiator can protect the working area from potential damage.
    • Electrical Hazard Mitigation: If the radiator has electrical components, disconnect the power supply before starting any work. Ensure all electrical connections are properly insulated and protected. Consult an electrician if there are any doubts about the electrical safety of the radiator.
    • Mechanical Hazard Mitigation: Use appropriate tools for disassembly. Ensure tools are in good condition and fit for purpose. Wear safety glasses and gloves to prevent cuts or scrapes. Work in a well-lit area to minimize the risk of slips and falls.

    Importance of Ventilation and PPE

    Adequate ventilation is crucial when working with radiators, especially if they contain any potentially harmful substances. Proper ventilation reduces the risk of inhaling fumes or dust particles that could be released during the disassembly process. Personal Protective Equipment (PPE) is equally important for protecting against potential hazards.

    • Ventilation: Ensure good ventilation in the work area to prevent the buildup of dust, fumes, or other contaminants. Open windows and use fans if necessary. If possible, work outdoors in a well-ventilated area.
    • PPE Selection: The choice of PPE depends on the specific hazards present. For example, heat-resistant gloves and aprons are necessary for handling hot radiators. Safety glasses protect the eyes from flying debris. Appropriate respiratory protection, such as a dust mask, is essential if the radiator contains any hazardous materials.

    PPE Comparison Table

    The following table provides a comparison of different types of PPE and their suitability for radiator work.

    PPE Type Description Suitability for Radiator Work
    Heat-Resistant Gloves Gloves designed to protect against heat and burns. High
    Safety Glasses/Goggles Eye protection against flying debris and splashes. High
    Dust Mask/Respirator Protects the respiratory system from dust and fumes. Moderate to High (depending on radiator contents)
    Insulated Apron Provides protection against heat and spills. High
    Work Boots Provides protection for feet. Moderate

    Tools and Materials Needed: Take A Radiator Off The Wall

    Preparing to tackle a radiator removal project requires a well-stocked toolkit and a thoughtful consideration of the materials needed. This meticulous approach ensures a safe and efficient job, minimizing potential damage to the surrounding area and the radiator itself. Understanding the specific tools and materials involved is paramount to a successful and injury-free outcome.

    Essential Tools

    A comprehensive set of tools is crucial for safely and effectively removing a radiator. The right tools prevent damage and ensure the project is completed in a timely manner. The following list provides a detailed overview of necessary tools and their functions.

    Tool Name Description Function
    Adjustable Wrench A versatile wrench with adjustable jaws that can grip various pipe sizes. Used to loosen and tighten nuts and bolts securing the radiator to the pipes.
    Pipe Wrench A wrench designed specifically for plumbing tasks, featuring a pivoting head. Ideal for gripping and turning pipes, especially those that may be corroded or difficult to access.
    Basin Wrench A specialized wrench with a long handle and a basin-shaped head, providing leverage. Useful for turning stubborn or hard-to-reach nuts and bolts, enhancing leverage.
    Screwdrivers (Phillips and Flathead) Tools with pointed tips for turning screws. Used for removing screws securing the radiator’s mounting brackets and other accessories.
    Gloves Protective coverings for the hands. Protect hands from potential cuts and burns during the process.
    Safety Glasses Protective eyewear. Protect eyes from debris or flying particles that may be generated during the process.
    Hammer A tool for striking objects. Used to remove or detach items that are obstructing the radiator’s removal.
    Putty Knife or Utility Knife Tools for scraping and cutting materials. Assist in removing any caulking or sealant around the radiator’s base or connections.
    Measuring Tape A tool for measuring lengths and distances. Essential for ensuring proper alignment and measurements when replacing the radiator.
    Bucket A container for holding water. Used to collect any water draining from the radiator’s pipes during the removal process.

    Materials Needed

    Proper materials are essential for completing the radiator removal safely and effectively. The following list Artikels the different types of materials required.

    • Pipe Sealant or Thread Sealant: A crucial material for ensuring a watertight seal after the radiator is removed. It creates a barrier against leaks and prevents water damage. Proper application is vital to prevent future problems.
    • Insulation (optional): Adding insulation to the pipes after removal can reduce heat loss. The type of insulation will depend on the specific pipes and the desired level of insulation. For instance, pipe wrap insulation is often used for pipes exposed in the attic or crawl space.
    • Cleaning Supplies: Depending on the condition of the radiator and pipes, cleaning supplies such as wire brushes or solvents might be necessary to remove rust or grime before reinstallation.
    • Replacement parts (if necessary): If the existing pipes or valves require replacement, you’ll need to purchase the necessary components to ensure a proper fit and function.

    Types of Radiators

    Take a Radiator Off the Wall

    Radiators come in various materials, each with unique characteristics affecting their installation and removal. Understanding these differences is crucial for safe and efficient work. Choosing the right tools and approach for a particular radiator type prevents damage and ensures a smooth removal process.Different radiator materials offer varying levels of durability, heat transfer efficiency, and maintenance requirements. Proper identification of the radiator type is essential for determining the best course of action for disconnection and removal.

    Careful consideration of these factors will make the entire process more manageable and less prone to errors.

    Cast Iron Radiators

    Cast iron radiators are a classic choice, often found in older homes. Their robust construction and excellent heat retention make them popular. However, their weight and potential for rust or corrosion must be considered. Disconnecting these radiators requires extra care due to their size and potential for damage.

    • Cast iron radiators are typically connected using a series of threaded pipes. Connections may include nuts, bolts, and washers. The pipes may be copper, steel, or brass, each with its own characteristics in terms of corrosion resistance and handling.
    • Carefully inspect the connections for signs of corrosion or damage before disconnecting. Use appropriate wrenches to avoid damaging the connections or the radiator itself.
    • Disconnect the water supply valves first. Then, carefully disconnect the supply and return pipes using the appropriate wrenches.

    Steel Radiators

    Steel radiators are a more common choice in modern homes. They are generally lighter than cast iron, but may not offer the same level of heat retention. Their construction allows for a variety of designs and finishes, offering aesthetic options.

    • Steel radiators are typically connected in a similar manner to cast iron, often using threaded pipes and fittings. Ensure compatibility with the existing plumbing system when choosing replacement components.
    • Steel radiators may be equipped with valves and other accessories that need to be disconnected before removal. Proper identification and careful handling are essential for safe removal.
    • To disconnect steel radiators, follow the same procedure as cast iron, prioritizing safety and proper tools.

    Aluminum Radiators, Take a Radiator Off the Wall

    Aluminum radiators are lightweight and efficient. Their modern design often incorporates fins for improved heat transfer. They are generally more delicate than cast iron or steel, requiring extra care during removal.

    • Aluminum radiators are often connected using compression fittings or soldered joints, depending on the specific design. The connection method significantly impacts the disassembly process.
    • Aluminum radiators, being lighter, may not require the same level of support as cast iron or steel, but careful handling remains important to prevent damage.
    • Compression fittings are often easier to disconnect than soldered joints. Use appropriate tools for the connection type.

    Disassembly Steps Table

    Type Steps Tools
    Cast Iron 1. Disconnect water supply valves. 2. Disconnect supply and return pipes. 3. Carefully lift and remove the radiator. Adjustable wrenches, pipe wrenches, safety equipment.
    Steel 1. Disconnect water supply valves. 2. Disconnect supply and return pipes. 3. Disconnect any valves or accessories. 4. Carefully lift and remove the radiator. Adjustable wrenches, pipe wrenches, valve tools, safety equipment.
    Aluminum 1. Identify connection type (compression or soldered). 2. Disconnect connections using appropriate tools. 3. Carefully lift and remove the radiator. Compression fitting pliers, soldering equipment (if applicable), safety equipment.

    Disassembly Procedures

    Taking a radiator off the wall requires careful planning and execution. Improper handling can damage the radiator, plumbing, or even injure you. This section details the crucial steps for safely disconnecting water supply lines, removing the radiator, and handling it with the necessary support. Understanding these procedures ensures a smooth and efficient process.

    Disconnecting Water Supply Lines

    Before removing the radiator, you must first shut off the water supply to the unit. This prevents water damage and ensures a safe work environment. Locate the valves controlling the water flow to the radiator, usually located near the supply pipes. Turn the valves clockwise to fully shut off the water supply. It’s important to verify that the water is completely shut off by checking for any leaks.

    If you’re unsure of the location of the valves, consult a qualified plumber or refer to your home’s plumbing diagram.

    Removing the Radiator from the Wall

    Radiator removal involves several steps to ensure safety and avoid damage. Proper support and handling are critical during the process. The following section Artikels the procedures.

    Radiator Removal Procedure

    1. Preparation: Ensure the water supply is completely shut off and the room is well-lit. Gather necessary tools, including adjustable wrenches, screwdrivers, and a sturdy support like a piece of plywood or a similar material.
    2. Disconnect Fittings: Carefully disconnect any pipes or fittings connected to the radiator using appropriate wrenches. Be cautious not to over-tighten or damage the pipes.
    3. Support the Radiator: Place a strong support, such as a piece of plywood or a heavy-duty board, beneath the radiator. This will distribute the weight evenly and prevent damage to the wall or the radiator itself.
    4. Detaching Wall Brackets: If the radiator has wall brackets, carefully remove the brackets using appropriate tools. Ensure the brackets are securely fastened to the support and that the radiator is held firmly.
    5. Lifting the Radiator: Carefully lift the radiator using the support and ensure that it doesn’t tilt or shift during the removal process. Two people are recommended for lifting larger or heavier radiators.
    6. Inspect for Damage: Before moving the radiator, inspect for any signs of damage to the radiator or the wall. This helps prevent further issues later.
    7. Removal from the Room: Carefully carry the radiator out of the room. If possible, roll the radiator on a suitable surface to avoid causing unnecessary stress on the unit.

    Importance of Proper Support and Handling

    Proper support and handling during radiator removal are crucial to avoid damaging the radiator, wall, or surrounding fixtures. Improper lifting can lead to cracking the radiator, damaging the wall studs, or even causing injury. Using adequate support prevents the radiator from tilting or shifting during removal. A sturdy support evenly distributes the weight, preventing pressure points and ensuring the safety of the unit and the surrounding environment.

    Troubleshooting

    Taking a radiator off the wall can sometimes reveal unexpected challenges. This section details common problems encountered during the process, along with practical solutions. Understanding these potential issues and their fixes will help ensure a smooth and safe removal process, minimizing complications.The process of radiator removal, while generally straightforward, can sometimes encounter unforeseen obstacles. Careful attention to potential problems, combined with the correct tools and procedures, will greatly improve the likelihood of a successful and efficient job.

    Common Radiator Removal Problems

    This section Artikels potential issues encountered during radiator removal, providing context for each. Understanding these problems is crucial for efficient troubleshooting and resolution.Common problems during radiator removal include damaged pipes, loose connections, and unexpected obstructions. These problems often arise from the age or condition of the plumbing system, the type of radiator being removed, or the specific installation method used.

    Recognizing these issues early can help prevent more extensive problems during the process.

    Damaged Pipes or Connections

    Sometimes, the pipes connected to the radiator might be damaged or corroded. This damage can manifest as leaks, cracks, or weakened connections. Identifying and addressing these issues early in the process is essential to avoid further complications.Dealing with damaged pipes or connections requires careful assessment. First, isolate the affected area by turning off the water supply to the radiator.

    Then, inspect the damage. If the damage is minor, consider using pipe sealant or epoxy to repair the leak. For more extensive damage, it’s crucial to consult a qualified plumber for professional repair or replacement. Improper repair could lead to water damage or safety hazards.

    Unexpected Obstructions

    During the removal process, unexpected obstructions like electrical wiring, pipes, or hidden support structures might be encountered. These obstructions can complicate the removal process and lead to delays or damage if not addressed proactively.Thorough pre-removal inspection is vital to identify any potential obstructions. A thorough visual inspection of the area around the radiator, including the wall behind it, is highly recommended.

    Taking a radiator off the wall can be a surprisingly involved project, requiring careful planning and execution. It’s a bit like diving into a whole other world, almost a different kind of DIY challenge. You need to consider the plumbing and electrical connections, and the aesthetic impact of removing the radiator, which can make you feel like you’re part of a creative symphony.

    For inspiration, check out this awesome playlist of 5 10 15 20 kurt vile 5 10 15 20 kurt vile to really get you pumped for that radiator-removal project, and hopefully you’ll find some inspiration there. Then, you can get back to your DIY radiator makeover!

    If obstructions are found, careful planning is necessary to determine the best approach for navigating them without causing further damage. Sometimes, minor adjustments to the removal procedure might be required to accommodate these obstructions. This could involve using different tools or techniques to carefully remove or reroute the obstructions.

    Taking a radiator off the wall might seem like a drastic move, but sometimes it’s the only way to create the space you need. For instance, if you’re trying to make room for a new shower, especially if you have a baby and need to adapt your bathroom for easier access and safety, you might consider the practicalities of Shower with a Baby.

    It’s all about maximizing your space and making things work for your lifestyle. Ultimately, a little rearranging can completely change the flow and usability of a room, making your home feel more functional and comfortable, even with a radiator out of the way.

    Table of Common Problems, Causes, and Solutions

    This table provides a concise overview of common radiator removal problems, their potential causes, and recommended solutions.

    Problem Cause Solution
    Leaks or drips from pipes Damaged or corroded pipes, loose connections Turn off water supply, assess damage, use pipe sealant or epoxy for minor damage, consult a plumber for major repairs.
    Unexpected obstructions Hidden electrical wiring, pipes, or support structures Thorough pre-removal inspection, careful planning to reroute or remove obstructions, potentially involving adjustments to the removal procedure.
    Difficulty detaching connections Tight connections, rust, or corrosion Use appropriate tools (e.g., adjustable wrenches, pliers), apply penetrating oil to loosen connections, avoid forceful removal to prevent damage.
    Radiator won’t budge Embedded or faulty supports, insufficient tools Check for embedded supports, use appropriate tools for lifting, if necessary, consider professional help for stubborn radiators.

    Reinstallation Procedures

    Take a Radiator Off the Wall

    Getting your radiator back on the wall correctly is crucial for both efficient heating and safety. Proper reinstallation ensures the radiator functions optimally and prevents potential leaks or structural damage. Following these steps will guide you through the process, enabling you to complete the project successfully.

    Preparing the Wall for Reinstallation

    Before mounting the radiator, meticulous preparation of the wall is paramount. This involves ensuring the mounting points are clean and stable. Check for any damage or loose plaster, and repair any imperfections to prevent the radiator from shifting or causing future problems. Clean the area around the mounting holes thoroughly to remove any debris or residue that could interfere with the adhesive or screws.

    Reconnecting the Water Supply Lines

    Correctly reconnecting the water supply lines is essential for ensuring the radiator’s proper operation and preventing water leaks. Before connecting the lines, ensure that the water supply to the radiator is shut off. Carefully align the lines with their respective connections on the radiator. Apply Teflon tape to the threads of the connections to create a watertight seal.

    Tighten the connections firmly but avoid over-tightening, which could damage the fittings.

    Securing the Radiator to the Wall

    The radiator’s secure attachment to the wall is critical for both its stability and safety. Use the appropriate mounting hardware, ensuring that the screws are long enough to penetrate the wall studs. Pre-drill holes to prevent the wall from cracking. Use wall anchors if necessary for added support. Double-check that the radiator is level and plumb before tightening the screws completely.

    Radiator Reinstallation Steps

    1. Ensure the water supply to the radiator is completely shut off.
    2. Thoroughly clean the wall mounting points and surrounding areas, removing any debris or residue.
    3. If necessary, repair any damaged plaster or loose areas around the mounting points.
    4. Align the radiator with the mounting points, ensuring it’s level and plumb.
    5. Carefully reconnect the water supply lines, applying Teflon tape to the threads and tightening firmly but not excessively.
    6. Secure the radiator to the wall using appropriate mounting hardware and wall anchors where needed. Pre-drill holes to avoid cracking the wall.
    7. Carefully tighten all screws, ensuring the radiator is securely attached and level.
    8. Turn the water supply back on slowly and monitor for any leaks.

    Additional Considerations

    Taking a radiator off the wall is a task that demands careful planning and execution. Beyond the technical steps of disassembly and reinstallation, there are crucial aspects to consider regarding the wall structure, local regulations, and proper disposal. Understanding these factors ensures the job is completed safely and responsibly.Careful consideration must be given to the structural integrity of the wall to avoid causing damage.

    Knowing the specific type of wall construction and the placement of crucial support elements will help in avoiding potential issues. Following these precautions minimizes the risk of compromising the wall’s stability or compromising safety.

    Potential Wall Structure Issues

    Wall structures vary significantly, from simple plasterboard to complex brick or concrete. Understanding the construction is crucial to avoid causing damage during removal. Incorrect handling could lead to cracks, loose plaster, or even structural instability. Before starting any work, inspecting the wall and understanding its construction is essential.

    • Plasterboard walls might require careful handling of the surrounding area to avoid damage to the plaster or drywall. Any damage to the drywall needs to be repaired appropriately. If there is significant damage, professional help should be considered to prevent further issues.
    • Brick or stone walls might require specialized tools and techniques to avoid damaging the mortar or bricks themselves. Care should be taken to avoid unnecessary impact or pressure on the wall structure during removal and reinstallation.
    • Concrete walls typically present fewer issues during removal, but careful consideration of the anchoring points for the radiator is necessary. Incorrect removal techniques might lead to damage to the concrete. Specialized tools may be required.

    Local Regulations and Permits

    Local building codes and regulations may dictate specific requirements for radiator removal, especially in older buildings or historical areas. Before undertaking any work, checking local ordinances is essential. Contacting the relevant authorities can provide crucial information on permits, safety measures, or specific disposal procedures.

    • Some areas might require a permit for work involving the wall structure. Obtaining the necessary permit is crucial to avoid legal issues. It is always recommended to verify this with local authorities.
    • Regulations might exist for the disposal of old materials, such as lead paint, asbestos, or other potentially hazardous substances. Understanding and following these regulations is crucial for the safety of workers and the environment.

    Proper Disposal of Old Parts

    Proper disposal of old parts is essential to avoid environmental contamination and potential health hazards. Incorrect disposal can lead to contamination of soil or water sources. Following local regulations is crucial to ensure the safe and responsible disposal of the old radiator and related materials.

    • Check local regulations for the appropriate disposal methods for old radiators. Different materials within the radiator might have specific disposal requirements. Contacting the relevant waste management services can provide valuable information.
    • Ensure that any potentially hazardous materials, such as lead or asbestos, are handled and disposed of according to local regulations. Professional disposal services may be necessary for materials like these.

    Recycling or Disposal Procedures

    Recycling or disposal procedures for removed radiators vary depending on the type of radiator and local regulations. Following the correct procedures is essential to avoid harming the environment. Consult with local waste management services to determine the most appropriate disposal method.

    • Many municipalities offer recycling programs for metals. Radiators often contain significant metal components, which can be recycled. Check with your local recycling center to see if radiators are accepted.
    • Some types of radiators may contain hazardous materials, like lead paint. In these cases, specialized disposal methods are necessary to prevent environmental contamination. Local regulations should be followed, and professional waste removal services might be required.

    Illustrative Examples

    Radiator removal can vary significantly depending on the type of wall and the radiator itself. Understanding these differences is crucial for a safe and efficient job. This section provides a practical example to illustrate the process for a cast iron radiator in a plaster wall.

    Cast Iron Radiator Removal from a Plaster Wall

    This scenario details the specific steps for removing a cast iron radiator from a plaster wall. It emphasizes the importance of proper preparation and safety measures throughout the entire process.

    Tools and Materials Needed

    To safely and effectively remove a cast iron radiator from a plaster wall, you’ll need the following:

    • Screwdrivers (Phillips and flathead): Essential for disassembling the radiator’s connections and securing parts.
    • Adjustable wrench: Needed for loosening nuts and bolts on the radiator’s connections.
    • Pliers: Useful for gripping and manipulating small parts during the disassembly.
    • Hammer and chisel: Necessary for carefully removing plaster or any obstructions encountered around the radiator.
    • Safety glasses: Protect your eyes from flying debris.
    • Gloves: Protect your hands from sharp edges and potential hazards.
    • Dust mask: Prevent inhalation of dust and debris.
    • Bucket and rags: To collect water and debris from the radiator.
    • Level: To ensure the radiator is properly aligned for installation.
    • Measuring tape: To ensure accurate measurements for reinstallation.
    • Utility knife: To carefully cut away any stubborn plaster or drywall.
    • Possibly, a small amount of plaster patching compound, depending on the condition of the wall and whether you are planning to repair any damage to it after the removal.

    Disassembly Procedures

    This section Artikels the steps involved in disassembling a cast iron radiator in a plaster wall, ensuring you’re prepared for the task ahead.

    1. Turn off the water supply: This is paramount to prevent water damage and personal injury. Shut off the valves supplying water to the radiator, ensuring there’s no residual pressure.
    2. Assess the wall: Carefully inspect the wall around the radiator for any loose or fragile plaster. Note any unusual conditions or potential hazards.
    3. Remove any coverings: If there are any decorative covers or caps, carefully remove them to access the radiator’s connections.
    4. Disconnect the pipes: Loosen and remove the nuts and bolts connecting the radiator to the pipes. Use the appropriate tools and proceed with caution.
    5. Remove the radiator: Once the pipes are disconnected, carefully lift the radiator and remove it from its location. Be mindful of the weight and ensure there’s enough support to avoid dropping it.

    Detailed Removal Process for a Cast Iron Radiator

    This step-by-step procedure ensures a safe and effective removal of a cast iron radiator in a plaster wall.

    1. Safety First: Wear safety glasses, gloves, and a dust mask. Ensure the water supply is turned off and the area is well-lit.
    2. Locate the pipes: Identify the pipes connected to the radiator and carefully inspect their condition.
    3. Disconnect the pipes: Use an adjustable wrench to loosen and remove the nuts and bolts connecting the pipes to the radiator. Place a bucket underneath the radiator to catch any drips or residual water.
    4. Remove the radiator: Carefully lift the radiator and remove it from the wall, using appropriate support if needed. If the plaster around the radiator is loose, use a utility knife to carefully cut away any sections that might obstruct removal. A hammer and chisel might be necessary to gently remove obstructions.
    5. Inspect the wall: Examine the wall for any damage caused during the removal process. Document any issues for later repair.

    Outcome Summary

    Successfully removing a radiator involves meticulous planning, precise execution, and a deep understanding of the task at hand. This guide provides a comprehensive resource for safely and effectively taking a radiator off the wall, covering everything from essential safety precautions to detailed reinstallation steps. Remember, proper planning and execution are key to a smooth and safe outcome. Armed with this knowledge, you can confidently tackle this project, knowing you’ve got a solid foundation of information to draw upon.