Install a Coolant Flush Kit: This comprehensive guide walks you through the process of performing a coolant flush, from understanding why it’s necessary to the meticulous steps for a successful installation. Maintaining a healthy coolant system is crucial for your vehicle’s longevity, and this guide provides a step-by-step approach to ensure you do it right.
We’ll cover everything from selecting the right kit for your car to safely disposing of old coolant. Prepare to tackle this essential maintenance task with confidence and avoid costly repairs down the road. Let’s dive in!
Introduction to Coolant Flush Kits: Install A Coolant Flush Kit
A coolant flush kit is a collection of tools and fluids designed to thoroughly clean and replace the coolant in a vehicle’s cooling system. This process is crucial for maintaining optimal engine performance and preventing costly repairs. Regular coolant flushes are a vital part of preventive maintenance for your car’s engine.Coolant, or antifreeze, protects your engine from overheating.
Over time, contaminants like rust, minerals, and debris build up in the system. A coolant flush removes these contaminants, restoring the cooling system’s efficiency and prolonging the life of your engine.
Benefits of Performing a Coolant Flush
Regular coolant flushes offer numerous advantages. They significantly improve engine performance by ensuring the cooling system operates at peak efficiency. This leads to reduced engine wear and tear, resulting in a longer lifespan for your vehicle. Further, a clean cooling system is less prone to leaks and other issues, lowering the risk of costly repairs down the road.
Maintaining a clean coolant system reduces the risk of overheating and potential engine damage.
Common Reasons for a Coolant Flush
Several factors can necessitate a coolant flush. A noticeable decrease in engine performance, unusual engine noises, or overheating issues are often indicative of a build-up of contaminants. Coolant that has changed color, become cloudy, or exhibits a strong odor also suggests the need for a flush. Additionally, vehicles that have exceeded a certain mileage or age, typically specified in the owner’s manual, often benefit from a coolant flush to maintain optimal system health.
A coolant flush is also a smart preventive measure to maintain the efficiency and longevity of your vehicle.
Getting a coolant flush kit is a great way to keep your car running smoothly. It’s important to maintain your vehicle’s systems, and a regular flush can improve its performance. Want to boost your teamwork skills while playing Among Us? Learning how to use voice chat in Among Us Use Voice Chat in Among US can really enhance your strategy and communication, just like a well-maintained cooling system improves your car’s efficiency.
Ultimately, a coolant flush kit is a worthwhile investment for any car owner.
Importance of Proper Coolant System Maintenance
Maintaining a healthy coolant system is essential for preventing engine damage. The coolant acts as a vital component in regulating engine temperature, preventing overheating, and lubricating internal parts. A properly maintained coolant system ensures optimal engine performance and minimizes the risk of expensive repairs. The coolant’s effectiveness in carrying away heat is significantly diminished by the presence of contaminants.
Regular coolant flushes, combined with appropriate coolant changes, can dramatically reduce the likelihood of overheating issues, leaks, or other cooling system problems.
Coolant Flush Kit: Troubleshooting Guide
| Problem | Cause | Solution (Coolant Flush Kit) |
|---|---|---|
| Overheating | Contaminated coolant, low coolant level, faulty thermostat | Flush the coolant system, check coolant level, replace thermostat (if needed) |
| Decreased Engine Performance | Contaminated coolant hindering heat transfer, air bubbles in the system | Flush the coolant system, bleed air from the system, check for leaks |
| Unusual Noises | Damaged components due to overheating, loose or damaged hoses or connections | Flush the coolant system to remove contaminants, inspect hoses and connections for damage, replace as necessary |
| Coolant Leaks | Damaged hoses, gaskets, or radiator, corrosion | Inspect the coolant system for leaks, replace damaged components, address corrosion issues |
| Cloudy or Discolored Coolant | Contaminants and minerals in the coolant | Flush the coolant system, refill with fresh coolant |
Types of Coolant Flush Kits
Coolant flush kits are essential for maintaining a healthy and efficient cooling system in your vehicle. Choosing the right kit depends on factors like the type of vehicle, the extent of the coolant system’s contamination, and your DIY skill level. A proper flush helps prevent costly repairs down the line by removing contaminants and restoring optimal performance.Different coolant flush kits cater to various needs and budgets.
Understanding the distinctions between these kits empowers you to make informed decisions and select the best option for your specific situation.
Coolant Flush Kit Types
Various types of coolant flush kits are available, each with unique features and functionalities. These differences often stem from the specific components included and the intended application. Some kits are designed for simple DIY tasks, while others offer advanced features for more extensive jobs.
- Basic Kits: These kits typically include the necessary components for a straightforward coolant flush. They often consist of a coolant flush solution, a drain pan, and a funnel. These kits are generally budget-friendly and suitable for occasional coolant changes or for users with limited DIY experience. They are best suited for vehicles where the coolant system is not excessively contaminated.
Getting a coolant flush kit is a great way to keep your car running smoothly, and honestly, it’s a surprisingly satisfying DIY project. While I’m usually glued to my gaming chair, practicing my aim on counter strike dust 2 , sometimes a little mechanical tinkering is just as rewarding. A thorough coolant flush can significantly improve engine performance, which, in turn, helps you feel like a pro on the virtual battlefield.
So, next time you’re feeling ambitious, grab a coolant flush kit and get those engines purring!
The simple design reduces complexity and cost, making them ideal for basic flushing jobs.
- Enhanced Kits: These kits expand upon the basic kits by including additional features like specialized flushing tools, extra-large drain pans, and more powerful flushing solutions. This enhanced functionality is beneficial for vehicles with significant coolant system contamination or for more complex flushing procedures. The extra tools provide better control and efficiency during the flushing process, leading to a more thorough cleaning of the system.
- Professional-Grade Kits: These kits are designed for complete coolant system regeneration. They typically incorporate specialized flushing solutions, filtration systems, and comprehensive tools for thorough system cleaning. These kits are often more expensive but are suitable for vehicles with severe coolant system damage or for professional-level DIY enthusiasts. The added components allow for a more extensive and deep clean, ideal for restoring a system to optimal health.
Components of a Coolant Flush Kit
A comprehensive coolant flush kit generally includes these components:
- Coolant Flush Solution: This is the chemical agent that dissolves contaminants and helps to remove them from the system. The solution’s potency and specific formulation often dictate the effectiveness of the flush.
- Drain Pan: A large, sturdy pan is crucial for safely collecting the old coolant. It needs to be large enough to hold the entire volume of coolant drained from the vehicle’s system.
- Funnel: A funnel assists in pouring the new coolant into the system with precision.
- Flushing Tools (optional): Specialized tools like flushing pumps, hoses, and pressure gauges may be included in enhanced kits, aiding in more efficient and thorough cleaning.
Comparison Table: Coolant Flush Kit Types, Install a Coolant Flush Kit
This table compares different kit types based on features and approximate price.
| Kit Type | Features | Price (USD) |
|---|---|---|
| Basic | Coolant solution, drain pan, funnel | $25-$50 |
| Enhanced | Coolant solution, drain pan, funnel, flushing tools | $50-$100 |
| Professional-Grade | Specialized solution, filtration system, flushing tools, pressure gauges | $100+ |
Coolant Flush Kit Brands and Vehicle Compatibility
This table lists some popular brands, their typical features, and target vehicle types.
| Brand | Features | Target Vehicle Types |
|---|---|---|
| XYZ Flush | Comprehensive solution, large drain pan, flushing tools | Cars, SUVs, light trucks (most makes/models) |
| ABC Coolant | Professional-grade solution, filtration system, high-pressure flushing | Cars, trucks, and vans (larger engines) |
| Generic Brand | Basic solution, drain pan, funnel | Compact cars, smaller engines |
Choosing the Right Coolant Flush Kit
Selecting the appropriate coolant flush kit is crucial for maintaining your vehicle’s cooling system. A poorly chosen kit can lead to inefficiencies, potential damage, and costly repairs down the line. Understanding the factors influencing your selection, and the vehicle-specific needs, is paramount.Proper coolant flushing ensures optimal engine performance and longevity. A suitable kit will effectively remove contaminants, restore the cooling system’s efficiency, and prevent future problems.
This detailed guide will equip you with the knowledge to make an informed decision.
Matching the Kit to Vehicle Specifications
Vehicle-specific coolant flush kits are designed to address the unique requirements of particular makes and models. Ignoring these specifications can lead to compatibility issues. For example, a kit designed for a V8 engine might not be compatible with a four-cylinder engine due to differing coolant capacities and component configurations. Ensuring a precise match minimizes the risk of leaks, improper flow, or other problems.
Importance of Manufacturer’s Specifications
Thoroughly reviewing the manufacturer’s recommendations is critical. These guidelines often Artikel the ideal coolant type, flushing procedures, and component compatibility. Following these instructions guarantees that the flushing process does not harm any vehicle components. For instance, some manufacturers may specify specific coolant types, additives, or flushing procedures, which must be followed for optimal results.
Potential Compatibility Issues and Avoidance
Compatibility issues can arise from mismatched kits. Different vehicle designs have unique coolant system configurations, and using a kit not explicitly designed for your make and model could lead to complications. One common issue is using a kit that does not correctly accommodate the specific coolant capacity of the vehicle.
Considerations for Selecting a Coolant Flush Kit
Several factors influence the best choice for your vehicle. Consider the engine type, coolant capacity, and any pre-existing issues with the cooling system. A kit designed for a high-performance engine, for instance, might not be suitable for a standard engine. The coolant capacity of the vehicle also influences the kit selection; using a kit with an insufficient capacity may not remove all contaminants.
If there are known issues with the cooling system, such as leaks or corrosion, choose a kit that can address these issues. A kit designed for high-pressure systems, for example, might be better for a vehicle experiencing leaks.
Example Table of Recommended Flush Kits
| Vehicle Make/Model | Recommended Flush Kit | Reasons |
|---|---|---|
| Toyota Camry (2015) | Toyota Genuine Coolant Flush Kit | Exact fit, ensures compatibility with Toyota’s specifications, addresses potential corrosion concerns |
| Honda Civic (2018) | Honda Genuine Coolant Flush Kit | Ensures correct component compatibility, and meets Honda’s standards for coolant types and flushing procedures |
| Ford Mustang (2020) | OEM-approved Coolant Flush Kit | Addresses Ford’s specific coolant requirements, and ensures proper flow for the high-performance engine. |
Preparing for a Coolant Flush
Before diving into the coolant flush procedure, meticulous preparation is crucial for a safe and effective outcome. This involves understanding the necessary safety precautions, gathering the required tools, and meticulously planning the steps to drain and disconnect the coolant system. Proper preparation minimizes risks and maximizes the chances of a successful flush.
Safety Precautions
Ensuring your safety is paramount during any automotive repair. Adhering to safety precautions minimizes the risk of accidents and injuries. Always wear appropriate personal protective equipment (PPE), such as safety glasses, gloves, and closed-toe shoes. Working in a well-ventilated area is also essential to avoid inhaling harmful fumes. Disconnect the vehicle’s battery to prevent accidental electrical shocks.
Tools and Materials Required
Efficient coolant flushing relies on having the right tools and materials. This section details the necessary items for a smooth and safe procedure. The specific tools and materials may vary depending on the type of vehicle.
- Appropriate safety glasses and gloves.
- A drain pan of sufficient size to catch the old coolant.
- A funnel for pouring the new coolant.
- A wrench set for disconnecting various components.
- A coolant recovery system (optional, but highly recommended for environmental responsibility).
- A coolant filter, if applicable.
- A new coolant solution, specifically formulated for the vehicle.
Draining the Old Coolant
Properly draining the old coolant is vital for a successful flush. This step ensures that all the contaminated coolant is removed, making way for the fresh, clean coolant. Incorrect draining can lead to incomplete flushing and potential issues.
- Park the vehicle on a level surface and engage the parking brake. Ensure the engine is completely cool to prevent burns and potential injuries.
- Locate the coolant drain plug on the bottom of the radiator or expansion tank. Use the appropriate wrench to carefully loosen and remove the plug.
- Position the drain pan beneath the drain plug to catch the old coolant. Slowly open the plug to allow the coolant to drain completely. Observe the coolant for any unusual color or debris.
- Once the coolant stops draining, tighten the drain plug securely.
Disconnecting Coolant System Components
This section details the systematic process of disconnecting the various components of the coolant system. This ensures the old coolant is removed effectively, preparing for the new coolant to be introduced. Thoroughness in this step is key to complete flushing.
- Identify all hoses and connections in the coolant system. Note their positions for easy reconnection later.
- Using the appropriate wrench size, carefully loosen and disconnect the hoses and clamps connecting the radiator, water pump, and heater core. Take care to avoid damaging any components.
- If necessary, disconnect the coolant reservoir cap. Be prepared to collect any residual coolant in a container.
- Place the disconnected hoses and components in a safe place to avoid any misplacement or damage.
Safety Equipment, Tools, and Materials
The following table Artikels the essential safety equipment, tools, and materials needed for a coolant flush procedure.
| Category | Item | Quantity |
|---|---|---|
| Safety Equipment | Safety Glasses | 1 pair |
| Safety Equipment | Gloves | 1 pair |
| Tools | Wrench Set (various sizes) | 1 set |
| Tools | Funnel | 1 |
| Materials | Drain Pan | 1 |
| Materials | New Coolant | As required |
| Materials | Coolant Filter (if applicable) | 1 |
Proper Disposal of Used Coolant
Proper disposal of used coolant is essential to protect the environment. Used coolant contains harmful chemicals and must be disposed of responsibly. Never pour used coolant down the drain or into the environment.
- Contact your local waste disposal services to find out the proper disposal procedures for used coolant.
- Some auto parts stores or recycling centers may accept used coolant for proper disposal.
- Adhering to local regulations is essential to protect the environment.
Performing the Coolant Flush Procedure
Successfully flushing your vehicle’s coolant system is crucial for optimal engine performance and longevity. A clean coolant system helps prevent overheating, reduces the risk of leaks, and maintains the efficiency of your engine’s cooling components. This section details the precise steps for performing a coolant flush, ensuring a thorough and safe procedure.
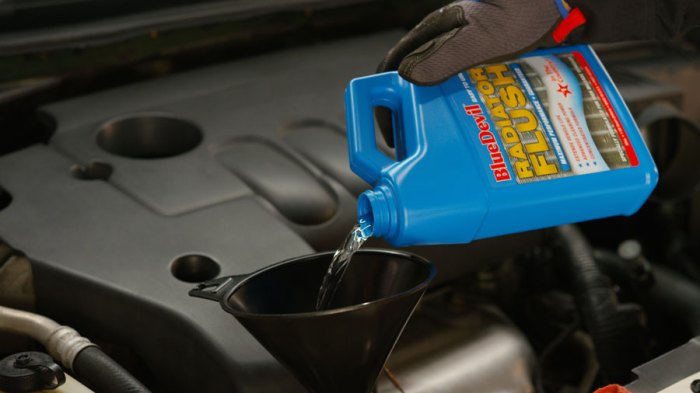
Installing the Coolant Flush Kit
Proper installation of the coolant flush kit is vital for a successful flush. Ensure all necessary components, including the drain pan, hoses, and the flushing solution reservoir, are correctly assembled according to the manufacturer’s instructions. This step minimizes potential leaks and ensures the flushing solution flows efficiently through the system.
Getting a coolant flush kit is a great way to keep your car running smoothly. While you’re working on that, why not try making a natural insect repellent? A simple lavender-based recipe, like the one in Make a Lavender Insect Repellent , is a fun DIY project. It’s a nice distraction from the more mechanical tasks involved in the coolant flush kit install and will leave you feeling refreshed and ready to tackle the job at hand.
Circulating the Flushing Solution
Once the kit is installed, the next step involves circulating the flushing solution through the coolant system. This process removes contaminants and debris from the engine’s cooling passages. A proper circulation ensures complete removal of old coolant, rust, and other contaminants, preparing the system for the fresh coolant.
Step-by-Step Guide for Flushing the Coolant System
This detailed procedure Artikels the steps for a complete coolant system flush:
- Prepare the Vehicle: Park the vehicle on a level surface and engage the parking brake. Disconnect the negative terminal of the battery to prevent accidental electrical shocks. Position a drain pan under the vehicle’s radiator drain plug to catch the old coolant.
- Drain the Old Coolant: Locate the radiator drain plug and carefully remove it. Allow the old coolant to drain completely into the pan. This step is critical to remove all the old coolant, preventing the mixture of old and new coolant.
- Install the Coolant Flush Kit: Carefully connect all the hoses and components of the coolant flush kit according to the manufacturer’s instructions. Ensure all connections are secure and leak-proof.
- Fill with Flushing Solution: Fill the flushing solution reservoir with the appropriate flushing solution. Follow the manufacturer’s instructions for the correct mixture ratio.
- Circulate the Solution: Turn the engine on and allow the flushing solution to circulate through the system for the recommended time, typically as per the manufacturer’s instructions. This allows the solution to thoroughly clean the system.
- Drain the Flushing Solution: Once the circulation time is complete, shut off the engine and carefully drain the flushing solution into the drain pan. This step removes the flushing solution, preparing the system for fresh coolant.
- Inspect for Leaks: Thoroughly inspect all connections and components for leaks. Tighten any loose connections. Addressing any leaks is vital for a functioning coolant system.
- Replace Coolant System Components (if necessary): If any components, like the radiator or water pump, show signs of damage or excessive corrosion, replace them before proceeding. This is critical for maintaining the integrity of the coolant system and preventing future issues.
- Fill with Fresh Coolant: Once the system is leak-free, refill the coolant reservoir with the recommended type of coolant. Be sure to use the correct coolant, considering your vehicle’s specific requirements. Consult your vehicle’s owner’s manual for the appropriate coolant specifications.
- Top-up and Test: Check the coolant level and top it up as needed. Start the engine and let it run for a few minutes, checking for leaks or unusual noises. Check the temperature gauge to ensure the engine is cooling correctly.
- Final Checks: Once the engine has reached operating temperature, check the coolant level again. If necessary, top up to the appropriate level. Perform a final leak check before returning the vehicle to normal use. This final step ensures that the coolant system is fully functional and free of leaks.
Replacing All Coolant System Components
Replacing all coolant system components is a comprehensive approach that ensures a completely clean and functional system. This includes the radiator, water pump, hoses, and other components. Replacing damaged or corroded parts is vital to prevent future leaks, overheating, and system failures. Proper component replacement involves carefully following manufacturer’s instructions and using high-quality replacement parts. This approach assures the coolant system’s integrity and reliability for extended periods.
Post-Flush Procedures and Maintenance
Completing a coolant flush is just half the battle. Proper refilling, leak checks, and pressure testing are crucial to ensure your engine’s longevity and optimal performance. These post-flush steps prevent potential problems and guarantee a successful coolant system rejuvenation.The coolant system, a vital part of your engine’s cooling mechanism, must be meticulously maintained to prevent overheating and other severe issues.
This involves more than just flushing; it encompasses a series of procedures to guarantee the system is fully functional and safe.
Refilling the Coolant System
Before adding fresh coolant, ensure the engine is cool to the touch. Incorrect handling of hot components can lead to severe burns. Carefully remove the coolant reservoir cap and add the prescribed amount of new coolant, following the manufacturer’s recommendations. The coolant reservoir level should be checked with the engine cold. Using a funnel can make the process more convenient and less messy.
Avoid overfilling the reservoir, as this can lead to coolant leakage.
Checking for Leaks
Thoroughly inspect the entire cooling system for leaks after the refilling process. Leaks can stem from various points, including hoses, gaskets, and the radiator itself. Look for any signs of coolant dripping, puddles, or unusual dampness around these components. A visual inspection is the first step. If a leak is detected, address it immediately to prevent further damage and loss of coolant.
Repairing a leak as soon as possible prevents additional issues and ensures the cooling system functions properly.
Testing the Coolant System’s Pressure
Testing coolant system pressure is essential to confirm the system’s integrity and identify potential leaks that may have been missed. A pressure test will identify any potential leaks before they cause major problems. This process ensures the system can withstand pressure fluctuations during operation. Use the appropriate pressure testing equipment and follow the manufacturer’s instructions carefully to avoid any damage to the system.
Coolant Type Comparison
| Coolant Type | Properties | Suitability |
|---|---|---|
| OAT (Organic Acid Technology) | Excellent corrosion protection, long life, environmentally friendly. | Suitable for most modern vehicles. |
| HOAT (Hybrid Organic Acid Technology) | Excellent corrosion protection, long life, and good environmental performance. | Suitable for modern and older vehicles, often preferred for long-term protection. |
| Ethylene Glycol-based | Good corrosion protection, affordable. | Suitable for older vehicles or applications where cost is a primary concern. |
| Propylene Glycol-based | Non-toxic, environmentally friendly, often less corrosive. | Suitable for vehicles where environmental impact is prioritized or where toxicity is a concern. |
Different coolant types offer varying levels of protection and environmental friendliness. Choosing the correct type is vital for optimal engine performance and longevity.
Coolant System Pressure Test Procedure
A proper pressure test is crucial to ensure the coolant system’s integrity.
- Prepare the coolant system by ensuring it’s filled to the proper level.
- Use a pressure gauge and a pressure source (often a specialized pressure tester).
- Slowly increase the pressure to the specified pressure level.
- Monitor the pressure gauge and look for any signs of pressure loss, which can indicate a leak.
- Hold the pressure for a designated time to allow for a comprehensive check.
- Slowly release the pressure and examine the system for any leaks.
- If any leaks are found, address them immediately. Leaks can be from various points in the system.
Following these steps ensures a thorough and accurate pressure test, guaranteeing the cooling system’s integrity and preventing potential issues down the road.
Troubleshooting Common Issues
Coolant flushes, while generally straightforward, can sometimes encounter unexpected hiccups. Understanding potential problems and their solutions is crucial for a successful and safe procedure. This section will delve into common issues, their causes, and how to diagnose and fix them, ensuring a smooth and efficient flushing process.Troubleshooting during a coolant flush often involves identifying and addressing specific problems as they arise.
A systematic approach, combined with careful observation and attention to detail, can prevent minor issues from escalating into major complications.
Potential Problems During the Coolant Flush Process
Identifying potential problems early on can prevent more serious issues. Common problems include leaks, inadequate flushing, and difficulties with draining the old coolant.
- Coolant Leaks: A crucial aspect of troubleshooting is promptly identifying and addressing leaks. These leaks can stem from various sources, including loose connections, damaged hoses, or faulty seals. Identifying the source of the leak is vital for effective repair. Failure to address leaks immediately can lead to significant coolant loss and potential engine damage.
- Insufficient Flushing: Incomplete flushing can result in residual contaminants remaining in the cooling system. This can lead to corrosion, reduced efficiency, and the need for a second or even third flush. A visual inspection of the drained coolant can reveal if the flushing process was thorough enough. If particles or discoloration persist, further flushing might be necessary.
- Difficulty Draining the Old Coolant: If the old coolant is proving difficult to drain, it could be due to a blockage in the drain lines, or a problem with the coolant itself. In some cases, the coolant might be unusually viscous, making drainage challenging. Checking the drain lines for blockages and the coolant’s consistency can help determine the source of the problem.
Diagnosing and Fixing Coolant Leaks
Identifying and fixing coolant leaks promptly is essential to prevent significant cooling system damage.
- Visual Inspection: A thorough visual inspection of the cooling system components, including hoses, connections, and the radiator, is the first step in locating leaks. Pay close attention to areas where coolant is likely to pool or drip.
- Pressure Testing: Using a pressure tester to identify leaks is a crucial step, as it pinpoints subtle leaks that might not be evident during a visual inspection. This test involves pressurizing the cooling system and carefully monitoring for pressure loss. The point where pressure drops rapidly indicates the leak’s location.
- Repairing the Leak: Once the leak’s source is identified, the appropriate repair method should be employed. This might involve tightening loose connections, replacing damaged hoses or gaskets, or repairing corroded components.
Troubleshooting Table
This table summarizes potential problems, their causes, and suggested solutions.
| Problem | Cause | Solution |
|---|---|---|
| Coolant Leaks | Loose connections, damaged hoses, faulty seals, cracked radiator | Tighten connections, replace damaged parts, repair cracks, or replace the radiator |
| Insufficient Flushing | Blockages in drain lines, inadequate pressure, or viscous coolant | Ensure drain lines are clear, increase pressure if necessary, or use a specialized flushing solution |
| Difficulty Draining Coolant | Blocked drain lines, thick or viscous coolant | Clear drain lines, thin out coolant if necessary, or use specialized tools |
Maintaining a Healthy Coolant System
")
Keeping your vehicle’s cooling system in top shape is crucial for its longevity and performance. A properly functioning cooling system prevents overheating, which can lead to significant engine damage. Regular maintenance, including coolant flushes and replacements, plays a vital role in maintaining this critical system.A well-maintained coolant system ensures consistent engine temperature, optimizing fuel efficiency and prolonging the lifespan of engine components.
Ignoring these crucial maintenance steps can lead to costly repairs down the road. Let’s explore the key aspects of maintaining a healthy coolant system.
Regular Coolant Maintenance Recommendations
Regular maintenance of your coolant system is essential for optimal performance and prevents potential issues. Routine checks and procedures are vital to ensure your vehicle’s engine operates at the correct temperature. This involves inspecting the coolant level, checking for leaks, and ensuring the correct coolant type is used.
- Regular Coolant Level Checks: Checking the coolant level in the reservoir is a simple but vital maintenance task. Low coolant levels can lead to overheating, so it’s crucial to maintain the proper level to avoid this problem.
- Visual Inspection for Leaks: Regularly inspect the coolant system for leaks, paying attention to hoses, gaskets, and the radiator. Early detection of leaks is key to preventing major coolant loss and potential engine damage.
- Coolant Flush Frequency: Following a recommended schedule for coolant flushes is crucial for maintaining a healthy coolant system. This helps remove contaminants and ensure optimal cooling efficiency.
Coolant Flush Frequency and Replacement
The frequency of coolant flushes depends on several factors, including the type of vehicle and driving conditions. Regular flushes are necessary to remove contaminants that can build up over time and hinder the cooling system’s effectiveness.
- Frequency: The recommended frequency for coolant flushes typically ranges from every 30,000 to 100,000 miles, or annually. However, this is just a guideline, and your specific vehicle’s maintenance schedule might recommend different intervals. Consult your owner’s manual for precise recommendations.
- Replacement Intervals: Coolant should be replaced in accordance with your vehicle’s manufacturer recommendations, generally at intervals of 30,000 to 100,000 miles, or annually. This ensures the coolant’s effectiveness in preventing overheating and maintaining optimal engine temperature.
Monitoring Coolant Levels
Monitoring coolant levels is a simple but crucial part of preventative maintenance. Low coolant levels can lead to serious engine damage, making regular checks essential.
- Regular Checks: Regularly check the coolant level in the reservoir. The level should be within the specified range indicated on the reservoir. Adding coolant when needed ensures the system operates efficiently.
- Recognizing Signs of Low Coolant: Pay attention to signs of low coolant, such as a low level in the reservoir or visible leaks. Prompt action is necessary to avoid overheating issues and engine damage.
Using the Correct Coolant Type
Using the correct coolant type is critical for maintaining a healthy cooling system. Incorrect coolant can lead to corrosion and damage to engine components.
- Matching Coolant to Vehicle: Always use the coolant type specified by your vehicle manufacturer. This ensures compatibility and prevents potential damage to the cooling system.
- Importance of Coolant Compatibility: Using the correct coolant type is essential for maintaining the cooling system’s efficiency and longevity. Incompatible coolants can cause corrosion and damage, which can lead to costly repairs.
Recommended Coolant Flush Intervals
The table below provides a general guideline for coolant flush intervals based on vehicle type and driving conditions. These are estimations and specific recommendations should be obtained from your vehicle’s owner’s manual.
| Vehicle Type | Driving Conditions | Recommended Coolant Flush Interval (miles/years) |
|---|---|---|
| Cars (Normal Driving) | Moderate driving conditions | 30,000 – 50,000 miles / 3-5 years |
| Trucks (Heavy Driving) | Heavy-duty driving, towing, or frequent idling | 20,000 – 40,000 miles / 2-4 years |
| Vehicles in Harsh Climates | High temperatures, frequent freeze/thaw cycles | 15,000 – 30,000 miles / 1.5-3 years |
Outcome Summary

In conclusion, installing a coolant flush kit is a vital maintenance task for any vehicle owner. Following the detailed steps Artikeld in this guide will ensure a safe and effective flush, protecting your engine and preventing costly repairs. Remember to prioritize safety, carefully select the correct kit, and dispose of old coolant responsibly. A well-maintained coolant system contributes significantly to the overall health and longevity of your car.
Now you’re equipped to tackle this essential maintenance job!