Clear Clogged Windshield Washers is a comprehensive guide to tackling a common car problem. Frozen washer fluid, mineral deposits, or debris can lead to frustratingly clogged nozzles, making your windshield cleaning efforts ineffective. This guide will walk you through identifying the problem, troubleshooting various causes, implementing preventative measures, and even exploring DIY solutions for a quick fix. We’ll also cover when professional help is necessary and how to select a reliable auto repair shop.
From understanding the different types of clogs that can occur to comparing various windshield washer fluid types, this guide offers practical advice to keep your windshield clean and your car functioning optimally. Whether you’re facing a minor blockage or a more serious issue, we’ve got you covered with actionable steps and helpful insights. Learn to recognize the symptoms, understand the causes, and discover effective solutions for a squeaky-clean windshield.
Problem Identification

A clogged windshield washer system can be a frustrating and sometimes costly problem for drivers. It can lead to ineffective cleaning, potential damage to the system, and even safety concerns if visibility is compromised. Understanding the causes, symptoms, and potential damage associated with these clogs is crucial for preventing costly repairs and ensuring clear driving conditions.Identifying the specific issue and its severity is vital to take the appropriate action.
Prompt attention to these problems can save time and money, avoiding significant damage that may require extensive repairs. Addressing clogs early in their development can prevent more significant problems from arising.
Common Causes of Clogged Systems
Mineral deposits, especially in hard water areas, are a significant contributor to clogs. Over time, minerals in the water can accumulate and harden inside the washer fluid reservoir, lines, and nozzles, obstructing the flow of washer fluid. Foreign debris, such as leaves, insects, or small stones, can also become lodged in the system, creating blockages. Poor quality washer fluid, lacking the proper additives to prevent clogging, can contribute to the issue.
Symptoms of Clogged Washer Fluid Nozzles
A lack of washer fluid spray or a weak spray, which is insufficient for effective cleaning, is a common sign of a clogged nozzle. Intermittent spraying, where the washer fluid sprays inconsistently, may also indicate a clog. Noisy spraying, such as gurgling or sputtering sounds, often accompanies blockages. A significant reduction in the range or overall coverage of the washer fluid spray is another noticeable symptom.
These symptoms can vary in severity and frequency depending on the extent of the clog.
Clearing clogged windshield washers is a surprisingly satisfying task, especially on a dreary day. It’s a simple fix, but a crucial one for safe driving, and often the first step in getting your car ready for a journey. Thinking about how a real-life spy like the remarkable individuals featured on black widow real life spy might have needed precise tools for covert operations, I can’t help but wonder if they had equally effective solutions for their own vehicles.
Back to my clogged washer fluid, a quick flush and a fresh bottle of solution will have me driving clear and ready for any adventure.
Potential Damage from Ignoring Clogged Systems
Ignoring a clogged washer fluid system can lead to a complete blockage, preventing the use of the windshield washer system altogether. This can be particularly problematic in inclement weather conditions or during periods of heavy traffic. Continued use with a clog can cause damage to the pump, resulting in costly repairs. The pump may overheat or malfunction if forced to operate against a blockage.
Repeated spraying against clogs can also lead to corrosion within the system, potentially causing further damage over time.
Types of Clogs
Clogs can manifest in various forms. Mineral deposits, often found in areas with hard water, form a hard crust that can obstruct the flow. Decomposed organic matter, like leaves or plant debris, can also accumulate, blocking the nozzle. Insects, small stones, and other foreign objects can get lodged in the system, creating a blockage.
Frequency of Clogged Washer Fluid Issues
The frequency of clogged washer fluid issues varies geographically. Areas with hard water tend to experience clogs more frequently than those with soft water. Regions with harsh winters or significant amounts of debris in the air may also see more clogs.
Effectiveness of Different Washer Fluid Types
The effectiveness of different washer fluid types in preventing clogs varies. Formulations with specific additives to prevent mineral buildup and debris adhesion may be more effective in reducing clogging compared to standard fluids. The presence of corrosion inhibitors in the fluid can help protect the system from rust and mineral deposits. The use of higher-quality washer fluid may be a preventative measure.
Comparison of Symptoms, Causes, and Potential Damage
| Symptom | Cause | Potential Damage |
|---|---|---|
| Weak or no spray | Mineral deposits, debris, foreign objects | Pump damage, system corrosion, complete blockage |
| Intermittent spraying | Partially blocked nozzles or lines | Ineffective cleaning, potential pump damage |
| Noisy spraying (gurgling, sputtering) | Obstructions in the system | Pump damage, reduced efficiency, increased wear |
| Reduced spray range | Clogged nozzles, restricted flow | Ineffective cleaning, potential for pump damage |
Troubleshooting Methods
Unclogging your windshield washer system can be a straightforward task if you know the right methods. This section dives into various troubleshooting techniques, guiding you through identifying the blockage and safely removing it. We’ll explore several methods, from simple visual inspections to more involved disassembly procedures. By understanding these methods, you can effectively resolve the issue without causing further damage.
Visual Inspection and Preliminary Diagnosis
A thorough visual inspection is the first step in diagnosing a clogged washer system. Look for any obvious obstructions in the washer fluid reservoir, the spray nozzles, or the tubing. This preliminary check can often pinpoint the location of the blockage. If the reservoir is dirty, consider replacing the reservoir with a clean one. If the nozzles are visibly blocked, try using compressed air or a small brush to dislodge debris.
If these methods are ineffective, move on to more involved procedures.
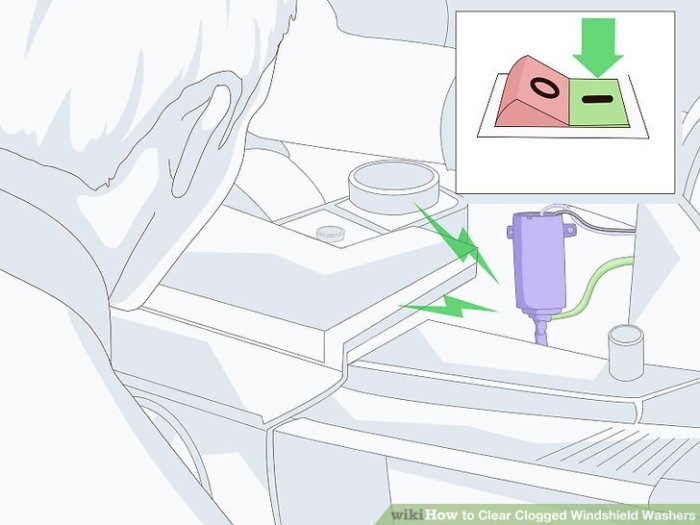
Unclogging a Washer Fluid Nozzle
This step-by-step procedure details how to unclog a washer fluid nozzle safely. Proper technique is crucial to avoid damaging the nozzle or the surrounding components.
- Isolate the Nozzle: Identify the nozzle that is blocked. If possible, disconnect the washer fluid hose from the nozzle to isolate the nozzle for easier access.
- Use a Small Brush or Compressed Air: Carefully insert a small, soft-bristled brush (like a toothbrush) or a can of compressed air into the nozzle opening. Gently scrub or blow away any debris that might be lodged inside. Avoid using abrasive materials or excessive force, which could damage the nozzle.
- Flush the Nozzle: Once you’ve removed visible debris, flush the nozzle with fresh washer fluid. This helps to clear out any remaining particles and ensures the nozzle is ready for use.
- Reassemble and Test: Reconnect the washer fluid hose to the nozzle. Activate the washer system to verify that the nozzle is spraying properly. If the problem persists, move on to more advanced troubleshooting steps.
Tools and Materials Required
The following tools and materials are essential for safely unclogging a washer nozzle:
- Soft-bristled brush (e.g., toothbrush)
- Compressed air can
- Fresh washer fluid
- Gloves (to protect your hands)
- Small container to collect debris (optional)
Safe Disassembling Techniques
Disassembling the washer system requires careful handling to avoid damaging the parts. Before beginning any disassembly, ensure the washer fluid reservoir is empty.
- Disconnect the Hose: Disconnect the washer fluid hose from the nozzle and the reservoir.
- Inspect for Obstructions: Carefully examine the hoses and nozzles for any visible blockages or debris.
- Use Cleaning Solutions (with Caution): If necessary, use a mild cleaning solution to remove stubborn clogs. Always test a small area first to ensure it doesn’t damage the plastic parts.
- Reassemble: Follow the reverse order of disassembly, ensuring all connections are secure.
Troubleshooting Steps and Solutions
The following table summarizes different troubleshooting steps and their corresponding solutions:
| Troubleshooting Step | Solution |
|---|---|
| Nozzle blocked with debris | Use a soft brush or compressed air to dislodge debris. Flush with fresh washer fluid. |
| Hose blocked with debris | Carefully disconnect the hose. Use a brush or compressed air to remove the obstruction. Flush with fresh washer fluid. |
| Reservoir blocked | Empty and clean the reservoir. Replace with a clean reservoir if necessary. |
| Nozzle spraying inconsistently | Inspect the nozzle and hose connections. Ensure all connections are tight and secure. |
Prevention Strategies
Keeping your windshield washer system in top condition is crucial for safe driving, especially during challenging weather. Preventing clogs saves you time, money, and frustration. This section details essential preventative measures and highlights the importance of proactive maintenance.Preventing clogs in your windshield washer system is not just about avoiding a frustrating breakdown, it’s about maintaining visibility and safety on the road.
By understanding how to choose the right fluid, maintain optimal levels, and perform regular checks, you can ensure your washer system operates smoothly and reliably, even in the harshest conditions.
Choosing the Right Washer Fluid
Selecting the appropriate washer fluid is critical for preventing clogs and ensuring optimal performance. Different climates require different formulations. For instance, winter formulations often contain antifreeze to prevent freezing, while summer formulations might focus on dissolving road grime and salt buildup. Consider your region’s typical weather patterns when making your choice.
Clearing clogged windshield washers is a surprisingly satisfying chore, especially when the weather’s turning nasty. Speaking of satisfying, I just heard the news that Jim Jarmusch’s Ghost Dog: The Way of the Samurai is getting a Criterion Collection release! This is huge news for film buffs , and hopefully, it’ll motivate me to finally get that car’s washer fluid flowing smoothly again.
Now, where did I put that bottle of windshield washer fluid?
Importance of Regular Maintenance Checks
Regular checks are essential for maintaining optimal washer system performance. Inspect the washer fluid reservoir regularly to ensure adequate levels and for signs of contamination or discoloration. This proactive approach can identify potential issues before they lead to serious problems, such as clogs. Checking the washer fluid regularly helps ensure the system remains efficient and safe to operate.
Comparison of Washer Fluid Brands
Various brands offer washer fluids with varying formulations. While price points and marketing strategies can differ, the effectiveness in preventing clogs and dissolving road debris often varies. Some brands are known for their ability to handle a wider range of temperatures and contaminants, while others excel in specific applications. A quick online search can help you find reviews and comparisons of different brands.
Maintaining Optimal Fluid Levels
Maintaining proper washer fluid levels is crucial. Adequate fluid ensures proper operation of the washer system, preventing clogs and maximizing cleaning effectiveness. Low fluid levels can lead to a system that struggles to perform, potentially causing clogs and reduced visibility. A simple visual check of the reservoir can prevent this problem.
Preventative Measures and Benefits
| Preventative Measure | Associated Benefit |
|---|---|
| Regular fluid checks | Early detection of contamination, low levels, or discoloration. |
| Use appropriate fluid for your climate | Prevent freezing in winter and ensure effectiveness in dissolving grime in summer. |
| Regular maintenance checks | Identify potential clogs or other issues early, saving you from costly repairs and lost time. |
| Proper fluid level maintenance | Optimal system operation, ensuring efficient cleaning and preventing clogging. |
| Consider different brands | Assess effectiveness and find a formula that best suits your needs. |
DIY Solutions and Remedies
Sometimes, tackling a clogged windshield washer system yourself can save you a trip to the mechanic and some serious cash. This section dives into simple, effective DIY methods for unclogging your washer system, offering alternative solutions and homemade remedies to get your windshield sparkling clean again.Understanding the causes of clogs is crucial to choosing the right DIY approach. From mineral deposits to frozen water, various culprits can lead to a sluggish or completely blocked washer system.
The solutions presented here target these common issues.
Simple Flushing Techniques
A straightforward approach to unclogging your windshield washer system involves a thorough flushing process. This method is particularly effective for removing loose debris and minor clogs. Fill the reservoir with a mixture of distilled water and a mild, non-abrasive cleaner, like a diluted solution of dish soap. Run the washer fluid pump a few times to circulate the solution.
Repeat this process several times to remove any sediment. If the clog persists, consider more aggressive methods.
Using Vinegar and Water
Vinegar’s acidity can dissolve mineral deposits and other buildup in the system. Combine equal parts white vinegar and distilled water in the reservoir. Run the washer fluid pump several times to distribute the solution throughout the system. Let it sit for a few minutes before flushing thoroughly with plain distilled water. Repeat this process if necessary.
This method is especially useful for hard water areas where mineral deposits are common.
Using Baking Soda and Water
Baking soda’s mild abrasive properties can help loosen clogs. Dissolve a tablespoon of baking soda in a cup of distilled water. Pour this mixture into the reservoir and run the washer pump to circulate it. Allow it to sit for a few minutes before flushing thoroughly with water. This is an effective alternative for those seeking a non-acidic solution.
Table of DIY Solutions, Clear Clogged Windshield Washers
| Problem | DIY Solution | Materials Required |
|---|---|---|
| Minor clogs, debris | Simple Flushing | Distilled water, mild non-abrasive cleaner (like dish soap) |
| Mineral deposits | Vinegar and Water Solution | White vinegar, distilled water |
| Loose clogs | Baking Soda and Water Solution | Baking soda, distilled water |
Professional Assistance
Sometimes, even with DIY troubleshooting, your windshield washer system might need a more expert hand. Knowing when to call in the professionals can save you time and potential damage to your vehicle. This section details when professional help is necessary, where to find qualified technicians, and the costs involved.
When Professional Help is Necessary
Professional assistance is recommended for complex or recurring issues that DIY methods can’t resolve. This includes scenarios where you suspect internal damage to the washer pump, lines, or valves. If you encounter significant resistance when attempting repairs, or if you’re uncomfortable working on intricate mechanical components, a professional mechanic is the best course of action. Also, if you’ve already tried multiple troubleshooting steps and the problem persists, seeking professional diagnosis is crucial.
Finding Qualified Repair Technicians
Finding a reliable mechanic for your vehicle is essential. Start by asking for recommendations from friends, family, or colleagues who have had positive experiences. Online review platforms, such as Yelp or Google My Business, can also be helpful tools for researching local repair shops. Look for shops with certified technicians and experience working on your vehicle’s make and model.
Check if the shop is properly licensed and insured, as this adds an extra layer of safety and accountability.
Costs Associated with Professional Repair Services
The cost of professional windshield washer repair varies based on the complexity of the issue and the location. Labor costs can range from $50 to $150 per hour, and parts can add significantly to the total bill. A simple nozzle replacement might cost around $25-$50, while a pump replacement could range from $100 to $300 or more. It’s crucial to get an estimate from several shops before committing to a repair.
Having clear clogged windshield washers is crucial for visibility, especially in tough driving conditions. Sometimes, the seemingly small problem of a clogged washer system can be a real pain. You might even feel like the ‘destruction unit’ has gotten the upper hand, destruction unit the upper hand , on your car’s cleaning system. But don’t worry, a quick flush and a bit of elbow grease usually gets you back on track to clear those clogged lines and enjoy a clean, streak-free windshield again.
Tips for Selecting a Reputable Auto Repair Shop
Choosing a trustworthy repair shop is critical. Look for shops with transparent pricing policies and detailed estimates. Ask about the mechanic’s experience with your specific vehicle make and model. A reputable shop will clearly Artikel the proposed repairs, including any potential additional issues they identify during the diagnosis. Ensure they have readily available repair manuals and service records for your specific vehicle.
Potential Problems Requiring Professional Help
Troubleshooting issues often require professional help. A systematic approach is essential to determine the best course of action. Here’s a list of potential problems that necessitate professional intervention.
- Malfunctioning pump: A faulty pump is often the source of recurring washer fluid issues. This could be due to a damaged motor, clogged impeller, or electrical problems.
- Clogged lines and nozzles: If the issue is beyond simple cleaning, a professional can diagnose the cause of the blockage, potentially using specialized tools or equipment.
- Leaks: A leak in the system can result in fluid loss and inefficient operation. Professional diagnosis can pinpoint the source of the leak, whether it’s a damaged hose, a faulty connection, or a problem with the reservoir.
- Electrical problems: Electrical issues can cause the washer system to not function correctly. A professional mechanic can diagnose the electrical problems and repair or replace faulty components.
- Internal damage: If the problem is extensive or involves internal components like the pump or valves, it’s best to rely on a professional mechanic.
Potential Problems and Estimated Costs
This table provides a general overview of common windshield washer problems and associated costs for professional assistance. These estimates are approximate and may vary depending on the specific situation.
| Problem | Professional Assistance Needed | Estimated Cost |
|---|---|---|
| Faulty pump | Pump replacement and system diagnostics | $150 – $400 |
| Clogged lines | Line cleaning and system flush | $75 – $150 |
| Nozzle blockage | Nozzle replacement and system flush | $25 – $75 |
| Electrical issues | Electrical system diagnosis and repair | $100 – $300 |
| Leak in the system | Leak detection and repair | $75 – $200 |
Vehicle-Specific Information: Clear Clogged Windshield Washers

Knowing your car’s specific washer fluid system is crucial for effective maintenance and troubleshooting. Different vehicle models, even within the same make, can have varying designs. This impacts everything from fluid capacity to the type of nozzles used. Understanding these nuances allows you to address potential issues correctly and avoid costly mistakes.Vehicle manufacturers often tailor their washer fluid systems to specific needs and design constraints.
This means that what works for one car might not work for another. This section delves into the importance of consulting your owner’s manual, explores potential variations in components, and contrasts older and newer designs, providing you with a more comprehensive understanding of your vehicle’s system.
Variations in Washer Fluid System Designs
Different car models employ various designs for their washer fluid systems. This can include variations in the size and type of reservoir, the placement of the nozzles, and the pump mechanism. Older vehicles might have simpler designs with smaller reservoirs and fewer features, while newer models often feature advanced features like heated washer nozzles or integrated automatic fluid level sensors.
Importance of Consulting Vehicle Owner’s Manuals
Vehicle owner’s manuals provide detailed information tailored to each specific model. These manuals are invaluable resources, outlining the proper procedures, component details, and specific recommendations for your car’s washer fluid system. They are the definitive source for understanding the correct fluid type, recommended maintenance schedules, and any unique system characteristics. Referencing your owner’s manual ensures you adhere to the manufacturer’s specifications and maintain your vehicle’s optimal performance.
Potential Variations in Washer Fluid System Components
Several components within the washer fluid system can differ across vehicle models. These include the reservoir capacity, nozzle design, pump type, and the specific wiring or electrical connections. For instance, some cars use a more powerful pump for improved spray coverage, while others might have a different nozzle design for a targeted spray pattern. Understanding these variations allows for accurate identification of potential problems and appropriate solutions.
Comparison of Washer Fluid System Design Differences Between Older and Newer Vehicles
Older vehicles often have simpler washer fluid systems with smaller reservoirs and less advanced components. Nozzles are typically less sophisticated and may not offer the same spray pattern or reach as newer models. Newer vehicles often feature larger reservoirs, more powerful pumps, heated washer nozzles, and integrated sensors for fluid levels. These enhancements can lead to more efficient cleaning and improved winter performance.
Specialized Tools Needed for Some Vehicle Models
Some vehicles may require specialized tools for accessing or servicing the washer fluid system. For instance, some cars may require specific tools to remove or replace the reservoir, pump, or nozzles. Knowing these requirements can help prevent damage to the vehicle and ensure proper maintenance. Checking your owner’s manual for specific tool requirements is vital.
Table Comparing Washer Fluid System Designs
| Car Make & Model | Reservoir Capacity (Liters) | Nozzle Type | Pump Type | Unique Features |
|---|---|---|---|---|
| Toyota Camry (2020) | 0.6 | Standard Jet | Electric | Heated washer nozzles |
| Honda Civic (2015) | 0.5 | Standard Jet | Electric | None |
| Ford F-150 (2010) | 0.7 | Standard Jet | Electric | None |
Note: This table provides a simplified comparison. Actual specifications may vary based on trim level and specific year of manufacture. Consult your vehicle’s owner’s manual for precise details.
Safety Precautions
Working on your car, even a seemingly simple task like checking or replacing windshield washer fluid, involves potential hazards. Ignoring safety precautions can lead to injuries, property damage, or even environmental contamination. This section Artikels crucial safety measures to ensure a safe and successful DIY repair or maintenance procedure.Proper safety measures are paramount when dealing with automobiles. Understanding the potential risks and implementing the necessary precautions can significantly reduce the chances of accidents and injuries.
Following these guidelines ensures a smooth and safe experience for yourself and others.
Vehicle Safety Guidelines
Safeguarding yourself and your surroundings is paramount when working on your vehicle. This involves adhering to established safety protocols to minimize risks associated with vehicle maintenance. Here’s a breakdown of crucial guidelines.
- Secure the Vehicle: Park the vehicle on a level surface, engage the parking brake, and use wheel chocks to prevent accidental movement. This prevents the car from rolling unexpectedly, especially if you’re working under it. This prevents potential injuries from a sudden movement of the vehicle.
- Ventilation: Ensure adequate ventilation in the work area, particularly when using cleaning agents or working under the hood. Open windows or use a fan to prevent the buildup of fumes, which can be hazardous to your health.
- Clear the Area: Remove any obstructions or clutter from the work area to maintain a clear and unobstructed space. This prevents tripping hazards and keeps the workspace organized.
Cleaning Agent Safety
Using cleaning agents for vehicle maintenance, while essential, requires careful handling to prevent potential hazards.
- Read Labels Carefully: Always read the labels of cleaning agents to understand the potential risks, safety precautions, and instructions for proper use. Follow all manufacturer’s guidelines precisely. This includes the required protective gear for each specific product.
- Proper Storage: Store cleaning agents in designated areas, away from children and pets, and out of direct sunlight to maintain their potency and prevent unintended exposure.
- Ventilation and Gloves: Use proper ventilation and protective gloves when handling cleaning agents to minimize skin contact and inhalation of harmful fumes. This is especially important when using strong chemicals or concentrated solutions.
Handwashing Protocol
Maintaining proper hygiene after working on your vehicle is crucial for preventing contamination and potential health risks.
- Thorough Handwashing: Wash your hands thoroughly with soap and water immediately after working on the vehicle, especially after handling cleaning agents. This helps remove contaminants and prevents the spread of germs.
Hazards of Washer Fluid System
The washer fluid system, while seemingly simple, can present certain hazards if not handled with care.
- Chemical Burns: Washer fluid, especially concentrated solutions, can cause chemical burns if it comes into contact with skin or eyes. Always wear protective eyewear and gloves.
- Eye Protection: Always wear safety glasses or goggles when working on the washer fluid system to protect your eyes from splashing fluid.
- Fluid Leaks: Be cautious of potential leaks in the washer fluid system. A leak could create a slippery surface or introduce the fluid into the environment.
Protective Gear
Appropriate protective gear is essential to safeguard yourself against potential hazards during vehicle maintenance.
- Eye Protection: Wear safety glasses or goggles to protect your eyes from splashes of fluid, debris, or chemicals.
- Gloves: Wear appropriate gloves to protect your hands from contact with cleaning agents, chemicals, and fluids. The type of glove should match the specific cleaning agent.
- Long Sleeves and Pants: Wear long sleeves and pants to protect your skin from potential chemical exposure or abrasions.
Safety Precautions Table
| Safety Precaution | Description | Importance |
|---|---|---|
| Secure the vehicle | Park on a level surface, engage the parking brake, and use wheel chocks. | Prevents accidental movement and potential injury. |
| Proper Ventilation | Ensure adequate airflow in the work area. | Reduces exposure to harmful fumes and chemicals. |
| Thorough Handwashing | Wash hands immediately after handling fluids or chemicals. | Prevents contamination and potential health risks. |
| Eye Protection | Wear safety glasses or goggles. | Protects eyes from splashes of fluids, debris, and chemicals. |
| Protective Gloves | Wear appropriate gloves when handling chemicals or fluids. | Protects hands from chemical exposure and contamination. |
Final Wrap-Up
In conclusion, dealing with clogged windshield washers is a manageable task with the right knowledge and tools. By understanding the causes, symptoms, and prevention strategies, you can keep your washer system functioning smoothly. This guide has explored everything from DIY fixes to professional assistance, ensuring you’re well-equipped to tackle this common car problem. Armed with this information, you’ll be ready to maintain a clean windshield, no matter the weather or the clog.