Replace the Line on a Black and Decker Trimmer – Replacing the Line on a Black and Decker Trimmer is a straightforward process, but knowing the right steps can save you time and frustration. This guide provides a comprehensive overview, covering everything from understanding your trimmer to troubleshooting common issues and maintaining it for optimal performance.
This guide will walk you through the entire process of replacing the line on a Black and Decker trimmer, from preparing the tools to securing the new line. We’ll cover various Black and Decker trimmer models and provide clear, step-by-step instructions with helpful visuals. Safety precautions are also emphasized throughout to ensure a safe and successful line replacement.
Understanding the Black and Decker Trimmer
Black and Decker trimmers are popular for their affordability and effectiveness in maintaining lawns and gardens. Understanding the different types, parts, and maintenance procedures is key to getting the most out of your trimmer. This guide delves into the specifics of Black and Decker trimmers, ensuring you have the knowledge to select the right one and maintain it properly.A Black and Decker trimmer, in its most basic form, is a handheld power tool designed for cutting grass, weeds, and other vegetation.
They vary significantly in design, power, and features. Different models cater to various needs and preferences, offering a wide range of options for users.
Types of Black and Decker Trimmers
Black and Decker offers a variety of trimmer models, each with its own strengths and weaknesses. Understanding the different types helps you choose the most suitable trimmer for your needs.
- Electric Trimmers: These rely on an electric motor powered by a standard electrical outlet. They are generally quieter and easier to use than other types, but their range is limited by the cord.
- String Trimmers: Also known as rotary or reel trimmers, these use rotating blades to cut the grass. They are usually more powerful than electric models and offer greater maneuverability.
- Cordless Trimmers: These trimmers offer greater freedom of movement as they are powered by rechargeable batteries. They balance power and maneuverability, but battery life and charging times vary between models.
Parts of a Black and Decker Trimmer
Knowing the parts of your trimmer is crucial for proper maintenance and troubleshooting.
- Cutting Line: The most important part, it is the element that directly cuts the grass or weeds. Different types and sizes are required for different models.
- Housing: The outer shell, typically made of plastic or metal, protects the internal components and provides a handle for grip.
- Motor: The engine that powers the cutting mechanism, whether electric, gas, or battery-operated.
- Blade or Rotating Head: The part responsible for the actual cutting. This is found in reel trimmers, where rotating blades cut the grass.
- Handle: Provides control and balance when using the trimmer. Some models have adjustable handles for user comfort.
- Battery Pack (Cordless): Stores the energy for the motor. The capacity and type of battery are crucial factors in performance.
Common Causes of Line Replacement
Line replacement is a necessary maintenance task for trimmers. Several factors contribute to the need to replace the line.
- Frayed or Worn Line: The cutting line deteriorates over time, becoming frayed and losing its sharpness. This leads to less efficient cutting and potentially damaging the trimmer’s blades.
- Damaged or Broken Line: A broken line will immediately stop cutting effectively. It’s also potentially hazardous to the user.
- Reduced Cutting Efficiency: A worn or damaged line may struggle to cut the grass effectively, leading to increased effort and time required for the task.
Significance of Correct Line Type and Size, Replace the Line on a Black and Decker Trimmer
Using the correct line type and size is crucial for optimal performance and to avoid damage to your trimmer.
- Line Type Compatibility: Different models of trimmers require different types of cutting line. Using the wrong type can lead to premature wear and tear or damage the trimmer’s components.
- Line Diameter: The diameter of the line directly impacts cutting performance. Using a line that is too thick or too thin can reduce the efficiency of the trimmer and potentially cause problems.
Safety Precautions
Safety should always be the top priority when operating any power tool.
- Wear appropriate safety gear, such as eye protection and work gloves.
- Inspect the trimmer before each use to ensure it is in good working order.
- Never operate the trimmer when you are tired or under the influence of alcohol or drugs.
- Keep children and pets at a safe distance.
- Use the trimmer in a well-lit area and clear of obstacles.
Trimmer Model Comparison Table
This table provides a quick reference for different Black and Decker trimmer models and their line replacement procedures.
| Trimmer Model | Line Type | Line Size | Replacement Procedure |
|---|---|---|---|
| Model A | Nylon | 0.090″ | Refer to user manual |
| Model B | Metal | 0.065″ | Refer to user manual |
| Model C | Composite | 0.070″ | Refer to user manual |
Tools and Materials Required
Replacing the line on your Black and Decker trimmer is a straightforward process. Having the right tools and materials on hand will ensure a smooth and efficient replacement. Understanding the specific requirements for your model will help you avoid mistakes and get the job done correctly the first time.Proper preparation is key to a successful line replacement. Knowing what tools and materials are needed, as well as the types of line appropriate for your trimmer, ensures a safe and effective repair.
This section details the essential equipment and materials for a successful replacement.
Essential Tools
A few essential tools are necessary for a safe and efficient line replacement. Having these tools readily available will minimize any potential delays or complications during the process.
- A pair of needle-nose pliers or a pair of wire cutters: These tools are essential for gripping and cutting the old line. Precision is crucial to avoid damaging the trimmer’s housing or other components.
- A flathead screwdriver: A flathead screwdriver is useful for disassembling the trimmer’s housing if needed, depending on the model. Be cautious when using a screwdriver to avoid scratching or damaging the plastic components.
- A utility knife or box cutter: A sharp utility knife or box cutter is useful for cutting the new line to the appropriate length. Always use caution when handling sharp objects to prevent injuries.
- Work gloves: Protecting your hands is important when handling the trimmer and line. Work gloves prevent cuts and scrapes from the sharp line or other components.
Specific Line Types
Different Black and Decker trimmer models require different types of trimmer line. Selecting the correct line ensures optimal performance and longevity of the trimmer.
Replacing the line on my Black and Decker trimmer was surprisingly straightforward. While I was tackling the task, I couldn’t help but get excited about the new album from Talib Kweli and Hi-Tek, talib kweli and hi tek reunite for new reflection eternal album. It’s a great way to keep my mind occupied while getting this chore done.
Hopefully, the new line will last as long as their latest work!
- Nylon line: Commonly used for general-purpose trimming, nylon line is known for its durability and ability to handle various types of vegetation. This is often a good choice for most models.
- String trimmer line: String trimmer line is another popular choice, known for its flexibility and effectiveness on thick grass or weeds. This is suitable for heavy-duty tasks.
- Monofilament line: Monofilament line is thinner and more lightweight. This type is commonly used for trimming smaller areas or delicate plants, and is suited for specific models designed for precision.
Safety Equipment
Protecting yourself is paramount during any repair task. Wearing appropriate safety gear will minimize the risk of injury.
- Safety glasses: Safety glasses protect your eyes from flying debris or any potential line fragments.
- Work gloves: Protect your hands from cuts or abrasions. Choose gloves appropriate for the task and environment.
Tools and Materials List
The following table summarizes the tools and materials needed for a line replacement.
| Category | Item | Description |
|---|---|---|
| Tools | Needle-nose pliers/Wire Cutters | For gripping and cutting the old line |
| Tools | Flathead Screwdriver | For disassembling the trimmer housing (if needed) |
| Tools | Utility knife/Box Cutter | For cutting the new line to size |
| Tools | Work Gloves | Protect hands from cuts and scrapes |
| Materials | Replacement Line | Specific type based on your model |
| Materials | Safety Glasses | Protect your eyes from debris |
Step-by-Step Procedure for Line Replacement

Replacing the trimmer line on your Black and Decker trimmer is a straightforward process that can save you time and money. Proper line replacement ensures optimal performance and extends the life of your tool. This guide provides a detailed step-by-step procedure for removing the old line and installing a new one correctly.
Removing the Old Trimmer Line
Before installing the new line, the old one must be removed. This typically involves releasing the tension and then dislodging the old line from the spool. Improper removal can damage the trimmer mechanism.
- Power Off: Turn off the trimmer and disconnect it from the power source to avoid any electrical hazards. This safety precaution is paramount.
- Loosen the Line Tension: Locate the tensioning mechanism on the trimmer head. Usually, this involves a knob or lever. Turn the tensioning knob counterclockwise to loosen the line, allowing it to unwind from the spool.
- Grasp and Remove: Carefully grasp the old line near the spool. Pull gently but firmly to remove the old line completely from the spool.
Installing the New Trimmer Line
Installing the new line involves carefully guiding the line onto the spool and adjusting the tension for optimal performance. Correct installation prevents tangles and ensures smooth operation.
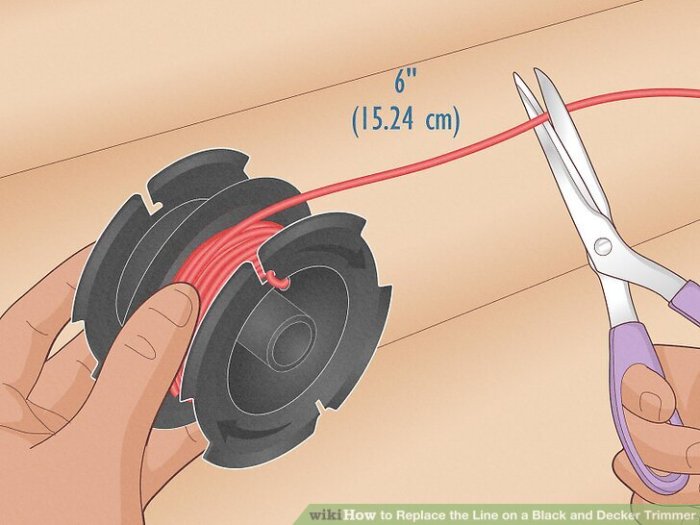
- Prepare the New Line: Unwind a section of the new trimmer line from the packaging. This section should be long enough to wrap around the spool.
- Positioning the Line: Carefully guide the new line onto the spool, ensuring that it winds onto the spool in the correct direction. The line should sit neatly against the spool.
- Tightening the Line: Turn the tensioning knob clockwise to progressively tighten the line on the spool. Ensure the line is wrapped around the spool in a uniform manner.
Tensioning the New Trimmer Line
Proper tensioning of the new trimmer line is crucial for efficient cutting and minimizing wear and tear on the trimmer motor. Over-tightening can damage the motor; under-tightening leads to ineffective cutting.
- Initial Tensioning: Start with a moderate tension. This is usually accomplished by winding the line onto the spool to a point where the line doesn’t sag or is taut enough to spin freely.
- Test Cut: Turn the trimmer on and perform a test cut on a small patch of grass. Observe how the line performs.
- Adjustments: If the line is too tight or too loose, adjust the tensioning knob accordingly. Fine-tuning the tension is essential for optimal performance.
Securing the Line
Several methods can be used to secure the new trimmer line. These methods ensure that the line stays in place and doesn’t become loose during use.
- Standard Spool: The standard spool method is straightforward and effective. The line is wound around the spool, and the tensioning knob is used to secure the line.
- Line Guides: Some models include line guides. These guides help ensure the line runs smoothly and efficiently.
- Additional Clamps: Additional clamps or clips may be necessary for certain trimmer models. These are typically located near the spool.
Adjusting Trimmer Line Tension
Proper adjustment of the trimmer line tension ensures optimal performance and prevents unnecessary wear and tear on the trimmer. Incorrect adjustment can lead to uneven cutting and damage to the motor.
- Inspect the Line: Inspect the line to check for any kinks or tangles. Straighten the line if necessary.
- Check for Sag: Observe the line for any sag. If present, increase the tension.
- Fine Tuning: Gradually adjust the tension knob until the line provides the desired performance. Testing in different conditions is recommended.
Step-by-Step Guide with Images (Illustrative Only)
Unfortunately, I cannot create images. However, a detailed visual guide could include images demonstrating the tensioning knob, the spool, and the line guides. These would show how to properly position the line and adjust the tension. Visual representation of the trimmer’s parts would be helpful.
Table Outlining the Sequence of Steps
(A table would include columns for step number, description, and visual representation. This is a placeholder, as I cannot generate images.)| Step Number | Description | Visual Representation ||—|—|—|| 1 | Turn off the trimmer. | Image of a switched-off trimmer. || 2 | Loosen the line tension. | Image of the tension knob being turned counterclockwise.
|| 3 | Remove the old line. | Image of the old line being pulled from the spool. || 4 | Prepare the new line. | Image of the new line being unwound. || 5 | Position the new line on the spool.
| Image of the new line being positioned correctly on the spool. || 6 | Tighten the line tension. | Image of the tension knob being turned clockwise. || 7 | Test the tension. | Image of the trimmer being used to test the line tension.
|
Troubleshooting Common Issues
Replacing the line on your Black and Decker trimmer is a straightforward process, but occasional issues can arise. Understanding potential problems and their solutions can save you time and frustration. This section details common issues, their causes, and effective troubleshooting steps.
Identifying Line Feed Issues
Improper line feeding often leads to problems during the replacement process. A jammed or blocked feed mechanism can prevent the new line from properly seating. This can result in the trimmer not functioning correctly or potentially damaging the trimmer’s internal parts.
Replacing the line on my Black and Decker trimmer was surprisingly straightforward. It’s a simple process, really, but I found a helpful video online demonstrating the steps. Speaking of interesting things, I was just reading about how Eddie Vedder is set to perform at the Obama farewell address! eddie vedder to play obama farewell address It’s inspiring stuff, and a complete change of pace from yard work, but I’m glad I got that trimmer line fixed up now that I’m ready for the upcoming weekend’s lawn care.
- Jammed Line Feed Mechanism: A jammed line feed mechanism is a common problem. It usually stems from debris or tangled trimmer line getting caught within the feed system. Visual inspection of the feed area is crucial for identifying obstructions.
- Misaligned Line Feed: A misaligned line feed may cause the line to feed incorrectly or not at all. This often results from improper assembly or damage to the internal components of the trimmer. Careful re-assembly and visual alignment of the feed components is essential.
Troubleshooting Line Tension Issues
Incorrect line tension can significantly impact the trimmer’s performance. Over-tightened lines can lead to breakage or excessive wear, while under-tightened lines may result in the line not cutting effectively.
- Over-Tightened Line: Over-tightened lines may be caused by using excessive force during the line installation process. This can result in the trimmer line breaking prematurely or placing undue stress on the trimmer’s internal components. Ensure the line is fed with moderate pressure to avoid over-tightening.
- Under-Tightened Line: An under-tightened line often results from insufficient tension during the installation process. This may lead to the trimmer line not cutting properly or slipping out of the trimmer’s housing. The trimmer’s manual should provide specific line tension guidelines.
Diagnosing Trimmer Motor Issues
In rare cases, problems with the trimmer motor itself can arise during line replacement. This usually manifests as the trimmer not functioning at all or showing reduced power output.
- Motor Malfunction: A malfunctioning motor could be caused by internal damage, such as a short circuit or a damaged motor shaft. If the motor is not working, seek professional repair service to avoid further damage. Never attempt to repair a motor yourself unless you have extensive experience with electrical components.
Troubleshooting Table
| Problem | Cause | Solution |
|---|---|---|
| Line won’t feed | Jammed feed mechanism, misaligned feed | Inspect and clear any obstructions, re-check alignment of feed components |
| Line breaks easily | Over-tightened line, weak or damaged line | Reduce installation force, replace the line with a new one |
| Line cuts poorly | Under-tightened line, dull line | Adjust line tension, replace the line with a new one |
| Trimming motor doesn’t function | Motor malfunction, electrical issues | Consult a qualified technician; do not attempt repairs yourself |
Maintenance Tips and Prevention
Keeping your Black and Decker trimmer in top condition is crucial for longevity and optimal performance. Regular maintenance not only extends the life of your tool but also ensures smooth operation and prevents costly repairs. Proper care and attention to detail can significantly impact the overall user experience.A well-maintained trimmer will run efficiently, reducing strain on the motor and other components, leading to a longer lifespan.
Consistent cleaning and inspection help identify potential problems early on, preventing more serious issues from developing.
Routine Cleaning and Inspection
Regular cleaning and inspection are vital for maintaining a trimmer’s efficiency and preventing premature wear. Cleaning removes debris, ensuring proper airflow and preventing clogs. This preventative measure safeguards against motor overheating and other performance issues. A clean trimmer operates smoothly, prolonging its useful life.
- Weekly: Wipe down the trimmer with a damp cloth, removing loose debris and grass clippings. This simple step keeps the unit running smoothly and efficiently.
- Monthly: Disassemble the trimmer and clean all parts with a brush or compressed air. Pay close attention to the blades, housing, and the cutting head. Thorough cleaning prevents the buildup of debris and ensures efficient operation.
- Quarterly: Inspect the trimmer for any signs of wear or damage. Look for bent or broken parts, loose connections, and any unusual noises. Early detection of problems is crucial to prevent significant damage or failure.
Storage and Care
Proper storage and care are essential for maximizing the lifespan of your trimmer. Store the trimmer in a dry, cool place, away from direct sunlight and extreme temperatures. Protecting the trimmer from moisture and harsh elements is key. Proper storage prevents corrosion and protects the motor, blades, and other components.
- Storage Location: A dry, cool, and sheltered area away from direct sunlight, rain, and moisture will help to prevent rust and corrosion. A garage or shed, if properly ventilated, could be a suitable option. Keep the trimmer out of direct contact with other tools or equipment that may cause damage.
- Protective Cover: Consider a protective cover for the trimmer to prevent dust and dirt from accumulating. A dedicated storage case or a cover designed for the specific trimmer model is beneficial.
- Blade Care: After each use, carefully wipe down the blades to remove grass clippings and debris. This will keep the blades sharp and efficient for a longer period of time. Store the trimmer with the blades in a slightly raised position to prevent them from touching the surface.
Preventive Measures
Implementing preventive measures can significantly extend the lifespan of your Black and Decker trimmer. These steps are crucial for avoiding costly repairs and keeping the tool in optimal working condition.
Replacing the line on a Black and Decker trimmer can be a surprisingly simple task, but sometimes a bit of a pain. If you’re having trouble with the trimmer, it’s important to make sure the area is safe and secure before starting any repair work, which often includes disabling the surrounding fire alarm system. Check out this helpful guide on Disable a Fire Alarm for important safety tips.
Once you’ve got the area secured and the alarm system safely out of the way, you can get back to replacing that trimmer line, and get back to enjoying your yard work.
- Regular Blade Sharpening: Regularly sharpening the blades is crucial. Dull blades strain the motor and reduce cutting efficiency, leading to increased wear on other components. Use a sharpening stone or file to maintain the blades’ sharpness.
- Avoid Overuse: Do not operate the trimmer continuously for extended periods. Allowing the motor to cool down between use is crucial to prevent overheating and potential damage.
- Inspect for Damage: Regularly examine the trimmer for signs of damage, such as bent or cracked housing, loose connections, or frayed cords. Address any issues promptly to prevent further damage and costly repairs.
Maintenance Schedule
A well-maintained trimmer will give you many years of reliable service. This schedule provides a structured approach to maintaining your Black and Decker trimmer.
| Task | Frequency |
|---|---|
| Wipe down with damp cloth | Weekly |
| Disassemble and clean parts | Monthly |
| Inspect for wear and tear | Quarterly |
| Sharpen blades | As needed |
Safety Precautions and Warnings: Replace The Line On A Black And Decker Trimmer

Replacing the line on your Black and Decker trimmer is a relatively straightforward task, but safety should always be your top priority. Ignoring safety precautions can lead to serious injuries, so understanding and adhering to them is crucial for a safe and successful line replacement. This section details essential safety precautions and warnings to help you avoid potential hazards.Proper safety procedures are not just a formality; they are vital for preventing accidents.
Following these precautions will significantly reduce the risk of injury and ensure a smooth and safe line replacement process.
Essential Safety Gear
Understanding the importance of safety gear is paramount when working with power tools. Appropriate safety gear provides a protective barrier against potential hazards, minimizing the risk of injury. This includes protective eyewear, gloves, and sturdy footwear.
- Eye Protection: Safety glasses or goggles are essential to protect your eyes from flying debris. Small pieces of metal or plastic can cause serious eye injuries during line replacement.
- Hand Protection: Wear heavy-duty work gloves to protect your hands from cuts and abrasions. The trimmer’s sharp blades can easily slice through skin, so glove use is vital.
- Foot Protection: Sturdy, closed-toe shoes or boots are crucial to protect your feet from falling objects or accidental contact with the trimmer.
Potential Hazards
Working with a power tool like a trimmer involves potential hazards that must be acknowledged and addressed. Understanding these hazards is the first step in mitigating risk.
- Moving Parts: The rotating blades of the trimmer can cause severe cuts or lacerations if you come into contact with them. Always ensure the trimmer is switched off and unplugged before handling any moving parts.
- Line Snapping: A sudden snapping of the trimmer line can cause the line to ricochet unpredictably. Always handle the trimmer line with care and avoid putting your hands near the cutting area.
- Unintentional Start-up: A carelessly handled trimmer could unexpectedly start, resulting in injury from the moving parts. Always ensure the trimmer is switched off and unplugged before performing any maintenance.
- Environmental Factors: Wet or slippery surfaces can increase the risk of falls and accidents. Make sure the work area is dry and stable.
Safety Tips and Precautions
Following these tips will significantly enhance the safety of your line replacement process.
- Disconnect the Power: Always disconnect the power source to the trimmer before starting any work. This is a crucial step to prevent accidental operation.
- Secure the Trimmer: Place the trimmer on a stable, level surface to prevent it from moving during operation.
- Clear the Area: Remove any obstacles or debris from the work area to ensure a clear workspace and prevent tripping hazards.
- Keep Children and Pets Away: Never allow children or pets to approach the trimmer during operation or maintenance.
Safety Guidelines Summary
This table summarizes important safety guidelines for using a trimmer, emphasizing the critical steps to avoid accidents.
| Safety Guideline | Action |
|---|---|
| Power Source | Disconnect the power source before any maintenance. |
| Work Area | Ensure the work area is clear, dry, and stable. |
| Personal Protection | Wear safety glasses, gloves, and sturdy shoes. |
| Line Handling | Handle the trimmer line carefully to avoid sudden snapping. |
| Moving Parts | Avoid contact with moving parts. |
Final Review
In conclusion, replacing the line on your Black and Decker trimmer is a manageable task when approached systematically. By following the detailed steps Artikeld in this guide, you can ensure a smooth and efficient replacement process. Remember to prioritize safety and maintain your trimmer regularly to extend its lifespan. This guide equips you with the knowledge and confidence to tackle this task effectively.
Leave a Reply