Category: Home Improvement

  • Get Rid of Bleach Smell  A Comprehensive Guide

    Get Rid of Bleach Smell A Comprehensive Guide

    Get Rid of Bleach Smell is your ultimate guide to conquering that lingering chlorine scent. From identifying the source of the problem to preventing future occurrences, we’ll explore a range of effective solutions. Discover how to banish bleach odors from clothes, carpets, hard surfaces, and the air itself. We’ll even delve into the science behind these stubborn smells, offering you a complete understanding of the issue.

    This guide provides detailed methods for removing bleach smells, ranging from simple ventilation techniques to more involved cleaning solutions. We’ll cover everything from using baking soda and vinegar to exploring specialized odor-eliminating products. Plus, we’ll share tips for proper bleach storage and handling to prevent future issues.

    Identifying the Source of the Smell

    Get Rid of Bleach Smell

    Unpleasant bleach-like odors can be a real nuisance, often stemming from unexpected sources. Pinpointing the culprit is crucial for effective remediation. This involves understanding how bleach interacts with various materials and environments. A thorough investigation into potential culprits can save you time and effort in resolving the issue.Identifying the origin of the bleach smell necessitates a systematic approach. Careful consideration of potential sources and the circumstances surrounding their use is paramount to determining the cause.

    This detailed analysis will help you narrow down the possibilities and eliminate those that are unlikely.

    Common Household Items That Might Release Bleach-Like Odors

    Bleach itself, when used improperly, or in combination with other substances, can produce lingering odors. Understanding the conditions that lead to these odors is crucial to avoiding them in the future. Some materials react with bleach, generating off-gassing that mimics bleach smells.

    • Clorox Bleach: The most obvious source. Improper storage, spills, or incomplete rinsing of treated surfaces can result in lingering odors. Improper dilution can also lead to stronger and longer-lasting smells.
    • Cleaning products containing bleach: Many cleaning solutions include bleach as an active ingredient. These products can release chlorine-like odors if not used or stored correctly.
    • Fabric softener sheets: Although not containing bleach directly, some fabric softener sheets may contain chemicals that react with moisture or other substances, potentially generating a bleach-like smell.
    • Certain types of paints or adhesives: Some paints or adhesives contain components that can react with moisture or other substances, potentially producing bleach-like odors, especially during application or drying.
    • Disinfectants: Disinfectants, even those not containing bleach directly, can sometimes produce off-gassing that resembles bleach smells.

    Ways Bleach Can Be Used and Potential for Lingering Smells

    The manner in which bleach is employed significantly impacts the likelihood of lingering smells. Proper techniques are essential to minimize the risk of odor problems.

    Getting that lingering bleach smell out of your clothes can be a real pain, but thankfully, there are some great tricks to try. Speaking of creative ways to tackle stubborn smells, did you know that Kelela is collaborating with Skrillex, Clams Casino, and Ratking’s Hak on a new track? It’s a fascinating musical collaboration, and it got me thinking about the surprising connections between art and everyday household tasks.

    Regardless of the music, it’s important to find effective ways to get rid of bleach smell for the best results. kelela teams with skrillex clams casino and ratkings hak on new song Hopefully, these ideas help you tackle those tough smells, and you can enjoy fresh clothes without the lingering scent.

    • Cleaning: Bleach is a powerful cleaning agent, but improper dilution or application can lead to lingering smells. Incomplete rinsing of treated surfaces can result in a noticeable chlorine-like smell.
    • Disinfection: Bleach is commonly used for disinfecting surfaces, and if not adequately rinsed, can leave behind a lingering chlorine scent.
    • Laundry: Using bleach in laundry can sometimes produce lingering smells if the laundry isn’t thoroughly rinsed or the bleach concentration is too high.
    • Pool maintenance: Using bleach to maintain pools can lead to noticeable odors, particularly if the pool water isn’t adequately balanced or the bleach isn’t diluted correctly.

    Distinguishing Between Bleach Smells and Other Similar Scents

    Differentiating between bleach odors and other similar scents can be challenging. Careful observation of associated factors is crucial.

    Item Description Odor Characteristics
    Bleach Household cleaning agent Strong, sharp, chlorine-like
    Chlorinated water Water treated with chlorine Pungent, often sharp, and similar to bleach
    Swimming pools Water treated with chlorine Strong chlorine smell, often noticeable outdoors
    Certain cleaning products Products containing chlorine May have a sharp, pungent odor similar to bleach
    Chlorine-based disinfectants Cleaning solutions containing chlorine May have a sharp, chlorine-like odor, sometimes more intense than bleach

    Methods for Removing Bleach Smell

    Banishing the pungent scent of bleach can be a frustrating task, but with the right approach, you can effectively neutralize the odor and restore a fresh atmosphere. Understanding the underlying causes of the smell, as discussed in the previous sections, is crucial for choosing the most effective removal methods. Different materials and environments will react differently to various cleaning solutions, so a tailored approach is essential.

    Ventilation Techniques

    Proper ventilation is often the first step in eliminating bleach odors. Fresh air circulation helps to dissipate the chemical compounds that contribute to the lingering smell. Opening windows and doors, using fans, or employing exhaust fans in kitchens and bathrooms can significantly improve air quality. In enclosed spaces, consider using a dehumidifier to remove moisture, which can sometimes trap the odor.

    Prolonged ventilation, especially in conjunction with other methods, often proves highly effective in reducing the bleach smell.

    Cleaning Solutions

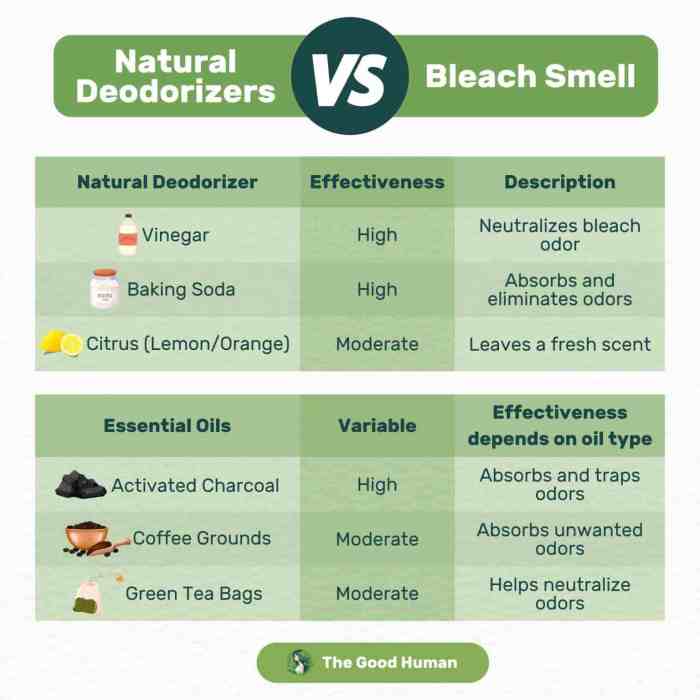
    Neutralizing the bleach smell often involves using cleaning solutions that chemically react with the residual bleach. These solutions work by forming less pungent compounds or neutralizing the active ingredients in the bleach. Common cleaning agents, such as vinegar and baking soda, are effective in neutralizing the smell. Choosing the appropriate solution depends on the specific surface and the severity of the odor.

    Baking Soda and Vinegar

    A popular and effective method for eliminating bleach smells is using a mixture of baking soda and vinegar. Baking soda acts as an absorbent, trapping the lingering bleach molecules. Vinegar, with its acidic properties, helps to break down the bleach residue. The procedure involves mixing baking soda with water to create a paste, applying it to the affected area, allowing it to sit, scrubbing, and then rinsing thoroughly.

    This method is particularly useful for porous surfaces like carpets and upholstery.

    Comparison of Odor-Eliminating Products

    Various commercial odor-eliminating products are available, each claiming to neutralize specific smells. However, the effectiveness of these products can vary. Some products contain enzymes that break down organic matter, while others utilize fragrances to mask the odor. A crucial aspect to consider is the potential for allergic reactions or irritations when using these products, especially for individuals with sensitivities.

    Thorough research and careful selection are recommended.

    Ugh, bleach smell. It’s a real pain to get rid of, especially if you’re trying to keep your laundry room smelling fresh. Luckily, I just stumbled upon some awesome news about cocorosie announcing a new album plot tour! cocorosie announce new album plot tour Their music always helps me de-stress, and hopefully, a little bit of that positive energy will carry over to conquer that stubborn bleach scent.

    Now, back to the task of finding the perfect laundry room air freshener to keep my whites bright and my space smelling great!

    Procedure for Using Cleaning Solutions

    The following table Artikels the steps for using various cleaning solutions to eliminate bleach smells. These steps are guidelines, and specific adjustments may be necessary based on the surface being treated.

    Method Materials Steps
    Using Baking Soda Baking soda, water Mix baking soda with water to create a paste. Apply to the affected area, let it sit for approximately 15-30 minutes. Gently scrub the area with a soft brush. Rinse thoroughly with water.
    Using White Vinegar White vinegar, spray bottle Spray the affected area with white vinegar. Allow it to sit for 10-15 minutes. Wipe clean with a damp cloth.
    Using Commercial Odor Eliminators Commercial odor eliminator, spray bottle Follow the manufacturer’s instructions on the product label. Typically, spray the affected area and allow it to sit for the recommended duration. Wipe or blot the area clean as instructed.

    Preventing Bleach Smell in the Future: Get Rid Of Bleach Smell

    Keeping your home smelling fresh and avoiding the harsh scent of bleach requires proactive measures. Proper storage, ventilation, and cleaning techniques are crucial to minimizing the risk of lingering bleach odors. By understanding these strategies, you can enjoy a clean home without the unwanted chemical aroma.Effective bleach management involves more than just applying it; it’s about handling it safely and thoughtfully to avoid unwanted odors.

    This section focuses on preventative measures to ensure a fresh, clean environment free from the lingering scent of bleach.

    Proper Bleach Storage

    Proper storage is key to preventing leaks and the release of bleach fumes. Store bleach in a cool, dry place, away from direct sunlight and heat sources. Choose a tightly sealed container to maintain its potency and prevent leakage. Inspect the container regularly for any signs of damage or deterioration. If the container shows any cracks or signs of wear, replace it immediately.

    Using a sturdy, leak-proof container is a preventative measure against spills and subsequent odor issues.

    Ventilation Best Practices

    Adequate ventilation is essential when using bleach. Open windows and doors, and use fans to circulate air, especially in smaller spaces. This helps to dissipate the bleach fumes and prevent them from accumulating. Remember to work in a well-ventilated area to minimize the risk of inhaling bleach vapors. In enclosed spaces, using an exhaust fan or a powerful fan can significantly improve ventilation and help prevent the lingering odor.

    Bleach Cleaning Techniques, Get Rid of Bleach Smell

    To minimize the possibility of lingering smells, use bleach only as needed and in the correct dilution. Always follow the product instructions carefully, as over-dilution or improper use can contribute to odor problems. Thoroughly rinse surfaces after applying bleach to remove any residue. Allowing surfaces to dry completely is also crucial in preventing lingering smells. For instance, after using bleach to clean a bathroom, open windows to ensure thorough ventilation and allow the area to air out completely.

    Preventing Bleach Smells in Specific Areas

    • Bathrooms: Maintain good ventilation by opening windows or using exhaust fans. Ensure thorough rinsing after cleaning to remove any bleach residue. Using a bleach-free alternative for occasional cleaning can help prevent buildup of bleach smell.
    • Kitchens: Thoroughly clean and rinse surfaces after bleaching. Use a well-ventilated area when cleaning, and use a good exhaust fan if available. Avoid using bleach on food preparation surfaces unless absolutely necessary.
    • Laundry Rooms: Open windows or use exhaust fans in the laundry room to remove bleach vapors. Follow the recommended bleach dosage and ensure thorough rinsing of clothes to avoid residue. Consider using a washing machine’s extra rinse cycle to remove bleach residue from clothes.

    Step-by-Step Bleach Handling Guide

    1. Assess the area: Determine if adequate ventilation is available. Open windows and doors, or turn on fans.
    2. Prepare the solution: Dilute bleach according to product instructions, and always wear appropriate protective gear like gloves and eye protection.
    3. Apply the solution: Use a sponge or cloth to apply the solution to the affected area, ensuring even coverage. Avoid spraying directly.
    4. Rinse thoroughly: Rinse the area with clean water to remove any bleach residue.
    5. Allow to dry: Open windows and allow the area to air dry completely to avoid lingering odors.
    6. Dispose of used bleach solution responsibly: Never pour bleach down drains, toilets, or sinks. Follow local guidelines for proper disposal.

    Addressing Specific Situations

    Dealing with bleach smells can be frustrating, but understanding how to target the source and apply the right cleaning methods is key to a fresh-smelling home. Different surfaces react differently to bleach, so a tailored approach is essential for effective removal. This section details specific strategies for eliminating bleach odors from various areas, from clothes to hard surfaces, ensuring a complete solution.

    Removing Bleach Odors from Clothes

    Bleach stains and odors on clothing often require a multi-step approach. Pre-treating the affected area is crucial. A mixture of oxygen bleach and cool water can often lift the stain and diminish the odor. For tougher stains, consider using a commercial stain remover specifically designed for bleach. Hand-washing or machine-washing, using a gentle cycle and cold water, is generally recommended.

    Avoid using hot water, as it can set the stain.

    • Pre-treatment: Soak the stained area in a solution of oxygen bleach and cool water for at least 30 minutes before washing.
    • Washing: Use a gentle cycle and cold water. Avoid using fabric softeners, as they can trap the bleach odor.
    • Drying: Dry the garment in a cool or low heat setting to avoid further setting the odor.
    • Additional Steps: If the odor persists, consider using a laundry booster specifically designed for removing odors. Repeated washing with appropriate detergents and pre-treatment methods may be necessary for stubborn stains and odors.

    Removing Bleach Odors from Carpets and Upholstery

    Bleach odors on carpets and upholstery can be particularly stubborn. A mixture of baking soda and white vinegar is often effective. Baking soda helps to absorb the odor, while vinegar helps neutralize the bleach. Carefully test any cleaning solution on an inconspicuous area first to avoid damage. For heavily soiled areas, professional cleaning services may be necessary.

    • Preparation: Blot up any excess moisture with a clean cloth.
    • Baking Soda Application: Sprinkle a generous amount of baking soda onto the affected area and let it sit for several hours, or preferably overnight. This will absorb the bleach odor.
    • Vinegar Application: Mix equal parts white vinegar and water. Using a clean cloth or sponge, gently apply the solution to the area where baking soda has been sprinkled. Let it sit for a few minutes before blotting up the excess.
    • Vacuuming: Vacuum the area thoroughly to remove the baking soda and any remaining moisture.
    • Repeat if Needed: If the odor persists, repeat the process.

    Eliminating Bleach Odors from Hard Surfaces

    Hard surfaces like countertops, sinks, and tiles can also retain bleach odors. A solution of equal parts white vinegar and water can help neutralize the bleach. Always test the solution on an inconspicuous area first. If the odor persists, consider using a commercial cleaner designed for removing bleach stains and odors.

    • Cleaning Solution: Mix equal parts white vinegar and water. Apply the solution to the affected area with a clean cloth or sponge.
    • Blot Dry: Blot up any excess moisture with a clean cloth.
    • Air Dry: Allow the surface to air dry completely.
    • Repeat if Needed: If the odor persists, repeat the process.

    Removing Bleach Odors from the Air

    Bleach odors in the air can be challenging to eliminate. Opening windows and doors to increase ventilation is the first step. Activated charcoal air fresheners can also help absorb the odor. Consider using a dehumidifier, especially in areas with high humidity, as moisture can exacerbate the odor.

    Trying to get rid of that lingering bleach smell? It can be a real pain, especially in a laundry room. I was just reading about the sad news of Pan Sonic’s Mika Vainio, who passed away at 53. While that’s a truly heartbreaking story, I’m hoping to find a good natural solution to get rid of bleach smells.

    Perhaps baking soda and vinegar could help, or maybe a few drops of essential oil? I’ll be doing some research on different methods to find the best solution for getting rid of the smell. pan sonics mika vainio dead at 53 Hopefully, a fresh, clean scent will be the result!

    • Ventilation: Open windows and doors to allow fresh air to circulate.
    • Activated Charcoal: Place activated charcoal air fresheners in the affected area.
    • Dehumidifier: Consider using a dehumidifier to reduce moisture, as moisture can trap the odor.
    • Air Fresheners: Use natural air fresheners like essential oils to mask the smell temporarily.

    Strategies for Specific Rooms

    Specific rooms, like bathrooms or laundry rooms, may require additional strategies to eliminate bleach odors. In bathrooms, using a combination of ventilation and targeted cleaning solutions can help. In laundry rooms, ensuring proper ventilation and regularly cleaning the area can help minimize the odor.

    • Bathrooms: Run the exhaust fan continuously to help clear the air, and use vinegar-based cleaning solutions to neutralize bleach residue.
    • Laundry Rooms: Maintain proper ventilation in the laundry room to prevent odor buildup. Clean the washing machine and dryer regularly to remove residue. If the smell comes from the laundry, ensure proper use of laundry detergent and correct bleach use.

    Understanding the Science Behind Bleach Odors

    Get Rid of Bleach Smell

    Bleach, a powerful cleaning agent, often leaves behind a pungent, chlorine-like odor. This odor isn’t simply an unpleasant byproduct; it stems from specific chemical reactions that occur when bleach interacts with various substances. Understanding these reactions is key to effectively eliminating the smell and preventing its recurrence.

    Chemical Reactions Causing Bleach Odors

    The characteristic bleach odor arises from the breakdown of hypochlorite ions (OCl⁻) present in bleach solutions. These ions react with organic compounds in the environment, such as those found in fabrics, water, or even the air itself. This reaction often produces volatile organic compounds (VOCs), including chlorinated hydrocarbons, which are responsible for the pungent smell.

    HOCl (hypochlorous acid) → OCl⁻ + H⁺

    This decomposition can be influenced by various factors, including temperature, moisture, and the presence of other substances.

    Impact of Moisture and Temperature

    Moisture plays a crucial role in the persistence of bleach odors. Water acts as a solvent, allowing the bleach to interact more readily with other substances, intensifying the reaction and the subsequent odor. Increased temperature accelerates chemical reactions, thus potentially exacerbating the release of volatile compounds responsible for the smell. Higher temperatures also often contribute to more rapid evaporation of these compounds, spreading the odor more quickly.

    Different Types of Bleach and Their Impact

    Different types of bleach, while all containing hypochlorite ions, may have varying concentrations and formulations. Sodium hypochlorite (NaClO) is the most common form. Higher concentrations of sodium hypochlorite can lead to more intense odors due to greater reactivity. Other bleaches, such as calcium hypochlorite, might have different levels of volatility and may release different types of VOCs, resulting in slightly varying odors.

    This nuance underscores the importance of tailoring cleaning methods to the specific type of bleach used.

    Materials Absorbing or Neutralizing Bleach Odors

    Several materials can absorb or neutralize the VOCs released during bleach reactions. Activated charcoal, for example, is known for its excellent adsorption capabilities. Baking soda, with its alkaline properties, can potentially react with some of the acidic components involved in the reaction, reducing the odor. Furthermore, certain materials like natural clays can also help absorb and bind with the volatile compounds.

    Chemical Reactions Table

    Substance Reaction with Bleach Result
    Water (H₂O) Dissolves bleach (NaClO), reducing its concentration Reduces odor intensity as the concentration of the reactive components decreases.
    Organic Matter (e.g., proteins, fats) Reacts with hypochlorite ions (OCl⁻), producing chlorinated hydrocarbons Forms volatile compounds, leading to the characteristic bleach odor.
    Ammonia (NH₃) Reacts violently with bleach (OCl⁻), releasing toxic gases Produces chlorine gas, which is extremely harmful and toxic, and results in a stronger, more unpleasant odor.
    Baking Soda (NaHCO₃) Reacts with hypochlorite ions (OCl⁻), potentially neutralizing the odor Forms sodium chloride (NaCl) and other compounds, potentially reducing the odor.
    Activated Charcoal Absorbs volatile compounds Reduces the concentration of VOCs in the air, effectively masking the smell.

    Last Word

    Banishing that persistent bleach smell can be a real challenge, but with the right knowledge and approach, it’s entirely achievable. This guide has equipped you with a wealth of information, from identifying the source of the odor to understanding the science behind it, and offering various methods for effective removal. By following the steps Artikeld, you can confidently tackle bleach smells in any situation and maintain a fresh, clean home.

    Remember, proper storage and handling are key to preventing future issues.

  • Install a Storm Door A Comprehensive Guide

    Install a Storm Door A Comprehensive Guide

    Install a Storm Door is a crucial home improvement project, offering enhanced security, energy efficiency, and curb appeal. This guide dives deep into every aspect, from selecting the perfect door style to tackling the installation process step-by-step. We’ll explore various materials, discuss potential challenges, and provide practical tips for a smooth and successful installation.

    Understanding the different types of storm doors – wood, fiberglass, and vinyl – is key to making the right choice for your home. Each material presents unique advantages and disadvantages, and we’ll present a detailed comparison to help you decide.

    Introduction to Storm Doors

    Storm doors are more than just a decorative addition to your home; they’re a practical investment that significantly improves the security, energy efficiency, and overall comfort of your entryway. They provide an extra layer of protection against harsh weather elements, intruders, and pests, while also helping to insulate your home and reduce drafts. Understanding the different types, styles, and installation scenarios can help you choose the perfect storm door for your needs.Storm doors offer a wide range of benefits beyond aesthetics.

    They enhance security by creating an additional barrier against forced entry, and they help reduce noise pollution from the outside world. They also provide an important energy-saving function by reducing drafts and heat loss, lowering your utility bills.

    Types of Storm Doors

    Storm doors are available in various materials, each with its own set of advantages and disadvantages. Common materials include fiberglass, wood, and vinyl. The choice of material often depends on your budget, desired aesthetic, and the specific needs of your home.

    Styles and Designs

    Storm doors come in a variety of styles, each offering unique aesthetic appeal and functional advantages. Classic styles include traditional double-hung or single-hung configurations, while contemporary designs feature more modern aesthetics and innovative features. The style you choose should complement the overall architectural design of your home. For example, a traditional-style home might benefit from a classic storm door, while a modern home could showcase a contemporary design.

    Consider the architectural style of your house when selecting the storm door to ensure a harmonious look.

    Installation Scenarios

    Storm doors are beneficial in various situations. They are particularly valuable in homes with frequent exposure to extreme weather conditions, such as strong winds, heavy rains, or snow. They also improve the security of homes located in high-crime areas. Furthermore, storm doors can significantly improve the energy efficiency of a home by preventing drafts and reducing heat loss.

    In colder climates, this is especially important. Furthermore, storm doors offer an additional layer of protection from unwanted pests.

    Material Comparison Table

    Material Pros Cons
    Wood Natural beauty, excellent insulation, often customizable with various finishes. Prone to rot and decay in humid climates, requires regular maintenance (staining, sealing), susceptible to insect damage, more expensive than vinyl.
    Fiberglass Excellent durability and weather resistance, low maintenance, resistant to rot and insects, good insulation properties. Can be less aesthetically appealing than wood, may not have the same level of customization as wood.
    Vinyl Low maintenance, resistant to rot and insects, affordable compared to wood and fiberglass, excellent durability against extreme weather. Can be less aesthetically pleasing than wood or fiberglass, may not offer the same level of insulation as wood or fiberglass.

    Planning and Preparation

    Getting ready for a storm door installation is crucial for a smooth and successful project. Proper planning minimizes potential problems and ensures a finished product that meets your expectations. Careful measurement and material selection are paramount to avoid costly mistakes or delays.Thorough preparation, from accurate measurements to a well-stocked toolkit, sets the stage for a successful storm door installation.

    This involves not only the physical aspects but also anticipating potential challenges and having a contingency plan.

    Essential Preparation Steps

    Careful planning is vital for a successful storm door installation. The process starts with accurate measurements and ends with a comprehensive checklist. Following these steps will significantly reduce the chances of encountering unexpected issues during installation.

    • Accurate Measurement: Precise measurements are critical. Incorrect measurements lead to doors that are too large or too small, causing fit issues and potentially damaging the existing frame. Measure the existing door frame meticulously to ensure a perfect fit for the new storm door. Using a measuring tape is crucial for getting precise measurements.
    • Material Gathering: A well-stocked toolkit is essential for a smooth installation. A comprehensive list of necessary tools and materials should be prepared before starting. This will ensure you have everything needed and avoid interruptions in the process.
    • Identifying Potential Challenges: Anticipating possible obstacles during installation is key. Potential issues include the complexity of the existing frame, variations in door frame dimensions, and hidden structural issues. Thorough pre-installation inspections help identify and mitigate these challenges.

    Tools and Materials Needed

    Having the right tools and materials is essential for a smooth and efficient installation. The necessary items should be gathered before starting the installation process.

    • Measuring Tools: A measuring tape, level, and pencil are essential for accurate measurements. A combination square and a framing square are helpful for precise angles.
    • Installation Tools: A drill, screwdriver, hammer, and saw are essential. A utility knife, pliers, and a reciprocating saw are also valuable tools.
    • Hardware: The appropriate screws, hinges, and other hardware specific to your storm door model are needed. Check the manufacturer’s specifications for accurate recommendations.

    Accurate Door Frame Measurement

    Accurate measurements are paramount for a proper fit. Errors in measurement can lead to significant issues, such as the door not fitting correctly or requiring extensive modifications.

    1. Exterior Dimensions: Measure the width and height of the existing door frame from the exterior. Use a measuring tape to get precise measurements.
    2. Interior Dimensions: Measure the width and height of the interior opening of the existing door frame. This ensures that the storm door will fit within the existing frame without obstructing the interior.
    3. Threshold Measurement: Measure the threshold of the existing door frame. This measurement is crucial for determining the appropriate storm door threshold height to avoid issues with water or air leakage.

    Checklist for Gathering Items, Install a Storm Door

    Creating a comprehensive checklist before starting the installation helps ensure you have all the necessary items. A detailed checklist prevents last-minute scrambles and potential delays.

    Category Items
    Measuring Tools Measuring tape, level, pencil, combination square, framing square
    Installation Tools Drill, screwdriver, hammer, saw, utility knife, pliers, reciprocating saw
    Hardware Screws, hinges, weather stripping, flashing, and other hardware specific to the storm door
    Materials Caulk, sealant, and any additional materials recommended by the storm door manufacturer

    Installation Process: Install A Storm Door

    Install a Storm Door

    Installing a storm door is a rewarding DIY project that enhances the security and energy efficiency of your home. Proper installation ensures a tight seal, preventing drafts and unwanted intruders. This detailed guide will walk you through the steps, from framing to finishing touches, making the process manageable and successful.The key to a smooth installation lies in meticulous preparation and precise execution.

    Carefully following the steps, paying close attention to measurements and alignment, will yield a sturdy and aesthetically pleasing storm door. This section provides a step-by-step guide to install your storm door, ensuring a perfect fit and a long-lasting addition to your home.

    Framing and Alignment

    Proper framing and alignment are crucial for a secure and weather-tight installation. Misalignment can lead to drafts, gaps, and ultimately, a poorly performing storm door. Ensure the frame is precisely aligned with the existing door frame to guarantee a snug fit and prevent any unwanted gaps. This step is critical for long-term performance.

    Attaching the Storm Door to the Existing Door Frame

    Several methods exist for attaching the storm door to the existing frame. The best approach depends on the specific door frame and storm door style. Common methods include using screws or nails to secure the storm door frame to the existing door frame. Ensure the screws are long enough to penetrate both the storm door frame and the door jamb, providing a secure hold.

    Securing the Door to the Frame for Stability

    Securing the storm door for stability involves more than just attaching the frame. Additional reinforcements and adjustments are necessary to ensure the door doesn’t sag or warp. Use appropriate hardware, such as hinges and braces, for added support. This prevents the door from moving or wobbling.

    Types of Hardware

    Storm doors use various hardware components to function properly. These components include hinges, latches, and handles. Each plays a specific role in the operation and security of the door.

    Installing Storm Door Hardware

    A detailed step-by-step guide for installing storm door hardware:

    
    Step 1:  Prepare the storm door and the door frame by ensuring they are clean and free of debris.
    Step 2:  Position the hinges on the storm door and the door frame, ensuring alignment.
    Step 3:  Mark the locations for the hinge screws on both the storm door and the door frame.
    Step 4:  Drill pilot holes to prevent the screws from splitting the wood.
    Step 5:  Secure the hinges using appropriate screws.
    Step 6:  Install the latch and handle according to the manufacturer's instructions.
    Step 7:  Test the latch and handle mechanisms to ensure smooth operation.
    Step 8:  Adjust the hinges as needed to ensure proper alignment and smooth operation of the storm door.
    Step 9:  Once the hardware is installed, check for any gaps or misalignments.
    Step 10: Secure the storm door with the necessary hardware.
    

    Safety and Considerations

    Install a Storm Door

    Installing a storm door is a rewarding project, but safety and careful planning are paramount. Proper attention to detail during installation, including the use of appropriate safety gear and proper ventilation, is crucial for a successful and safe outcome. Ignoring these aspects can lead to costly errors, injuries, and even damage to your home.

    Careful consideration of safety precautions and energy efficiency is vital to ensure a successful installation and protect your home and family. This section dives into essential safety measures, the importance of proper ventilation and weatherstripping, and how to mitigate potential hazards. We’ll also explore the significant impact of a storm door on energy efficiency, comparing different weatherstripping options.

    Safety Precautions During Installation

    Proper safety precautions are essential to prevent accidents during installation. Always wear safety glasses, gloves, and sturdy work shoes. Ensure the work area is well-lit and clear of obstructions. Never work alone, especially when handling heavy materials or using power tools. If possible, have a second person available for assistance.

    Always follow the manufacturer’s instructions for specific safety precautions and use of tools.

    Getting a storm door installed is a worthwhile home improvement project, especially if you’re aiming for better energy efficiency. While I’m busy prepping for that, I’ve been keeping tabs on the music scene, and heard some exciting news: a final UGK album is on the way! final ugk album on the way. Hopefully, this new project will be just as impactful as the installation of my new storm door, making my home both cozy and soundproof.

    It’s all about creating a space that’s both comfortable and secure.

    Importance of Proper Ventilation and Weatherstripping

    Proper ventilation is crucial during the installation process, especially when using adhesives or sealants. Adequate ventilation ensures proper curing and minimizes the risk of breathing harmful fumes. Weatherstripping is essential for energy efficiency and preventing drafts. Different types of weatherstripping provide varying levels of insulation and sealing.

    Potential Safety Hazards and Mitigation

    Potential hazards during storm door installation include cuts from sharp tools, falls from heights, and electrical shocks. Using proper safety equipment and following safety protocols can mitigate these risks. For example, using a ladder that’s stable and properly secured can prevent falls. Always disconnect electrical power to the area where you’re working, especially if you’re using power tools or working near electrical components.

    If you’re unsure about any aspect of the installation, consult a professional.

    Impact on Home’s Energy Efficiency

    Storm doors significantly improve a home’s energy efficiency. They reduce drafts, preventing heat loss in winter and heat gain in summer. Properly installed weatherstripping is crucial for achieving maximum energy savings. A well-sealed storm door can reduce energy bills, and this is reflected in many homeowners’ experiences. For example, homeowners often report a noticeable reduction in their heating and cooling bills after installing a storm door.

    Comparison of Weatherstripping Options

    Various weatherstripping options are available, each with its own characteristics and effectiveness. Consider the following:

    • Foam weatherstripping is relatively inexpensive and easy to install. It provides good insulation, but its effectiveness can vary based on the type of foam used.
    • Felt weatherstripping is a classic option, providing good insulation and a tight seal. Its durability is often high, though it may require more effort for installation.
    • Rubber weatherstripping is a popular choice due to its flexibility and ability to conform to various door frames. It provides a good seal and is available in different thicknesses.
    • Metal weatherstripping offers excellent durability and can withstand high pressure. It’s commonly used for commercial applications, but it’s also suitable for residential use.

    Different weatherstripping materials have varying performance characteristics. For example, foam weatherstripping might be suitable for a simpler installation, while rubber or metal weatherstripping might be better suited for a more complex or demanding installation.

    Troubleshooting and Maintenance

    Keeping your storm door in top condition involves proactive troubleshooting and regular maintenance. A well-maintained storm door not only enhances the curb appeal of your home but also increases its longevity, providing years of reliable protection against the elements. Proper maintenance can also help prevent costly repairs down the line.

    Addressing issues promptly and performing routine maintenance can save you time and money in the long run. This section will guide you through common problems, troubleshooting steps, and maintenance procedures for your storm door.

    Installing a storm door can really boost your home’s energy efficiency, but sometimes you need a little extra DIY know-how. For example, if you’re tackling a project like making a camping toilet, you’ll need some serious resourcefulness. Luckily, there’s a great guide on Make a Camping Toilet that can help with that. But back to storm doors, the right materials and proper installation are key to keeping your home cozy and protected from the elements.

    Common Installation Problems

    Troubleshooting potential installation issues is crucial for a functioning storm door. Common problems include misaligned frames, sticking or dragging doors, and improper weatherstripping application.

    • Misaligned Frames: Ensure the storm door frame is properly aligned with the existing door frame. Misalignment can cause the door to bind or not close properly. Use a level and a straightedge to check for any deviations. If misalignment is found, carefully adjust the screws or shims to realign the frame.
    • Sticking or Dragging Doors: A sticking or dragging door can be caused by obstructions, worn hinges, or improperly adjusted weatherstripping. Inspect the area around the door for any obstructions. Ensure hinges are lubricated and functioning correctly. If weatherstripping is worn, replace it. Adjust the door’s alignment if needed.

    • Improper Weatherstripping Application: Weatherstripping should be installed correctly to prevent air leaks and drafts. Check for gaps or loose areas in the weatherstripping. Ensure it’s properly compressed against the door and frame. If necessary, re-apply or replace the weatherstripping.

    Troubleshooting Techniques

    Correctly diagnosing and resolving problems is key to maintaining a well-functioning storm door. This involves careful inspection and systematic evaluation of the issue.

    • Visual Inspection: Begin by thoroughly inspecting the storm door for any visible damage, misalignment, or obstructions. Pay close attention to the hinges, weatherstripping, and any hardware components. A visual inspection can often identify the source of the problem.
    • Checking Hardware: Examine the hinges, screws, and other hardware components for signs of wear, looseness, or damage. Tighten loose screws and replace any damaged hardware. Proper hardware function ensures smooth operation of the door.
    • Adjusting Weatherstripping: Check for gaps or uneven compression of the weatherstripping. Use appropriate tools to adjust the weatherstripping for proper contact with the door and frame. Weatherstripping is critical for maintaining the energy efficiency of the door and preventing drafts.

    Regular Maintenance

    Regular maintenance significantly extends the lifespan of your storm door. Preventive maintenance will reduce the need for extensive repairs.

    • Cleaning: Regular cleaning of the storm door helps maintain its appearance and prevent the buildup of dirt, grime, and debris. Use a mild detergent and a soft cloth to clean the surface of the door and frame. Avoid using harsh chemicals that could damage the finish. Thoroughly rinse the door and frame after cleaning.
    • Lubrication: Regular lubrication of hinges, rollers, and other moving parts prevents friction and wear. Use a suitable lubricant specifically designed for metal components. Lubrication ensures smooth and efficient operation of the door.
    • Weatherstripping Inspection: Periodically inspect the weatherstripping for wear and tear. Replace worn or damaged weatherstripping to maintain the door’s seal and prevent drafts. Inspecting weatherstripping is a crucial step to ensure energy efficiency.

    Replacing Damaged Components

    Replacing damaged or worn components is essential for maintaining the storm door’s structural integrity and functionality.

    • Hinges: If hinges are damaged or show signs of wear, replace them with new ones. Damaged hinges can affect the door’s proper operation and alignment. Always use hinges compatible with the existing door and frame.
    • Weatherstripping: Replace worn or damaged weatherstripping to maintain the door’s seal and prevent drafts. Using the correct type of weatherstripping is crucial for preventing air leaks and maintaining energy efficiency.
    • Hardware: If any hardware components like handles, latches, or locks are damaged, replace them with new ones. Ensure the new hardware is compatible with the existing door and frame.

    Cost and Alternatives

    Installing a storm door can be a worthwhile investment for your home, but the upfront cost can sometimes be a deterrent. Understanding the potential costs, alongside alternative solutions, is crucial for making an informed decision. This section will explore the range of costs associated with different storm door types, and examine alternative options such as repairs or upgrades, to help you weigh the pros and cons before committing to a new installation.

    Estimating Installation Costs

    The cost of installing a storm door varies significantly based on several factors. These include the type of door (wood, fiberglass, or vinyl), the size and complexity of the installation, labor costs in your area, and any additional features like special hardware or glass types. A basic, standard storm door installation could range from $500 to $1500, but more elaborate or customized options can easily exceed this range.

    For example, a double-entry storm door with enhanced security features might cost considerably more. Homeowners should consult local contractors for precise estimates tailored to their specific needs.

    Potential Alternatives to Replacement

    Replacing a storm door isn’t always the only solution. Sometimes, a repair or upgrade might be more cost-effective and still achieve the desired results. A damaged storm door can often be repaired, fixing the broken components or replacing the damaged frame. This is generally more economical than a full replacement. In some cases, an upgrade to existing hardware, like better locks or stronger hinges, can enhance security and improve the door’s performance without the need for a complete replacement.

    Comparing Installation Options

    The decision to replace, repair, or upgrade a storm door should be based on a comprehensive cost-benefit analysis. A replacement might offer the best aesthetic match and the latest technology, but it comes with a higher initial investment. A repair, on the other hand, might be quicker and less expensive, but it may not provide the same level of improvement or longevity.

    An upgrade could be a suitable compromise between these two options, providing a functional improvement without the substantial cost of a complete replacement.

    Cost Breakdown of Storm Door Types

    The type of material significantly influences the cost of a storm door. Different materials offer varying levels of durability, energy efficiency, and aesthetics, which directly affect the price.

    Storm Door Type Estimated Cost (USD)
    Wood $600 – $1200
    Fiberglass $800 – $1500
    Vinyl $500 – $1000

    Note: These are estimated costs and can vary greatly based on the specific features and installation requirements.

    Installing a storm door can significantly improve your home’s energy efficiency, and honestly, it’s a pretty cool DIY project. While I’m tackling that, I’ve also been super excited about the new EP from boots, featuring Run the Jewels and more! boots announces new ep ft run the jewels and more is shaping up to be a must-listen, and I’m already planning to blast it while I finish up my storm door installation.

    Hopefully, I can get this storm door installed by the weekend!

    Visual Examples and Inspirations

    Choosing the right storm door isn’t just about functionality; it’s about enhancing your home’s aesthetic. The visual impact of a storm door can be substantial, dramatically altering the curb appeal and overall look of your property. This section explores various installation examples, highlighting different styles and how they complement different architectural designs.

    Understanding how a storm door interacts with the existing facade is crucial. The style, color, and material choices can either blend seamlessly or create a bold statement, reflecting your personal taste and the character of your home. This section will walk you through various examples to inspire your own storm door selection.

    Storm Door Installations for Different Home Styles

    Different architectural styles demand different storm door treatments. A classic craftsman home benefits from a storm door that echoes its architectural details, while a modern contemporary house might welcome a sleek, minimalist design. Matching the door’s style to the home’s architecture is key to achieving a harmonious look.

    Visual Impact of Different Storm Door Styles

    Storm doors come in a variety of styles, each with a unique visual impact. French doors, for instance, create a feeling of openness and grandeur, while sliding doors offer a clean, modern aesthetic. The choice of style directly affects the overall appearance of the exterior.

    Enhancing Curb Appeal with Storm Doors

    Storm doors are more than just a protective layer; they are an exterior design element. A well-chosen storm door can significantly boost curb appeal. A new, attractive storm door can update a tired facade, or complement a recently renovated home, adding visual interest and value.

    Storm Door Colors and Their Effects

    The color of a storm door can dramatically impact a home’s aesthetic. A bold, contrasting color can add a pop of personality, while a neutral tone blends seamlessly with the existing facade. Consider the existing colors of your home’s exterior when selecting a storm door color. For example, a dark gray storm door on a light beige house might create a striking contrast.

    Conversely, a light gray storm door on a light beige house would create a softer, more subtle look.

    Factors to Consider When Choosing a Storm Door Based on Architectural Style

    Choosing a storm door that complements your home’s architectural style is paramount. Consider these factors:

    • Material: Does the material of the storm door (e.g., wood, fiberglass, vinyl) align with the materials used in the home’s construction? Matching materials creates a cohesive look.
    • Style: Does the door style (e.g., traditional, modern, contemporary) reflect the overall design of your home? A craftsman-style home, for example, might look best with a traditional-style storm door.
    • Color: Does the color of the storm door complement the existing colors of your home’s exterior? Consider the color scheme and contrast with the siding, roof, and other exterior elements.
    • Size and Proportion: Does the size and proportion of the storm door harmoniously fit within the framework of the entryway and the overall home design? A disproportionately large or small storm door can detract from the aesthetic balance.

    Final Wrap-Up

    Installing a storm door is a rewarding project that can significantly improve your home. By following the steps Artikeld in this guide, you can confidently tackle the installation process, ensuring a secure, energy-efficient, and aesthetically pleasing addition to your property. Remember to prioritize safety and carefully consider the material and style that best suit your home’s needs and budget.

  • Take a Radiator Off the Wall A Comprehensive Guide

    Take a Radiator Off the Wall A Comprehensive Guide

    Take a Radiator Off the Wall – it sounds daunting, but with careful planning and the right know-how, it’s achievable. This comprehensive guide covers everything from safety precautions and tool selection to detailed disassembly and reinstallation procedures, making the entire process less intimidating and more manageable. We’ll explore different radiator types, potential problems, and troubleshooting strategies, ensuring you can tackle this project with confidence.

    This guide provides a step-by-step approach to safely removing and reinstalling a radiator. We’ll delve into the specific needs of various radiator types and the essential tools required for each stage of the process. From disconnecting water lines to securing the radiator, we’ll address every crucial aspect, ensuring a successful outcome.

    Safety Precautions

    Taking apart a radiator, while potentially rewarding, comes with inherent risks. Ignoring safety precautions can lead to serious injuries, property damage, or even environmental hazards. This section details crucial safety measures to ensure a safe and successful radiator disassembly project. Following these steps will minimize the risk of accidents and complications.Understanding the potential hazards associated with radiator disassembly is crucial for mitigating risks.

    Taking a radiator off the wall can be a surprisingly involved project. It’s not just about unscrewing a few bolts; you’ve got to consider the plumbing, electrical connections, and the overall impact on the room’s aesthetics. Interestingly, while contemplating such a DIY project, I stumbled across news that the Bruce Springsteen E Street Band will be performing at the Super Bowl, which, frankly, makes me want to immediately tackle that radiator job.

    So, while I’m researching how to best disconnect the heating system, I’ll be also checking out the performance details on bruce springsteen e street band to play super bowl. Hopefully, the energy from the music will inspire me to get that radiator off the wall faster!

    Radiators often contain trapped water, potentially pressurized, and may have concealed electrical connections or hidden components. Improper handling can lead to scalding, electric shocks, or mechanical injuries. Careful preparation and adherence to safety guidelines are essential.

    Potential Hazards and Mitigation Strategies

    Radiator disassembly involves several potential hazards, and careful planning is vital to mitigate them. Water, often under pressure, can cause serious burns if not handled correctly. Metal parts, particularly when hot, can lead to burns or cuts. Potential electrical hazards are present if the radiator has electrical components, which are sometimes concealed within.

    • Water Hazard Mitigation: Always drain the radiator completely before attempting any disassembly. Use appropriate tools for draining, and ensure the water is disposed of safely. If possible, disconnect the radiator from the water supply system to prevent accidental refilling during work. A slow and deliberate approach, checking for leaks at each step, is paramount.
    • Thermal Hazard Mitigation: Allow the radiator to cool completely before touching any metal parts. Using insulated gloves and protective eyewear is essential. A heat-resistant mat or surface beneath the radiator can protect the working area from potential damage.
    • Electrical Hazard Mitigation: If the radiator has electrical components, disconnect the power supply before starting any work. Ensure all electrical connections are properly insulated and protected. Consult an electrician if there are any doubts about the electrical safety of the radiator.
    • Mechanical Hazard Mitigation: Use appropriate tools for disassembly. Ensure tools are in good condition and fit for purpose. Wear safety glasses and gloves to prevent cuts or scrapes. Work in a well-lit area to minimize the risk of slips and falls.

    Importance of Ventilation and PPE

    Adequate ventilation is crucial when working with radiators, especially if they contain any potentially harmful substances. Proper ventilation reduces the risk of inhaling fumes or dust particles that could be released during the disassembly process. Personal Protective Equipment (PPE) is equally important for protecting against potential hazards.

    • Ventilation: Ensure good ventilation in the work area to prevent the buildup of dust, fumes, or other contaminants. Open windows and use fans if necessary. If possible, work outdoors in a well-ventilated area.
    • PPE Selection: The choice of PPE depends on the specific hazards present. For example, heat-resistant gloves and aprons are necessary for handling hot radiators. Safety glasses protect the eyes from flying debris. Appropriate respiratory protection, such as a dust mask, is essential if the radiator contains any hazardous materials.

    PPE Comparison Table

    The following table provides a comparison of different types of PPE and their suitability for radiator work.

    PPE Type Description Suitability for Radiator Work
    Heat-Resistant Gloves Gloves designed to protect against heat and burns. High
    Safety Glasses/Goggles Eye protection against flying debris and splashes. High
    Dust Mask/Respirator Protects the respiratory system from dust and fumes. Moderate to High (depending on radiator contents)
    Insulated Apron Provides protection against heat and spills. High
    Work Boots Provides protection for feet. Moderate

    Tools and Materials Needed: Take A Radiator Off The Wall

    Preparing to tackle a radiator removal project requires a well-stocked toolkit and a thoughtful consideration of the materials needed. This meticulous approach ensures a safe and efficient job, minimizing potential damage to the surrounding area and the radiator itself. Understanding the specific tools and materials involved is paramount to a successful and injury-free outcome.

    Essential Tools

    A comprehensive set of tools is crucial for safely and effectively removing a radiator. The right tools prevent damage and ensure the project is completed in a timely manner. The following list provides a detailed overview of necessary tools and their functions.

    Tool Name Description Function
    Adjustable Wrench A versatile wrench with adjustable jaws that can grip various pipe sizes. Used to loosen and tighten nuts and bolts securing the radiator to the pipes.
    Pipe Wrench A wrench designed specifically for plumbing tasks, featuring a pivoting head. Ideal for gripping and turning pipes, especially those that may be corroded or difficult to access.
    Basin Wrench A specialized wrench with a long handle and a basin-shaped head, providing leverage. Useful for turning stubborn or hard-to-reach nuts and bolts, enhancing leverage.
    Screwdrivers (Phillips and Flathead) Tools with pointed tips for turning screws. Used for removing screws securing the radiator’s mounting brackets and other accessories.
    Gloves Protective coverings for the hands. Protect hands from potential cuts and burns during the process.
    Safety Glasses Protective eyewear. Protect eyes from debris or flying particles that may be generated during the process.
    Hammer A tool for striking objects. Used to remove or detach items that are obstructing the radiator’s removal.
    Putty Knife or Utility Knife Tools for scraping and cutting materials. Assist in removing any caulking or sealant around the radiator’s base or connections.
    Measuring Tape A tool for measuring lengths and distances. Essential for ensuring proper alignment and measurements when replacing the radiator.
    Bucket A container for holding water. Used to collect any water draining from the radiator’s pipes during the removal process.

    Materials Needed

    Proper materials are essential for completing the radiator removal safely and effectively. The following list Artikels the different types of materials required.

    • Pipe Sealant or Thread Sealant: A crucial material for ensuring a watertight seal after the radiator is removed. It creates a barrier against leaks and prevents water damage. Proper application is vital to prevent future problems.
    • Insulation (optional): Adding insulation to the pipes after removal can reduce heat loss. The type of insulation will depend on the specific pipes and the desired level of insulation. For instance, pipe wrap insulation is often used for pipes exposed in the attic or crawl space.
    • Cleaning Supplies: Depending on the condition of the radiator and pipes, cleaning supplies such as wire brushes or solvents might be necessary to remove rust or grime before reinstallation.
    • Replacement parts (if necessary): If the existing pipes or valves require replacement, you’ll need to purchase the necessary components to ensure a proper fit and function.

    Types of Radiators

    Take a Radiator Off the Wall

    Radiators come in various materials, each with unique characteristics affecting their installation and removal. Understanding these differences is crucial for safe and efficient work. Choosing the right tools and approach for a particular radiator type prevents damage and ensures a smooth removal process.Different radiator materials offer varying levels of durability, heat transfer efficiency, and maintenance requirements. Proper identification of the radiator type is essential for determining the best course of action for disconnection and removal.

    Careful consideration of these factors will make the entire process more manageable and less prone to errors.

    Cast Iron Radiators

    Cast iron radiators are a classic choice, often found in older homes. Their robust construction and excellent heat retention make them popular. However, their weight and potential for rust or corrosion must be considered. Disconnecting these radiators requires extra care due to their size and potential for damage.

    • Cast iron radiators are typically connected using a series of threaded pipes. Connections may include nuts, bolts, and washers. The pipes may be copper, steel, or brass, each with its own characteristics in terms of corrosion resistance and handling.
    • Carefully inspect the connections for signs of corrosion or damage before disconnecting. Use appropriate wrenches to avoid damaging the connections or the radiator itself.
    • Disconnect the water supply valves first. Then, carefully disconnect the supply and return pipes using the appropriate wrenches.

    Steel Radiators

    Steel radiators are a more common choice in modern homes. They are generally lighter than cast iron, but may not offer the same level of heat retention. Their construction allows for a variety of designs and finishes, offering aesthetic options.

    • Steel radiators are typically connected in a similar manner to cast iron, often using threaded pipes and fittings. Ensure compatibility with the existing plumbing system when choosing replacement components.
    • Steel radiators may be equipped with valves and other accessories that need to be disconnected before removal. Proper identification and careful handling are essential for safe removal.
    • To disconnect steel radiators, follow the same procedure as cast iron, prioritizing safety and proper tools.

    Aluminum Radiators, Take a Radiator Off the Wall

    Aluminum radiators are lightweight and efficient. Their modern design often incorporates fins for improved heat transfer. They are generally more delicate than cast iron or steel, requiring extra care during removal.

    • Aluminum radiators are often connected using compression fittings or soldered joints, depending on the specific design. The connection method significantly impacts the disassembly process.
    • Aluminum radiators, being lighter, may not require the same level of support as cast iron or steel, but careful handling remains important to prevent damage.
    • Compression fittings are often easier to disconnect than soldered joints. Use appropriate tools for the connection type.

    Disassembly Steps Table

    Type Steps Tools
    Cast Iron 1. Disconnect water supply valves. 2. Disconnect supply and return pipes. 3. Carefully lift and remove the radiator. Adjustable wrenches, pipe wrenches, safety equipment.
    Steel 1. Disconnect water supply valves. 2. Disconnect supply and return pipes. 3. Disconnect any valves or accessories. 4. Carefully lift and remove the radiator. Adjustable wrenches, pipe wrenches, valve tools, safety equipment.
    Aluminum 1. Identify connection type (compression or soldered). 2. Disconnect connections using appropriate tools. 3. Carefully lift and remove the radiator. Compression fitting pliers, soldering equipment (if applicable), safety equipment.

    Disassembly Procedures

    Taking a radiator off the wall requires careful planning and execution. Improper handling can damage the radiator, plumbing, or even injure you. This section details the crucial steps for safely disconnecting water supply lines, removing the radiator, and handling it with the necessary support. Understanding these procedures ensures a smooth and efficient process.

    Disconnecting Water Supply Lines

    Before removing the radiator, you must first shut off the water supply to the unit. This prevents water damage and ensures a safe work environment. Locate the valves controlling the water flow to the radiator, usually located near the supply pipes. Turn the valves clockwise to fully shut off the water supply. It’s important to verify that the water is completely shut off by checking for any leaks.

    If you’re unsure of the location of the valves, consult a qualified plumber or refer to your home’s plumbing diagram.

    Removing the Radiator from the Wall

    Radiator removal involves several steps to ensure safety and avoid damage. Proper support and handling are critical during the process. The following section Artikels the procedures.

    Radiator Removal Procedure

    1. Preparation: Ensure the water supply is completely shut off and the room is well-lit. Gather necessary tools, including adjustable wrenches, screwdrivers, and a sturdy support like a piece of plywood or a similar material.
    2. Disconnect Fittings: Carefully disconnect any pipes or fittings connected to the radiator using appropriate wrenches. Be cautious not to over-tighten or damage the pipes.
    3. Support the Radiator: Place a strong support, such as a piece of plywood or a heavy-duty board, beneath the radiator. This will distribute the weight evenly and prevent damage to the wall or the radiator itself.
    4. Detaching Wall Brackets: If the radiator has wall brackets, carefully remove the brackets using appropriate tools. Ensure the brackets are securely fastened to the support and that the radiator is held firmly.
    5. Lifting the Radiator: Carefully lift the radiator using the support and ensure that it doesn’t tilt or shift during the removal process. Two people are recommended for lifting larger or heavier radiators.
    6. Inspect for Damage: Before moving the radiator, inspect for any signs of damage to the radiator or the wall. This helps prevent further issues later.
    7. Removal from the Room: Carefully carry the radiator out of the room. If possible, roll the radiator on a suitable surface to avoid causing unnecessary stress on the unit.

    Importance of Proper Support and Handling

    Proper support and handling during radiator removal are crucial to avoid damaging the radiator, wall, or surrounding fixtures. Improper lifting can lead to cracking the radiator, damaging the wall studs, or even causing injury. Using adequate support prevents the radiator from tilting or shifting during removal. A sturdy support evenly distributes the weight, preventing pressure points and ensuring the safety of the unit and the surrounding environment.

    Troubleshooting

    Taking a radiator off the wall can sometimes reveal unexpected challenges. This section details common problems encountered during the process, along with practical solutions. Understanding these potential issues and their fixes will help ensure a smooth and safe removal process, minimizing complications.The process of radiator removal, while generally straightforward, can sometimes encounter unforeseen obstacles. Careful attention to potential problems, combined with the correct tools and procedures, will greatly improve the likelihood of a successful and efficient job.

    Common Radiator Removal Problems

    This section Artikels potential issues encountered during radiator removal, providing context for each. Understanding these problems is crucial for efficient troubleshooting and resolution.Common problems during radiator removal include damaged pipes, loose connections, and unexpected obstructions. These problems often arise from the age or condition of the plumbing system, the type of radiator being removed, or the specific installation method used.

    Recognizing these issues early can help prevent more extensive problems during the process.

    Damaged Pipes or Connections

    Sometimes, the pipes connected to the radiator might be damaged or corroded. This damage can manifest as leaks, cracks, or weakened connections. Identifying and addressing these issues early in the process is essential to avoid further complications.Dealing with damaged pipes or connections requires careful assessment. First, isolate the affected area by turning off the water supply to the radiator.

    Then, inspect the damage. If the damage is minor, consider using pipe sealant or epoxy to repair the leak. For more extensive damage, it’s crucial to consult a qualified plumber for professional repair or replacement. Improper repair could lead to water damage or safety hazards.

    Unexpected Obstructions

    During the removal process, unexpected obstructions like electrical wiring, pipes, or hidden support structures might be encountered. These obstructions can complicate the removal process and lead to delays or damage if not addressed proactively.Thorough pre-removal inspection is vital to identify any potential obstructions. A thorough visual inspection of the area around the radiator, including the wall behind it, is highly recommended.

    Taking a radiator off the wall can be a surprisingly involved project, requiring careful planning and execution. It’s a bit like diving into a whole other world, almost a different kind of DIY challenge. You need to consider the plumbing and electrical connections, and the aesthetic impact of removing the radiator, which can make you feel like you’re part of a creative symphony.

    For inspiration, check out this awesome playlist of 5 10 15 20 kurt vile 5 10 15 20 kurt vile to really get you pumped for that radiator-removal project, and hopefully you’ll find some inspiration there. Then, you can get back to your DIY radiator makeover!

    If obstructions are found, careful planning is necessary to determine the best approach for navigating them without causing further damage. Sometimes, minor adjustments to the removal procedure might be required to accommodate these obstructions. This could involve using different tools or techniques to carefully remove or reroute the obstructions.

    Taking a radiator off the wall might seem like a drastic move, but sometimes it’s the only way to create the space you need. For instance, if you’re trying to make room for a new shower, especially if you have a baby and need to adapt your bathroom for easier access and safety, you might consider the practicalities of Shower with a Baby.

    It’s all about maximizing your space and making things work for your lifestyle. Ultimately, a little rearranging can completely change the flow and usability of a room, making your home feel more functional and comfortable, even with a radiator out of the way.

    Table of Common Problems, Causes, and Solutions

    This table provides a concise overview of common radiator removal problems, their potential causes, and recommended solutions.

    Problem Cause Solution
    Leaks or drips from pipes Damaged or corroded pipes, loose connections Turn off water supply, assess damage, use pipe sealant or epoxy for minor damage, consult a plumber for major repairs.
    Unexpected obstructions Hidden electrical wiring, pipes, or support structures Thorough pre-removal inspection, careful planning to reroute or remove obstructions, potentially involving adjustments to the removal procedure.
    Difficulty detaching connections Tight connections, rust, or corrosion Use appropriate tools (e.g., adjustable wrenches, pliers), apply penetrating oil to loosen connections, avoid forceful removal to prevent damage.
    Radiator won’t budge Embedded or faulty supports, insufficient tools Check for embedded supports, use appropriate tools for lifting, if necessary, consider professional help for stubborn radiators.

    Reinstallation Procedures

    Take a Radiator Off the Wall

    Getting your radiator back on the wall correctly is crucial for both efficient heating and safety. Proper reinstallation ensures the radiator functions optimally and prevents potential leaks or structural damage. Following these steps will guide you through the process, enabling you to complete the project successfully.

    Preparing the Wall for Reinstallation

    Before mounting the radiator, meticulous preparation of the wall is paramount. This involves ensuring the mounting points are clean and stable. Check for any damage or loose plaster, and repair any imperfections to prevent the radiator from shifting or causing future problems. Clean the area around the mounting holes thoroughly to remove any debris or residue that could interfere with the adhesive or screws.

    Reconnecting the Water Supply Lines

    Correctly reconnecting the water supply lines is essential for ensuring the radiator’s proper operation and preventing water leaks. Before connecting the lines, ensure that the water supply to the radiator is shut off. Carefully align the lines with their respective connections on the radiator. Apply Teflon tape to the threads of the connections to create a watertight seal.

    Tighten the connections firmly but avoid over-tightening, which could damage the fittings.

    Securing the Radiator to the Wall

    The radiator’s secure attachment to the wall is critical for both its stability and safety. Use the appropriate mounting hardware, ensuring that the screws are long enough to penetrate the wall studs. Pre-drill holes to prevent the wall from cracking. Use wall anchors if necessary for added support. Double-check that the radiator is level and plumb before tightening the screws completely.

    Radiator Reinstallation Steps

    1. Ensure the water supply to the radiator is completely shut off.
    2. Thoroughly clean the wall mounting points and surrounding areas, removing any debris or residue.
    3. If necessary, repair any damaged plaster or loose areas around the mounting points.
    4. Align the radiator with the mounting points, ensuring it’s level and plumb.
    5. Carefully reconnect the water supply lines, applying Teflon tape to the threads and tightening firmly but not excessively.
    6. Secure the radiator to the wall using appropriate mounting hardware and wall anchors where needed. Pre-drill holes to avoid cracking the wall.
    7. Carefully tighten all screws, ensuring the radiator is securely attached and level.
    8. Turn the water supply back on slowly and monitor for any leaks.

    Additional Considerations

    Taking a radiator off the wall is a task that demands careful planning and execution. Beyond the technical steps of disassembly and reinstallation, there are crucial aspects to consider regarding the wall structure, local regulations, and proper disposal. Understanding these factors ensures the job is completed safely and responsibly.Careful consideration must be given to the structural integrity of the wall to avoid causing damage.

    Knowing the specific type of wall construction and the placement of crucial support elements will help in avoiding potential issues. Following these precautions minimizes the risk of compromising the wall’s stability or compromising safety.

    Potential Wall Structure Issues

    Wall structures vary significantly, from simple plasterboard to complex brick or concrete. Understanding the construction is crucial to avoid causing damage during removal. Incorrect handling could lead to cracks, loose plaster, or even structural instability. Before starting any work, inspecting the wall and understanding its construction is essential.

    • Plasterboard walls might require careful handling of the surrounding area to avoid damage to the plaster or drywall. Any damage to the drywall needs to be repaired appropriately. If there is significant damage, professional help should be considered to prevent further issues.
    • Brick or stone walls might require specialized tools and techniques to avoid damaging the mortar or bricks themselves. Care should be taken to avoid unnecessary impact or pressure on the wall structure during removal and reinstallation.
    • Concrete walls typically present fewer issues during removal, but careful consideration of the anchoring points for the radiator is necessary. Incorrect removal techniques might lead to damage to the concrete. Specialized tools may be required.

    Local Regulations and Permits

    Local building codes and regulations may dictate specific requirements for radiator removal, especially in older buildings or historical areas. Before undertaking any work, checking local ordinances is essential. Contacting the relevant authorities can provide crucial information on permits, safety measures, or specific disposal procedures.

    • Some areas might require a permit for work involving the wall structure. Obtaining the necessary permit is crucial to avoid legal issues. It is always recommended to verify this with local authorities.
    • Regulations might exist for the disposal of old materials, such as lead paint, asbestos, or other potentially hazardous substances. Understanding and following these regulations is crucial for the safety of workers and the environment.

    Proper Disposal of Old Parts

    Proper disposal of old parts is essential to avoid environmental contamination and potential health hazards. Incorrect disposal can lead to contamination of soil or water sources. Following local regulations is crucial to ensure the safe and responsible disposal of the old radiator and related materials.

    • Check local regulations for the appropriate disposal methods for old radiators. Different materials within the radiator might have specific disposal requirements. Contacting the relevant waste management services can provide valuable information.
    • Ensure that any potentially hazardous materials, such as lead or asbestos, are handled and disposed of according to local regulations. Professional disposal services may be necessary for materials like these.

    Recycling or Disposal Procedures

    Recycling or disposal procedures for removed radiators vary depending on the type of radiator and local regulations. Following the correct procedures is essential to avoid harming the environment. Consult with local waste management services to determine the most appropriate disposal method.

    • Many municipalities offer recycling programs for metals. Radiators often contain significant metal components, which can be recycled. Check with your local recycling center to see if radiators are accepted.
    • Some types of radiators may contain hazardous materials, like lead paint. In these cases, specialized disposal methods are necessary to prevent environmental contamination. Local regulations should be followed, and professional waste removal services might be required.

    Illustrative Examples

    Radiator removal can vary significantly depending on the type of wall and the radiator itself. Understanding these differences is crucial for a safe and efficient job. This section provides a practical example to illustrate the process for a cast iron radiator in a plaster wall.

    Cast Iron Radiator Removal from a Plaster Wall

    This scenario details the specific steps for removing a cast iron radiator from a plaster wall. It emphasizes the importance of proper preparation and safety measures throughout the entire process.

    Tools and Materials Needed

    To safely and effectively remove a cast iron radiator from a plaster wall, you’ll need the following:

    • Screwdrivers (Phillips and flathead): Essential for disassembling the radiator’s connections and securing parts.
    • Adjustable wrench: Needed for loosening nuts and bolts on the radiator’s connections.
    • Pliers: Useful for gripping and manipulating small parts during the disassembly.
    • Hammer and chisel: Necessary for carefully removing plaster or any obstructions encountered around the radiator.
    • Safety glasses: Protect your eyes from flying debris.
    • Gloves: Protect your hands from sharp edges and potential hazards.
    • Dust mask: Prevent inhalation of dust and debris.
    • Bucket and rags: To collect water and debris from the radiator.
    • Level: To ensure the radiator is properly aligned for installation.
    • Measuring tape: To ensure accurate measurements for reinstallation.
    • Utility knife: To carefully cut away any stubborn plaster or drywall.
    • Possibly, a small amount of plaster patching compound, depending on the condition of the wall and whether you are planning to repair any damage to it after the removal.

    Disassembly Procedures

    This section Artikels the steps involved in disassembling a cast iron radiator in a plaster wall, ensuring you’re prepared for the task ahead.

    1. Turn off the water supply: This is paramount to prevent water damage and personal injury. Shut off the valves supplying water to the radiator, ensuring there’s no residual pressure.
    2. Assess the wall: Carefully inspect the wall around the radiator for any loose or fragile plaster. Note any unusual conditions or potential hazards.
    3. Remove any coverings: If there are any decorative covers or caps, carefully remove them to access the radiator’s connections.
    4. Disconnect the pipes: Loosen and remove the nuts and bolts connecting the radiator to the pipes. Use the appropriate tools and proceed with caution.
    5. Remove the radiator: Once the pipes are disconnected, carefully lift the radiator and remove it from its location. Be mindful of the weight and ensure there’s enough support to avoid dropping it.

    Detailed Removal Process for a Cast Iron Radiator

    This step-by-step procedure ensures a safe and effective removal of a cast iron radiator in a plaster wall.

    1. Safety First: Wear safety glasses, gloves, and a dust mask. Ensure the water supply is turned off and the area is well-lit.
    2. Locate the pipes: Identify the pipes connected to the radiator and carefully inspect their condition.
    3. Disconnect the pipes: Use an adjustable wrench to loosen and remove the nuts and bolts connecting the pipes to the radiator. Place a bucket underneath the radiator to catch any drips or residual water.
    4. Remove the radiator: Carefully lift the radiator and remove it from the wall, using appropriate support if needed. If the plaster around the radiator is loose, use a utility knife to carefully cut away any sections that might obstruct removal. A hammer and chisel might be necessary to gently remove obstructions.
    5. Inspect the wall: Examine the wall for any damage caused during the removal process. Document any issues for later repair.

    Outcome Summary

    Successfully removing a radiator involves meticulous planning, precise execution, and a deep understanding of the task at hand. This guide provides a comprehensive resource for safely and effectively taking a radiator off the wall, covering everything from essential safety precautions to detailed reinstallation steps. Remember, proper planning and execution are key to a smooth and safe outcome. Armed with this knowledge, you can confidently tackle this project, knowing you’ve got a solid foundation of information to draw upon.

  • Fill in Gaps in Wooden Floors A Comprehensive Guide

    Fill in Gaps in Wooden Floors A Comprehensive Guide

    Fill in Gaps in Wooden Floors: This guide dives deep into the world of repairing those pesky gaps in your wooden floors. From hairline cracks to wider gaps caused by settling or moisture damage, we’ll explore the causes, diagnosis, and various repair methods to get your floors looking and feeling their best again. We’ll also cover prevention strategies to keep your floors in tip-top shape for years to come.

    This comprehensive guide will equip you with the knowledge and tools to effectively identify, assess, and repair gaps in your wooden floors. We’ll cover everything from visual inspections and moisture testing to various repair methods and materials, ensuring you’re well-prepared for any situation.

    Identifying the Problem: Fill In Gaps In Wooden Floors

    Wooden floors, with their beauty and warmth, can subtly betray hidden issues. These issues, often manifested as gaps and inconsistencies, can stem from various factors, from improper installation to environmental conditions. Understanding the nature of these problems is crucial for effective and lasting solutions.Gaps in wooden floors, whether subtle or pronounced, often signal underlying problems that, if left unattended, can lead to significant damage and safety concerns.

    Proper diagnosis and understanding of the causes of these gaps are vital for effective repair and maintenance.

    Types of Gaps

    Gaps in wooden floors can vary significantly in appearance and severity. These differences directly correlate with the underlying causes and potential damage. Hairline cracks, for instance, might indicate minor stress, while wider gaps could signify more significant structural issues. Uneven settling, another common problem, results from varying degrees of support or pressure on the floorboards.

    Causes of Gaps

    Numerous factors can contribute to gaps in wooden floors. Moisture damage, a frequent culprit, can lead to swelling, shrinking, and warping of the wood, causing gaps to appear. Improper installation, such as inadequate subfloor preparation or incorrect nailing techniques, can also lead to premature deterioration. Structural issues, such as settling or shifting of the building itself, are also significant contributors.

    Visual and Structural Implications

    Gaps in wooden floors have both aesthetic and structural consequences. Visually, gaps detract from the overall appearance of the room, creating an uneven and potentially unprofessional look. Structurally, these gaps compromise the integrity of the floor. They can allow moisture to seep into the subfloor, leading to further damage and potentially impacting the structural stability of the entire house.

    Potential Dangers and Consequences

    Ignoring gaps in wooden floors can lead to several potential dangers. The gaps might allow for the accumulation of debris, insects, and moisture, creating a breeding ground for pests and rot. Uneven settling can lead to tripping hazards and cause the floor to buckle or sag, which is a safety concern, especially in high-traffic areas. Ignoring these problems can increase the likelihood of costly repairs down the line.

    Importance of Timely Repair

    Promptly addressing gaps in wooden floors is crucial for maintaining both the aesthetic appeal and structural integrity of the home. Early intervention prevents small issues from escalating into more significant and expensive problems. Addressing the underlying causes of the gaps, rather than just the visible symptoms, is key to long-term success. Prevention of further damage and the preservation of the floor’s value are the paramount goals.

    Fixing those pesky gaps in my wooden floor has been a real pain lately. It’s surprisingly tricky, and I’ve been scouring the internet for solutions. Speaking of quirky videos, have you seen the hilarious prank Jonny Greenwood pulled on Thom Yorke during a Radiohead show? watch jonny greenwood prank thom yorke during a radiohead show Anyway, back to the floor, I’m hoping some of the tips in those DIY repair guides will finally get these gaps sealed up properly.

    Assessment and Diagnosis

    Fill in Gaps in Wooden Floors

    Pinpointing the exact cause of gaps in a wooden floor requires a systematic approach, combining visual observation with more in-depth diagnostic techniques. A thorough assessment will help determine the extent of the damage, the underlying issues, and the best course of action for repair. A clear understanding of the problem is crucial for effective solutions and to avoid costly mistakes.

    Methods for Assessing Gap Extent and Severity

    Visual inspection, moisture testing, and structural analysis are essential tools for evaluating the condition of a wooden floor with gaps. Each method offers unique insights into the problem, helping to paint a comprehensive picture of the floor’s health.

    Method Description Advantages Disadvantages
    Visual Inspection A preliminary assessment involving careful observation of the gaps, their size, shape, and location on the floor. This includes noting any signs of damage to the surrounding wood, such as cracks, splinters, or discoloration. Quick, inexpensive, and readily available. Provides a first impression of the extent and nature of the problem. Subjective; may miss subtle signs of damage or underlying issues. Difficult to determine the precise cause of the gaps solely from visual inspection.
    Moisture Testing Utilizing specialized equipment to measure moisture content within the wooden floorboards. This helps determine if moisture intrusion is contributing to the gaps. Provides objective data on moisture levels, identifying potential causes like water leaks or excessive humidity. Requires specialized equipment and trained personnel; may not always pinpoint the exact source of the moisture. Can be time-consuming and potentially expensive.
    Structural Analysis Involves examining the subfloor, joists, and other structural components supporting the wooden floor. This could include checking for signs of rot, pest damage, or inadequate support. Provides insights into the structural integrity of the floor, revealing underlying issues like insufficient support or decay. Can be complex and expensive, often requiring the expertise of a structural engineer. May not always be necessary for minor gap issues.

    Factors to Consider When Diagnosing Gap Causes

    Diagnosing the cause of gaps requires careful consideration of various contributing factors. Understanding the potential origins will guide the repair process and prevent future issues.

    Factor Description Example
    Moisture Water intrusion or high humidity can cause wood to swell and shrink, leading to gaps. A leaky pipe or condensation from a bathroom.
    Subfloor Issues Problems with the subfloor, such as uneven surfaces, inadequate support, or rot, can create gaps in the overlying floor. Settlement of the house, insufficient subfloor support, or rot in the subfloor joists.
    Movement Expansion and contraction of the wood due to temperature changes or uneven settling can create gaps. Significant temperature fluctuations in a home, especially in areas with significant temperature swings.
    Pest Infestation Termites, carpenter ants, or other wood-destroying insects can weaken the wood and cause gaps. Presence of wood-destroying insects or signs of their activity, such as frass or tunnels in the wood.

    Tools and Equipment for a Thorough Assessment

    A thorough assessment necessitates the use of specific tools and equipment. A list of these tools will aid in a more efficient and accurate evaluation.

    • Moisture meter: Essential for measuring moisture content in the wood.
    • Measuring tape and level: Accurate measurements are crucial for determining gap sizes and ensuring flatness.
    • Hammer and screwdriver: Needed for checking the condition of the subfloor and floorboards.
    • Magnifying glass: To inspect for small signs of damage or insect activity.
    • Camera: To document the extent and location of the gaps and damage.
    • Safety glasses and gloves: Essential for personal protection during the assessment.

    Repair Methods and Materials

    Fixing gaps in wooden floors can be a tricky but rewarding task. Understanding the various repair methods and the suitable materials is crucial for achieving a lasting and aesthetically pleasing result. Careful consideration of the gap’s size, location, and the type of wood will dictate the best approach. A well-executed repair will not only restore the floor’s integrity but also enhance its overall appearance.

    Repair Methods

    Different repair methods cater to various gap sizes and complexities. Patching is a common approach for smaller gaps, while sanding is necessary for larger ones or to achieve a smooth finish. Specialized fillers, chosen carefully based on the type of wood and gap, offer a solution for more substantial damage.

    Patching

    Patching involves filling the gap with a suitable material and then carefully blending it with the surrounding wood. This method is ideal for small gaps that don’t significantly impact the floor’s structural integrity. The material used must closely match the wood’s color and grain for a seamless result.

    Sanding, Fill in Gaps in Wooden Floors

    For larger gaps or areas where patching isn’t suitable, sanding is a necessary step. This process involves removing excess material to level the surface and prepare it for filling. It’s essential to use appropriate sanding tools and techniques to avoid damaging the surrounding wood. This method ensures a smooth transition between the repaired area and the rest of the floor.

    Fixing those pesky gaps in your wooden floors can be a real pain, but thankfully, there are simple solutions. I was recently inspired by the imaginative world of free guy stranger things ai dustin steve , and the way characters overcome challenges, which reminded me of the satisfying feeling of perfectly filled-in floor gaps. Ultimately, choosing the right filler and method is key to achieving a flawless finish for your floors.

    Specialized Fillers

    Wood fillers are specifically formulated to match the properties of wood, making them ideal for filling gaps. Different types of wood fillers are available, each with unique properties and applications.

    Wood Filler Types

    The selection of wood filler depends on the type of gap and the desired outcome. A good understanding of the various filler types is critical to selecting the right material.

    Filler Type Properties Application Pros Cons
    Epoxy Filler Strong, durable, and water-resistant Large gaps, high-moisture areas Excellent bonding, long-lasting Can be difficult to work with, may be more expensive
    Polyurethane Filler Versatile, relatively easy to work with Various gap sizes, good for most woods Good adhesion, dries quickly May not be as strong as epoxy, may not match all wood types perfectly
    Wood Putty Easy to apply, good color matching Smaller gaps, decorative repairs Affordable, relatively easy to work with May not be as durable as other options, may not be suitable for high-traffic areas

    Applying Wood Filler (Example: Polyurethane)

    This demonstrates the process for applying polyurethane filler, a versatile choice for most wood gaps.

    1. Prepare the gap by removing any loose debris or dust. Ensure the surrounding area is clean and dry.
    2. Mix the filler according to the manufacturer’s instructions. A consistent mixture is crucial for optimal results.
    3. Using a putty knife or similar tool, carefully fill the gap with the mixed filler, ensuring a smooth and even surface.
    4. Allow the filler to dry completely according to the manufacturer’s instructions. Patience is key to avoiding unevenness.
    5. Once dry, lightly sand the filler to match the surrounding wood’s surface. Careful sanding is important for a seamless finish.

    Preparation and Installation

    Getting those pesky gaps in your wooden floors filled requires careful preparation and precise installation. Proper surface preparation is crucial for achieving a strong, lasting repair that won’t just mask the problem but truly fix it. Skipping these steps can lead to the filler failing prematurely, leaving you with the same issue in the future. This section will guide you through each stage, from cleaning and priming to the actual filling and finishing, ensuring a professional-looking and durable result.

    Surface Preparation

    Thorough surface preparation is the foundation of a successful gap-filling project. Ignoring this step can compromise the longevity of the repair, leading to potential issues down the line. The goal is to ensure a clean, stable surface that provides optimal adhesion for the filler. This means removing any loose debris, dust, or old sealant that could prevent the filler from bonding effectively.

    • Cleaning the Affected Area: Remove all loose dirt, dust, and debris from the gap and surrounding area. Use a stiff brush or vacuum cleaner to thoroughly clean the area. Pay special attention to removing any loose wood particles or remnants of previous attempts to fill the gaps.
    • Repairing Damaged Wood: If the gap is significant or the surrounding wood is damaged, address the underlying issue. This might involve patching damaged wood, repairing cracks, or using wood filler to create a smooth surface.
    • Removing Existing Filler: Carefully remove any existing filler from the gap. This ensures a clean surface for the new filler to adhere to. Use a putty knife or similar tool to carefully scrape away old material without damaging the surrounding wood. Be mindful of not harming the wood beneath.
    • Cleaning and Drying: Thoroughly clean the gap and the surrounding area again. A damp cloth and then a dry cloth will remove any residual dust or dirt. Ensure the surface is completely dry before applying the filler. Allow the wood to completely dry before continuing to prevent issues.

    Filler Selection and Application

    Choosing the right filler is essential for a successful repair. The filler must be compatible with the type of wood and should match the existing floor’s color and texture.

    • Filler Selection: Select a wood filler that is specifically designed for hardwood floors. Consider the color and texture match. Look for fillers that offer high adhesion and durability. Test the filler on an inconspicuous area first to ensure it blends with the existing floor.
    • Applying the Filler: Use a putty knife or similar tool to apply the filler to the gap. Ensure the filler is packed firmly into the gap, but avoid overfilling. Work in small sections, allowing each section to dry before moving on to the next.
    • Smooth and Level: Once the filler is in place, use a putty knife or a sanding block to smooth and level the filler to the surrounding wood. This ensures a seamless transition between the filled gap and the existing floor. Work in small sections, and don’t try to fill the gap too quickly.

    Finishing Touches

    Once the filler is dry, the final steps involve sanding and sealing.

    • Sanding: Sand the filled area with progressively finer grits of sandpaper to smooth out any imperfections and blend the filler seamlessly with the surrounding wood. Sanding ensures a smooth and polished finish.
    • Sealing: Apply a wood sealant or finish to protect the filled gap and the surrounding area. This step is crucial to prevent moisture damage and extend the lifespan of the repair.

    Tools and Equipment

    A variety of tools and equipment are needed for this task.

    • Putty Knife: For applying and smoothing the filler.
    • Sandpaper: Different grits for smoothing the filler.
    • Sanding Block: For easier and more controlled sanding.
    • Vacuum Cleaner: For cleaning the area.
    • Dust Mask: For personal safety.
    • Safety Glasses: For eye protection.

    Safety Precautions

    Safety is paramount during any repair project.

    • Dust Mask: Always wear a dust mask to prevent inhaling wood dust.
    • Safety Glasses: Protect your eyes from flying debris.
    • Gloves: Wear gloves to protect your hands from filler and wood dust.
    • Proper Ventilation: Ensure proper ventilation in the area to minimize exposure to dust and fumes.

    Maintenance and Prevention

    Fill in Gaps in Wooden Floors

    Keeping your wooden floors in pristine condition involves more than just filling gaps. Proactive maintenance is crucial to prevent future issues and extend the lifespan of your beautiful investment. Regular care and attention to environmental factors can significantly reduce the risk of further damage and costly repairs.Proper maintenance isn’t just about aesthetics; it’s about preserving the structural integrity of your floor.

    Fixing those unsightly gaps in my wooden floorboards has been a real pain lately. It’s a bit like trying to patch up a rift with a sibling, and sometimes, that’s exactly what it feels like! Just like needing to apologize to your older sister (check out Apologize to Your Older Sister for some helpful advice), finding the right filler and technique is key.

    Hopefully, this careful process will leave my floor looking seamless and beautiful again.

    By understanding the common causes of gaps and implementing preventive measures, you can maintain a healthy and durable wooden floor for years to come.

    Importance of Regular Maintenance

    Regular maintenance is paramount for preventing future gaps. Routine inspections can identify minor issues before they escalate into major problems. Early intervention can save you significant time, effort, and money in the long run. Addressing minor issues promptly is often far less expensive than dealing with larger, more complex problems later. Regular maintenance helps maintain the floor’s structural integrity and prevents warping or cracking.

    Methods for Preventing Future Gaps

    Preventing future gaps hinges on addressing the root causes. Moisture control is paramount. Controlling humidity levels within your home can significantly reduce the risk of warping and expansion. Consider using a dehumidifier in areas with high humidity or areas prone to moisture accumulation. Adequate structural support is equally vital.

    Ensure the subfloor is stable and adequately supported. Regular checks for signs of sagging or uneven settling can prevent future issues.

    Extending the Lifespan of Repaired Floors

    Proper maintenance extends the lifespan of repaired wooden floors. Regular cleaning and sealing help protect the wood from environmental factors. This can also help protect the repaired area from further damage. Maintaining the proper humidity levels is essential to prevent the wood from expanding or contracting, which can lead to further gaps.

    Long-Term Maintenance Strategies

    Long-term maintenance involves a combination of strategies to maintain the integrity of your wooden floors. Routine cleaning and polishing will keep the wood in top condition. Periodic inspections for signs of wear or damage are crucial for identifying potential issues before they become serious problems. Professional cleaning and refinishing can also help extend the life of your floor and enhance its appearance.

    Regularly checking for moisture accumulation, structural support, and overall stability is essential for the longevity of your floors.

    Common Causes and Preventive Measures

    Understanding the causes of gaps and implementing preventive measures is key to long-term success.

    Cause Preventive Measures
    Moisture fluctuations (high humidity or excessive dryness) Maintain stable humidity levels using dehumidifiers or humidifiers as needed. Seal the floor properly to prevent moisture penetration.
    Uneven subfloor or inadequate support Ensure the subfloor is level and properly supported. Use shims or other methods to address unevenness. Regular inspection is vital to prevent settling.
    Poor installation (incorrect nailing, improper fitting) If possible, hire a professional installer to ensure proper techniques. Careful and thorough installation is key. Inspect the work for potential problems.
    Heavy furniture placed on specific areas Distribute furniture weight evenly across the floor. Use floor protectors under heavy furniture to prevent concentrated pressure.
    Insect infestation Regular inspections for signs of pests and immediate treatment are crucial. Professional pest control can be necessary in some cases.

    Case Studies and Examples

    Filling gaps in wooden floors can be a rewarding DIY project, but success hinges on careful planning and execution. Understanding real-world scenarios and successful repairs provides valuable insight into best practices. This section delves into case studies, highlighting the specific challenges and solutions encountered in various repair projects.

    Case Study: Repairing a Gap with Epoxy Filler

    This case study details the repair of a 12-inch gap in a hardwood floor using an epoxy-based filler. The gap, caused by a shifting subfloor, was initially filled with a wood filler, which failed due to the continued movement of the floor.The solution involved a two-part epoxy filler specifically designed for flooring applications. The epoxy was mixed according to the manufacturer’s instructions and carefully injected into the gap.

    Once the epoxy cured, the surface was carefully sanded and finished to match the surrounding floor. This approach proved highly effective in addressing the root cause of the problem, ensuring long-term stability and preventing future issues.

    Real-World Example: A Kitchen Floor Repair

    A homeowner noticed widening gaps in their kitchen floor. The gaps initially appeared small but worsened over time. The cause was identified as insufficient moisture barrier under the floorboards. The solution involved removing the damaged floorboards, installing a moisture barrier, and replacing the floorboards with new ones. Using pre-finished flooring significantly reduced the labor and time needed to complete the repair.

    Careful measurements and precise installation ensured a seamless transition between the new and existing flooring.

    Detailed Image Descriptions

    • Image 1: A close-up view of a gap in a hardwood floor. The gap is approximately 1/2 inch wide and 6 inches long. The surrounding wood is in good condition. The gap is clearly visible against the light-colored wood.
    • Image 2: Shows the gap after the area around the gap has been prepared. The surrounding wood is cleaned and the area around the gap is sanded smooth. The gap is still visible, but the surrounding area is ready for filling.
    • Image 3: A close-up of epoxy filler being injected into the gap. The filler is a light gray color. The filler is being injected with a specialized tool, ensuring proper filling of the gap without creating any visible bumps or lumps. The surface of the surrounding wood is visible, and the epoxy is visibly filling the gap.
    • Image 4: The filled gap after the epoxy has cured. The epoxy is now a smooth, uniform color, matching the surrounding floor. No visible imperfections or gaps are present. The surface is ready for sanding and finishing.
    • Image 5: The sanded and finished repair area. The epoxy-filled gap is perfectly blended with the surrounding hardwood floor. The finish is smooth and even, with no noticeable difference between the repaired and original flooring. A slight sheen is present, indicating a high-quality finish.

    Comparison of Repair Approaches

    Type of Damage Wood Filler Epoxy Filler Replacing Boards
    Small, recent gaps Effective and inexpensive Excellent for long-term stability Excessive labor and expense
    Significant gaps, or gaps with moisture issues Ineffective in the long run Effective for gaps with moisture issues and long-term stability Necessary for significant structural issues
    Pre-finished floors May not match finish May not match finish Often matches existing finish

    Outcome Summary

    In conclusion, repairing gaps in wooden floors is a multifaceted process requiring careful assessment, selection of appropriate materials, and precise execution. By understanding the causes, employing effective diagnosis techniques, and utilizing the right repair methods, you can restore your floors to their former glory. Remember, prevention is key! Regular maintenance and proactive measures will help you avoid costly repairs in the future.