Add Images to a Microsoft Word Document – Ready to elevate your documents with captivating visuals? This comprehensive guide will walk you through every step, from selecting the perfect image to mastering advanced techniques. We’ll explore various methods for adding images, discuss optimal placement and sizing, and delve into essential considerations like image formats and copyright.
From basic insertion to advanced manipulation, we cover it all. Learn how to seamlessly integrate images into your Word documents, ensuring professional-looking results every time. We’ll also address potential pitfalls and provide solutions for troubleshooting common issues.
Introduction to Adding Images

Adding images to your Microsoft Word documents enhances readability and visual appeal. Images can illustrate concepts, showcase data, or simply break up large blocks of text, making your document more engaging for the reader. This section explores the various methods for inserting images and the basic steps involved.
Methods for Adding Images
Images can be incorporated into a Word document in several ways. You can either upload an existing image file from your computer or use a URL to embed an image from an online source.
Adding Images from Files
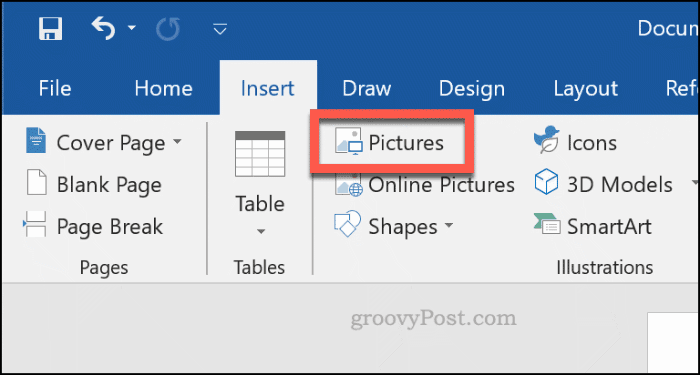
This is the most common method. To add an image from a file, navigate to the “Insert” tab in the Word ribbon. Within the “Illustrations” group, you’ll find the “Pictures” option. Clicking on “Pictures” will open a file browser. Select the image file from your computer, and it will be inserted into your document.
Word will automatically adjust the image’s size and position to fit the document layout.
Adding Images from Online Sources
For images hosted online, you can directly insert them into your document using their URL. Navigate to the “Insert” tab, click “Online Pictures” in the “Illustrations” group, and paste the image URL into the dialog box that appears. Word will then download and display the image. Be mindful of copyright restrictions and proper attribution when using images from online sources.
Supported Image File Types
The following table Artikels the image file types that Microsoft Word typically supports:
| File Type | Description |
|---|---|
| .jpg (JPEG) | A common, widely supported format known for its balance of image quality and file size. |
| .png (Portable Network Graphics) | Often used for graphics with transparency or complex details. |
| .gif (Graphics Interchange Format) | Suitable for simple animations or images with limited color palettes. |
| .bmp (Bitmap) | A simple, older format that may be less efficient in terms of file size compared to others. |
| .tiff (Tagged Image File Format) | Generally used for high-quality images that require maximum detail and precision. |
| .svg (Scalable Vector Graphics) | A vector-based format, ideal for graphics that need to be scaled without losing quality. |
Image Placement and Sizing
Positioning images effectively within a Microsoft Word document is crucial for readability and visual appeal. Choosing the right placement method and resizing techniques significantly impacts the overall presentation. Incorrectly placed images can disrupt the flow of text, making the document less engaging. Understanding the various options available empowers you to create a professional and polished document.Image placement options in Word go beyond simply dropping an image into the text.
The software provides several strategies for integrating visuals, each with its own set of advantages and disadvantages. Understanding these methods, coupled with resizing and cropping techniques, will allow you to precisely integrate images into your documents, enhancing their overall impact.
Adding images to a Microsoft Word document is pretty straightforward, but sometimes the process can be a bit fiddly. It’s amazing how easily you can enhance a document with visuals, though. Speaking of visuals, did you know that a song by Big Sean featuring Colin Kaepernick, included on the Madden NFL 19 soundtrack, had a lyric censored ?
Anyway, once you’ve got the hang of it, adding images becomes a breeze. Just remember to select the ‘Insert’ tab and choose your image file.
Image Positioning Methods
Different image positioning methods in Word offer unique ways to integrate visuals into your document. Inline positioning embeds the image directly within the text flow, while floating positioning allows the image to appear alongside the text, potentially on a separate line. Choosing the appropriate method hinges on the desired visual arrangement and the overall document design.
- Inline Images: Inline images are seamlessly integrated within the text, adjusting their position according to the surrounding text. This method is ideal for images that are essential parts of the text flow, and should be considered when the image is small and closely related to the adjacent text.
- Floating Images: Floating images, on the other hand, are positioned independently of the text flow. They can appear above or below the text, or alongside it, creating a more visually dynamic document layout. Floating images are best for images that need more space or serve as supporting visual aids.
Resizing Images
Resizing images is a critical step in integrating them into your document. Word provides tools for adjusting image dimensions, allowing you to maintain optimal visual clarity while preserving the document’s overall layout. Using the correct resizing methods is vital to maintaining the overall document’s aesthetics and visual appeal.
- Using the Sizing Handles: Word provides sizing handles around the image that allow for precise adjustments. Dragging these handles allows you to proportionally resize the image, keeping its aspect ratio intact. This method ensures that the image retains its intended visual impact while fitting within the document layout.
- Using the Picture Tools Format Tab: This tab offers a wider range of resizing options, including fixed dimensions, and specific constraints to accommodate your design needs. These options enable you to maintain optimal visual appeal within the document’s design, enhancing the overall presentation.
Cropping and Adjustments
Cropping and adjustments enhance the visual appeal and clarity of your images within the document. Cropping removes unwanted portions of an image, focusing on the essential elements, while adjustments fine-tune the image’s appearance, enhancing its visual impact.
- Cropping: Cropping an image allows you to remove any unwanted parts of the picture. This focuses the viewer’s attention on the relevant portion of the image, improving its overall impact. Word’s cropping tools provide precise control, enabling you to refine the image’s composition.
- Image Adjustments: Image adjustments such as brightness, contrast, and color saturation enhance the image’s visual quality. These adjustments are particularly important when the original image has poor lighting or color balance. These tools can drastically improve the quality of your images, ensuring a professional and polished presentation.
Comparison of Image Placement Options
| Placement Option | Pros | Cons |
|---|---|---|
| Inline | Seamless integration with text, improves readability | Can appear cramped if the image is large, may not be ideal for visually dominant images |
| Floating | Allows images to stand out, improves visual appeal | Can disrupt text flow if not positioned carefully, potentially requiring additional formatting |
Image Formats and Compatibility
Choosing the right image format is crucial for optimal display and compatibility within Microsoft Word. Different formats offer varying degrees of compression, quality, and support for specific features, impacting file size and visual fidelity. Understanding these nuances helps ensure your images integrate seamlessly with your documents.
Supported Image Formats in Microsoft Word
Microsoft Word supports a variety of image formats, enabling you to import images from various sources. The most common and widely compatible formats include JPEG, PNG, GIF, and others. Each format possesses unique characteristics that influence their suitability for different purposes.
Common Image Formats and Their Uses
Various image formats cater to specific needs. Understanding their characteristics helps in making informed choices.
- JPEG (Joint Photographic Experts Group): JPEG is a popular format known for its excellent compression, resulting in smaller file sizes. This makes it ideal for photographs and images with smooth color gradients. However, JPEG compression is lossy, meaning some image quality is sacrificed with each compression. Lossy compression means some data is discarded during the process, leading to reduced quality.
For example, if you repeatedly save and compress a JPEG image, the quality will gradually degrade.
- PNG (Portable Network Graphics): PNG is a lossless format, preserving the original image quality. This makes it suitable for graphics, logos, and images with sharp lines and text. PNG supports transparency, which is beneficial for creating images with transparent backgrounds. PNG files are typically larger than JPEG files of similar quality, but the quality is maintained.
- GIF (Graphics Interchange Format): GIF is a lossless format primarily used for simple animations and images with limited color palettes. It’s well-suited for icons and simple graphics. GIF supports animation, but the animation is limited to a small number of frames, and the colors are often limited. Its compression is relatively less efficient compared to JPEG.
- TIFF (Tagged Image File Format): TIFF is a lossless format that maintains high quality, commonly used for professional-grade images and scanned documents. It supports a wide range of color depths and is often preferred for archival purposes. TIFF is ideal for high-resolution images and situations where maintaining original quality is essential. For example, it’s often used in publishing and graphic design.
- BMP (Bitmap): BMP is a simple, lossless format that’s widely supported but often results in large file sizes. It’s best for situations where compatibility is paramount, such as older software versions. BMP files are straightforward, but their size can be considerable.
Compatibility Issues and Recommendations
While Microsoft Word supports various formats, compatibility issues can arise. Using inappropriate formats can lead to file corruption or display issues. Therefore, choosing the correct format is essential.
| Format | Characteristics | Suitability |
|---|---|---|
| JPEG | Lossy compression, smaller file size, good for photographs | Photographs, web images |
| PNG | Lossless compression, supports transparency, good for graphics | Logos, icons, images with text |
| GIF | Lossless compression, limited color palette, supports animation | Simple animations, icons |
| TIFF | Lossless compression, high quality, wide color support | High-resolution images, archival purposes |
| BMP | Simple, lossless, large file size | Compatibility with older software |
Image Adjustments and Effects
Adding a touch of finesse to your images is key to elevating your Word documents. From subtle enhancements to dramatic transformations, image adjustments and effects can significantly impact the overall visual appeal and clarity of your content. This section dives into the world of image manipulation within Microsoft Word, guiding you through brightness, contrast, effects, and filters.
Adjusting Image Brightness and Contrast
Image brightness and contrast are fundamental adjustments that significantly alter the visual impact of your images. Adjusting these properties can make an image pop or, conversely, draw attention to specific elements within it. Word provides intuitive tools to control these parameters. Increasing brightness lightens the image, making it appear brighter, while decreasing brightness does the opposite. Similarly, increasing contrast intensifies the difference between light and dark areas, enhancing the visual impact, whereas decreasing contrast softens the differences.
Adding Image Effects
Adding effects like shadows and reflections can significantly enhance the visual appeal of your images. Shadows add depth and dimension, while reflections create a sense of realism and visual interest. Word offers these effects as pre-configured options, simplifying the process. For instance, you can add a subtle drop shadow to give your image a 3D effect, or add a soft reflection to simulate light bouncing off a surface.
Adding images to a Microsoft Word document is pretty straightforward, just like seamlessly blending different styles in music. For example, you can find some seriously creative music mashups like this one featuring Kendrick Lamar singing freestyles over Taylor Swift’s “Shake It Off” here. Once you’ve got the hang of it, you can easily spice up your Word documents with visuals.
It’s all about finding the right balance, just like in music production.
Applying Image Filters and Styles, Add Images to a Microsoft Word Document
Image filters and styles can dramatically alter the appearance of your images, transforming them from standard representations to visually striking elements. Filters can be applied to adjust color tones, apply special effects, or change the overall feel of an image. Applying filters to an image can dramatically change its visual appearance, making it more engaging and eye-catching. Word offers a variety of filters, including sepia tones, black and white, and more.
Image Adjustment Tools Overview
| Tool | Function |
|---|---|
| Brightness | Adjusts the overall lightness or darkness of the image. |
| Contrast | Adjusts the difference between light and dark areas in the image. |
| Shadows | Adds a shadow effect to an image, creating a sense of depth and dimension. |
| Reflections | Adds a reflection effect to an image, simulating light reflecting off a surface. |
| Filters | Applies various visual effects to the image, such as sepia, black and white, or artistic effects. |
| Styles | Applies pre-defined visual themes to the image, enhancing its aesthetic appeal. |
Image Sources and Copyright: Add Images To A Microsoft Word Document
Finding and using images in your Microsoft Word documents is easier than ever, but it’s crucial to respect copyright and attribution. Using images without permission can lead to legal issues and damage your reputation. This section explores the importance of ethical image sourcing and provides practical methods for finding and using images responsibly.Proper image attribution is not just a formality; it’s a matter of acknowledging the original creator’s work and respecting their intellectual property rights.
By giving credit where it’s due, you demonstrate professionalism and build trust with your audience.
Importance of Proper Attribution
Respecting copyright is essential for ethical document creation. Using images without proper attribution is considered copyright infringement, which can lead to legal repercussions and damage your reputation. A simple “thank you” and a clear source citation demonstrates your commitment to responsible usage and respects the hard work of the original creators.
Adding images to a Microsoft Word document is pretty straightforward, but sometimes fiddly. I was just working on a project, and while I was getting my images lined up just right, I stumbled upon some cool studio footage of Bon Ivers’ Justin Vernon teasing new music. bon ivers justin vernon teases new music in studio footage watch It was inspiring, and got me back on track.
Luckily, I figured out the image placement in Word fairly quickly after that. Just a few clicks and you’re good to go!
Finding High-Quality, Royalty-Free Images
Numerous resources offer high-quality, royalty-free images, making it easier than ever to find suitable visuals for your documents. These resources often allow for commercial use without additional licensing fees, saving you time and money.
Methods for Finding Royalty-Free Images
- Stock Photo Websites: Many websites specialize in providing royalty-free images, including iStock, Unsplash, Pexels, and Pixabay. These sites typically have a wide variety of images in various styles and resolutions. Some offer free downloads, while others require a subscription for access to a broader selection or higher-quality images.
- Creative Commons Licensing: Images licensed under Creative Commons offer a flexible range of usage rights. This licensing allows for commercial use, modifications, and distribution, but it’s essential to check the specific terms of the license to ensure you comply with the conditions.
- Public Domain Images: Public domain images are in the public domain, meaning they are not subject to copyright restrictions. Government agencies, educational institutions, and other organizations often release images into the public domain, providing a free and readily available source for visual content. However, always verify the source’s official status to ensure the image is truly public domain.
Obtaining Permission for Using Images from Other Sources
If you need to use an image that isn’t royalty-free or public domain, obtaining permission from the copyright holder is crucial. This process typically involves contacting the image creator or the organization that holds the copyright. Communicating your intended use clearly and politely increases the likelihood of receiving permission.
Reliable Sources for Royalty-Free Images
- iStockphoto: A widely recognized stock photo site with a vast library of images. While some images are free, many require a subscription.
- Unsplash: Known for its high-quality, free, and readily available photos.
- Pexels: Similar to Unsplash, offering a large selection of free, high-quality images.
- Pixabay: A significant resource for free stock photos, illustrations, and vectors.
- Gratisography: Offers free images that can be used for commercial projects, highlighting its commitment to royalty-free usage.
Advanced Image Techniques
Beyond basic insertion, Microsoft Word offers powerful tools for manipulating images in sophisticated ways. Mastering these techniques can significantly enhance document presentation and functionality. From interactive elements to dynamic content integration, these advanced methods unlock greater creative potential.Image manipulation goes beyond mere placement. This section explores advanced techniques, including creating image maps for interactive experiences, embedding images as watermarks or backgrounds, and incorporating image placeholders for dynamic content updates.
These approaches allow for richer, more engaging document designs and more dynamic content integration.
Image Maps and Hyperlinks
Image maps enable interactive areas within an image. Clicking on specific regions of the image triggers different actions, such as navigating to a different document or page within the same file. This feature transforms static images into dynamic navigational tools. Creating an image map involves dividing the image into clickable zones. Each zone is associated with a specific hyperlink.
This process allows for sophisticated navigation within a document, similar to how interactive websites utilize clickable image maps. This enhances user experience by offering alternative navigation methods within a document, making it more intuitive and user-friendly.
Watermarks and Background Images
Applying watermarks to images is a useful technique for copyright protection or branding. Incorporating a watermark image or text into another image subtly overlays the original image with the watermark, which is often transparent or semi-transparent. This method is crucial for documents that need copyright protection or a consistent visual theme. Background images can be used to create a visually appealing backdrop for a document, adding a cohesive aesthetic and enhancing the overall visual appeal.
Applying a background image to a document’s pages gives a consistent, visually engaging, and professional look.
Image Placeholders for Dynamic Content
Image placeholders serve as containers for images that are populated dynamically. These placeholders can update automatically based on external data sources or variables. For example, a placeholder could be replaced with an image from a database, adjusting the document’s content based on user interactions or real-time data. This functionality can transform static documents into dynamic information hubs.
Additional Advanced Image Manipulation Features
Microsoft Word offers a variety of additional features for advanced image manipulation. These tools extend beyond the basic functionalities of inserting, resizing, and adjusting images. Some features include:
- Image Effects: Applying artistic effects like bevel, emboss, or glow can enhance the visual appeal of images, making them stand out in a document.
- Image Rotation and Resizing: Fine-tuning image rotation and resizing provides precise control over the image’s placement and dimensions, ensuring it fits seamlessly within the layout.
- Image Compression: Compressing images reduces their file size without significantly compromising image quality. This is essential for managing document file size and maintaining optimal performance.
- Image Alignment: Precisely aligning images within a document, using various alignment options like left, right, center, or top and bottom, can improve document aesthetics.
Troubleshooting Common Issues

Adding images to Microsoft Word documents can sometimes present unexpected challenges. From corrupted files to compatibility problems, understanding potential issues and their solutions is crucial for seamless image integration. This section will delve into common problems and effective methods to resolve them, ensuring your documents look their best.Image problems can stem from various sources, including file corruption, incorrect resolution, or incompatibility with Word’s file formats.
Addressing these issues efficiently can save time and prevent frustration. This guide provides practical solutions for common problems, ensuring your images display correctly and enhance your documents.
Image Corruption and Display Issues
Image corruption can manifest as missing parts of the image, unexpected colors, or a complete inability to display the image. This often results from issues during file transfer or storage. Inspect the file’s integrity carefully. If the file is corrupted, attempting to repair it or replacing it with a different copy from a reliable source is often the solution.
Try using image editing software to check the image for damage. If the problem persists, a backup copy of the original image might provide the necessary solution.
Image Resolution Issues
Image resolution significantly impacts how an image looks in a document. Low resolution images appear blurry or pixelated, detracting from the overall quality. Ensuring sufficient resolution is vital for professional-looking documents. Choose images with a resolution appropriate for the document’s size and intended use. Higher resolution images generally produce sharper results.
For instance, a high-resolution image used in a large poster will look more detailed than the same image scaled down for use in a letter.
File Format Compatibility Issues
Different image formats have varying compatibility with Microsoft Word. Some formats might not be supported directly, or the image may not display correctly. Word supports a range of formats, but not all formats render perfectly. Converting the image to a supported format, such as JPEG, PNG, or GIF, can often resolve compatibility issues. Conversion tools can readily handle this process, offering a practical solution to ensure image compatibility.
For example, a TIFF image might not display properly, while a JPEG or PNG version would render flawlessly. Image editing software often provides tools for format conversion.
Conclusive Thoughts
In conclusion, adding images to your Microsoft Word documents is more straightforward than you might think. By understanding the different insertion methods, placement options, and image formats, you can significantly enhance the impact and professionalism of your work. This guide provides a complete overview, equipping you with the knowledge to confidently integrate visuals into your documents. From beginner steps to advanced techniques, we’ve got you covered.
Leave a Reply