Take a Radiator Off the Wall – it sounds daunting, but with careful planning and the right know-how, it’s achievable. This comprehensive guide covers everything from safety precautions and tool selection to detailed disassembly and reinstallation procedures, making the entire process less intimidating and more manageable. We’ll explore different radiator types, potential problems, and troubleshooting strategies, ensuring you can tackle this project with confidence.
This guide provides a step-by-step approach to safely removing and reinstalling a radiator. We’ll delve into the specific needs of various radiator types and the essential tools required for each stage of the process. From disconnecting water lines to securing the radiator, we’ll address every crucial aspect, ensuring a successful outcome.
Safety Precautions
Taking apart a radiator, while potentially rewarding, comes with inherent risks. Ignoring safety precautions can lead to serious injuries, property damage, or even environmental hazards. This section details crucial safety measures to ensure a safe and successful radiator disassembly project. Following these steps will minimize the risk of accidents and complications.Understanding the potential hazards associated with radiator disassembly is crucial for mitigating risks.
Taking a radiator off the wall can be a surprisingly involved project. It’s not just about unscrewing a few bolts; you’ve got to consider the plumbing, electrical connections, and the overall impact on the room’s aesthetics. Interestingly, while contemplating such a DIY project, I stumbled across news that the Bruce Springsteen E Street Band will be performing at the Super Bowl, which, frankly, makes me want to immediately tackle that radiator job.
So, while I’m researching how to best disconnect the heating system, I’ll be also checking out the performance details on bruce springsteen e street band to play super bowl. Hopefully, the energy from the music will inspire me to get that radiator off the wall faster!
Radiators often contain trapped water, potentially pressurized, and may have concealed electrical connections or hidden components. Improper handling can lead to scalding, electric shocks, or mechanical injuries. Careful preparation and adherence to safety guidelines are essential.
Potential Hazards and Mitigation Strategies
Radiator disassembly involves several potential hazards, and careful planning is vital to mitigate them. Water, often under pressure, can cause serious burns if not handled correctly. Metal parts, particularly when hot, can lead to burns or cuts. Potential electrical hazards are present if the radiator has electrical components, which are sometimes concealed within.
- Water Hazard Mitigation: Always drain the radiator completely before attempting any disassembly. Use appropriate tools for draining, and ensure the water is disposed of safely. If possible, disconnect the radiator from the water supply system to prevent accidental refilling during work. A slow and deliberate approach, checking for leaks at each step, is paramount.
- Thermal Hazard Mitigation: Allow the radiator to cool completely before touching any metal parts. Using insulated gloves and protective eyewear is essential. A heat-resistant mat or surface beneath the radiator can protect the working area from potential damage.
- Electrical Hazard Mitigation: If the radiator has electrical components, disconnect the power supply before starting any work. Ensure all electrical connections are properly insulated and protected. Consult an electrician if there are any doubts about the electrical safety of the radiator.
- Mechanical Hazard Mitigation: Use appropriate tools for disassembly. Ensure tools are in good condition and fit for purpose. Wear safety glasses and gloves to prevent cuts or scrapes. Work in a well-lit area to minimize the risk of slips and falls.
Importance of Ventilation and PPE
Adequate ventilation is crucial when working with radiators, especially if they contain any potentially harmful substances. Proper ventilation reduces the risk of inhaling fumes or dust particles that could be released during the disassembly process. Personal Protective Equipment (PPE) is equally important for protecting against potential hazards.
- Ventilation: Ensure good ventilation in the work area to prevent the buildup of dust, fumes, or other contaminants. Open windows and use fans if necessary. If possible, work outdoors in a well-ventilated area.
- PPE Selection: The choice of PPE depends on the specific hazards present. For example, heat-resistant gloves and aprons are necessary for handling hot radiators. Safety glasses protect the eyes from flying debris. Appropriate respiratory protection, such as a dust mask, is essential if the radiator contains any hazardous materials.
PPE Comparison Table
The following table provides a comparison of different types of PPE and their suitability for radiator work.
| PPE Type | Description | Suitability for Radiator Work |
|---|---|---|
| Heat-Resistant Gloves | Gloves designed to protect against heat and burns. | High |
| Safety Glasses/Goggles | Eye protection against flying debris and splashes. | High |
| Dust Mask/Respirator | Protects the respiratory system from dust and fumes. | Moderate to High (depending on radiator contents) |
| Insulated Apron | Provides protection against heat and spills. | High |
| Work Boots | Provides protection for feet. | Moderate |
Tools and Materials Needed: Take A Radiator Off The Wall
Preparing to tackle a radiator removal project requires a well-stocked toolkit and a thoughtful consideration of the materials needed. This meticulous approach ensures a safe and efficient job, minimizing potential damage to the surrounding area and the radiator itself. Understanding the specific tools and materials involved is paramount to a successful and injury-free outcome.
Essential Tools
A comprehensive set of tools is crucial for safely and effectively removing a radiator. The right tools prevent damage and ensure the project is completed in a timely manner. The following list provides a detailed overview of necessary tools and their functions.
| Tool Name | Description | Function |
|---|---|---|
| Adjustable Wrench | A versatile wrench with adjustable jaws that can grip various pipe sizes. | Used to loosen and tighten nuts and bolts securing the radiator to the pipes. |
| Pipe Wrench | A wrench designed specifically for plumbing tasks, featuring a pivoting head. | Ideal for gripping and turning pipes, especially those that may be corroded or difficult to access. |
| Basin Wrench | A specialized wrench with a long handle and a basin-shaped head, providing leverage. | Useful for turning stubborn or hard-to-reach nuts and bolts, enhancing leverage. |
| Screwdrivers (Phillips and Flathead) | Tools with pointed tips for turning screws. | Used for removing screws securing the radiator’s mounting brackets and other accessories. |
| Gloves | Protective coverings for the hands. | Protect hands from potential cuts and burns during the process. |
| Safety Glasses | Protective eyewear. | Protect eyes from debris or flying particles that may be generated during the process. |
| Hammer | A tool for striking objects. | Used to remove or detach items that are obstructing the radiator’s removal. |
| Putty Knife or Utility Knife | Tools for scraping and cutting materials. | Assist in removing any caulking or sealant around the radiator’s base or connections. |
| Measuring Tape | A tool for measuring lengths and distances. | Essential for ensuring proper alignment and measurements when replacing the radiator. |
| Bucket | A container for holding water. | Used to collect any water draining from the radiator’s pipes during the removal process. |
Materials Needed
Proper materials are essential for completing the radiator removal safely and effectively. The following list Artikels the different types of materials required.
- Pipe Sealant or Thread Sealant: A crucial material for ensuring a watertight seal after the radiator is removed. It creates a barrier against leaks and prevents water damage. Proper application is vital to prevent future problems.
- Insulation (optional): Adding insulation to the pipes after removal can reduce heat loss. The type of insulation will depend on the specific pipes and the desired level of insulation. For instance, pipe wrap insulation is often used for pipes exposed in the attic or crawl space.
- Cleaning Supplies: Depending on the condition of the radiator and pipes, cleaning supplies such as wire brushes or solvents might be necessary to remove rust or grime before reinstallation.
- Replacement parts (if necessary): If the existing pipes or valves require replacement, you’ll need to purchase the necessary components to ensure a proper fit and function.
Types of Radiators

Radiators come in various materials, each with unique characteristics affecting their installation and removal. Understanding these differences is crucial for safe and efficient work. Choosing the right tools and approach for a particular radiator type prevents damage and ensures a smooth removal process.Different radiator materials offer varying levels of durability, heat transfer efficiency, and maintenance requirements. Proper identification of the radiator type is essential for determining the best course of action for disconnection and removal.
Careful consideration of these factors will make the entire process more manageable and less prone to errors.
Cast Iron Radiators
Cast iron radiators are a classic choice, often found in older homes. Their robust construction and excellent heat retention make them popular. However, their weight and potential for rust or corrosion must be considered. Disconnecting these radiators requires extra care due to their size and potential for damage.
- Cast iron radiators are typically connected using a series of threaded pipes. Connections may include nuts, bolts, and washers. The pipes may be copper, steel, or brass, each with its own characteristics in terms of corrosion resistance and handling.
- Carefully inspect the connections for signs of corrosion or damage before disconnecting. Use appropriate wrenches to avoid damaging the connections or the radiator itself.
- Disconnect the water supply valves first. Then, carefully disconnect the supply and return pipes using the appropriate wrenches.
Steel Radiators
Steel radiators are a more common choice in modern homes. They are generally lighter than cast iron, but may not offer the same level of heat retention. Their construction allows for a variety of designs and finishes, offering aesthetic options.
- Steel radiators are typically connected in a similar manner to cast iron, often using threaded pipes and fittings. Ensure compatibility with the existing plumbing system when choosing replacement components.
- Steel radiators may be equipped with valves and other accessories that need to be disconnected before removal. Proper identification and careful handling are essential for safe removal.
- To disconnect steel radiators, follow the same procedure as cast iron, prioritizing safety and proper tools.
Aluminum Radiators, Take a Radiator Off the Wall
Aluminum radiators are lightweight and efficient. Their modern design often incorporates fins for improved heat transfer. They are generally more delicate than cast iron or steel, requiring extra care during removal.
- Aluminum radiators are often connected using compression fittings or soldered joints, depending on the specific design. The connection method significantly impacts the disassembly process.
- Aluminum radiators, being lighter, may not require the same level of support as cast iron or steel, but careful handling remains important to prevent damage.
- Compression fittings are often easier to disconnect than soldered joints. Use appropriate tools for the connection type.
Disassembly Steps Table
| Type | Steps | Tools |
|---|---|---|
| Cast Iron | 1. Disconnect water supply valves. 2. Disconnect supply and return pipes. 3. Carefully lift and remove the radiator. | Adjustable wrenches, pipe wrenches, safety equipment. |
| Steel | 1. Disconnect water supply valves. 2. Disconnect supply and return pipes. 3. Disconnect any valves or accessories. 4. Carefully lift and remove the radiator. | Adjustable wrenches, pipe wrenches, valve tools, safety equipment. |
| Aluminum | 1. Identify connection type (compression or soldered). 2. Disconnect connections using appropriate tools. 3. Carefully lift and remove the radiator. | Compression fitting pliers, soldering equipment (if applicable), safety equipment. |
Disassembly Procedures
Taking a radiator off the wall requires careful planning and execution. Improper handling can damage the radiator, plumbing, or even injure you. This section details the crucial steps for safely disconnecting water supply lines, removing the radiator, and handling it with the necessary support. Understanding these procedures ensures a smooth and efficient process.
Disconnecting Water Supply Lines
Before removing the radiator, you must first shut off the water supply to the unit. This prevents water damage and ensures a safe work environment. Locate the valves controlling the water flow to the radiator, usually located near the supply pipes. Turn the valves clockwise to fully shut off the water supply. It’s important to verify that the water is completely shut off by checking for any leaks.
If you’re unsure of the location of the valves, consult a qualified plumber or refer to your home’s plumbing diagram.
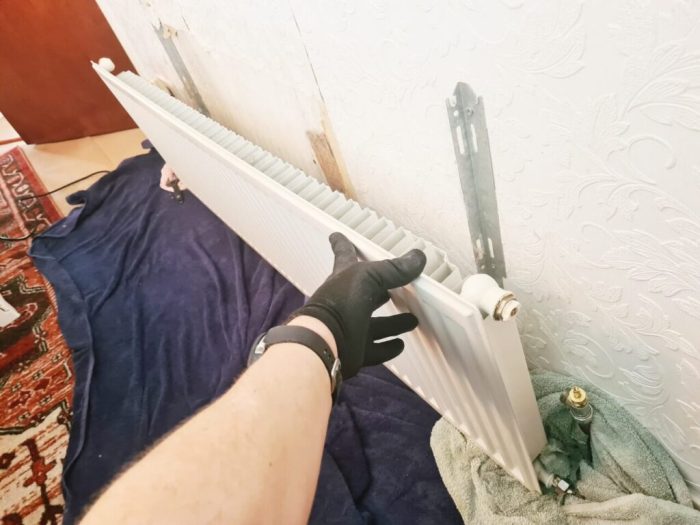
Removing the Radiator from the Wall
Radiator removal involves several steps to ensure safety and avoid damage. Proper support and handling are critical during the process. The following section Artikels the procedures.
Radiator Removal Procedure
- Preparation: Ensure the water supply is completely shut off and the room is well-lit. Gather necessary tools, including adjustable wrenches, screwdrivers, and a sturdy support like a piece of plywood or a similar material.
- Disconnect Fittings: Carefully disconnect any pipes or fittings connected to the radiator using appropriate wrenches. Be cautious not to over-tighten or damage the pipes.
- Support the Radiator: Place a strong support, such as a piece of plywood or a heavy-duty board, beneath the radiator. This will distribute the weight evenly and prevent damage to the wall or the radiator itself.
- Detaching Wall Brackets: If the radiator has wall brackets, carefully remove the brackets using appropriate tools. Ensure the brackets are securely fastened to the support and that the radiator is held firmly.
- Lifting the Radiator: Carefully lift the radiator using the support and ensure that it doesn’t tilt or shift during the removal process. Two people are recommended for lifting larger or heavier radiators.
- Inspect for Damage: Before moving the radiator, inspect for any signs of damage to the radiator or the wall. This helps prevent further issues later.
- Removal from the Room: Carefully carry the radiator out of the room. If possible, roll the radiator on a suitable surface to avoid causing unnecessary stress on the unit.
Importance of Proper Support and Handling
Proper support and handling during radiator removal are crucial to avoid damaging the radiator, wall, or surrounding fixtures. Improper lifting can lead to cracking the radiator, damaging the wall studs, or even causing injury. Using adequate support prevents the radiator from tilting or shifting during removal. A sturdy support evenly distributes the weight, preventing pressure points and ensuring the safety of the unit and the surrounding environment.
Troubleshooting
Taking a radiator off the wall can sometimes reveal unexpected challenges. This section details common problems encountered during the process, along with practical solutions. Understanding these potential issues and their fixes will help ensure a smooth and safe removal process, minimizing complications.The process of radiator removal, while generally straightforward, can sometimes encounter unforeseen obstacles. Careful attention to potential problems, combined with the correct tools and procedures, will greatly improve the likelihood of a successful and efficient job.
Common Radiator Removal Problems
This section Artikels potential issues encountered during radiator removal, providing context for each. Understanding these problems is crucial for efficient troubleshooting and resolution.Common problems during radiator removal include damaged pipes, loose connections, and unexpected obstructions. These problems often arise from the age or condition of the plumbing system, the type of radiator being removed, or the specific installation method used.
Recognizing these issues early can help prevent more extensive problems during the process.
Damaged Pipes or Connections
Sometimes, the pipes connected to the radiator might be damaged or corroded. This damage can manifest as leaks, cracks, or weakened connections. Identifying and addressing these issues early in the process is essential to avoid further complications.Dealing with damaged pipes or connections requires careful assessment. First, isolate the affected area by turning off the water supply to the radiator.
Then, inspect the damage. If the damage is minor, consider using pipe sealant or epoxy to repair the leak. For more extensive damage, it’s crucial to consult a qualified plumber for professional repair or replacement. Improper repair could lead to water damage or safety hazards.
Unexpected Obstructions
During the removal process, unexpected obstructions like electrical wiring, pipes, or hidden support structures might be encountered. These obstructions can complicate the removal process and lead to delays or damage if not addressed proactively.Thorough pre-removal inspection is vital to identify any potential obstructions. A thorough visual inspection of the area around the radiator, including the wall behind it, is highly recommended.
Taking a radiator off the wall can be a surprisingly involved project, requiring careful planning and execution. It’s a bit like diving into a whole other world, almost a different kind of DIY challenge. You need to consider the plumbing and electrical connections, and the aesthetic impact of removing the radiator, which can make you feel like you’re part of a creative symphony.
For inspiration, check out this awesome playlist of 5 10 15 20 kurt vile 5 10 15 20 kurt vile to really get you pumped for that radiator-removal project, and hopefully you’ll find some inspiration there. Then, you can get back to your DIY radiator makeover!
If obstructions are found, careful planning is necessary to determine the best approach for navigating them without causing further damage. Sometimes, minor adjustments to the removal procedure might be required to accommodate these obstructions. This could involve using different tools or techniques to carefully remove or reroute the obstructions.
Taking a radiator off the wall might seem like a drastic move, but sometimes it’s the only way to create the space you need. For instance, if you’re trying to make room for a new shower, especially if you have a baby and need to adapt your bathroom for easier access and safety, you might consider the practicalities of Shower with a Baby.
It’s all about maximizing your space and making things work for your lifestyle. Ultimately, a little rearranging can completely change the flow and usability of a room, making your home feel more functional and comfortable, even with a radiator out of the way.
Table of Common Problems, Causes, and Solutions
This table provides a concise overview of common radiator removal problems, their potential causes, and recommended solutions.
| Problem | Cause | Solution |
|---|---|---|
| Leaks or drips from pipes | Damaged or corroded pipes, loose connections | Turn off water supply, assess damage, use pipe sealant or epoxy for minor damage, consult a plumber for major repairs. |
| Unexpected obstructions | Hidden electrical wiring, pipes, or support structures | Thorough pre-removal inspection, careful planning to reroute or remove obstructions, potentially involving adjustments to the removal procedure. |
| Difficulty detaching connections | Tight connections, rust, or corrosion | Use appropriate tools (e.g., adjustable wrenches, pliers), apply penetrating oil to loosen connections, avoid forceful removal to prevent damage. |
| Radiator won’t budge | Embedded or faulty supports, insufficient tools | Check for embedded supports, use appropriate tools for lifting, if necessary, consider professional help for stubborn radiators. |
Reinstallation Procedures

Getting your radiator back on the wall correctly is crucial for both efficient heating and safety. Proper reinstallation ensures the radiator functions optimally and prevents potential leaks or structural damage. Following these steps will guide you through the process, enabling you to complete the project successfully.
Preparing the Wall for Reinstallation
Before mounting the radiator, meticulous preparation of the wall is paramount. This involves ensuring the mounting points are clean and stable. Check for any damage or loose plaster, and repair any imperfections to prevent the radiator from shifting or causing future problems. Clean the area around the mounting holes thoroughly to remove any debris or residue that could interfere with the adhesive or screws.
Reconnecting the Water Supply Lines
Correctly reconnecting the water supply lines is essential for ensuring the radiator’s proper operation and preventing water leaks. Before connecting the lines, ensure that the water supply to the radiator is shut off. Carefully align the lines with their respective connections on the radiator. Apply Teflon tape to the threads of the connections to create a watertight seal.
Tighten the connections firmly but avoid over-tightening, which could damage the fittings.
Securing the Radiator to the Wall
The radiator’s secure attachment to the wall is critical for both its stability and safety. Use the appropriate mounting hardware, ensuring that the screws are long enough to penetrate the wall studs. Pre-drill holes to prevent the wall from cracking. Use wall anchors if necessary for added support. Double-check that the radiator is level and plumb before tightening the screws completely.
Radiator Reinstallation Steps
- Ensure the water supply to the radiator is completely shut off.
- Thoroughly clean the wall mounting points and surrounding areas, removing any debris or residue.
- If necessary, repair any damaged plaster or loose areas around the mounting points.
- Align the radiator with the mounting points, ensuring it’s level and plumb.
- Carefully reconnect the water supply lines, applying Teflon tape to the threads and tightening firmly but not excessively.
- Secure the radiator to the wall using appropriate mounting hardware and wall anchors where needed. Pre-drill holes to avoid cracking the wall.
- Carefully tighten all screws, ensuring the radiator is securely attached and level.
- Turn the water supply back on slowly and monitor for any leaks.
Additional Considerations
Taking a radiator off the wall is a task that demands careful planning and execution. Beyond the technical steps of disassembly and reinstallation, there are crucial aspects to consider regarding the wall structure, local regulations, and proper disposal. Understanding these factors ensures the job is completed safely and responsibly.Careful consideration must be given to the structural integrity of the wall to avoid causing damage.
Knowing the specific type of wall construction and the placement of crucial support elements will help in avoiding potential issues. Following these precautions minimizes the risk of compromising the wall’s stability or compromising safety.
Potential Wall Structure Issues
Wall structures vary significantly, from simple plasterboard to complex brick or concrete. Understanding the construction is crucial to avoid causing damage during removal. Incorrect handling could lead to cracks, loose plaster, or even structural instability. Before starting any work, inspecting the wall and understanding its construction is essential.
- Plasterboard walls might require careful handling of the surrounding area to avoid damage to the plaster or drywall. Any damage to the drywall needs to be repaired appropriately. If there is significant damage, professional help should be considered to prevent further issues.
- Brick or stone walls might require specialized tools and techniques to avoid damaging the mortar or bricks themselves. Care should be taken to avoid unnecessary impact or pressure on the wall structure during removal and reinstallation.
- Concrete walls typically present fewer issues during removal, but careful consideration of the anchoring points for the radiator is necessary. Incorrect removal techniques might lead to damage to the concrete. Specialized tools may be required.
Local Regulations and Permits
Local building codes and regulations may dictate specific requirements for radiator removal, especially in older buildings or historical areas. Before undertaking any work, checking local ordinances is essential. Contacting the relevant authorities can provide crucial information on permits, safety measures, or specific disposal procedures.
- Some areas might require a permit for work involving the wall structure. Obtaining the necessary permit is crucial to avoid legal issues. It is always recommended to verify this with local authorities.
- Regulations might exist for the disposal of old materials, such as lead paint, asbestos, or other potentially hazardous substances. Understanding and following these regulations is crucial for the safety of workers and the environment.
Proper Disposal of Old Parts
Proper disposal of old parts is essential to avoid environmental contamination and potential health hazards. Incorrect disposal can lead to contamination of soil or water sources. Following local regulations is crucial to ensure the safe and responsible disposal of the old radiator and related materials.
- Check local regulations for the appropriate disposal methods for old radiators. Different materials within the radiator might have specific disposal requirements. Contacting the relevant waste management services can provide valuable information.
- Ensure that any potentially hazardous materials, such as lead or asbestos, are handled and disposed of according to local regulations. Professional disposal services may be necessary for materials like these.
Recycling or Disposal Procedures
Recycling or disposal procedures for removed radiators vary depending on the type of radiator and local regulations. Following the correct procedures is essential to avoid harming the environment. Consult with local waste management services to determine the most appropriate disposal method.
- Many municipalities offer recycling programs for metals. Radiators often contain significant metal components, which can be recycled. Check with your local recycling center to see if radiators are accepted.
- Some types of radiators may contain hazardous materials, like lead paint. In these cases, specialized disposal methods are necessary to prevent environmental contamination. Local regulations should be followed, and professional waste removal services might be required.
Illustrative Examples
Radiator removal can vary significantly depending on the type of wall and the radiator itself. Understanding these differences is crucial for a safe and efficient job. This section provides a practical example to illustrate the process for a cast iron radiator in a plaster wall.
Cast Iron Radiator Removal from a Plaster Wall
This scenario details the specific steps for removing a cast iron radiator from a plaster wall. It emphasizes the importance of proper preparation and safety measures throughout the entire process.
Tools and Materials Needed
To safely and effectively remove a cast iron radiator from a plaster wall, you’ll need the following:
- Screwdrivers (Phillips and flathead): Essential for disassembling the radiator’s connections and securing parts.
- Adjustable wrench: Needed for loosening nuts and bolts on the radiator’s connections.
- Pliers: Useful for gripping and manipulating small parts during the disassembly.
- Hammer and chisel: Necessary for carefully removing plaster or any obstructions encountered around the radiator.
- Safety glasses: Protect your eyes from flying debris.
- Gloves: Protect your hands from sharp edges and potential hazards.
- Dust mask: Prevent inhalation of dust and debris.
- Bucket and rags: To collect water and debris from the radiator.
- Level: To ensure the radiator is properly aligned for installation.
- Measuring tape: To ensure accurate measurements for reinstallation.
- Utility knife: To carefully cut away any stubborn plaster or drywall.
- Possibly, a small amount of plaster patching compound, depending on the condition of the wall and whether you are planning to repair any damage to it after the removal.
Disassembly Procedures
This section Artikels the steps involved in disassembling a cast iron radiator in a plaster wall, ensuring you’re prepared for the task ahead.
- Turn off the water supply: This is paramount to prevent water damage and personal injury. Shut off the valves supplying water to the radiator, ensuring there’s no residual pressure.
- Assess the wall: Carefully inspect the wall around the radiator for any loose or fragile plaster. Note any unusual conditions or potential hazards.
- Remove any coverings: If there are any decorative covers or caps, carefully remove them to access the radiator’s connections.
- Disconnect the pipes: Loosen and remove the nuts and bolts connecting the radiator to the pipes. Use the appropriate tools and proceed with caution.
- Remove the radiator: Once the pipes are disconnected, carefully lift the radiator and remove it from its location. Be mindful of the weight and ensure there’s enough support to avoid dropping it.
Detailed Removal Process for a Cast Iron Radiator
This step-by-step procedure ensures a safe and effective removal of a cast iron radiator in a plaster wall.
- Safety First: Wear safety glasses, gloves, and a dust mask. Ensure the water supply is turned off and the area is well-lit.
- Locate the pipes: Identify the pipes connected to the radiator and carefully inspect their condition.
- Disconnect the pipes: Use an adjustable wrench to loosen and remove the nuts and bolts connecting the pipes to the radiator. Place a bucket underneath the radiator to catch any drips or residual water.
- Remove the radiator: Carefully lift the radiator and remove it from the wall, using appropriate support if needed. If the plaster around the radiator is loose, use a utility knife to carefully cut away any sections that might obstruct removal. A hammer and chisel might be necessary to gently remove obstructions.
- Inspect the wall: Examine the wall for any damage caused during the removal process. Document any issues for later repair.
Outcome Summary
Successfully removing a radiator involves meticulous planning, precise execution, and a deep understanding of the task at hand. This guide provides a comprehensive resource for safely and effectively taking a radiator off the wall, covering everything from essential safety precautions to detailed reinstallation steps. Remember, proper planning and execution are key to a smooth and safe outcome. Armed with this knowledge, you can confidently tackle this project, knowing you’ve got a solid foundation of information to draw upon.
Leave a Reply