Replace Damaged Roof Shingles: A comprehensive guide to assessing damage, identifying shingle types, planning the replacement, understanding costs, finding professionals, and maintaining your roof. This in-depth look will walk you through each step, from identifying the extent of damage to choosing the right materials and ensuring a smooth replacement process. We’ll cover everything from the various types of shingle damage to the factors that influence the overall cost.
Get ready to tackle your roof repair project with confidence.
From understanding the different types of roof shingles and their lifespan to the essential safety precautions, this guide provides a detailed overview of the entire process. We’ll explore the nuances of each stage, ensuring you’re well-equipped to make informed decisions. This guide will empower you with the knowledge needed to handle this crucial home improvement project.
Assessing Damage
Roof damage, unfortunately, is a common occurrence, often exacerbated by weather events. Understanding the various signs of damage is crucial for prompt action and effective repair. Ignoring early signs can lead to more extensive and costly problems down the line. Proper assessment allows homeowners to make informed decisions about repair strategies.
Common Signs of Roof Shingle Damage, Replace Damaged Roof Shingles
Recognizing the early signs of roof shingle damage is key to preventing further deterioration and costly repairs. Different types of damage manifest in various ways, and a careful visual inspection can reveal critical issues. By paying close attention to subtle changes, homeowners can take proactive steps to maintain their roof’s integrity.
- Missing shingles: Noticeable gaps or empty spaces where shingles should be present are clear indicators of missing shingles. This often occurs due to wind damage, improper installation, or aging. These gaps expose the underlying roof structure, making it vulnerable to further water damage.
- Cracked shingles: Cracks can appear as hairline fractures or larger fissures, ranging from minor imperfections to significant damage. These cracks can result from impact, excessive heat, or even poor material quality. Identifying cracked shingles promptly is crucial to prevent water penetration.
- Curled shingles: Shingles that are curling upward or downward are a sign of moisture damage or improper installation. This warping can expose underlying layers, increasing the risk of leaks and rot. Curling may be localized or extensive, depending on the cause.
- Worn shingles: Over time, shingles can become worn and brittle, losing their original shape and color. This wear can be gradual or rapid, depending on environmental factors and the quality of the materials. This can increase the likelihood of leaks.
Types of Roof Shingle Damage
Different types of damage manifest in various ways, requiring different repair strategies. Identifying the type and extent of damage is critical for accurate estimations and efficient repairs.
- Localized damage: This type of damage affects a small area of the roof. It could be a result of a specific impact or a localized weather event. Examples include a single missing shingle or a small section of curled shingles.
- Widespread damage: This type of damage affects a larger area of the roof, potentially across multiple sections. This may result from strong winds, hail storms, or prolonged exposure to extreme weather. Examples include numerous missing shingles or extensive shingle curling across a considerable portion of the roof.
Importance of Professional Inspection
A professional inspection is crucial for accurate assessment of roof damage. Trained inspectors can identify subtle signs of damage that might be missed by homeowners. Their expertise helps in determining the extent of damage, necessary repairs, and long-term maintenance strategies.
Damage Comparison Table
| Damage Type | Description | Visual Representation | Extent of Damage ||—|—|—|—|| Missing Shingles | Gaps where shingles should be present. | Imagine a missing tile on a roof. | Localized or widespread. || Cracked Shingles | Cracks on the shingle surface. | A shingle with a visible fracture.
| Localized or widespread. || Curled Shingles | Shingles warped upward or downward. | Imagine a shingle that has risen slightly. | Localized or widespread. || Worn Shingles | Shingles showing signs of wear and tear.
Replacing damaged roof shingles is a crucial home maintenance task. It’s important to prioritize safety and choose the right materials. To stay organized, consider a helpful technique like the one used in Fill Salt and Pepper Shakers – keeping everything in its place can streamline the process. Once you’ve got your materials sorted, you can tackle the roof repairs with confidence.
| Imagine a faded or brittle shingle. | Localized or widespread. |
Identifying Shingle Types
Choosing the right roofing shingle type is crucial for both the longevity and cost-effectiveness of your roof replacement project. Understanding the various materials, their maintenance needs, and their lifespan is essential to making an informed decision. Different shingle types react differently to weather conditions, and their repair and replacement costs can vary significantly.A thorough evaluation of your existing roof’s shingle type, combined with an assessment of your budget and climate, will guide you towards the optimal solution.
This includes considering factors like wind load, rainfall, and potential future weather patterns in your region.
Shingle Materials
Various materials are used for roofing shingles, each with its own set of characteristics. Understanding these differences is key to selecting the right material for your home.
- Asphalt Shingles: These are the most common type of shingle, known for their affordability and relatively straightforward installation. They come in a variety of colors, styles, and warranties, offering homeowners a broad range of choices to match their aesthetic preferences. The wide availability of asphalt shingles also translates to easier access for repairs and replacements.
- Slate Shingles: These are naturally occurring, durable shingles crafted from stone. They provide a classic, elegant look but are significantly more expensive than asphalt shingles. Slate shingles are known for their longevity, potentially lasting for over a century with proper maintenance. Their high initial cost is often offset by their exceptional lifespan, making them a worthwhile investment for many homeowners.
- Tile Shingles: Ceramic or concrete tiles offer a distinctive, often traditional aesthetic. They are known for their durability and resistance to fire, making them a good option for high-risk areas. The higher cost and more complex installation process of tile shingles are often factors to consider.
- Wood Shingles: Historically used, wood shingles provide a rustic, natural appeal. They are less common now due to susceptibility to rot, fire, and insect damage. Proper maintenance, including regular inspections and treatments, is essential to preserve their integrity and lifespan. Their lifespan is significantly shorter compared to other options and requires ongoing maintenance.
Maintenance and Repair Requirements
The maintenance and repair requirements of each shingle type differ significantly.
- Asphalt Shingles: Require regular inspections for damage and deterioration, typically every few years. Repairing or replacing damaged sections is relatively straightforward and affordable. Frequent cleaning can also help maintain the longevity of asphalt shingles.
- Slate Shingles: Due to their durability, slate shingles require minimal maintenance. However, any damage needs to be addressed promptly to prevent further deterioration. Repairing slate shingles is often more complex and costly than repairing asphalt shingles.
- Tile Shingles: Require regular inspections to identify any cracks or loose tiles. Repairing or replacing damaged tiles should be performed by experienced professionals to ensure proper installation and long-term functionality. Tile shingles are typically low-maintenance, but any issues require expert attention.
- Wood Shingles: Require frequent inspections for signs of rot, insect damage, or fire damage. Prompt repairs are crucial to maintain the integrity of the roof. Wood shingles demand meticulous maintenance and regular treatment to prevent premature deterioration.
Lifespan and Susceptibility to Damage
The lifespan of shingles varies greatly based on the material and the level of maintenance.
- Asphalt Shingles: Typically have a lifespan of 15-30 years, depending on the quality and the weather conditions. They are susceptible to damage from wind, hail, and ice. Proper installation and regular maintenance can significantly extend their lifespan.
- Slate Shingles: Have an exceptionally long lifespan, potentially lasting over 100 years. Their resistance to damage is high, but they can be susceptible to damage from heavy impact or severe weather events.
- Tile Shingles: Offer a lifespan comparable to slate, potentially lasting for several decades or even longer with proper care. Their resistance to fire and high temperatures is a notable advantage, but they can be prone to cracking from temperature fluctuations.
- Wood Shingles: Have a relatively short lifespan compared to other materials, often lasting only 20-50 years. They are highly susceptible to rot, insect damage, and fire, making them a less desirable choice in high-risk areas.
Cost-Effectiveness Comparison
The cost-effectiveness of different shingle types varies considerably.
| Shingle Type | Initial Cost | Maintenance Cost | Lifespan | Overall Cost-Effectiveness |
|---|---|---|---|---|
| Asphalt | Moderate | Low | Moderate | Generally cost-effective |
| Slate | High | Low | Very High | Potentially high long-term value |
| Tile | High | Low | High | High long-term value |
| Wood | Moderate | High | Low | Generally less cost-effective |
Preparation and Planning

Roofing replacement isn’t just about slapping new shingles on top. Thorough preparation is crucial for a successful and safe job. This stage involves meticulous planning, ensuring the job is done right the first time, minimizing risks, and maximizing the longevity of the new roof. Proper preparation sets the foundation for a durable and aesthetically pleasing outcome.A well-planned roofing project involves much more than just the replacement itself.
It requires careful assessment of the existing roof structure, accurate identification of necessary materials, and a clear strategy for executing the entire process. This includes considering factors like weather conditions, access limitations, and potential complications.
Roof Structure Preparation
Preparing the roof for shingle replacement involves several key steps. First, all loose debris, including old shingles, dirt, and other unwanted materials, must be carefully removed. This crucial step prevents foreign materials from interfering with the new installation and ensures a clean surface for adhering the new shingles. Damaged or deteriorated wood and flashing should be replaced before proceeding with shingle replacement to prevent further issues.
This proactive approach prevents costly repairs down the line.
Safety Precautions
Safety is paramount during any roofing project. Falls are a significant risk. Use appropriate fall protection equipment, such as safety harnesses and ropes, whenever working at heights. Proper scaffolding and protective gear are essential to mitigate risks. Always be aware of your surroundings, including potential hazards such as electrical wires or overhanging branches.
Furthermore, weather conditions should be carefully monitored. Extreme temperatures, strong winds, or inclement weather can significantly affect the work and pose significant safety risks.
Replacing damaged roof shingles is crucial for a house’s longevity and curb appeal. While I’m focused on getting those shingles replaced, I couldn’t help but check out U2’s new song, “Ahimsa,” which I found really interesting – you can listen to it here: u2 share new song ahimsa listen. Hopefully, the new song inspires me to tackle the roofing project with renewed energy! I’m looking forward to getting that job done right.
Necessary Tools and Equipment
A comprehensive toolkit is essential for a smooth and efficient shingle replacement. The right tools simplify tasks and prevent unnecessary delays. This is crucial for minimizing project completion time and maintaining the quality of the work.
- Roofing tools are vital. This includes a variety of tools like pry bars, roofing hammers, and specialized shingle cutters.
- Safety equipment is paramount. This includes harnesses, ropes, and safety glasses. These are critical to preventing falls and protecting against other potential hazards.
- Measuring tools are necessary for accurate measurements. This includes measuring tapes and levels. These tools ensure precision in the replacement process.
- Cleaning tools are needed for the roof’s preparation. This includes scrapers, brooms, and dustpans. These tools ensure the roof surface is ready for new shingles.
- Materials handling equipment can be helpful. This might include heavy-duty lifting equipment and materials handling tools to ensure the safe handling of materials.
Securing the Roof Structure
Securing the roof structure is crucial to ensure the integrity of the entire roof system and the safety of the workers. Proper securing techniques are essential to prevent structural issues from occurring. This involves inspecting and addressing any existing damage to the roof’s framework before starting the replacement. Properly securing the roof structure ensures that the new shingles are adequately supported and that the roof can withstand the expected stresses and weather conditions.
Use appropriate fasteners and anchoring methods to prevent movement or detachment of the new shingles.
| Tool/Equipment | Description | Usage |
|---|---|---|
| Roofing Hammer | Heavy-duty hammer for driving nails and other fasteners | Used for driving nails and fasteners into the sheathing for shingle attachment. |
| Pry Bar | Metal bar used for prying and lifting shingles and other materials. | Used for lifting and removing old shingles and other materials. |
| Shingle Cutter | Specialized tool for cutting shingles to size. | Used for precisely cutting shingles to fit irregular roof areas. |
| Safety Harness | Provides secure attachment to safety lines. | Essential for fall protection when working at heights. |
| Measuring Tape | Used for measuring distances and dimensions. | Critical for accurate shingle placement and material calculations. |
Replacement Process
Roofing replacement is a crucial home maintenance task that requires careful planning and execution. Following the proper steps ensures a safe and effective repair, preventing future issues and extending the lifespan of your roof. A damaged roof, left unrepaired, can lead to significant water damage, structural issues, and higher energy bills. Thoroughness in the replacement process is essential for optimal results.The replacement process involves several key steps, from preparing the area to installing the new shingles.
Each step is critical to achieving a professional and lasting repair. Proper techniques and adherence to manufacturer guidelines are paramount to ensure the new roof is structurally sound and aesthetically pleasing.
Replacing damaged roof shingles is a crucial home maintenance task, ensuring your house stays protected from the elements. Just like you might act around someone you don’t like, sometimes you have to “act” a bit differently when tackling a home repair, like strategically planning your time to avoid the worst of the weather and to get the job done effectively.
You’ll need to be extra careful and organized, just like navigating a social situation. Remember, proper roof maintenance is key to a happy and healthy home. Check out this article for tips on how to act around someone you do not like: Act Around Someone You Do Not Like and you’ll find the same level of attention to detail is needed for replacing damaged shingles.
Preparing the Work Area
Before commencing shingle replacement, the work area must be prepared for efficient and safe operation. This preparation involves clearing debris, securing the surrounding area, and ensuring proper ventilation. A safe work environment is paramount. Improper preparation can lead to accidents, damage to surrounding structures, and inefficient work.
- Clearing the area around the roof is essential to prevent injury and damage to surrounding property. Remove all tools, equipment, and debris from the immediate work zone. This includes removing any loose shingles, nails, or other materials that may pose a tripping hazard. Ensure the area is free of obstructions.
- Protecting the surrounding areas from debris and damage is critical. Covering landscaping, vehicles, and any other structures around the roof is essential to prevent damage from falling debris. Tarps and other protective coverings are vital.
- Adequate ventilation is needed for the workers and to prevent the build-up of hazardous materials. Open windows or other ventilation sources will help ensure a safe work environment.
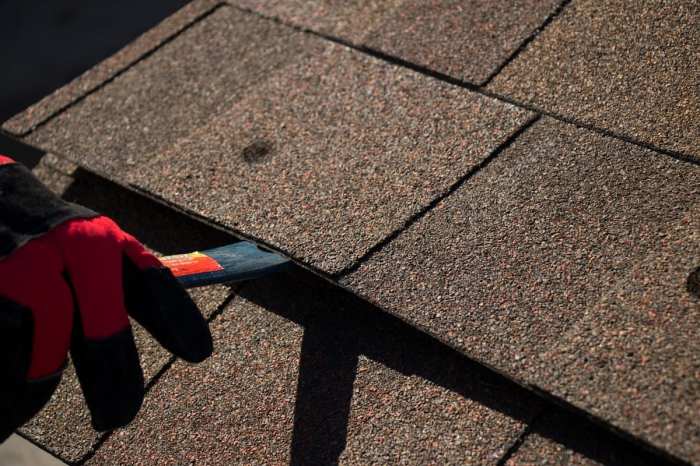
Removing Damaged Shingles
Carefully removing the damaged shingles is crucial to prevent further damage to the roof structure. The removal process requires precision and caution. Improper removal can damage the underlying roofing material, causing leaks and further structural damage. Always use appropriate safety gear, such as gloves and eye protection.
- Using the correct tools, such as a pry bar and a roofing shovel, carefully remove the damaged shingles. Work systematically, starting with the damaged sections and moving outward. Be cautious not to damage the underlying felt or the surrounding good shingles.
- Remove any nails or other fasteners using appropriate tools. Ensure all fasteners are removed completely. Carefully inspect the roof deck for any damage. Note any repairs that need to be done.
- Dispose of the old shingles properly. Follow local regulations for disposal of roofing materials.
Installing New Shingles
The installation of new shingles is a critical step in the replacement process. The correct installation techniques are crucial to ensure the roof’s longevity and structural integrity. Proper adherence to manufacturer instructions is paramount. Misaligned or improperly installed shingles can lead to leaks and structural damage.
| Step | Description | Image Description |
|---|---|---|
| 1 | Lay the underlayment over the sheathing. This layer protects the roof deck and provides a barrier against moisture. | Visualize a roll of roofing felt being carefully laid over the wood sheathing, ensuring it overlaps previous sections to create a continuous moisture barrier. |
| 2 | Install starter shingles along the eaves and ridges. This is the initial layer, and a crucial step in ensuring the proper layout for the rest of the shingles. | Imagine a row of starter shingles being placed at the edge of the roof, following the contour of the eaves. Ensure they are firmly nailed to the roof. |
| 3 | Install the new shingles, ensuring proper overlap and alignment. Pay attention to the manufacturer’s instructions for the correct shingle placement. | Visualize the new shingles being carefully placed, ensuring the shingles are correctly overlapped, with the appropriate shingle tab (or other element) positioning in relation to the previous row. |
| 4 | Secure the shingles with appropriate fasteners, following the manufacturer’s instructions for spacing and type. | Visualize nails or other appropriate fasteners being driven into the shingle to ensure secure attachment. Check the manufacturer’s specifications for proper spacing and fastener types. |
Cost Estimation and Materials
Knowing the precise cost of your roof shingle replacement is crucial for planning and budgeting. This section delves into the factors influencing the cost, methods for accurate estimation, necessary materials, and pricing strategies. Understanding these elements will empower you to make informed decisions and avoid unexpected expenses.
Factors Affecting Replacement Costs
Several factors contribute to the overall cost of a roof shingle replacement project. These include the size of the roof, the type of shingles being replaced, the complexity of the roof structure, labor costs in your area, and the availability of materials. For instance, a steeply pitched, multi-layered roof will demand more labor hours and materials than a flat roof.
Furthermore, specialized shingle types, like those designed for high winds or extreme weather conditions, can significantly increase the cost.
Estimating Total Replacement Cost
A precise cost estimate involves careful assessment of the roof’s dimensions and the specific shingle types required. Tools like online roof calculators or consultations with roofing contractors can assist in this process. Roofing contractors often provide detailed estimates, factoring in material costs, labor expenses, and any additional work needed. These estimates are valuable for budgeting purposes.
Materials Needed for Replacement
This section Artikels the key materials required for a typical roof shingle replacement project. The list includes quantities and specifications to ensure accurate purchasing.
- Shingles: The primary material. Quantities are determined by roof size and shingle dimensions. Choosing premium asphalt shingles or specialized materials will affect the price.
- Underlayment: A protective layer beneath the shingles. The quantity depends on the roof’s size and type. This often includes waterproof membranes.
- Roofing nails: Crucial for securing the shingles. Different types of nails are available, each with varying price points and specifications for durability.
- Starter shingles: Used along the edges of the roof to create a seamless look and protect the edges from the elements. These will vary based on the overall roof design and shingle type.
- Flashing: Essential for sealing vulnerable areas around chimneys, vents, and other protrusions. These materials are vital for preventing leaks and are often customized to the specific design.
Pricing and Sourcing Replacement Materials
Material prices fluctuate based on market conditions and supplier availability. Local building supply stores and online retailers are potential sources. Comparing prices from multiple vendors is recommended to ensure the best value. In some cases, contractors may provide materials at a negotiated rate. It’s wise to obtain quotes from different contractors to compare their pricing strategies and material sourcing.
Estimated Cost Breakdown
The table below illustrates a sample cost breakdown for different shingle types. Keep in mind that these are estimates and actual costs may vary based on location and specific project details.
| Shingle Type | Estimated Cost (per square) | Additional Notes |
|---|---|---|
| Asphalt shingles (standard) | $100 – $150 | Common choice; good value for most homes. |
| Asphalt shingles (premium) | $150 – $250 | Enhanced durability and aesthetic appeal. |
| Wood shingles | $250 – $500 | Higher cost; often used for aesthetic appeal. |
| Metal shingles | $200 – $400 | High durability and longevity; higher initial cost. |
Finding Professionals
Choosing the right roofing contractor is crucial for a successful and lasting repair. A qualified professional ensures the job is done correctly, using the right materials, and adhering to safety standards. This protects your investment and guarantees a long-lasting roof. Poorly executed repairs can lead to further damage and costly future repairs.Hiring a qualified roofing contractor is not just about getting the job done; it’s about getting it done right.
This means selecting a contractor with the necessary experience, licenses, and insurance to handle the work. This is a critical step in ensuring the longevity and structural integrity of your roof. A reputable contractor understands the specifics of your roof’s type, the nuances of local building codes, and the potential challenges of the project.
Importance of Qualified Contractors
Hiring a qualified roofing contractor is paramount. They possess the knowledge and expertise to assess damage accurately, select appropriate materials, and execute the replacement process safely and efficiently. This minimizes the risk of further damage and ensures a high-quality result. Furthermore, qualified contractors are often insured and bonded, protecting both the homeowner and the contractor in case of accidents or issues.
Factors to Consider When Choosing a Contractor
Several factors play a critical role in selecting the right roofing contractor. These include their experience, licensing, insurance, reputation, and references. Evaluating these factors ensures you’re working with a trustworthy and capable professional. Look for contractors who have a proven track record of successfully completing similar projects. Check for proper licenses and insurance coverage to ensure legal compliance and liability protection.
Thorough research and verification of these elements are essential before making a decision.
Questions to Ask Potential Contractors
Thorough questioning of potential contractors is essential. This process ensures you choose a contractor who understands your needs and can meet your expectations. Here’s a list of crucial questions to ask:
- What is your company’s experience with this type of shingle replacement?
- Do you have any certifications or specializations related to roofing?
- What is your company’s licensing and insurance status?
- Can you provide references from previous clients for similar projects?
- How do you handle potential weather delays or unforeseen complications during the replacement process?
- What is your warranty policy on the materials and workmanship?
- What is your proposed timeline for the entire project?
- What payment terms do you offer?
Importance of Multiple Bids
Obtaining multiple bids is critical for making an informed decision. Comparing bids allows you to assess the costs and services offered by different contractors. This competitive approach ensures you’re getting the best possible value for your investment. This process helps identify the most cost-effective and suitable contractor for your specific needs.
Contractor Comparison Table
Comparing potential contractors based on their services and pricing is essential. The table below illustrates a sample comparison, highlighting key factors for decision-making:
| Contractor | Experience (Years) | Licensing | Insurance | Estimated Cost | Warranty | Additional Services |
|---|---|---|---|---|---|---|
| Roofing Solutions Inc. | 15 | Yes | Yes | $5,500 | 5-year | Roof cleaning, gutter maintenance |
| Apex Roofing Co. | 10 | Yes | Yes | $6,000 | 3-year | Free consultation, project management |
| Reliable Roofing Experts | 8 | Yes | Yes | $5,000 | 10-year | 24/7 emergency service |
Post-Replacement Maintenance: Replace Damaged Roof Shingles
Congratulations on your new roof! A freshly replaced roof is a significant investment, and taking proactive steps to maintain it will ensure its longevity and protect your home’s value. Proper post-replacement maintenance extends the lifespan of your roof and minimizes the risk of costly repairs down the road.Investing in routine maintenance after a roof replacement is crucial. This proactive approach will not only prevent future damage but also maintain the warranty on your new roof shingles.
Regular inspections and upkeep will identify any potential problems early, preventing them from escalating into major issues and saving you money in the long run.
Importance of Routine Roof Maintenance
Routine roof maintenance is essential for preserving the integrity and longevity of your newly installed roofing system. Ignoring routine maintenance can lead to costly repairs or replacements in the future, impacting your budget and home’s structural integrity. By consistently checking for signs of damage and addressing minor issues promptly, you can significantly extend the lifespan of your roof and avoid major problems.
Steps for Inspecting the Roof After Replacement
A thorough inspection after the roof replacement is crucial for identifying any issues that might have arisen during the installation process. This ensures the integrity of the new roof and allows for prompt resolution of any problems.
- Visual Inspection: Carefully examine the entire roof surface for any signs of damage, such as missing shingles, loose flashing, or gaps in the sealant. Look for signs of water damage, particularly around valleys, chimneys, and vents. Inspect the edges of the roof and ensure proper installation of any gutters and downspouts.
- Check Flashing and Sealants: Inspect all flashing around chimneys, vents, and other penetrations. Ensure that the sealant is properly applied and free of cracks or gaps. These areas are particularly vulnerable to water intrusion and require careful attention.
- Examine Gutters and Downspouts: Ensure that gutters are properly installed, directing water away from the house. Check downspouts to make sure they are clear and draining effectively. Blocked gutters can lead to water damage on the roof and surrounding areas.
- Assess the Overall Structure: Look for any signs of structural damage or instability, such as sagging or warping. If you notice any anomalies, contact a roofing professional immediately for assessment and repair.
Preventative Measures to Avoid Future Damage
Implementing preventative measures can significantly reduce the risk of future damage to your roof. These measures focus on protecting the roof from environmental factors and ensuring the long-term health of the installation.
- Regular Cleaning: Remove debris, leaves, and other accumulated materials from the roof to prevent clogging and water damage. This is particularly important in areas prone to heavy rainfall or leaf accumulation.
- Proper Ventilation: Ensure proper ventilation in the attic to prevent moisture buildup, which can lead to structural damage and affect the overall performance of the roof.
- Addressing Leaks Promptly: If you detect any leaks, address them immediately to prevent water damage to the roof’s structure, interior walls, and ceilings.
- Protecting from Ice Dams: In areas with freezing temperatures, take preventative measures to protect your roof from ice dams. This may include installing ice and water shield products, or consulting with a professional for tailored solutions.
Checklist for Regular Roof Maintenance
A comprehensive checklist for regular roof maintenance will help ensure that your roof is properly maintained and protected from potential issues.
- Visual Inspection (monthly): Regularly inspect the roof for any visible signs of damage, such as missing shingles, cracked sealant, or signs of water damage.
- Gutters and Downspouts (quarterly): Clear gutters and downspouts of debris to ensure proper water drainage and prevent clogging. Check for any damage to gutters and downspouts.
- Flashing and Sealants (biannually): Inspect flashing and sealants around chimneys, vents, and other penetrations for any cracks, gaps, or deterioration. Repair any issues promptly.
- Attic Ventilation (yearly): Check attic ventilation for proper airflow and ensure that moisture is not accumulating. Address any issues to prevent moisture damage.
Ongoing Roof Maintenance and Inspections Checklist
This table Artikels a recommended schedule for ongoing roof maintenance and inspections, helping to ensure a long-lasting roof.
| Task | Frequency | Description |
|---|---|---|
| Visual Roof Inspection | Monthly | Check for missing shingles, signs of water damage, or other visible issues. |
| Gutters and Downspouts Cleaning | Quarterly | Clear gutters and downspouts of debris. Inspect for damage. |
| Flashing and Sealants Inspection | Biannually | Inspect flashing and sealants for cracks or gaps. |
| Attic Ventilation Check | Annually | Ensure proper ventilation and moisture control in the attic. |
| Professional Roof Inspection | Annually or as needed | Consult a professional for a thorough inspection and identify potential issues. |
Ultimate Conclusion

In conclusion, replacing damaged roof shingles is a significant home improvement undertaking. This guide provides a thorough framework for understanding the entire process, from assessment and planning to replacement and maintenance. Armed with this knowledge, you can confidently approach this project, ensuring a safe and successful outcome. Remember, proper planning and expert guidance are key to a lasting solution.
Leave a Reply